3 行まとめ
- Stability AI Image Services は API から利用できる
- Jupyter Notebook から Stability AI Image Services の in-painting をしてみた
- 短めなプロンプトでも、自然な in-painting できている印象
はじめに
Stability AI Image Services が 2025/09/18 に Amazon Bedrock でも利用できるようになりました。
画像生成もさることながら、背景やオブジェクトを消したり、画像編集したり、簡単な落書きからきれいな絵を作ったりと、色んな機能を兼ね揃えているようです。
Stability AI Image Services には様々な機能がありますが、このブログでは私が一番気になった in-painting を試してみたので、その検証の過程をご紹介します。

1. セットアップ - Amazon SageMaker AI から Jupyter Notebook を利用できるようにする
1-1. SageMaker ドメインをクイックセットアップで作成
まずは、Amazon SageMaker AI に移動し、右下のオレンジ色ボタンをクリックします。

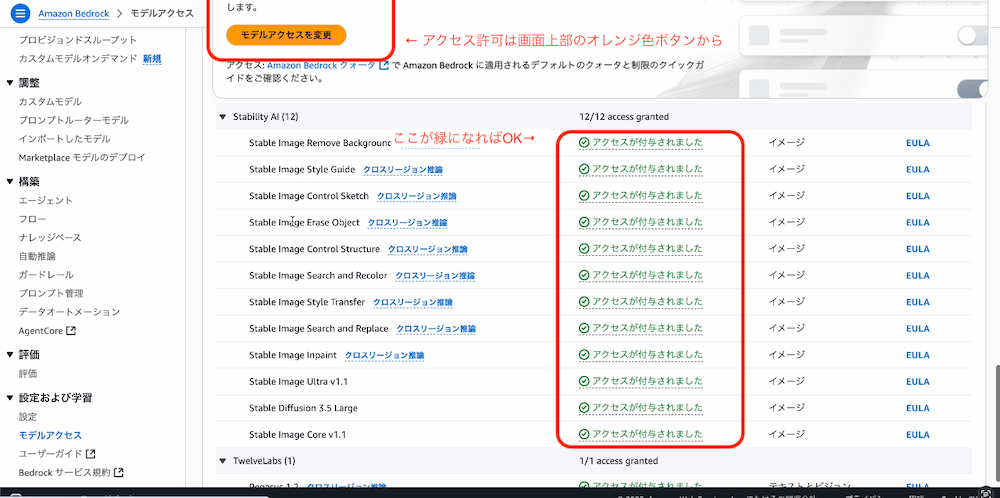
1-2. ドメイン作成を待っている間に Amazon Bedrock のモデルアクセスから申請
次に、 Amazon Bedrock のモデルアクセス から、Stability AI のモデルアクセスを許可します。
2. GitHub にすでにある Jupyter Notebook を Clone
元ネタとなるコードとして GitHub の aws-samples - stabilityai-sample-notebooks を使います。
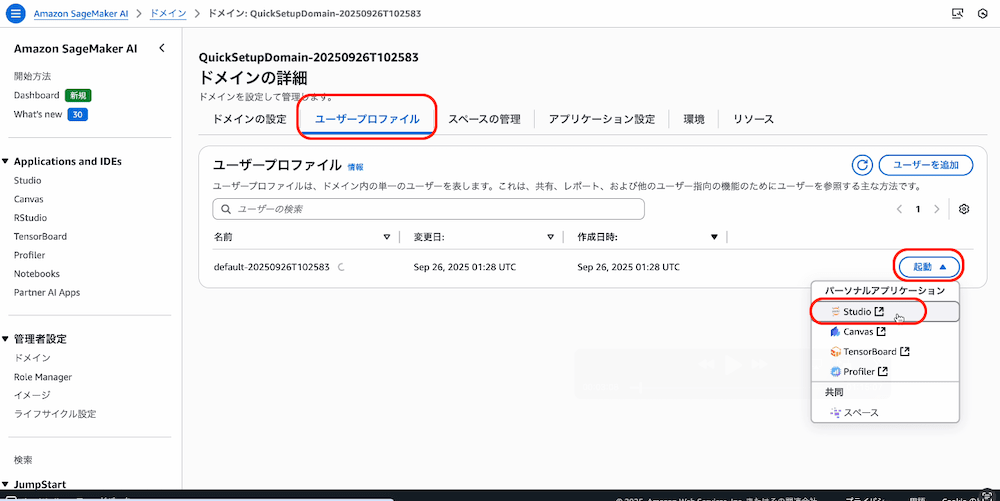
2-1. ユーザープロファイルから Studio を起動
Amazon SageMaker AI のコンソールに戻って、ユーザープロファイルタブから起動ボタンをクリックし、Studio を選択します。
2-2. JupyterLab から Quick start の Launch now をクリックし起動できたら Open
JupyterLab から 新規のインスタンスを起動します。

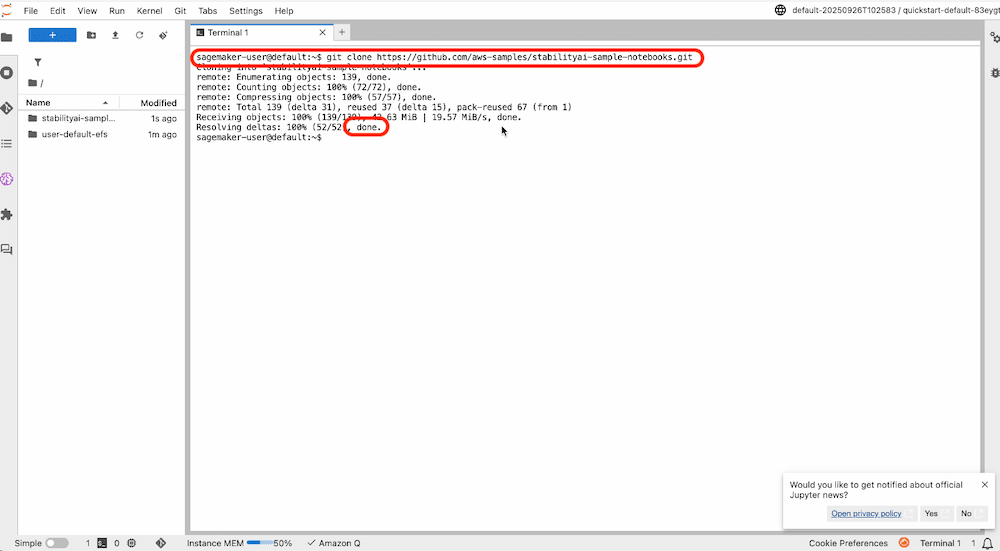
2-3. Terminal を開き、git clone
Notebook が開いたら、 Terminal を選択します。
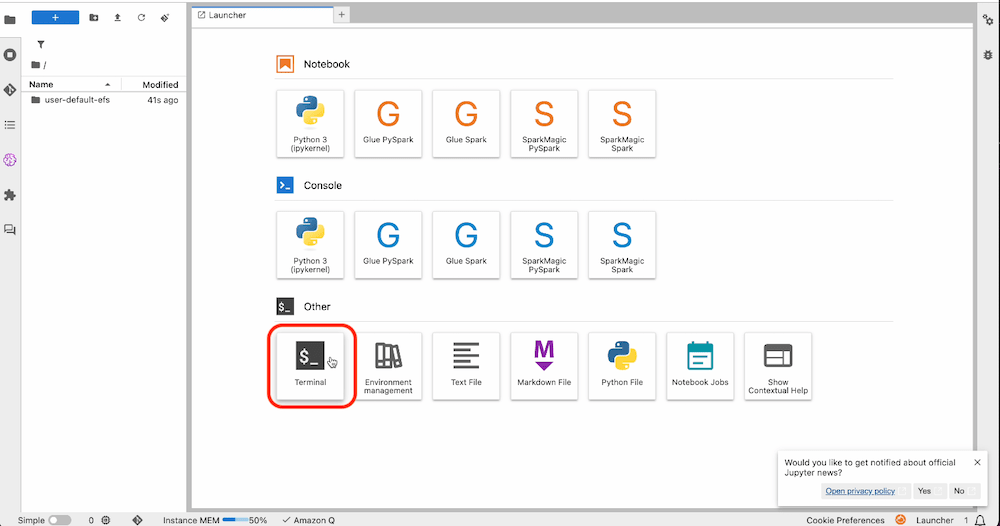
Terminal を開いたら、git clone https://github.com/aws-samples/stabilityai-sample-notebooks.git と打ち込みます。done と表示されれば OK です。
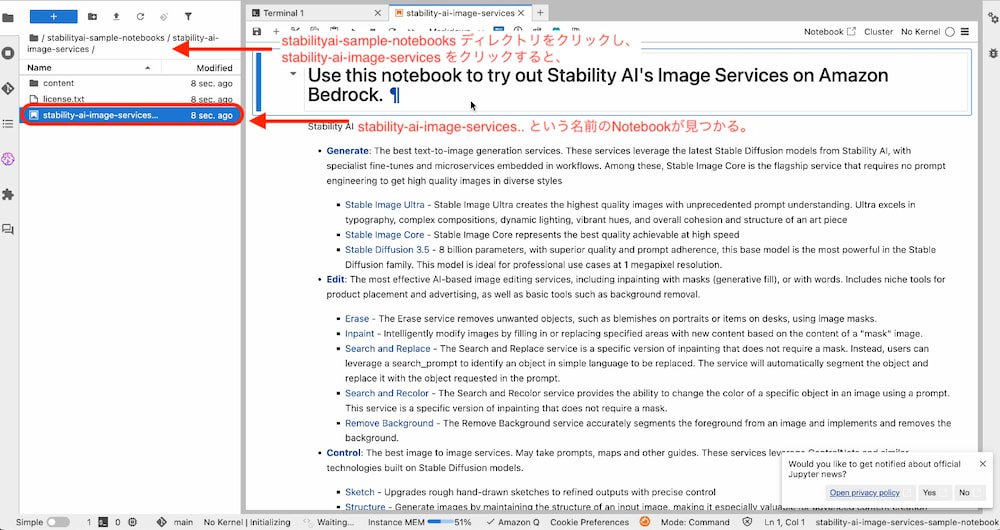
stabilityai-sample-notebooks ディレクトリ、stability-ai-image-services ディレクトリ、の順に開くと stability-ai-image-services-sample-notebook.ipynb が見つかるはずです。
3. GitHub にすでにある Jupyter Notebook を試す
Option: 日本語化
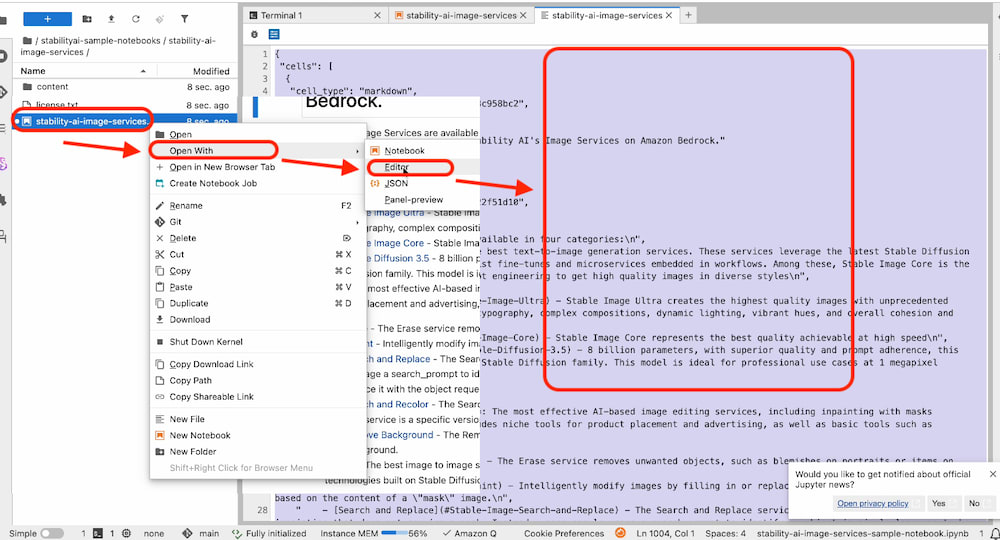
翻訳するには、右クリックから Open With を選択し、 Editor を開くと、json が見えるのでコピーします。
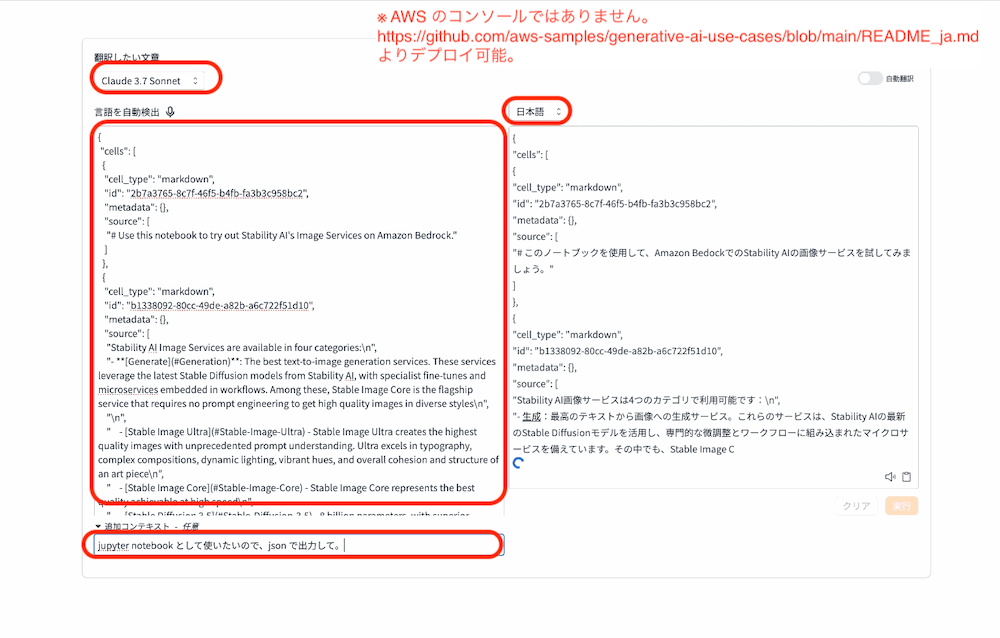
生成 AI の翻訳 (たとえば、 GenU) で翻訳をし、Editor に貼り付け直すと、Notebook の日本語化ができます。
walk-through で Notebook への理解を深める
一通り、上から実行して行きます。私は特にここで躓くことはありませんでした。
関数化されていて、使い勝手がいいですね。また、マスキングの方法もすでにコードがあるようです。
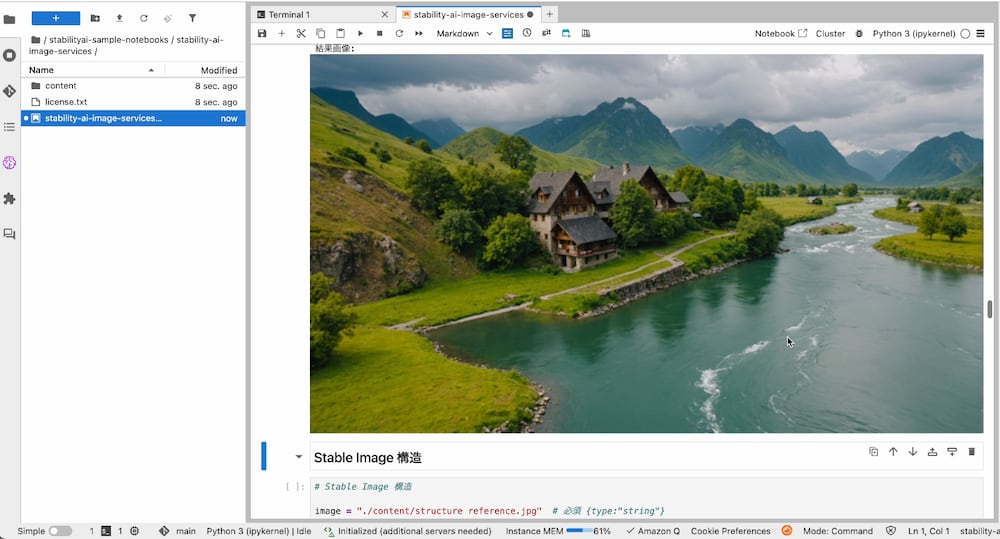
きれいな画像が出ていますね。
4. オリジナルな画像のマスクを作って、 in-painting
このステップが一番の山場です。オリジナルなものでやる場合は、
- AI にダミーデータを作らせる
- マスク画像を用意する
- in-paintingをする
が必要になります。
かなり AI に助けてもらいましたが、私は下記のようなコードで実施してみました。
4-1. 画像生成
import os
from datetime import datetime

prompt = "A power substation"  # 必須 {type:"string"}
negative_prompt = ""  # {type:"string"}
aspect_ratio = "21:9"  # ["21:9", "16:9", "3:2", "5:4", "1:1", "4:5", "2:3", "9:16", "9:21"]
style_preset = "None"  # ["None", "3d-model", "analog-film", "anime", "cinematic", "comic-book", "digital-art", "enhance", "fantasy-art", "isometric", "line-art", "low-poly", "modeling-compound", "neon-punk", "origami", "photographic", "pixel-art", "tile-texture"]
seed = 0  # [0 .. 4294967294]
output_format = "jpeg"  # ["webp", "jpeg", "png"]

model_id = stable_ultra_model_id
region = "us-west-2"

# 出力ディレクトリを作成
output_dir = "generated_images"
if not os.path.exists(output_dir):
    os.makedirs(output_dir)

try:
    params = {
        "prompt": prompt,
        "negative_prompt": negative_prompt,
        "aspect_ratio": aspect_ratio,
        "seed": seed,
        "output_format": output_format
    }

    if style_preset != "None":
        params["style_preset"] = style_preset

    generated_image = send_generation_request(params, model_id, region)

    # ファイル名を生成(タイムスタンプ + シード値)
    timestamp = datetime.now().strftime("%Y%m%d_%H%M%S")
    filename = f"stable_core_{timestamp}_seed{seed}.{output_format}"
    filepath = os.path.join(output_dir, filename)

    # 画像をファイルに保存
    with open(filepath, 'wb') as f:
        f.write(generated_image)

    print(f"画像を保存しました: {filepath}")

    # 画像を表示
    display(Image(data=generated_image))

except Exception as e:
    print(e)
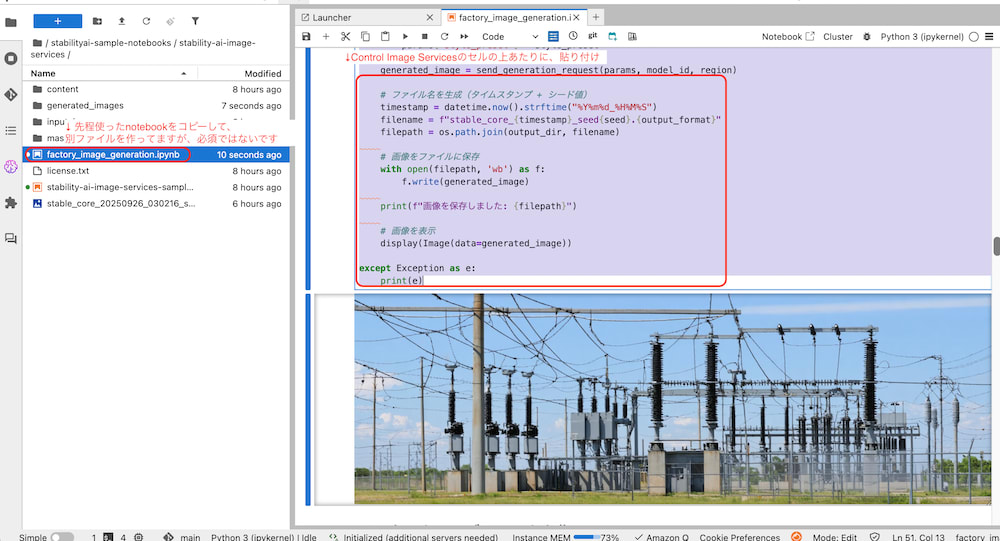
上記のコードを実行して画像を生成します。
私は先程 walk-through した notebook から複製して、Control Image Services のセル上あたりから、貼り付けています。
(あまり強い制約はないので、コードが実行できれば OK です。)
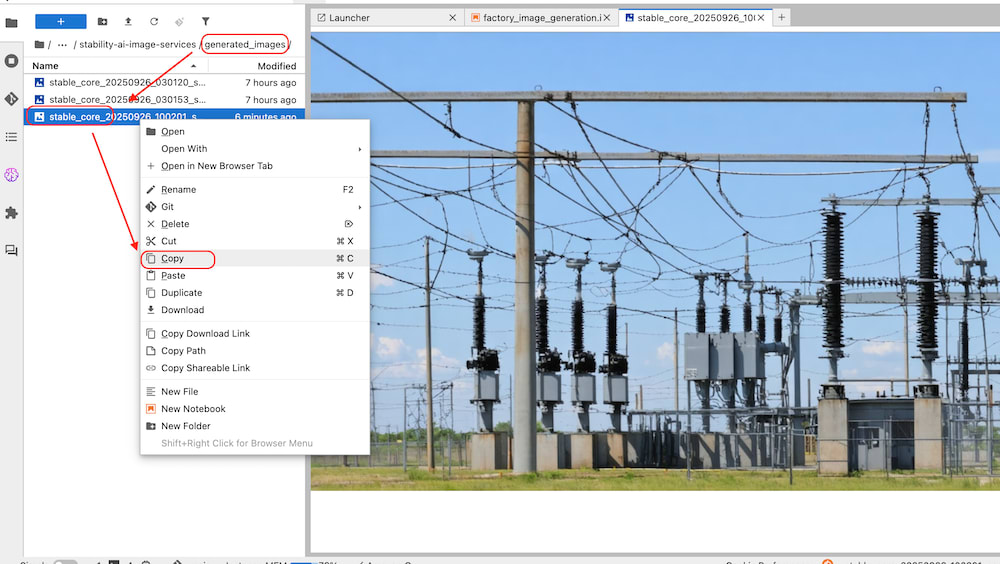
うまくいけば変電所っぽい画像が生成され、generated_images というディレクトリに画像が保存されています。
4-2. マスクの作成
作成した画像のマスクを作ります。@john-rocky さんの記事がとても参考になりました。ありがとうございます。
今回の環境でも使えるようにしなければいけません。そこで今回はファイルでのやりとりをするよう、AI (Amazon Bedrock の Anthropic Claude Sonnet 4) で書き換えています。
import base64
import os
from IPython.display import HTML, Image, display
from base64 import b64decode
import matplotlib.pyplot as plt
import numpy as np
from shutil import copyfile
import shutil
import glob
import time

# ファイル選択用の関数
def select_input_file():
    """入力ディレクトリから画像ファイルを選択"""
    input_dir = "input_images"
    if not os.path.exists(input_dir):
        os.makedirs(input_dir)
        print(f"'{input_dir}' ディレクトリを作成しました。")
        print("このディレクトリに処理したい画像ファイルを配置してから再実行してください。")
        return None

    # 画像ファイルを検索
    image_extensions = ['*.png', '*.jpg', '*.jpeg', '*.bmp', '*.gif']
    image_files = []
    for ext in image_extensions:
        image_files.extend(glob.glob(os.path.join(input_dir, ext)))
        image_files.extend(glob.glob(os.path.join(input_dir, ext.upper())))

    if not image_files:
        print(f"'{input_dir}' ディレクトリに画像ファイルが見つかりません。")
        print("サポートされる形式: PNG, JPG, JPEG, BMP, GIF")
        return None

    if len(image_files) == 1:
        return image_files[0]

    # 複数ファイルがある場合は一覧表示
    print("複数の画像ファイルが見つかりました:")
    for i, file in enumerate(image_files):
        print(f"{i}: {os.path.basename(file)}")

    try:
        choice = int(input("処理したいファイルの番号を入力してください: "))
        if 0 <= choice < len(image_files):
            return image_files[choice]
        else:
            print("無効な番号です。")
            return None
    except ValueError:
        print("数値を入力してください。")
        return None

# ファイルを選択
input_file = select_input_file()
if input_file is None:
    print("処理を中止します。")
else:
    fname = os.path.basename(input_file)
    dir_name = "mask_data"

    if not os.path.exists(dir_name):
        os.mkdir(dir_name)

    original_path = os.path.join(dir_name, fname)
    copyfile(input_file, original_path)

    # 画像を読み込んでbase64エンコーディングする
    image64 = base64.b64encode(open(original_path, 'rb').read()).decode('utf-8')

    # オリジナル画像のサイズを取得
    original_img = plt.imread(original_path)
    original_height, original_width = original_img.shape[:2]

    # 表示用のリサイズ係数を計算 (ここでは幅を400pxに合わせる例)
    resize_factor = 400 / original_width
    display_width = int(original_width * resize_factor)
    display_height = int(original_height * resize_factor)

    base_filename = fname.split('.')[0]
    mask_filename = f"{base_filename}_mask.png"

    # JavaScriptで使用するリサイズ係数、オリジナルサイズ、線の色と太さを渡す
    canvas_html = f"""
    <div style="position: relative; width: {display_width}px; height: {display_height}px;">
        <canvas id="backgroundCanvas" width="{display_width}" height="{display_height}" style="position: absolute; left: 0; top: 0; z-index: 0;"></canvas>
        <canvas id="drawingCanvas" width="{display_width}" height="{display_height}" style="position: absolute; left: 0; top: 0; z-index: 1;"></canvas>
        <canvas id="saveCanvas" width="{display_width}" height="{display_height}" style="display: none;"></canvas>
    </div>
    <div style="margin: 10px 0;">
        <button id="drawBtn">Draw</button>
        <button id="eraseBtn">Erase</button>
        <button id="clearBtn">Clear All</button>
        <button id="finishBtn" style="background-color: #4CAF50; color: white; font-weight: bold;">Save & Download Mask</button>
    </div>
    <div style="margin: 10px 0;">
        <label for="lineWidth">Line Width:</label>
        <input type="range" id="lineWidth" min="1" max="50" value="5">
        <span id="lineWidthValue">5</span>
    </div>
    <div id="status" style="margin-top: 10px; padding: 10px; background-color: #f0f0f0; border-radius: 5px;">
        Ready to draw. Click Draw to start painting the mask.
    </div>
    <script>
        var bgCanvas = document.getElementById('backgroundCanvas');
        var drawCanvas = document.getElementById('drawingCanvas');
        var saveCanvas = document.getElementById('saveCanvas');
        var bgCtx = bgCanvas.getContext('2d');
        var drawCtx = drawCanvas.getContext('2d');
        var saveCtx = saveCanvas.getContext('2d');
        var lineWidthRange = document.getElementById('lineWidth');
        var lineWidthValue = document.getElementById('lineWidthValue');
        var drawBtn = document.getElementById('drawBtn');
        var eraseBtn = document.getElementById('eraseBtn');
        var finishBtn = document.getElementById('finishBtn');
        var clearBtn = document.getElementById('clearBtn');
        var statusDiv = document.getElementById('status');
        var drawing = true;
        var isDrawing = false;

        // 線の太さ表示を更新
        lineWidthRange.oninput = function() {{
            lineWidthValue.textContent = this.value;
        }};

        var img = new Image();
        img.onload = function() {{
            bgCtx.drawImage(img, 0, 0, bgCanvas.width, bgCanvas.height);
        }};
        img.src = "data:image/png;base64,{image64}";

        function setDrawMode() {{
            drawing = true;
            drawCtx.globalCompositeOperation = 'source-over';
            drawCtx.strokeStyle = 'red'; // 表示用の描画色
            saveCtx.globalCompositeOperation = 'source-over'; // 保存用も描画モードに
            saveCtx.strokeStyle = 'white'; // 保存用の描画色
            updateButtonStyles();
            statusDiv.innerHTML = 'Draw mode: Paint with red to create mask areas.';
        }}

        function setEraseMode() {{
            drawing = false;
            drawCtx.globalCompositeOperation = 'destination-out';
            saveCtx.globalCompositeOperation = 'destination-out'; // 保存用キャンバスでも消去
            updateButtonStyles();
            statusDiv.innerHTML = 'Erase mode: Remove painted areas.';
        }}

        function clearAll() {{
            drawCtx.clearRect(0, 0, drawCanvas.width, drawCanvas.height);
            saveCtx.clearRect(0, 0, saveCanvas.width, saveCanvas.height);
            statusDiv.innerHTML = 'Canvas cleared. Ready to draw.';
        }}

        function updateButtonStyles() {{
            drawBtn.style.backgroundColor = drawing ? '#add8e6' : '';
            eraseBtn.style.backgroundColor = drawing ? '' : '#add8e6';
        }}

        saveCanvas.width = {original_width};
        saveCanvas.height = {original_height};

        // 描画イベントの座標をオリジナルのサイズに合わせてスケーリング
        drawCanvas.onmousedown = function(e) {{
            isDrawing = true;
            var rect = drawCanvas.getBoundingClientRect();
            var scaleX = saveCanvas.width / rect.width; // X座標のスケーリング係数
            var scaleY = saveCanvas.height / rect.height; // Y座標のスケーリング係数
            var x = (e.clientX - rect.left) * scaleX;
            var y = (e.clientY - rect.top) * scaleY;

            var lineWidth = parseInt(lineWidthRange.value);
            drawCtx.lineWidth = lineWidth;
            saveCtx.lineWidth = lineWidth * scaleX;
            drawCtx.lineCap = 'round';
            saveCtx.lineCap = 'round';

            drawCtx.beginPath();
            saveCtx.beginPath();
            drawCtx.moveTo(x / scaleX, y / scaleY); // 表示用キャンバスに適用(スケーリングを戻す)
            saveCtx.moveTo(x, y); // 保存用キャンバスに適用
        }};

        drawCanvas.onmousemove = function(e) {{
            if (!isDrawing) return;

            var rect = drawCanvas.getBoundingClientRect();
            var scaleX = saveCanvas.width / rect.width;
            var scaleY = saveCanvas.height / rect.height;
            var x = (e.clientX - rect.left) * scaleX;
            var y = (e.clientY - rect.top) * scaleY;

            drawCtx.lineTo(x / scaleX, y / scaleY); // 表示用キャンバスに適用(スケーリングを戻す)
            drawCtx.stroke();
            saveCtx.lineTo(x, y); // 保存用キャンバスに適用
            saveCtx.stroke();
        }};

        drawCanvas.onmouseup = function() {{
            isDrawing = false;
        }};

        drawCanvas.onmouseout = function() {{
            isDrawing = false;
        }};

        // ダウンロード用の関数
        function downloadCanvas(canvas, filename) {{
            var link = document.createElement('a');
            link.download = filename;
            link.href = canvas.toDataURL('image/png');
            link.click();
        }}

        finishBtn.onclick = function() {{
            statusDiv.innerHTML = 'Creating mask image...';
            finishBtn.disabled = true;

            // 一時キャンバスを作成してマスク画像を生成
            var tempCanvas = document.createElement('canvas');
            var tempCtx = tempCanvas.getContext('2d');
            tempCanvas.width = saveCanvas.width;
            tempCanvas.height = saveCanvas.height;

            // 背景を黒で塗りつぶし
            tempCtx.fillStyle = 'black';
            tempCtx.fillRect(0, 0, tempCanvas.width, tempCanvas.height);

            // 描画内容(白の描画)を一時キャンバスに追加
            tempCtx.globalCompositeOperation = 'source-over';
            tempCtx.drawImage(saveCanvas, 0, 0);

            // マスク画像をダウンロード
            downloadCanvas(tempCanvas, '{mask_filename}');

            // 少し待ってからローカルにも保存を試行
            setTimeout(function() {{
                try {{
                    // ローカル保存用のコードを実行
                    var dataURL = tempCanvas.toDataURL('image/png');
                    var saveCode = `
try:
    import base64
    from base64 import b64decode
    import os
    from IPython.display import Image, display

    # マスク画像をローカルに保存
    image_data_str = "${{dataURL}}"
    image_data = b64decode(image_data_str.split(',')[1])
    mask_path = os.path.join("{dir_name}", "{mask_filename}")

    with open(mask_path, 'wb') as f:
        f.write(image_data)

    print(f'マスク画像をローカルに保存しました: {{mask_path}}')
    display(Image(mask_path, width={display_width}, height={display_height}))

except Exception as e:
    print(f'ローカル保存でエラーが発生しました: {{e}}')
    print('ダウンロードされたファイルをご利用ください。')
`;

                    // Jupyter環境でコードを実行
                    if (typeof IPython !== 'undefined' && IPython.notebook && IPython.notebook.kernel) {{
                        IPython.notebook.kernel.execute(saveCode);
                    }} else if (typeof Jupyter !== 'undefined' && Jupyter.notebook && Jupyter.notebook.kernel) {{
                        Jupyter.notebook.kernel.execute(saveCode);
                    }} else {{
                        console.log('Jupyter environment not detected. File downloaded only.');
                    }}
                }} catch (e) {{
                    console.log('Local save failed:', e);
                }}

                statusDiv.innerHTML = 'Mask image downloaded successfully! Check your Downloads folder.';
                finishBtn.disabled = false;
            }}, 500);
        }};

        setDrawMode();
        drawBtn.onclick = setDrawMode;
        eraseBtn.onclick = setEraseMode;
        clearBtn.onclick = clearAll;
    </script>
    """

    # キャンバスを表示
    display(HTML(canvas_html))
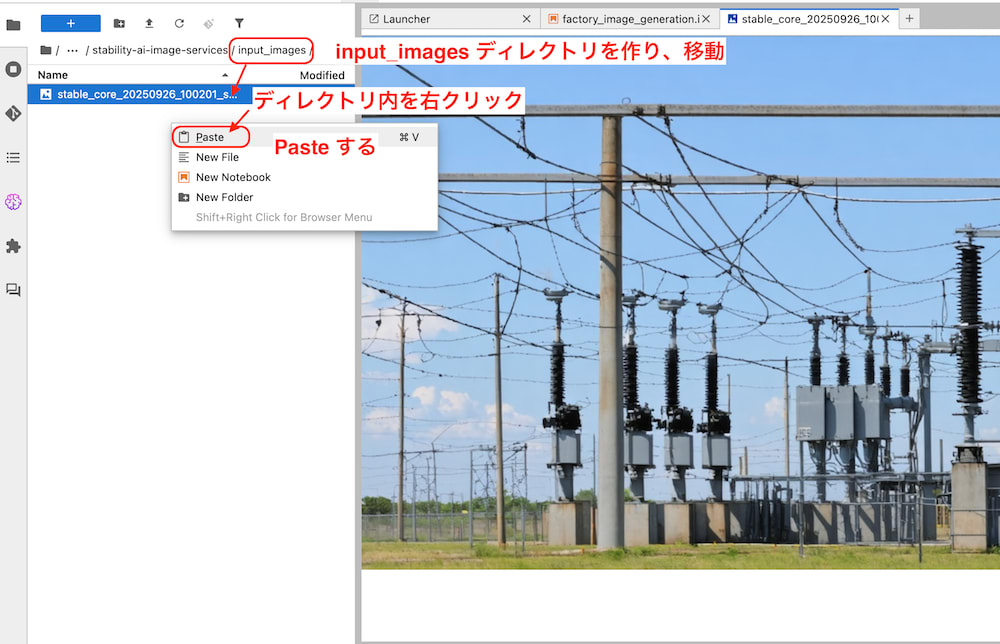
画像を移動させる
作成した画像ファイルのマスクを作るため、ディレクトリを移動させます。
コードを貼り付けて実行
先ほどのコードを貼り付けて、実行すると、マスクの作成がインタラクティブにできるお絵かきツールが現れます。
マスクを作ったら、Save & Download Mask をクリックします。
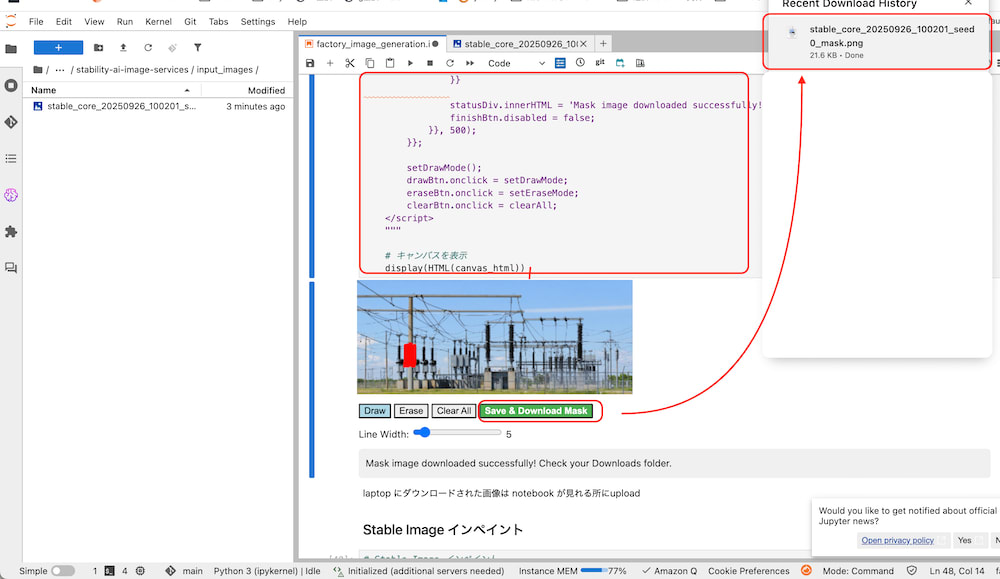
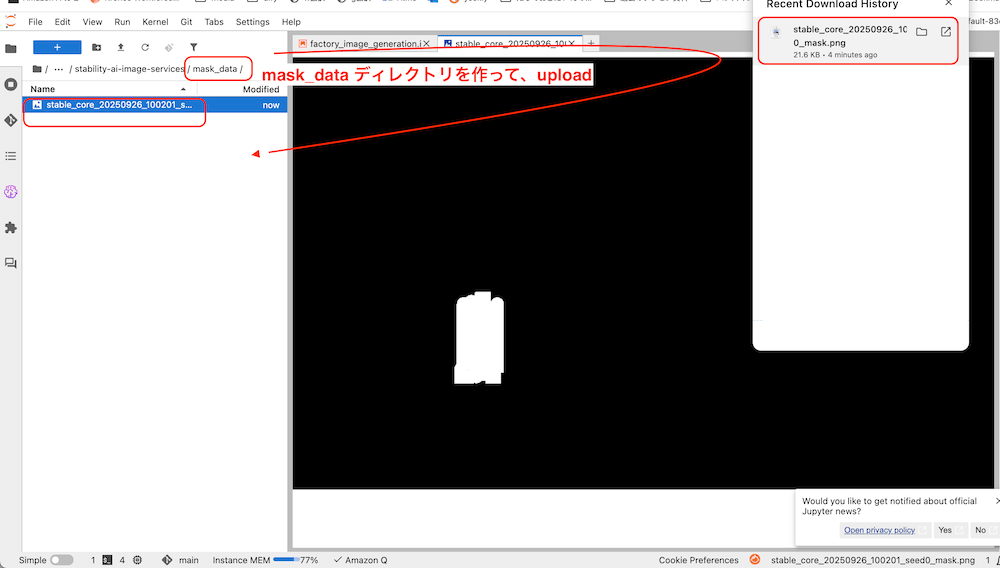
マスクがローカルにダウンロードされるので、mask_data ディレクトリを作成し、アップロードします。
in-painging を実行
in-painging の実行コードは下記の通りです。GitHub にあったものを少し変えています。
# Stable Image インペイント
image = "input_images/hogehoge.jpeg" # ← 要編集 : 元画像への相対パス
mask = "mask_data/fugafuga.png" # ← 要編集 : マスク画像への相対パス
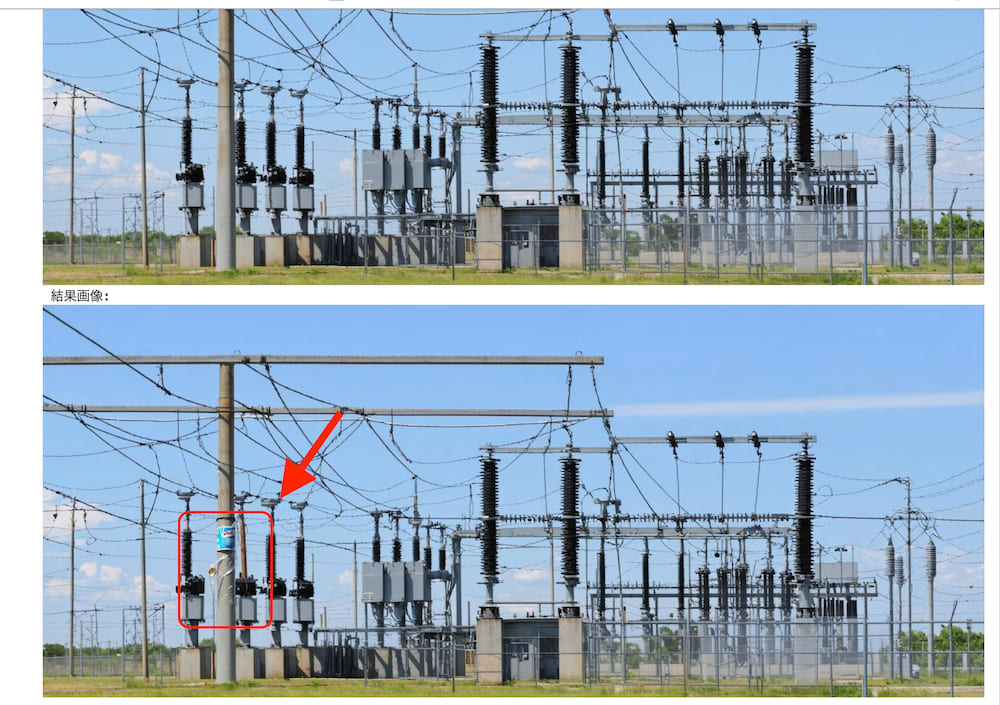
prompt = "Wrap the fluttering plastic trash like vinyl tape around the utility pole"
grow_mask = "" # [0 .. 100]
negative_prompt = "" # {type:"string"}
seed = 0 # {type:"integer"}
output_format = "webp" # ["webp", "jpeg", "png"]
style_preset = "None" # ["3d-model", "analog-film", "anime", "cinematic", "comic-book", "digital-art", "enhance", "fantasy-art", "isometric", "line-art", "low-poly", "modeling-compound", "neon-punk", "origami", "photographic", "pixel-art", "tile-texture"]
model_id = stable_image_inpaint
try:
image_base64 = create_base64_from_image(image)
mask_base64 = create_base64_from_image(mask)
params = {
"image": image_base64,
"mask": mask_base64,
"seed": seed,
"output_format": output_format,
"prompt": prompt
}
if mask is not None:
mask_image_base64 = create_base64_from_image(mask)
params["mask"] = mask_image_base64
generated_image = send_generation_request(params, model_id, region)
print("元の画像:")
display(Image(image))
print("結果画像:")
display(Image(data=generated_image))
except Exception as e:
print(e)
生成された画像
コードを貼り付けると、下記のような結果になるはずです。(maskによって、結果が変わることがあります。)
5. クリーンアップ
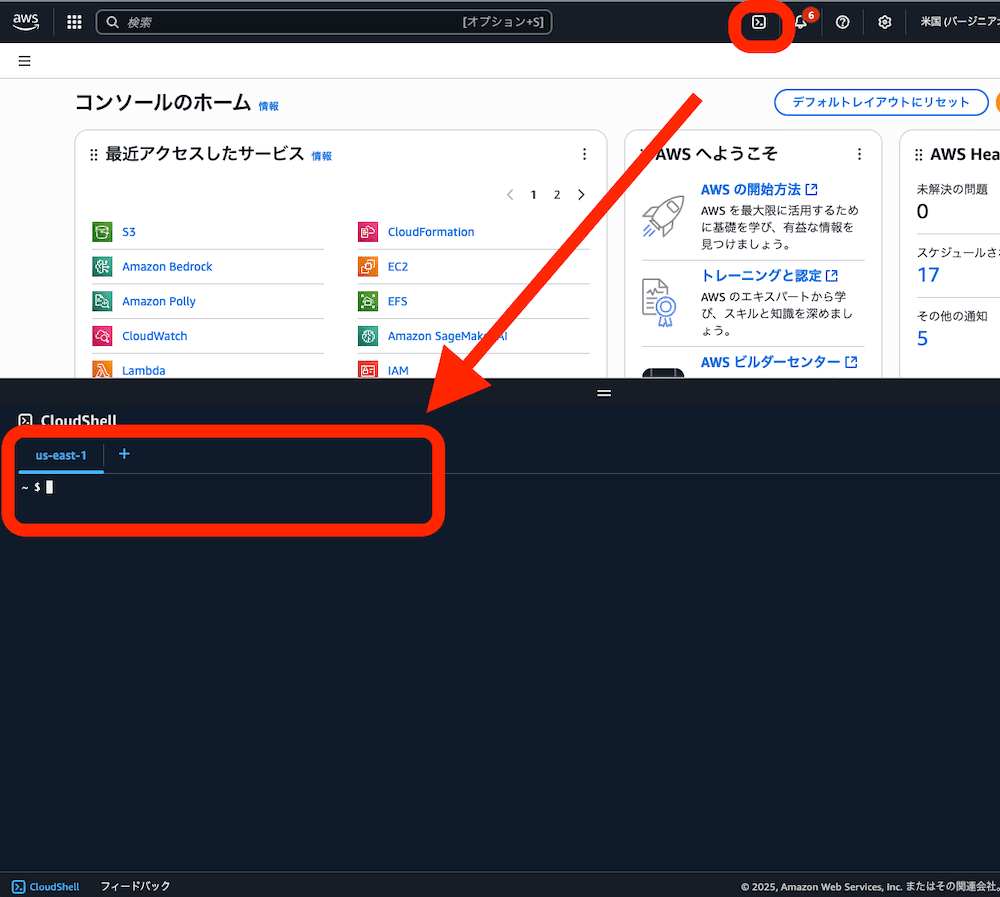
公式ドキュメント に従って、削除します。
ここでは、AWS CloudShell で実行します。
# ドメインの一覧を取得
aws --region Region sagemaker list-domains


# アプリケーションのリストを取得
aws --region Region sagemaker list-apps \
    --domain-id-equals DomainId
# ユーザープロファイルのリストを取得
aws --region Region sagemaker list-user-profiles \
    --domain-id-equals DomainId
# アプリケーションを削除
aws --region Region sagemaker delete-app \
    --domain-id DomainId \
    --app-name AppName \
    --app-type AppType \
    --user-profile-name UserProfileName


# 共有スペースのリストを取得
aws --region Region sagemaker list-spaces \
    --domain-id DomainId
# スペースを削除
aws --region Region sagemaker delete-space \
    --domain-id DomainId \
    --space-name SpaceName


# ユーザープロファイルを削除
aws --region Region sagemaker delete-user-profile \
    --domain-id DomainId \
    --user-profile-name UserProfileName

# ドメインを削除
aws --region Region sagemaker delete-domain \
    --domain-id DomainId \
    --retention-policy HomeEfsFileSystem=Delete
まとめ
この投稿では Jupyter Notebook から Stability AI Image Services の in-painitng を試してみました。
かなりきれいな絵が出ていて驚きでした。また、プロンプトの量も少なくなったように感じました。(以前は negative prompt やパラメータを細かく制御するのに、もっと苦労した印象があります。)
様々な会社の最新の生成 AI モデルが利用できるのはとても楽しいですね。動画とのやり取りができるモデルも出ているようなので、また気になるものがあれば試そうと思います。

この Publication に投稿している記事は、アマゾン ウェブ サービス ジャパン合同会社または Amazon Web Services, Inc. 所属社員による個人の見解であり、所属する組織の公式見解ではありません。参加したい従業員の方は、Sugiyama Suguru までお知らせください。
Discussion