【FastAPI-MCP】 既存の API を数行のコードで「LLM フレンドリー」にする方法
はじめに
既存の API サーバーを、LLM がツールとして認識し、利用しやすい「LLM Friendly」な形式で公開したい、というニーズが高まっています。
本記事では、FastAPI で構築した API サーバーを例に、従来のエンドポイントは残しつつ、自律型 AI エージェント(Agentic AI)と連携するための標準プロトコルである MCP エンドポイントを簡単に追加する方法を紹介します。
これにより、クライアント側で特別な実装をすることなく、あなたの API を様々な LLM アプリケーションの強力なツールとして提供できるようになります。
FastAPI-MCP とは
FastAPI-MCP は FastAPI を MCP サーバーとして動作させるためのライブラリです。
- 既存の FastAPI の依存関係を使用した認証機能を内蔵!
- FastAPI ネイティブ: 単なる OpenAPI から MCP への変換ツールではない
- 設定不要/最小限の設定: FastAPI アプリを指定するだけで動作します
- リクエストモデルとレスポンスモデルのスキーマを保持
- すべてのエンドポイントのドキュメントを Swagger と同様に保持
- 柔軟なデプロイメント: MCP サーバーを同じアプリにマウントするか、別途デプロイ可能
- ASGI トランスポート: 効率的な通信のために FastAPI の ASGI インターフェースを直接使用
なお、本記事ではfastapi-mcp v0.4.0を使用しています。
$ uv tree --depth 2 --no-dev
Resolved 49 packages in 7ms
fastapimcp-workspace v0.1.0
├── fastapi-mcp v0.4.0
│   ├── fastapi v0.116.1
│   ├── httpx v0.28.1
│   ├── mcp v1.12.3
│   ├── pydantic v2.11.7
│   ├── pydantic-settings v2.10.1
│   ├── requests v2.32.4
│   ├── rich v14.1.0
│   ├── tomli v2.2.1
│   ├── typer v0.16.0
│   └── uvicorn v0.35.0
└── tinydb v4.8.2
FastAPI によるサンプルアプリケーション
今回は以下のような 従業員情報を管理するアプリケーションをお題に FastAPI を使って実装しました。
エンドポイントには従業員の取得、検索、作成のほか、ヘルスチェックも実装しています。
"""demo API server built with FastAPI"""

from fastapi import FastAPI, HTTPException
from pydantic import BaseModel, Field
from tinydb import TinyDB
from tinydb.queries import Query as TinyQuery

app = FastAPI()
db = TinyDB("employees.json")


class Employee(BaseModel):
    """Employee model"""

    id: int = Field(..., description="The employee ID")
    first_name: str = Field(..., description="The employee first name")
    last_name: str = Field(..., description="The employee last name")
    email: str = Field(..., description="The employee email")
    department: str = Field(..., description="The employee department")
    position: str = Field(..., description="The employee position")
    hire_date: str = Field(..., description="The employee hire date")


@app.get("/health")
async def health() -> dict:
    """Health check"""
    return {"status": "ok"}


@app.get("/employees")
async def get_employees() -> list[Employee]:
    """Get all employees"""
    return [Employee(**employee) for employee in db.all()]


@app.get("/employees/{employee_id}")
async def get_employee(employee_id: int) -> Employee:
    """Get an employee by ID"""
    employee = db.get(doc_id=employee_id)
    if employee is None:
        raise HTTPException(status_code=404, detail="Employee not found")
    return Employee(**employee)


@app.get("/employees/search/by-name")
async def search_employees_by_name(name: str) -> list[Employee]:
    """Search employees by name"""
    query = TinyQuery()

    employees = db.search(
        (query.first_name.matches(f".*{name}.*", flags=2))
        | (query.last_name.matches(f".*{name}.*", flags=2)),
    )

    if not employees:
        raise HTTPException(
            status_code=404,
            detail="No employees found with that name",
        )

    return [Employee(**employee) for employee in employees]


@app.get("/employees/search/by-department")
async def search_employees_by_department(department: str) -> list[Employee]:
    """Search employees by department"""
    query = TinyQuery()
    employees = db.search(query.department == department)

    if not employees:
        raise HTTPException(
            status_code=404,
            detail="No employees found with that department",
        )

    return [Employee(**employee) for employee in employees]


@app.post("/employees", status_code=201)
async def create_employee(employee_data: Employee) -> Employee:
    """Create a new employee"""
    all_employees = db.all()
    if all_employees:
        max_id = max(emp.get("id", 0) for emp in all_employees)
        new_id = max_id + 1
    else:
        new_id = 1

    query = TinyQuery()
    existing_employee = db.search(query.email == employee_data.email)
    if existing_employee:
        raise HTTPException(
            status_code=400,
            detail="Employee with this email already exists",
        )

    new_employee = {"id": new_id, **employee_data.model_dump()}
    db.insert(new_employee)

    return Employee(**new_employee)
MCP エンドポイントの追加
次に FastAPI で作成したエンドポイントは残しつつ、MCP サーバーとして動作するエンドポイントを追加します。
方法はとても簡単で、先ほど作成した server.py に以下のコードを追加するだけです。
from fastapi_mcp import FastApiMCP

app = FastAPI()
db = TinyDB("employees.json")

(省略)

mcp = FastApiMCP(
    app,
    name="employees",
    description="従業員情報を管理するサービス",
)
mcp.mount_http(mount_path="/mcp")
これで/mcpに MCP サーバーとして動作するエンドポイントが追加されます。
動作確認
サーバー起動は FastAPI 単体のアプリケーションと同様です。
uv run uvicorn server:app --port 8080
API サーバーのエンドポイントを確認すると、以下のように従来のエンドポイントがそのまま動作していることが確認できます。
$ curl -X 'GET' 'http://0.0.0.0:8080/employees/3' | jq
  % Total    % Received % Xferd  Average Speed   Time    Time     Time  Current
                                 Dload  Upload   Total   Spent    Left  Speed
100   166  100   166    0     0   4199      0 --:--:-- --:--:-- --:--:--  4256
{
  "id": 3,
  "first_name": "Jiro",
  "last_name": "Tanaka",
  "email": "jiro.tanaka@example.com",
  "department": "Engineering",
  "position": "Software Engineer",
  "hire_date": "2019-01-20"
}
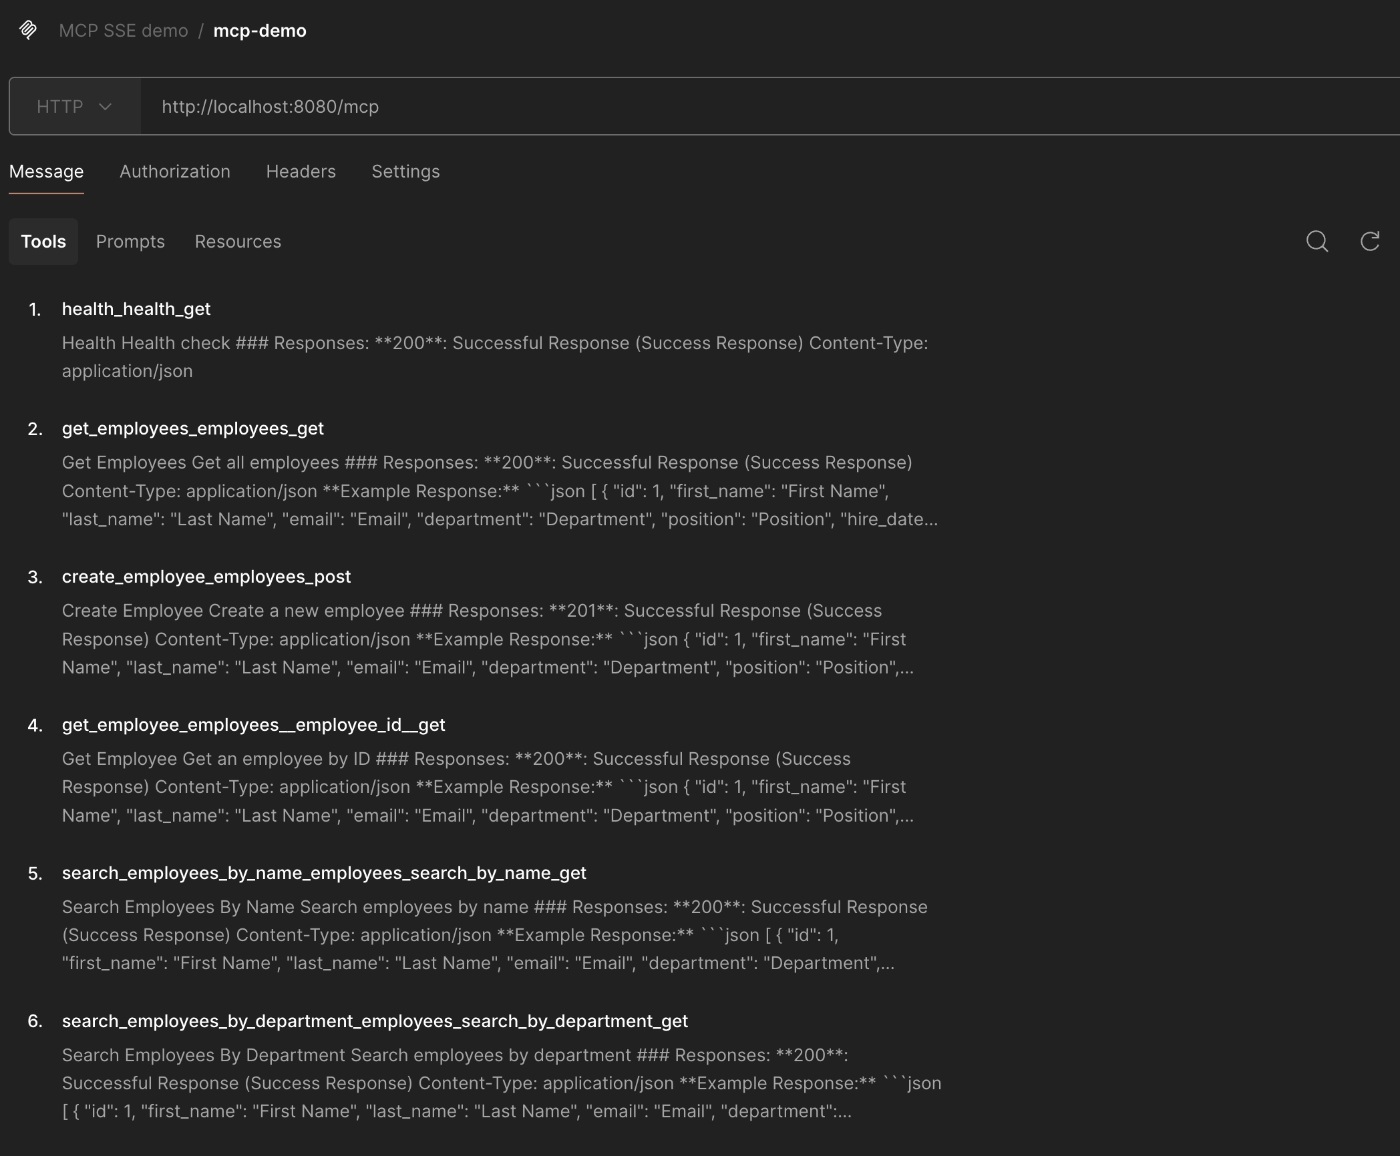
最後に/mcpにマウントした MCP サーバーを確認します。以下は MCP サーバーで提供されているツールリストを Postman を使って取得した結果です。FastAPI で作成した 6 つのエンドポイントに対応するツールが提供されていることが確認できます。
また、REST API から実行した/employees/{employee_id}に対応するツールを実行すると、同様の結果が MCP のスキーマに沿った形式で返ってきます。
{
  "content": [
    {
      "type": "text",
      "text": "{\n  \"id\": 3,\n  \"first_name\": \"Jiro\",\n  \"last_name\": \"Tanaka\",\n  \"email\": \"jiro.tanaka@example.com\",\n  \"department\": \"Engineering\",\n  \"position\": \"Software Engineer\",\n  \"hire_date\": \"2019-01-20\"\n}"
    }
  ],
  "isError": false
}
FastAPI-MCP のベストプラクティス
FastAPI-MCP を使って LLM / Agentic AI 向けの MCP サーバーを構築する際に、以下のベストプラクティスを意識することが非常に重要です。これらは、LLM が API を賢く、そして安全に使いこなすための鍵となります。
1.MCP ツール選定:まずは安全なツールから公開する
エンドポイントの中には、LLM / Agentic AI に公開したくないものもあるはずです。特に POST、 PUT、DELETE といったデータを変更・削除する操作は、意図せずシステムに破壊的な変更を加えてしまうリスクを伴います。
そのため、最初のステップとしては読み取り専用(GET メソッドなど)の安全な操作のみをツールとして公開するのが鉄則です。include_operations や include_tags を活用することで、LLM に提供するツールを限定することができます。
# `GET` メソッドのエンドポイント(Retrieveのみ)に限定する場合
mcp = FastApiMCP(
    app,
    name="employees",
    description="従業員情報を管理するサービス",
    include_operations=[
        "get_employee_list",
        "get_employee",
        "search_employees_by_name",
        "search_employees_by_department",
    ],
)
mcp.mount_http()
# エンドポイントをタグで限定する場合
mcp = FastApiMCP(
    app,
    include_tags=["users", "public"]
)
mcp.mount_http()
2.ツール名称:LLM が理解しやすい名前をつける
LLM がユーザーの要求に応えるとき、まず初めに「どのツールを使えばこのタスクを達成できるか?」と考えます。このとき、LLM が最大のヒントにするのがツール名です。
LLM にとって、ツール名は機能そのものを表すラベルです。FastAPI-MCP のデフォルト名(例: get_employees_get)よりも、@app.get デコレータの operation_id を使って get_all_employees のように具体的で能動的な名前をつけることで、LLM は「これは全従業員を取得するツールだな」とより正確に理解できます。
特に、search_employees_by_name と search_employees_by_department のように、名前だけで機能の違いが明確に区別できるようにすることが、LLM のツール選択ミスを防ぐ上で極めて重要になります。分かりやすく一意なツール名は、LLM のツール選択精度に直接影響する、最も大切な要素の一つと言えるでしょう。
# Explicit operation_id (Tool will be named `get_all_employees`)
@app.get("/employees", operation_id="get_all_employees")
async def get_employees() -> list[Employee]:
    """Get all employees"""
    # ...


# Tool name: `get_employee_by_id`
@app.get("/employees/{employee_id}", operation_id="get_employee_by_id")
async def get_employee(employee_id: int) -> Employee:
    """Get an employee by ID"""
    # ...
3. ドキュメンテーションの充実:詳細な「取扱説明書」を用意する
使うツールを決めた LLM は、次に「そのツールはどうやって使うのか?」を理解しようとします。そのための教科書となるのが、API のドキュメンテーション(descriptionやパラメータの説明文)です。
このように詳細なドキュメンテーションを整備することは、『必須パラメータが不足している』『引数の意味を取り違えた』といったツール実行時のエラーを未然に防ぎ、API 呼び出しの成功率を劇的に向上させます。丁寧なドキュメンテーションは、LLM に渡すツールの「取扱説明書」なのです。
具体的には、FastAPI のデコレータや Path、Query、Pydantic の BaseModel などを活用し、これまでのサンプルコードに以下のような詳細な説明を加えていきます。
@app.get(
    "/employees/{employee_id}",
    description="Get an employee by ID",
    response_model=Employee,
    responses={404: {"description": "Employee not found"}},
)
async def get_employee(
    employee_id: int = Path(..., description="The employee ID"),
) -> Employee:
    """Get an employee by ID"""
    ...


@app.get(
    "/employees/search/by-name",
    description="Search employees by name",
    response_model=list[Employee],
    responses={404: {"description": "No employees found with that name"}},
)
async def search_employees_by_name(
    name: str = Query(..., description="The name to search for"),
) -> list[Employee]:
    """Search employees by name"""
    ...
Claude での動作確認
Claude Desktop を使って、API サーバーに追加した MCP サーバーと LLM の連携を試してみましょう。
claude_desktop_config.json に以下のように設定を追加します。
{
  "mcpServers": {
    "employeesApi": {
      "command": "npx",
      "args": ["mcp-remote", "http://localhost:8080/mcp"]
    }
  }
}
それではKenta Watanabeさんと同じ部署の従業員を Claude 様に聞いてみましょう。

意図通りツールを実行し、想定する回答を得ることができました。
この DB に登録されている従業員はもちろん全て架空のもので、100 人分の従業員の情報をすべて Gemini 様に作成していただきました。LLM 様々でございます。
まとめ
本記事では、既存の FastAPI アプリケーションに、わずか数行のコードで LLM エージェント向けの MCP エンドポイントを追加する方法を、FastAPI-MCP ライブラリを用いて紹介しました。
従来の REST API エンドポイントはそのままに、LLM が解釈しやすい標準化されたインターフェースを提供できるのが大きな利点です。REST API をその都度クライアント側でツールとして定義する手間が省け、Claude を始めとする様々な LLM エージェントとシームレスに連携できるため、開発効率が飛躍的に向上します。
さらに、ツールとして公開する操作の選別や、LLM が機能を正しく理解するための命名・ドキュメンテーションといったベストプラクティスを適用することで、より安全で高精度な AI 連携が実現できます。
皆さんもぜひ、お手元の FastAPI アプリケーションを「LLM Friendly」にしてみてはいかがでしょうか!
参考資料
Discussion