[Unity] Input Systemを用いて入力を取得する
前回記事
前回記事においてUpdate()メソッドで入力を受け付けていた入力を、Unity公式の入力システムパッケージInput Systemを用いて実現します。
Input SystemはUnityの新しめの入力管理システムのようで、キーボードやゲームパッドなど異なる入力デバイスを一括で管理することが出来るのがウリなようです。
今回はキーボード&マウスとゲームパッド(Switch)の二種類を設定していきます。
多くは以下の記事を参考にしています。
Input Actionアセットの作成
Input Actionアセットを作成するためAssetsの適当な場所でCreate→Input Actionsを選択します。
作成したInput Actionアセットを開き新たな"Action Maps"を追加、"Actions"にMove, Jump, Run, Jogを作成します。

| 項目 | 概要 |
|---|---|
| Action Maps | Actionsをグループ単位で管理。ゲーム画面やメニュー画面で別に設定 |
| Actions | 各Mapにおける操作に対し、デバイス毎の設定。 (例:"Jump"ならSpaceとBボタンを個別に設定) |
| Action Properties | 動作に対する入力の挙動 |
| Action | ボタンや値のどちらで扱うか |
| Interactions | 押した瞬間や長押しなど特定の入力パターンを使うときは設定 |
| Processor | 受け取った入力に処理をしたいとき。(0f~1fは全て1fとして扱う、のような) |
それぞれのActionsにAction Typeを設定します。といってもMoveのみ上記画像のように値、Vector2に変更し、それ以外はAction TypeをButtonにするだけです。
次に、キーをBindingします。Add時にAction Typeで指定した物に対応する項目が出ます。

| 項目 | 概要 |
|---|---|
| Add Binding | キーを一つのみ指定出来る。 |
| Add Positive\Negative Binding | 二つのキーを-+で対応させる?(例:A\Dで対応させると-1\1と扱うような) |
| Add Up\Down\Left\Right Composite | 四つのキーを2D Axisで対応させる。(WASDキーに使う) |
| Modifier | 特定のキーを押しながらのみ行える動作を設定する。Oneなら一つのキー(Ctrl + C\V)、Twoなら二つのキー |
Moveの設定を行います。パッドの場合はLeft Stick、キーボードの場合はWASDキーを対応させるのが理想です。
既にある<No Binding>を選択し、PathからGamePad→Left Stickを選択します。またWASDキーを対応させるため"Add Up\Down\Left\Right Composite"を行い、それぞれに対応するキーを指定していきます。
他のキーも以下の画像の通りになるように設定していきます。
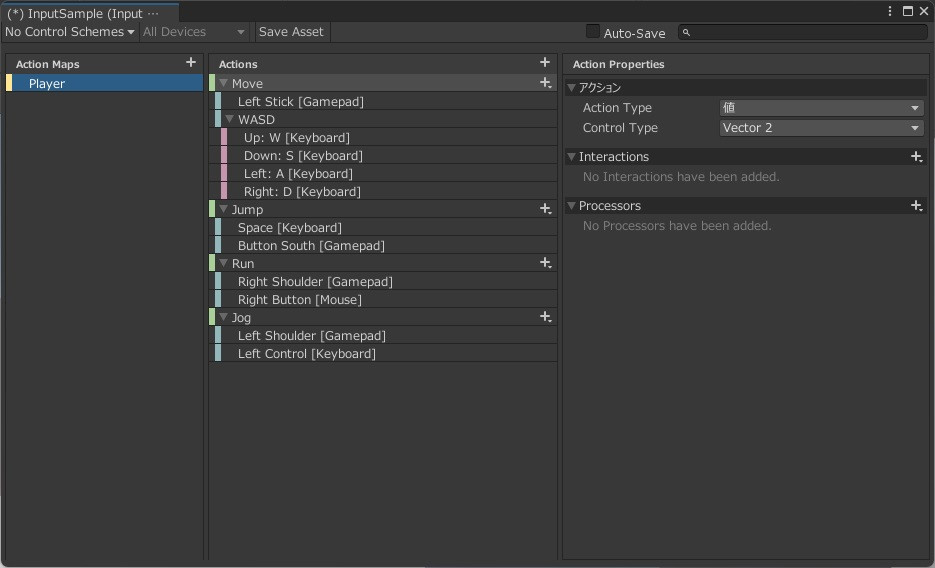
- Move: Vector2, 左スティック若しくはWASDキー
- Jump: Button, Space若しくはSouth(Bボタン)
- Run: Button, 右クリック若しくはR1ボタン
- Jog: Button, Left Ctrl若しくはL1ボタン
スクリプト上での扱い
Input Actionの設定を終えたのでスクリプト上でのInput Actionの入力を扱う手法を考えていきます。
以下の記事が分かりやすいので紹介しておきますが、大別すると四種類のBehaviorがあるようです。
基本的な考えとして、Action毎に個別のメソッドを作成し、そのメソッドとInput ActionのActionをBehaviorで繋げていくといった感じになります。
| 項目 | 概要 |
|---|---|
| Send Messages | Component.SendMessageメソッド |
| Broadcast Messages | Component.BroadcastMessageメソッド |
| Invoke Unity Events | UnityEvent。GUIで明示的に指定できる。今回使用する手法 |
| Invoke C Sharp Events | C#標準のAction経由 |
これらのBehaviorを利用せずともスクリプト上でInputActionのコンポーネントを取得することでInput Actionの入力を受け取ることは可能です。今回は以下の構成で行います。
- Move: Script上でGetComponent<PlayerInput>()を行い直接取得する
- Jump,Run,Jog: は"Invoke Unity Events"を用いて取得
コンポーネントでの取得
Script上では以下のようにコンポーネントを取得し、該当のActionを文字列で指定することで取得できます。
var playerInput = GetComponent<PlayerInput>();
move = playerInput.actions["Move"];
var inputMoveAxis = move.ReadValue<Vector2>();
horizontalInput = inputMoveAxis.x;
verticalInput = inputMoveAxis.y;
Invoke Unity Events
分かりやすい名前のメソッド名を作成し、引数にInputAction.CallbackContext contextを指定、contextの入力状況によって処理を分けることが出来ます。特に明示しない場合は押した瞬間に動作されます。
public void OnJump(InputAction.CallbackContext context)
    {
        if (context.performed)
        {
		//押した瞬間の処理
        }
        if (context.canceld)
        {
		//離した瞬間の処理
        }
    }
全体のScriptです。省いている部分は前回の記事と同等の物になります。
using UnityEngine;
using UnityEngine.InputSystem;

public class Controller : MonoBehaviour
{
    private float horizontalInput, verticalInput;
    [SerializeField] float moveSpeed = 2f;
    private float currentSpeed = 5f;
    [SerializeField] float walkSpeed = 2f;
    [SerializeField] float jogSpeed = 5f;
    [SerializeField] float runSpeed = 10f;
    private Rigidbody playerRb;

    public Animator _animator;
    private bool walkInput = false;
    private bool runOn = false;
    private bool jogOn = true;
    private bool flying = false;
    public bool onGround = true;
    private const float RotateSpeed = 900f;
    private const float RotateSpeedLockon = 500f;
    public GroundCheck3D rightGround, leftGround;

    private float start, elapsedTime;
    InputAction move;
    void Start()
    {
        playerRb = GetComponent<Rigidbody>();
        playerLo = GetComponent<PlayerLockon>();

        var playerInput = GetComponent<PlayerInput>();
        move = playerInput.actions["Move"];
    }

    void Update()
    {
        var inputMoveAxis = move.ReadValue<Vector2>();
        horizontalInput = inputMoveAxis.x;
        verticalInput = inputMoveAxis.y;
        _animator.SetFloat("InputX", horizontalInput);
        _animator.SetFloat("InputY", verticalInput);
        if (onGround)
        {
            if ((horizontalInput == 0.0f) && (verticalInput == 0.0f))
            {
                walkInput = false;
            }
            else
            {
                walkInput = true;
            }
        }
        setti();
    }

    void FixedUpdate()
    {
        // カメラの方向から、X-Z平面の単位ベクトルを取得
        Vector3 cameraForward = Vector3.Scale(Camera.main.transform.forward, new Vector3(1, 0, 1)).normalized;
        // 方向キーの入力値とカメラの向きから、移動方向を決定
        Vector3 moveForward = cameraForward * verticalInput + Camera.main.transform.right * horizontalInput;
        if (onGround)
        {
            moveSpeed = currentSpeed;
        }

        // 移動方向にスピードを掛ける。ジャンプや落下がある場合は、別途Y軸方向の速度ベクトルを足す。
        playerRb.velocity = moveForward * moveSpeed + new Vector3(0, playerRb.velocity.y, 0);

        _animator.SetBool("input", walkInput);
        _animator.SetBool("jogOn", jogOn);
        if (onGround)
        {
            _animator.SetBool("runOn", runOn);
        }
        //_animator.SetBool("runOn", runOn);

        //_animator.SetBool("jumpOn", jumpOn);
        _animator.SetBool("flying", flying);
        _animator.SetBool("onGround", onGround);

        // キャラクターの向きを進行方向に
        if (moveForward != Vector3.zero)
        {
             Quaternion from = transform.rotation;
             Quaternion to = Quaternion.LookRotation(moveForward);
             transform.rotation = Quaternion.RotateTowards(from, to, RotateSpeed * Time.deltaTime);

        }

    }

    public void OnMove(InputAction.CallbackContext context) { }

    public void OnJump(InputAction.CallbackContext context)
    {
        if (onGround)
        {
            playerRb.velocity = Vector3.up * 10;
            _animator.SetBool("jumpOn", true);
            walkInput = false;
            onGround = false;
        }
    }

    public void OnJog(InputAction.CallbackContext context)
    {
        if (onGround)
        {
            if (!jogOn)
            {
                jogOn = true;
                currentSpeed = jogSpeed;
            }
            else
            {
                jogOn = false;
                currentSpeed = walkSpeed;
            }
        }
    }

    public void OnRun(InputAction.CallbackContext context)
    {

        if (onGround)
        {
            if (context.performed)
            {
                currentSpeed = runSpeed;
                runOn = true;
            }
        }
        if (context.canceled)
        {
            currentSpeed = walkSpeed;
            if (jogOn)
            {
                currentSpeed = jogSpeed;
            }
            runOn = false;
        }
    }
}
---
Input Actionの受け取り
ここまででInput Actionの設定、スクリプトでの入力の扱いが完了したので、実際にInput Actionとオブジェクトのスクリプト間を繋げさせます。
まずはプレイヤーとなるゲームオブジェクトに対し"Player Input"コンポーネントを追加、先程設定したInput ActionをActionsで選択します。

イベントを開くとAction Maps毎に設定が可能なので、Move以外の3つに対しCallbackContextを追加します。

カメラ関連
カメラ関連の操作もinput Actionで管理します。
inout Actionに新たなAction Mapsを作成し、Actionsに"Camera XY"を作成します。
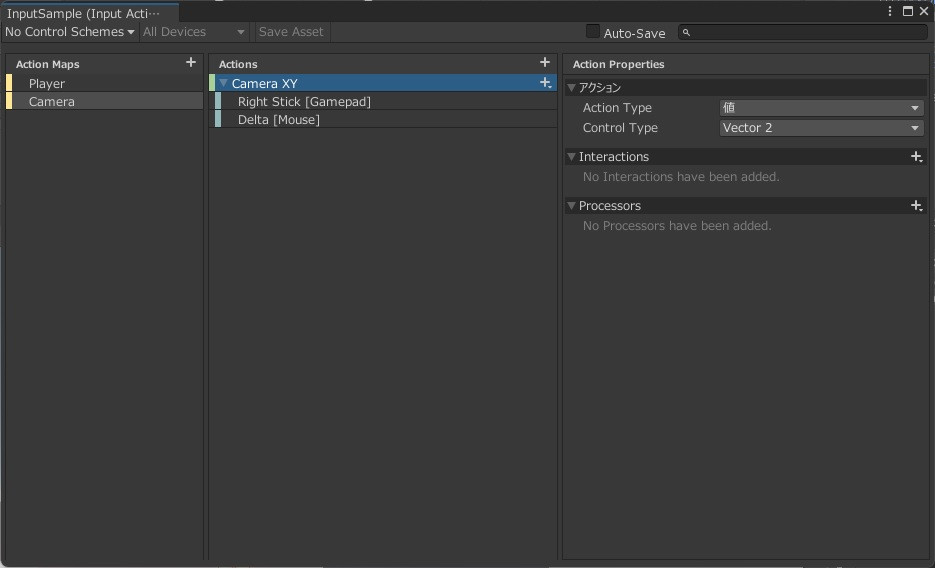
次にFreeLookCameraのオブジェクトにコンポーネント"Cinemachine Input Provider"を追加、XY Axisに作成したCamera XYを選択します。

終
以上でInput Actionを用いた入力の取得が完了するはずです。
従来のInputManagerに比べ異なる入力デバイスの管理が可能な点、加えて前回書いたコードよりも気持ちスッキリした点から今後は積極的にこちらを使っていきたいと思います。
参考資料
Discussion