WPF MVVMサンプル(処理中表示)
1)概要
WPFでMVVMを使った簡単なサンプルを作ります。
ボタンを押すと数秒、ぐるぐる処理中表示になってから完了表示になります。
MVVMライブラリにはWCT MVVM Toolkit(Microsoft.Toolkit.Mvvm)を使用します。

2)環境
- Windows 10 Version 21H1
- .NET Framework 4.7.2
- Visual Studio 2019 Version 16.10.3
- WPF
- Microsoft.Toolkit.Mvvm Version 7.0.2
- ModernWpfUI Version 0.9.4
- CalcBinding Version 2.5.2
3)プロジェクトの作成
広く普及している.NET Framework 4.7.2で作ります。
| 10 (1803) |
10 (1809) |
10 (1903) |
10 (1909) |
10 (2004) |
10 (20H2) |
10 (21H1) |
|
|---|---|---|---|---|---|---|---|
| 4.7.2 | 〇 | 〇 | 〇 | 〇 | 〇 | 〇 | 〇 |
| 4.8 | - | - | 〇 | 〇 | 〇 | 〇 | 〇 |
| 5.0 | - | - | - | - | - | - | - |
.NET 5.0で作る場合はこちら↓の3)~4)を、.NET 6.0で作る場合は12-3)~12-4-a)を参考にプロジェクトを作成してください。
新規プロジェクトでWPFアプリ(.NET Framework)を選択します。

プロジェクト名にProgressSample1と入力し、フレームワークに.NET Framework 4.7.2を選択します。

4)プロジェクトの設定
[ツール]-[オプション]-[NuGetパッケージマネージャー]-[既定のパッケージ管理方式]でPackageReferenceを指定します。

5)NuGetパッケージ追加
以下のパッケージをNuGetで追加します。
Microsoft.Toolkit.MvvmModernWpfUICalcBinding
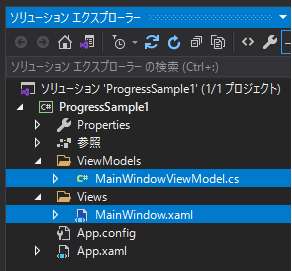
6)ファイル準備
MainWindow.xamlを削除し、
プロジェクト直下にViewModelsフォルダとViewsフォルダを作成します。
ViewModelsフォルダにクラスMainWindowViewModel.csを追加します。
Viewsフォルダにウィンドウ(WPF)MainWindow.xamlを追加します。
7)画面デザイン変更
App.xamlに
xmlns:ui="http://schemas.modernwpf.com/2019"を追加し、
StartupUriをViews/MainWindow.xamlに修正し、
Application.ResourcesにResourceDictionaryを追加します。
<Application x:Class="ProgressSample1.App"
             xmlns="http://schemas.microsoft.com/winfx/2006/xaml/presentation"
             xmlns:x="http://schemas.microsoft.com/winfx/2006/xaml"
             xmlns:local="clr-namespace:ProgressSample1"

             xmlns:ui="http://schemas.modernwpf.com/2019"
             StartupUri="Views/MainWindow.xaml">

    <Application.Resources>

        <ResourceDictionary>
            <ResourceDictionary.MergedDictionaries>
                <ui:ThemeResources />
                <ui:XamlControlsResources />
                <!-- Other merged dictionaries here -->
            </ResourceDictionary.MergedDictionaries>
            <!-- Other app resources here -->
        </ResourceDictionary>

    </Application.Resources>
</Application>
MainWindow.xamlに
xmlns:ui="http://schemas.modernwpf.com/2019"と
ui:WindowHelper.UseModernWindowStyle="True"を追加します。
<Window x:Class="ProgressSample1.Views.MainWindow"
        xmlns="http://schemas.microsoft.com/winfx/2006/xaml/presentation"
        xmlns:x="http://schemas.microsoft.com/winfx/2006/xaml"
        xmlns:d="http://schemas.microsoft.com/expression/blend/2008"
        xmlns:mc="http://schemas.openxmlformats.org/markup-compatibility/2006"
        xmlns:local="clr-namespace:ProgressSample1.Views"

        xmlns:ui="http://schemas.modernwpf.com/2019"
        ui:WindowHelper.UseModernWindowStyle="True"

        mc:Ignorable="d"
        Title="MainWindow" Height="450" Width="800">
    <Grid>

    </Grid>
</Window>
8)ViewModelの作成
MainWindowViewModel.csを以下のように編集します。
-
ObservableObjectを継承するようにします。 - 処理中か否かを表すフラグを定義します。
- 現在の状態を表示するメッセージを定義します。
- 時間のかかる処理を実行するコマンドを定義します。
using Microsoft.Toolkit.Mvvm.ComponentModel;
using Microsoft.Toolkit.Mvvm.Input;
using System.Threading.Tasks;
using System.Windows.Input;

namespace ProgressSample1.ViewModels
{
    public class MainWindowViewModel : ObservableObject
    {
        private bool _isBusy;
        /// <summary>
        /// 処理中の時true
        /// </summary>
        public bool IsBusy
        {
            get => _isBusy;
            set => SetProperty(ref _isBusy, value);
        }

        private string _statusMessage;
        /// <summary>
        /// ステータス メッセージ
        /// </summary>
        public string StatusMessage
        {
            get => _statusMessage;
            set => SetProperty(ref _statusMessage, value);
        }

        /// <summary>
        /// 実行コマンド
        /// </summary>
        public ICommand ExecCommand { get; }

        /// <summary>
        /// コンストラクタ
        /// </summary>
        public MainWindowViewModel()
        {
            IsBusy = false;
            StatusMessage = "";
            ExecCommand = new AsyncRelayCommand(ExecAsync);
        }

        /// <summary>
        /// 時間のかかる処理
        /// </summary>
        /// <returns></returns>
        private async Task ExecAsync()
        {
            IsBusy = true;
            StatusMessage = "処理中...";

            // 時間のかかる処理
            await Task.Delay(5000);

            IsBusy = false;
            StatusMessage = "処理完了!";
        }
    }
}
9)Viewの作成
MainWindow.Xamlを開き、
Windowに
xmlns:vm~, d:DataContext~, xmlns:cb~, IsEnabled~を追加します。
Widthを250, Heightを200に編集します。
- Windowの
IsEnabledプロパティにはVMのIsBusyを反転した値をバインディングします。- これによって処理中の間は画面が無効状態になります。
-
!で反転するのはNuGetで追加したCalcBindingの機能です。
-
Window.DataContextにVMを設定します。 - StackPanelに処理実行用のボタンと、処理中表示に使うコントロールを追加します。
<Window
    x:Class="ProgressSample1.Views.MainWindow"
    xmlns="http://schemas.microsoft.com/winfx/2006/xaml/presentation"
    xmlns:x="http://schemas.microsoft.com/winfx/2006/xaml"
    xmlns:d="http://schemas.microsoft.com/expression/blend/2008"
    xmlns:local="clr-namespace:ProgressSample1.Views"
    xmlns:mc="http://schemas.openxmlformats.org/markup-compatibility/2006"
    xmlns:ui="http://schemas.modernwpf.com/2019"
    ui:WindowHelper.UseModernWindowStyle="True"

    xmlns:vm="clr-namespace:ProgressSample1.ViewModels"
    d:DataContext="{d:DesignInstance Type=vm:MainWindowViewModel,
                                     IsDesignTimeCreatable=True}"

    xmlns:cb="clr-namespace:CalcBinding;assembly=CalcBinding"
    IsEnabled="{cb:Binding !IsBusy,
                           Mode=OneWay}"

    Title="MainWindow"
    Width="250"
    Height="200"
    mc:Ignorable="d">

    <Window.DataContext>
        <vm:MainWindowViewModel />
    </Window.DataContext>

    <StackPanel>
        <Button
            Margin="5"
            Command="{Binding ExecCommand, Mode=OneTime}"
            Content="実行"
            Style="{StaticResource AccentButtonStyle}" />

        <ui:ProgressRing
            Width="50"
            Height="50"
            IsActive="{Binding IsBusy, Mode=OneWay}" />

        <TextBlock
            Margin="5"
            HorizontalAlignment="Center"
            Text="{Binding StatusMessage, Mode=OneWay}" />
    </StackPanel>
</Window>
完成です。
10)実行
実行してみます。

実行ボタンを押します。
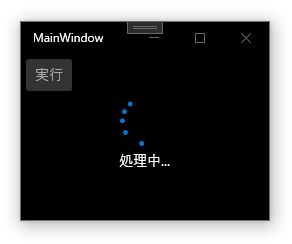
ボタンが無効状態になり、プログレスリングが表示され、処理中のメッセージが表示されました。
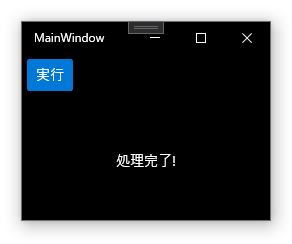
しばらくすると処理完了のメッセージが表示されます。
11)参考
Discussion