🦊
Angular - FormArray を使って動的なリアクティブなフォームを作る
Angular ではリアクティブなフォームを作るためのに FormGroup, FormArray, FormControl クラスが用意されています。
ユーザーがボタンを押すとフォームとフォームが増えるようなユースケースでは動的なフォームが必要です。その際に FormArray を使うと簡単に実装できます。
開発者ガイドにも FormArray の説明がありますがテーブル形式の動的フォームについては載っていなかったので今回はそのやり方について書いていきます。
作成したフォーム
作成したフォームはこのような見た目です。
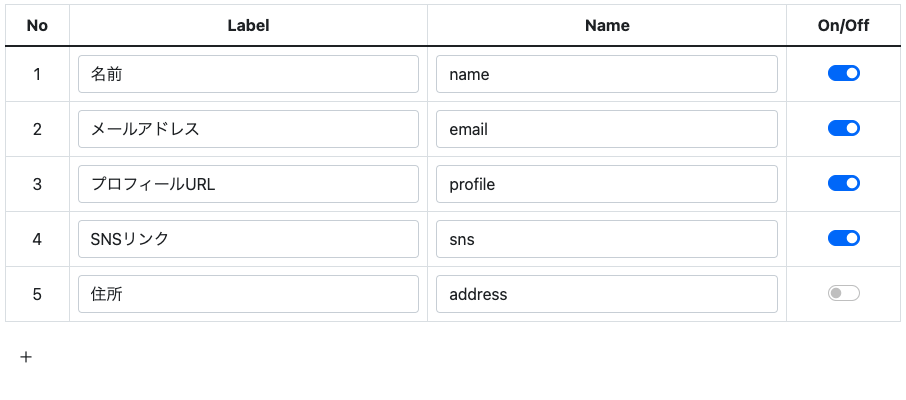
Label, Name はテキスト入力、On/Off はチェックボックス入力で左下の + ボタンを押すと1行追加されるようになっています。
ちなみにスタイルは Bootstrap を使って整えています。
コードの解説
以下のステップで実装しています。
- コンポーネント側で FormArray をインスタンス化
- DBからデータを取得して FormGroup に入れて FormArray に追加
- formArray の controls を取得するためのゲッターを定義
- テンプレート側で *ngFor を使って control を取り出し [formGroup] にバインド
- formControlName 属性で input と FormGroup のキーをバインド
はじめはうまく動作しなかったのですが以下の点に注意すると正しく動作しました。
- FormArray に対しては push メソッドを使って追加
- ゲッターでは戻り値の型を指定することでTSのエラーを解消できる
- control には key がないので formGroupName ではなく [formGroup] を使う
コンポーネントとテンプレートはそれぞれ以下のようになっています。
/* 省略 */

export class SettingComponent implements OnInit {
  forms$: Observable<OriginalForm[]>;
  formsSubscription: Subscription;
  isUpdated: boolean = false;
  formArray = new FormArray([]);  // FormArray インスタンス化

  constructor(private settingService: SettingService) {
    this.forms$ = this.settingService.forms$;  // DBからデータ取得するサービスクラス
  }

  // controls を取得するためのゲッター
  get formArrayControls(): FormGroup[] {
    return this.formArray.controls as FormGroup[];
  }

  ngOnInit(): void {
    this.formsSubscription = this.forms$
      .pipe(
        take(1),
        tap((forms) => {
          forms.forEach((form) =>
            this.formArray.push(
              new FormGroup({
                id: new FormControl(form.id, []),
                label: new FormControl(form.label, []),
                name: new FormControl(form.name, []),
                isValid: new FormControl(form.isValid, []),
              })
            )
          );
        })
      )
      .subscribe(() => {
        this.formArray.valueChanges
          .pipe(
            debounceTime(2000),
            mergeMap((values) => this.settingService.updateValues(values))
          )
          .subscribe((isUpdated) => {
            if (isUpdated) {
              this.isUpdated = true;
              setTimeout(() => (this.isUpdated = false), 2000);
            }
          });
      });
  }

  ngOnDestroy(): void {
    this.formsSubscription.unsubscribe();
  }

  async addForm() {
    const key = this.formArray.length + 1;
    const id = await this.settingService.addNewRow(key);
    this.formArray.push(
      new FormGroup({
        id: new FormControl(id, []),
        label: new FormControl('', []),
        name: new FormControl('', []),
        isValid: new FormControl(true, []),
      })
    );
  }
}
<table class="table table-bordered">
  <thead>
    <tr class="text-center">
      <th>No</th>
      <th>Label</th>
      <th>Name</th>
      <th>On/Off</th>
    </tr>
  </thead>
  <tbody>
    /* formGroup にバインド */
    <tr
      *ngFor="let control of formArrayControls; let i = index"
      [formGroup]="control"
    >
      <td class="align-middle text-center">{{ i + 1 }}</td>
      /* input にバインド */
      <td><input formControlName="label" class="form-control" /></td>
      <td><input formControlName="name" class="form-control" /></td>
      <td class="align-middle text-center">
        <div class="form-check form-switch d-flex justify-content-center">
          <input
            class="form-check-input"
            type="checkbox"
            id="flexSwitchCheckChecked"
            formControlName="isValid"
          />
        </div>
      </td>
    </tr>
  </tbody>
</table>

<button type="button" class="btn" (click)="addForm()">+</button>
DBからのデータ取得や更新は SettingService クラスで行なっています。DBには Firestore を利用して連携していますが今回は解説を省きます。ちなみに以下のようなデータが登録されています。
サンプルデータ
    {
      "BMUiCwPAbDkvqqNyrNUA": {
        "id": "BMUiCwPAbDkvqqNyrNUA",
        "isValid": true,
        "key": 1,
        "label": "名前",
        "name": "name"
      },
      "mEca48XWPKm05aR263cs": {
        "id": "mEca48XWPKm05aR263cs",
        "isValid": true,
        "key": 2,
        "label": "メールアドレス",
        "name": "email"
      },
      "T4x2rhQ0jE5a2daGWOr8": {
        "id": "T4x2rhQ0jE5a2daGWOr8",
        "isValid": true,
        "key": 3,
        "label": "プロフィールURL",
        "name": "profile"
      },
      "DD0FiCLieZQQnby9MpHW": {
        "id": "DD0FiCLieZQQnby9MpHW",
        "isValid": true,
        "key": 4,
        "label": "SNSリンク",
        "name": "sns"
      },
      "8IoSSb3lgMEPe93eu0xU": {
        "id": "8IoSSb3lgMEPe93eu0xU",
        "isValid": false,
        "key": 5,
        "label": "住所",
        "name": "address1"
      }
    }
まとめ
FormArray を使ったテーブル形式の動的なリアクティブフォームの作成方法について解説しました。
これを使えばスプレッドシートやエクセルのような見た目の入力フォームも実装することができます。
似たような場面で参考になれば幸いです。
Discussion