NestJS に Prisma を導入して認証機能を実装してみる
NestJSでAPIを実装する際、認証機能が必要になるケースは良くあります。
今回は未ログインだと401エラーを返し、ログイン済みでは正常にレスポンスを返すRESTful APIの仕組みを実装してみます。
以下の技術を利用しました。
- DB: PostgreSQL
- ORM: Prisma
- 認証ライブラリ: Passport, JWT
- ハッシュ化: bcrypt
DBについてはdocker-composeを使ってローカルで起動している前提です。
利用したdocker-compose.yml
version: '3.8'
services:
dev-postgres:
image: postgres:14.4-alpine
ports:
  - 5434:5432
environment:
  POSTGRES_USER: dbuser
  POSTGRES_PASSWORD: dbpass
  POSTGRES_DB: sampledb
restart: always
networks:
  - sample
networks:
sample:
プロジェクトの作成はNestCLIで行ってます。
NestCLIでnewを実行
nest new nestjs-auth-sample
⚡  We will scaffold your app in a few seconds..

? Which package manager would you ❤️  to use? npm
CREATE nestjs-auth-sample/.eslintrc.js (663 bytes)
CREATE nestjs-auth-sample/.prettierrc (51 bytes)
CREATE nestjs-auth-sample/README.md (3340 bytes)
CREATE nestjs-auth-sample/nest-cli.json (171 bytes)
CREATE nestjs-auth-sample/package.json (1959 bytes)
CREATE nestjs-auth-sample/tsconfig.build.json (97 bytes)
CREATE nestjs-auth-sample/tsconfig.json (546 bytes)
CREATE nestjs-auth-sample/src/app.controller.spec.ts (617 bytes)
CREATE nestjs-auth-sample/src/app.controller.ts (274 bytes)
CREATE nestjs-auth-sample/src/app.module.ts (249 bytes)
CREATE nestjs-auth-sample/src/app.service.ts (142 bytes)
CREATE nestjs-auth-sample/src/main.ts (208 bytes)
CREATE nestjs-auth-sample/test/app.e2e-spec.ts (630 bytes)
CREATE nestjs-auth-sample/test/jest-e2e.json (183 bytes)

✔ Installation in progress... ☕

🚀  Successfully created project nestjs-auth-sample
👉  Get started with the following commands:

$ cd nestjs-auth-sample
$ npm run start

		      Thanks for installing Nest 🙏
	     Please consider donating to our open collective
		    to help us maintain this package.

	   🍷  Donate: https://opencollective.com/nest
最終的なコードはGitHubにて公開しています。
Prismaの準備
セットアップとDBマイグレーション
インストールして起動。
npm i prisma -D
npx prisma init
DB接続情報は環境変数で管理したいので.envに以下を追加。
DATABASE_URL="postgresql://dbuser:dbpass@localhost:5434/sampledb?schema=public"
prisma/schema.prismaにUserモデルを追加。
model User {
    id             Int      @id @default(autoincrement())
    createdAt      DateTime @default(now())
    updatedAt      DateTime @updatedAt
    email          String   @unique
    hashedPassword String
}
DBマイグレーション。Prisma Studioを開いてモデルが存在していればOK。
npx prisma migrate dev
npx prisma studio
モジュール作成
CLIでモジュール・サービスを生成。
nest g module prisma
nest g service prisma
ユーザー作成時にDBにデータ追加するのでPrisma Clientを入れておく。
NestJS側で環境変数を使いたいので@nestjs/configも入れておく。
npm i @prisma/client @nestjs/config
ConfigServiceを利用したいのでapp.module.tsでインポートしておく。
@Module({
  imports: [ConfigModule.forRoot({ isGlobal: true }), AuthModule, PrismaModule],
モジュールとサービスを実装。
prisma.module.ts
import { Module } from '@nestjs/common';
import { PrismaService } from './prisma.service';

@Module({
  providers: [PrismaService],
  exports: [PrismaService],
})
export class PrismaModule {}
prisma.service.ts
import { Injectable } from '@nestjs/common';
import { ConfigService } from '@nestjs/config';
import { PrismaClient } from '@prisma/client';

@Injectable()
export class PrismaService extends PrismaClient {
  constructor(private readonly configService: ConfigService) {
    super({
      datasources: {
        db: {
          url: configService.get('DATABASE_URL'),
        },
      },
    });
  }
}
認証処理の実装
サインアップ処理を実装
CLIで必要なファイルを生成。
nest g module auth
nest g service auth
nest g controller auth
パスワード暗号化のためbcryptをインストール。
npm i bcrypt
npm i -D @types/bcrypt
サインアップの処理とルーティングを実装。
auth.service.ts
async signUp(postData): Promise<Msg> {
  const hashed = await bcrypt.hash(postData.password, 12);
  try {
    await this.prismaService.user.create({
      data: {
        email: postData.email,
        hashedPassword: hashed,
      },
    });
    return { message: 'ok' };
  } catch (error) {
    if (error instanceof PrismaClientKnownRequestError) {
      if (error.code === 'P2002') {
        throw new ForbiddenException('This email is already taken.');
      }
    }
  }
}
auth.controller.ts
@Post('signup')
signUp(@Body() postData: { email: string; password: string }): Promise<Msg> {
  return this.authService.signUp(postData);
}
POSTリクエストを送って、Userにデータが追加されていればサインアップはOK。
ログイン処理を実装
認証関連のライブラリを入れる。
npm i @nestjs/passport passport @nestjs/jwt passport-jwt
npm i -D @types/passport-jwt
JWTの生成にシークレットキーが必要なので.envに追加。
JWT_SECRET="secret1234"
JwtModuleをauth.module.tsでインポート。
@Module({
  imports: [PrismaModule, JwtModule.register({})],
ログイン処理ととルーティングを実装。
auth.service.ts
async login(postData) {
  const user = await this.prismaService.user.findUnique({
    where: { email: postData.email },
  });
  if (!user) throw new ForbiddenException('Email or password incorrect');
  const isValid = await bcrypt.compare(
    postData.password,
    user.hashedPassword,
  );
  if (!isValid) throw new ForbiddenException('Email or password incorrect');
  return this.generateJwt(user.id, user.email);
}

async generateJwt(userId: number, email: string): Promise<Jwt> {
  const payload = {
    sub: userId,
    email,
  };
  const secret = this.configService.get('JWT_SECRET');
  const token = await this.jwtService.signAsync(payload, {
    expiresIn: '5m',
    secret: secret,
  });
  return { accessToken: token };
}
auth.controller.ts
@HttpCode(HttpStatus.OK)
@Post('/login')
async login(
  @Body() postData: { email: string; password: string },
): Promise<any> {
  return await this.authService.login(postData);
}
JWTストラテジの実装
PassportとJWTを使った認証機能を今回は利用します。
authフォルダ内に以下のファイルを作成。
jwt.strategy.ts
@Injectable()
export class JwtStrategy extends PassportStrategy(Strategy) {
  constructor(
    private readonly configService: ConfigService,
    private readonly prismaService: PrismaService,
  ) {
    super({
      jwtFromRequest: ExtractJwt.fromAuthHeaderAsBearerToken(),
      ignoreExpiration: false,
      secretOrKey: configService.get('JWT_SECRET'),
    });
  }

  async validate(payload: { sub: number; email: string }) {
    const user = await this.prismaService.user.findUnique({
      where: { id: payload.sub },
    });
    delete user.hashedPassword;
    return user;
  }
}
jwt-auth.guard.ts
@Injectable()
export class JwtAuthGuard extends AuthGuard('jwt') {}
Userモジュールとガードの利用
ログイン状態に応じたレスポンスの動作確認のため、Userデータを取得するためのモジュールを作成します。/user にリクエストを送るとログインユーザー情報が返ってくるようになっています。
認証済みか判定して弾きたいルーティングに対してガードを指定。
nest g module user
nest g controller user
user.module.ts
@Module({
  imports: [PrismaModule],
  controllers: [UserController],
})
user.controller.ts
@UseGuards(JwtAuthGuard)
@Get()
getProfile(@Request() req) {
  return req.user;
}
動作確認
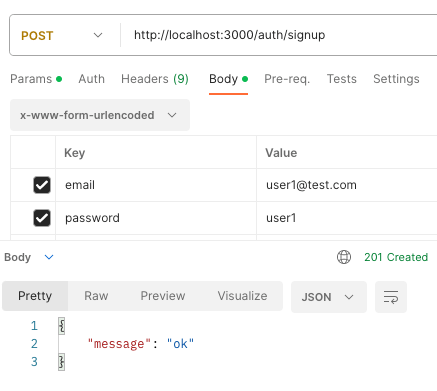
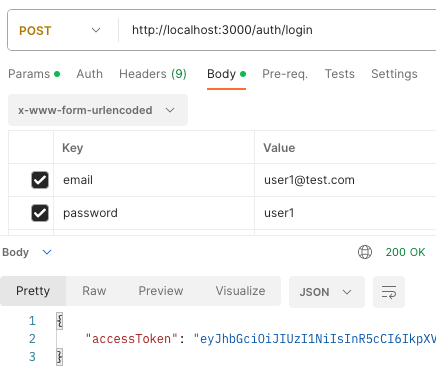
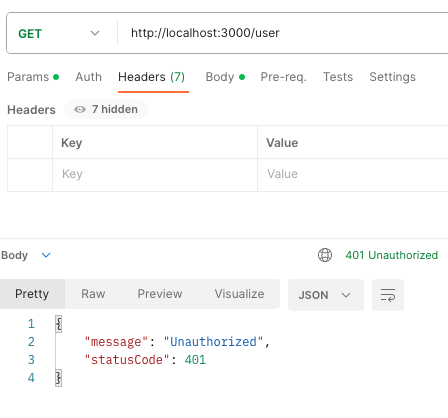
リクエストの送信にはPostmanを利用して動作を見てみます。
-
サインアップ → ユーザーが追加される。

-
ログイン → accessTokenが返ってくる。
-
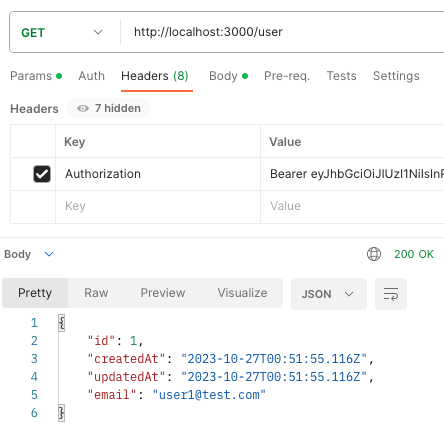
HeaderにAuthorizationを付けてリクエスト → 200 OK
-
HeaderにAuthorization無しでリクエスト → 401 Unauthorized
まとめ
Prismaを使うとDBへのユーザー登録も楽に実装できます。Prisma Studioを使えばブラウザ結果をすぐに確認できるのも有り難いですね!
今回はその仕組みを使いつつ認証機能の基本的な実装手順をまとめてみました。
NestJSを使った開発する時の参考になれば幸いです。
参考サイト
NestJS公式ドキュメント日本語訳 security-authentication
NestJS公式ドキュメント日本語訳 security-encryptionandhashing
NestJSでPrismaを使うレシピ
Udemy動画 NestJS + Next.js によるフルスタックWeb開発
Discussion