【Python】yieldでなんちゃって非同期処理
yield
夫れ
そもそも、私は

柴田昌吉, 子安峻 共編『英和字彙 : 附・音插図』,日就社,1873. 国立国会図書館デジタルコレクション https://dl.ndl.go.jp/pid/1871572 (参照 2025-09-14)
yield
基本的なところを確認しましょう。
特徴的な挙動
>>> def R():
...    return "return"
...    return "?"
...
>>> r = R()
>>> r
'return'

>>> def Y():
...    yield "return"
...    yield "?"
...    yield "??"
...
>>> y = Y()
>>> y
<generator object Y at 0x00000253D16D7A00>
>>> next(y)
'return'
>>> next(y)
'?'
>>> next(y)
'??'
yieldを使わない場合
>>> def no_yield():
...     print("return")
...     print("?")
...     print("??")
...
>>> no_yield()
return
?
??
値を取りだすにはnext()を使う必要があるという点に注意。
条件による篩分け
「偶数のみ」というように、特定の条件に適合したもののみ渡すこともできます。
>>> def F():
...     l = [1, 2, 3, 4, 5, 6, 7, 8, 9, 10]
...     for i in l:
...         if i % 2 == 0:
...             yield i
...
>>> even_numbers = F()
>>> next( even_numbers )
2
>>> next( even_numbers )
4
>>> next( even_numbers )
6
>>> next( even_numbers )
8
>>> next( even_numbers )
10
yieldを使わない場合
>>> def F():
...     l = [1, 2, 3, 4, 5, 6, 7, 8, 9, 10]
...     for i in l:
...         if i % 2 == 0:
...             print(i)
...
>>> F()
2
4
6
8
10
無限ループのyield
上のように、
import random
import time


def yieldTask():
    weathers = ["Sunny", "Rainy", "Cloudy", "Windy", "Snowy"]

    while True:
        # ランダムに天気を選ぶ
        weather = random.choice(weathers)
        # 選ばれた天気を渡す
        yield weather
        # 2秒待機
        time.sleep(2)

weathers = yieldTask()

while True:
    # yieldTask()から渡されたものがweatherに入る
    match weather := next(weathers):
        case "Sunny":
            print("It's a bright and sunny day!")
        case "Rainy":
            print("Don't forget your umbrella, it's raining!")
        case "Cloudy":
            print("It's a bit gloomy with all the clouds.")
        case "Windy":
            print("Hold onto your hat, it's windy out there!")
        case "Snowy":
            print("Time for some snow fun!")
        case _:
            print("Unknown weather condition.")
実行すると次のようになります。無限ループなので、停止する際はCtrl + Cなどで強制終了します。
PS C:\⋯> python .\yield_task.py
It's a bright and sunny day!
Don't forget your umbrella, it's raining!
It's a bright and sunny day!
Hold onto your hat, it's windy out there!
It's a bright and sunny day!
It's a bright and sunny day!
It's a bit gloomy with all the clouds.
It's a bright and sunny day!
Time for some snow fun!
Don't forget your umbrella, it's raining!
Time for some snow fun!
Hold onto your hat, it's windy out there!
Hold onto your hat, it's windy out there!
Time for some snow fun!
yieldを使わない場合
import random
import time


def yieldTask():
    weathers = ["Sunny", "Rainy", "Cloudy", "Windy", "Snowy"]

    while True:
        weather = random.choice(weathers)
        match weather:
            case "Sunny":
                print("It's a bright and sunny day!")
            case "Rainy":
                print("Don't forget your umbrella, it's raining!")
            case "Cloudy":
                print("It's a bit gloomy with all the clouds.")
            case "Windy":
                print("Hold onto your hat, it's windy out there!")
            case "Snowy":
                print("Time for some snow fun!")
            case _:
                print("Unknown weather condition.")
        time.sleep(2)

yieldTask()
なんちゃって非同期
これを使うと、雰囲気だけ非同期のように思えないこともないことができるようになります。
その前に:asyncio
変なことをする前に、一度正しい(?)非同期処理の実装を確認しておきます。
プログラム
import asyncio

SERVER_HOST = '127.0.0.1'
SERVER_PORT = 18883
BUFFER_SIZE = 1024

async def clientHandler(reader: asyncio.StreamReader, writer: asyncio.StreamWriter):
    try:
        # 接続してきたクライアントのアドレスを取得
        addr, port = writer.get_extra_info('peername')
        print(f"{addr}:{port} connected:\n")

        while True:
            # クライアントからデータを受信
            data: bytes = await reader.read(BUFFER_SIZE)
            if not data:
                # 切断された場合
                print(f"{addr} disconnected\n")
                break
                # raise Exception("disconnected")
            print(f"{addr}:{port} > {data.decode()}")

    except Exception as e:
        print(f"{addr} disconnected: {e}")

async def main(host: str, port: int):
    server = await asyncio.start_server(
        client_connected_cb = clientHandler,
        host = host,
        port = port
    )
    addr, port = server.sockets[0].getsockname()
    print(f"Server: {addr}:{port} listening")

    async with server:
        await server.serve_forever()

try:
    asyncio.run(main(host = SERVER_HOST, port = SERVER_PORT))
finally:
    print("Server: exitting")
    exit(0)
画面が開かれたら接続、閉じられたら切断とするか悩みましたが、単純なので都度「接続→送信→切断」と行うようにしています。
import tkinter as tk
from socket import socket

SERVER_HOST = '127.0.0.1'
SERVER_PORT = 18883

def on_right_click():
    with socket() as s:
        s.connect((SERVER_HOST, SERVER_PORT))
        s.send(b'Right Button Clicked\n')

def on_left_click():
    with socket() as s:
        s.connect((SERVER_HOST, SERVER_PORT))
        s.send(b'Left Button Clicked\n')

root = tk.Tk()
root.title("asyncio client")

left_button = tk.Button(root, text="Left Button", command=on_left_click)
left_button.pack(side="left", padx=10, pady=10)

right_button = tk.Button(root, text="Right Button", command=on_right_click)
right_button.pack(side="right", padx=10, pady=10)

root.mainloop()
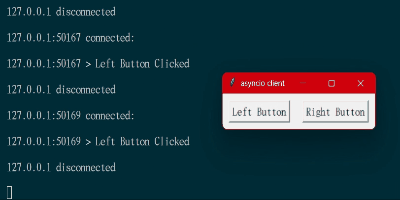
ところで、asyncioのサーバーとTkinterの画面とは、同じプログラムで一度に実行することが難しいようです。threadingやprocessing、concurrent.futuresなどでマルチタスクを実装すれば宜しいのですが、面倒なので今回はそれぞれ個別に実行しています。
yield
プログラム
import os
import time


def yieldTask():
    while True:
        # log_right.txtが作られた場合
        if os.path.exists("log_right.txt"):
            # log_right.txtを削除する
            os.remove("log_right.txt")
            # 右ボタンがクリックされたと報せる
            yield "Right"

        # log_left.txtが作られた場合
        if os.path.exists("log_left.txt"):
            # log_left.txtを削除する
            os.remove("log_left.txt")
            # 左ボタンがクリックされたことを報せる
            yield "Left"

        # 0.1秒待機
        time.sleep(0.1)

data = yieldTask()

try:
    while True:
        # 報せに応じてメッセージを表示する
        match next(data):
            case "Left":
                print("Left Button Clicked")
            case "Right":
                print("Right Button Clicked")
            case _:
                pass
        time.sleep(0.1)
except KeyboardInterrupt:
    exit(0)
from tkinter import Button, Tk


def on_right_click():
    # 右ボタンがクリックされたらlog_right.txtを作る
    with open("log_right.txt", "w") as f:
        f.write("Right Button Clicked\n")

def on_left_click():
    # 左ボタンがクリックされたらlog_left.txtを作る
    with open("log_left.txt", "w") as f:
        f.write("Left Button Clicked\n")

root = Tk()
root.title("yield")

left_button = Button(root, text="Left Button", command=on_left_click)
left_button.pack(side="left", padx=10, pady=10)

right_button = Button(root, text="Right Button", command=on_right_click)
right_button.pack(side="right", padx=10, pady=10)

root.mainloop()
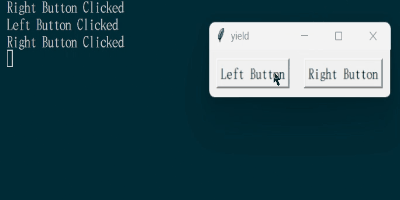
asyncio同様、一度に両者を実行することは難しいため、それぞれ別に実行しています。
socketを使う場合
ソケット通信を使う場合、次のようになりました。なおソケットサーバーはCtrl + Cで停止できないため、ここでは停止する処理を追加しています。またソケットサーバーが停止すると、next()でStopIteration例外となります。
import time
from socket import socket

SERVER_HOST = '127.0.0.1'
SERVER_PORT = 18884

def yieldTask():
    with socket() as s:
        s.bind((SERVER_HOST, SERVER_PORT))
        s.listen(1)
        print(f'Listening on {SERVER_HOST}:{SERVER_PORT}')

        while True:
            conn, addr = s.accept()
            with conn:
                print(f'Connected: {addr[0]}:{addr[1]}')

                data = conn.recv(1024)
                if not data:
                    break

                message = data.decode('utf-8').strip()

                match message:
                    case "Left":
                        yield "Left"
                    case "Right":
                        yield "Right"
                    case "Quit":
                        print("Quit Command Received: raising StopIteration")
                        break
                    case _:
                        print(f"Unknown command: {message}")

data = yieldTask()

while True:
    try:
        match next(data):
            case "Left":
                print("Left Button Clicked")
            case "Right":
                print("Right Button Clicked")
            case _:
                pass
        time.sleep(0.1)
    except StopIteration:
        break
from socket import socket
from tkinter import Button, Tk

SERVER_HOST = '127.0.0.1'
SERVER_PORT = 18884

def on_right_click():
    with socket() as s:
        s.connect((SERVER_HOST, SERVER_PORT))
        s.sendall(b'Right')

def on_left_click():
    with socket() as s:
        s.connect((SERVER_HOST, SERVER_PORT))
        s.sendall(b'Left')

def quit_app():
    with socket() as s:
        s.connect((SERVER_HOST, SERVER_PORT))
        s.sendall(b'Quit')
    root.quit()

root = Tk()
root.title("yield")

left_button = Button(root, text="Left Button", command=on_left_click)
left_button.pack(side="left", padx=10, pady=10)

right_button = Button(root, text="Right Button", command=on_right_click)
right_button.pack(side="right", padx=10, pady=10)

quit_button = Button(root, text="Quit", command=quit_app)
quit_button.pack(side="bottom", padx=10, pady=10)

root.mainloop()
応用:Raspberry Pi GPIO
私が唯一思いつく
なお私のbookwormです。
$ cat /etc/os-release
PRETTY_NAME="Debian GNU/Linux 12 (bookworm)"
NAME="Debian GNU/Linux"
VERSION_ID="12"
VERSION="12 (bookworm)"
VERSION_CODENAME=bookworm
ID=debian
HOME_URL="https://www.debian.org/"
SUPPORT_URL="https://www.debian.org/support"
BUG_REPORT_URL="https://bugs.debian.org/"
非常に簡素ですが、回路としてはこのようになります。
スイッチがあればその方がよいのですが、そんなもの持っていないので、
GPIO libgpiod
RPi.GPIOやlgpio、gpiozeroなど、どれを使うかは使用者に委ねられるものでした。私はRPi.GPIOに慣れていますが、どうやらlibgpiodというものを使います。
gpiozeroもRPi.GPIOとは勝手が随分違うので避けてしまいました。
今回pipでgpiodをインストールすると、異なるものがインストールされてしまうそうです。
libgpiodについて
libgpiodの基本的な使い方
記事の主旨と乖離するものの、簡単に触れておきます。
ピン情報の確認
結局GPIO18とかGPIO12とか書けばよいのですが、gpiochip0というものがどこから参看したものなのか示しておきます。環境によってはこの数字が変わるようです。
gpioinfo全ての表示
$ gpioinfo
gpiochip0 - 58 lines:
        line   0:     "ID_SDA"       unused   input  active-high
        line   1:     "ID_SCL"       unused   input  active-high
        line   2:      "GPIO2"       unused   input  active-high
        line   3:      "GPIO3"       unused   input  active-high
        line   4:      "GPIO4"       unused   input  active-high
        line   5:      "GPIO5"       unused   input  active-high
        line   6:      "GPIO6"       unused   input  active-high
        line   7:      "GPIO7"       unused   input  active-high
        line   8:      "GPIO8"       unused   input  active-high
        line   9:      "GPIO9"       unused   input  active-high
        line  10:     "GPIO10"       unused   input  active-high
        line  11:     "GPIO11"       unused   input  active-high
        line  12:     "GPIO12"       unused   input  active-high
        line  13:     "GPIO13"       unused   input  active-high
        line  14:     "GPIO14"       unused   input  active-high
        line  15:     "GPIO15"       unused   input  active-high
        line  16:     "GPIO16"       unused   input  active-high
        line  17:     "GPIO17"       unused   input  active-high
        line  18:     "GPIO18"       unused   input  active-high
        line  19:     "GPIO19"       unused   input  active-high
        line  20:     "GPIO20"       unused   input  active-high
        line  21:     "GPIO21"       unused   input  active-high
        line  22:     "GPIO22"       unused   input  active-high
        line  23:     "GPIO23"       unused   input  active-high
        line  24:     "GPIO24"       unused   input  active-high
        line  25:     "GPIO25"       unused   input  active-high
        line  26:     "GPIO26"       unused   input  active-high
        line  27:     "GPIO27"       unused   input  active-high
        line  28: "RGMII_MDIO"       unused   input  active-high
        line  29:  "RGMIO_MDC"       unused   input  active-high
        line  30:       "CTS0"       unused   input  active-high
        line  31:       "RTS0"       unused   input  active-high
        line  32:       "TXD0"       unused   input  active-high
        line  33:       "RXD0"       unused   input  active-high
        line  34:    "SD1_CLK"       unused   input  active-high
        line  35:    "SD1_CMD"       unused   input  active-high
        line  36:  "SD1_DATA0"       unused   input  active-high
        line  37:  "SD1_DATA1"       unused   input  active-high
        line  38:  "SD1_DATA2"       unused   input  active-high
        line  39:  "SD1_DATA3"       unused   input  active-high
        line  40:  "PWM0_MISO"       unused   input  active-high
        line  41:  "PWM1_MOSI"       unused   input  active-high
        line  42: "STATUS_LED_G_CLK" "ACT" output active-high [used]
        line  43: "SPIFLASH_CE_N" unused input active-high
        line  44:       "SDA0"       unused   input  active-high
        line  45:       "SCL0"       unused   input  active-high
        line  46: "RGMII_RXCLK" unused input active-high
        line  47: "RGMII_RXCTL" unused input active-high
        line  48: "RGMII_RXD0"       unused   input  active-high
        line  49: "RGMII_RXD1"       unused   input  active-high
        line  50: "RGMII_RXD2"       unused   input  active-high
        line  51: "RGMII_RXD3"       unused   input  active-high
        line  52: "RGMII_TXCLK" unused input active-high
        line  53: "RGMII_TXCTL" unused input active-high
        line  54: "RGMII_TXD0"       unused   input  active-high
        line  55: "RGMII_TXD1"       unused   input  active-high
        line  56: "RGMII_TXD2"       unused   input  active-high
        line  57: "RGMII_TXD3"       unused   input  active-high
gpiochip1 - 8 lines:
        line   0:      "BT_ON"   "shutdown"  output  active-high [used]
        line   1:      "WL_ON"       unused  output  active-high
        line   2: "PWR_LED_OFF" "PWR" output active-low [used]
        line   3: "GLOBAL_RESET" unused output active-high
        line   4: "VDD_SD_IO_SEL" "vdd-sd-io" output active-high [used]
        line   5:   "CAM_GPIO" "regulator-cam1" output active-high [used]
        line   6:  "SD_PWR_ON" "regulator-sd-vcc" output active-high [used]
        line   7:    "SD_OC_N"       unused   input  active-high
gpiochip0 - 58 lines:
        line   0:     "ID_SDA"       unused   input  active-high
        line   1:     "ID_SCL"       unused   input  active-high
        line   2:      "GPIO2"       unused   input  active-high
        line   3:      "GPIO3"       unused   input  active-high
        line   4:      "GPIO4"       unused   input  active-high
        line   5:      "GPIO5"       unused   input  active-high
        line   6:      "GPIO6"       unused   input  active-high
        line   7:      "GPIO7"       unused   input  active-high
        line   8:      "GPIO8"       unused   input  active-high
        line   9:      "GPIO9"       unused   input  active-high
        line  10:     "GPIO10"       unused   input  active-high
        line  11:     "GPIO11"       unused   input  active-high
        line  12:     "GPIO12"       unused   input  active-high
        line  13:     "GPIO13"       unused   input  active-high
        line  14:     "GPIO14"       unused   input  active-high
        line  15:     "GPIO15"       unused   input  active-high
        line  16:     "GPIO16"       unused   input  active-high
        line  17:     "GPIO17"       unused   input  active-high
        line  18:     "GPIO18"       unused   input  active-high
        line  19:     "GPIO19"       unused   input  active-high
        line  20:     "GPIO20"       unused   input  active-high
        line  21:     "GPIO21"       unused   input  active-high
        line  22:     "GPIO22"       unused   input  active-high
        line  23:     "GPIO23"       unused   input  active-high
        line  24:     "GPIO24"       unused   input  active-high
        line  25:     "GPIO25"       unused   input  active-high
        line  26:     "GPIO26"       unused   input  active-high
        line  27:     "GPIO27"       unused   input  active-high
        line  28: "RGMII_MDIO"       unused   input  active-high
        line  29:  "RGMIO_MDC"       unused   input  active-high
        line  30:       "CTS0"       unused   input  active-high
        line  31:       "RTS0"       unused   input  active-high
        line  32:       "TXD0"       unused   input  active-high
        line  33:       "RXD0"       unused   input  active-high
        line  34:    "SD1_CLK"       unused   input  active-high
        line  35:    "SD1_CMD"       unused   input  active-high
        line  36:  "SD1_DATA0"       unused   input  active-high
        line  37:  "SD1_DATA1"       unused   input  active-high
        line  38:  "SD1_DATA2"       unused   input  active-high
        line  39:  "SD1_DATA3"       unused   input  active-high
        line  40:  "PWM0_MISO"       unused   input  active-high
        line  41:  "PWM1_MOSI"       unused   input  active-high
        line  42: "STATUS_LED_G_CLK" "ACT" output active-high [used]
        line  43: "SPIFLASH_CE_N" unused input active-high
        line  44:       "SDA0"       unused   input  active-high
        line  45:       "SCL0"       unused   input  active-high
        line  46: "RGMII_RXCLK" unused input active-high
        line  47: "RGMII_RXCTL" unused input active-high
        line  48: "RGMII_RXD0"       unused   input  active-high
        line  49: "RGMII_RXD1"       unused   input  active-high
        line  50: "RGMII_RXD2"       unused   input  active-high
        line  51: "RGMII_RXD3"       unused   input  active-high
        line  52: "RGMII_TXCLK" unused input active-high
        line  53: "RGMII_TXCTL" unused input active-high
        line  54: "RGMII_TXD0"       unused   input  active-high
        line  55: "RGMII_TXD1"       unused   input  active-high
        line  56: "RGMII_TXD2"       unused   input  active-high
        line  57: "RGMII_TXD3"       unused   input  active-high
この場合、gpiochip1にGPIOがないことが明らかであるため、迷いなくgpiochip0を選ぶことができます。
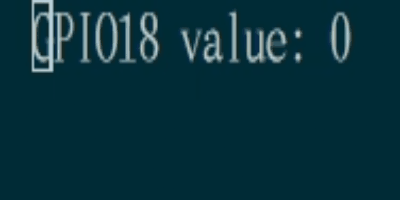
一つのピン
先ずは
import gpiod
import time

# gpiochip0 - 58 lines
gpiochip0 = gpiod.Chip('gpiochip0')
# 	line  18:     "GPIO18"       unused   input  active-high
# gpio18 = gpiochip0.get_line(18) # 数字で指定する場合
gpio18 = gpiochip0.find_line('GPIO18') # 名称で指定する場合

gpio18.request(
    consumer = 'pullup_sample',                 # user-defined name
    type = gpiod.LINE_REQ_DIR_IN,               # input
    flags = gpiod.LINE_REQ_FLAG_BIAS_PULL_UP    # pull up
)

try:
    while True:
        # read GPIO18 value
        gpio18_value = gpio18.get_value()
        print(f'GPIO18 value: {gpio18_value}', end = '\r')

        time.sleep(0.5)
except KeyboardInterrupt:
    gpio18.release()
    print()
    exit(0)
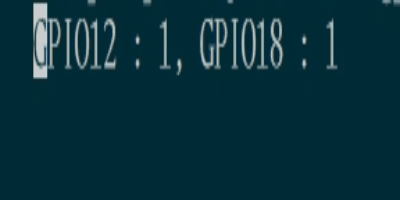
複数のピン
次に、
import gpiod
import time

# gpiochip0 - 58 lines
gpiochip0 = gpiod.Chip('gpiochip0')
# 	line  12:     "GPIO12"       unused   input  active-high
# 	line  18:     "GPIO18"       unused   input  active-high
# lines = gpiochip0.get_lines([12, 18]) # 数字で指定する場合
lines = gpiochip0.find_lines(['GPIO12', 'GPIO18']) # 名称で指定する場合

lines.request(
    consumer = 'pullup_sample',                 # user-defined name
    type = gpiod.LINE_REQ_DIR_IN,               # input
    flags = gpiod.LINE_REQ_FLAG_BIAS_PULL_UP    # pull up
)

try:
    while True:
        # read values
        values = lines.get_values()
        gpio12_value = values[0]
        gpio18_value = values[1]
        print(f'GPIO12 : {gpio12_value}, GPIO18 : {gpio18_value}', end = '\r')

        time.sleep(0.25)
except KeyboardInterrupt:
    lines.release()
    print()
    exit(0)
yield GPIO
import gpiod
import time

def read_gpio_lines():
    # gpiochip0 - 58 lines
    gpiochip0 = gpiod.Chip('gpiochip0')
    # 	line  12:     "GPIO12"       unused   input  active-high
    # 	line  18:     "GPIO18"       unused   input  active-high
    # lines = gpiochip0.get_lines([12, 18])
    lines_list = ['GPIO12', 'GPIO18']
    lines = gpiochip0.find_lines(lines_list)

    lines.request(
        consumer = 'pullup_sample',                 # user-defined name
        type = gpiod.LINE_REQ_DIR_IN,               # input
        flags = gpiod.LINE_REQ_FLAG_BIAS_PULL_UP    # pull up
    )

    try:
        while True:
            # read values
            values = lines.get_values()

            for index, value in enumerate(values):
                if value == 0:
                    yield f'ALERT {lines_list[index]}'

            time.sleep(0.25)
    except KeyboardInterrupt:
        print('release lines')
        lines.release()

alerts = read_gpio_lines()

try:
    while True:
        print(alerts.__next__()) # alerts.__next__() は next(alerts)と同じ?
except Exception:
    print('exit')
    exit(0)
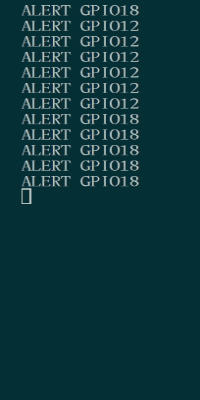
ALERT GPIO18、ALERT GPIO12、と表示されるようになっています。
ここでは唯ALERT GPIO18などと表示しているだけですが、
alerts = read_gpio_lines()
while True:
    print(alerts.__next__())
この通知を基に何か別の処理に繋げることも、これだけ整理されていれば容易になるというものです。
Discussion