【Unity】Androidのローカル通知実装と審査対応
この記事はambr, Inc. Advent Calendar 2024の3日目の記事です。
こんにちは!ambr所属Unityエンジニアのtsyk5です。
今回は、UnityのAndroidアプリにおけるローカル通知の実装方法と審査対応について解説していきます。
はじめに
Unityでのローカル通知は、Unity Mobile Notificationsを使用することで実装可能です。
しかし、OSのネイティブ機能を利用して多機能な通知を実現したい場合、JavaもしくはKotlinでの実装が必要になります。
とは言え、OSの機能を全て挙げるとキリがないので、今回はサンプルプロジェクトを用いて、下記の3つの機能に焦点を当てています。
- Foreground Service
- Broadcast Receiver
- AlarmManager(SCHEDULE_EXACT_ALARM)
これらの機能を軸にバックグラウンド状態で、正確なタイミングかつ任意のSEを鳴らすローカル通知をJavaで実装する方法を紹介していきます。
バックグラウンド通知の実行までの流れ

大まかに、下記のようなフローで作成しました。
- Unity側でバックグラウンド移行を検知し、Javaメソッドを呼び出す
- Serviceを起動し、通知のスケジューリング作成およびライフサイクルを管理する
- Serviceで作成した通知をReceiverで受け取り、通知の送信処理を行う
Unity側ではバックグラウンド時に操作がほぼできないため、バックグラウンド状態になるタイミングでネイティブ側に処理を委譲しています。
サンプルコードとフロー部分の紹介
OnApplicationFocus時(Unity)
private void OnApplicationFocus(bool hasFocus)
{
    using (var notificationService = new AndroidJavaClass("com.sample_company.sample_app.NotificationForegroundService"))
    {
        if (!hasFocus)
        {
            int notifyCount = 3;
            int notifyIntervalSecond = 15;

            // バックグラウンド移行時に、任意の通知回数と通知間隔を設定
            notificationService.CallStatic("startService", _currentActivity, notifyCount, notifyIntervalSecond);
        }
    }
}
Unity側でバックグラウンド検知後、任意の通知回数と通知間隔をServiceに渡しています。
(割愛しましたが、アプリフォーカス時に通知のキャンセル処理を発火させることも重要です)
Service側で通知回数と通知間隔を受け取る(Java)
  public static void startService(Context context, int notifyCount, int notifyIntervalSeconds)
  {
      Intent intent = new Intent(context, NotificationForegroundService.class);
      intent.setAction("START_SERVICE");
      intent.putExtra("extraNotifyCount", notifyCount);
      intent.putExtra("extraNotifyIntervalSeconds", notifyIntervalSeconds);

      if (Build.VERSION.SDK_INT >= Build.VERSION_CODES.O)
      {
          context.startForegroundService(intent);
      }
      else
      {
          context.startService(intent);
      }
  }
Unity側からstartService()を呼び出し、Intentにパラメータとして渡しています。
IntentはServiceにデータを渡すための仕組みで、渡した値を後から取り出すことができます。
Receiverで受け取り、通知の送信処理を行う(Java)
@Override
public void onReceive(Context context, Intent intent)
{
    int notificationId = intent.getIntExtra("notification_id", -1);
    String channel_id = intent.getStringExtra("channel_id");
    sendIntervalNotification(context, notificationId, channel_id);
}

private void sendIntervalNotification(Context context, int notificationId, String channel_id)
{
    // ・・・省略

    // 通知の作成
    NotificationCompat.Builder builder = new NotificationCompat.Builder(context, channel_id)
        .setContentTitle("通知のテスト")
        .setContentText( (notificationId + 1) + " 回目の通知です。")
        .setSmallIcon(context.getResources().getIdentifier("sample_small_icon", "drawable", context.getPackageName()))
        .setLargeIcon(BitmapFactory.decodeResource(context.getResources(), context.getResources().getIdentifier("sample_large_icon", "drawable", context.getPackageName())))
        .setAutoCancel(true)
        .setNumber(0)
        .setPriority(NotificationCompat.PRIORITY_HIGH);

    notificationManager.notify(notificationId, builder.build());
}
Receiverでは、Service側で作成したIntentを基に、実際の通知を発行しています。
NotificationCompatは、上記で使っている通知タイトルやテキスト、アイコンの設定以外にも、バッジの表示やバイブ設定といったことも可能です。
バックグラウンド通知の軸となるネイティブ機能
①Foreground Serviceについて
Foreground Serviceとはバックグラウンドで動作するサービスの一種で、これを使うとバックグラウンドに移行しても継続的に処理を行うことが可能になります。
また、Serviceクラスを継承したサービスが開始されると、Androidシステム側がonStartCommand()を呼び出すという点もポイントです。
サンプルコードでは下記の部分が該当します。
// Unity側から呼び出される`startService()`内で`context.startForegroundService(intent)`を実行しており、
// これによりサービスが起動して`onStartCommand()`がシステム側から呼ばれる
@Override
    public int onStartCommand(Intent intent, int flags, int startId)
    {
      // 中略
      scheduleNotifications();
      startForeground(NOTIFICATION_ID, createForegroundNotification()); // Forground Serviceの開始
      // 中略
      return START_NOT_STICKY;
    }
また、ForegroundServiceを利用する際の注意点として、ユーザーへの通知が義務づけられています。
通知を表示しないと、ポリシー違反になりアプリの公開の拒否や、ストアから削除されるリスクがあるため注意してください。
    private Notification createForegroundNotification()
    {
        NotificationCompat.Builder builder = new NotificationCompat.Builder(this, FOREGROUND_SERVICE_CHANNEL_ID)
            .setContentTitle("Sample Service")
            .setContentText("Foreground service is running...")
            .setPriority(NotificationCompat.PRIORITY_LOW)
            .setSound(null) // 無音
            .setVibrate(new long[]{0L}); // バイブ無し

        return builder.build();
    }
②Broadcast Receiverについて
Broadcast Receiverとは、その名の通りブロードキャストメッセージ(Intent)を受信するためのコンポーネントです。
使い方は非常にシンプルで、クラスにBroadcast Receiverを継承するだけで使用できます。
public class NotificationForegroundReceiver extends BroadcastReceiver {
    @Override
    public void onReceive(Context context, Intent intent)
    {
        // 中略
    }
補足:好きな通知音を設定する方法
少し話が飛躍しますが、Receiverで通知を作成しているので、合わせて任意の音源を鳴らす方法を紹介します。
前述した通り、サンプルコードではService側で通知を管理しており、下記の部分でチャネルを作成しています。
このチャネルを作成する際、デフォルトだとOSの通知音が鳴ってしまうためOFFにしておく必要があります。
private void createNotificationChannels()
    {
      // 中略

      // Unity側で指定した間隔/回数分の通知用チャネル
      NotificationChannel intervalChannel = new NotificationChannel
      (
          INTERVAL_NOTIFICATION_CHANNEL_ID,
          "Interval Notifications",
          NotificationManager.IMPORTANCE_HIGH
      );
      intervalChannel.setSound(null, null); // ここ
      intervalChannel.setShowBadge(false);
    }
デフォルト通知をOFFにしたら、通知を送信する際にMediaPlayerを使用して任意のSEを再生することで、通知と同時に鳴らすことができます。
また、今回の場合はForeground Serviceで音源を使っているため、AndroidManifest.xmlにPermissionを追記する必要があります。
        // サウンドの再生
        Uri soundUri = Uri.parse("android.resource://" + context.getPackageName() + "/raw/sample_sound");
        MediaPlayer mediaPlayer = MediaPlayer.create(context, soundUri);
        if (mediaPlayer != null)
        {
            mediaPlayer.start();
        }
<service android:name="com.sample_company.sample_app.NotificationForegroundService" android:permission="android.permission.FOREGROUND_SERVICE" android:foregroundServiceType="mediaPlayback" android:exported="true"/>
③AlarmManager(SCHEDULE_EXACT_ALARM)について
定期的な通知のスケジューリングを行うには、AlarmManagerで設定可能です。
今回は正確なタイミングで通知を出したいため、setExact()を使用しました。
    private void setExactAlarm(Context context, long triggerAtMillis, PendingIntent operation)
    {
        AlarmManager alarmManager = (AlarmManager) context.getSystemService(Context.ALARM_SERVICE);
        if(alarmManager == null) return;

        if (Build.VERSION.SDK_INT >= Build.VERSION_CODES.S)
        {
            // Android12以降はSCHEDULE_EXACT_ALARM権限がないと正確な時間に通知できないため、権限があるか確認する
            if (alarmManager.canScheduleExactAlarms())
            {
                alarmManager.setExact(AlarmManager.ELAPSED_REALTIME_WAKEUP, triggerAtMillis, operation);
            }
        }
        else
        {
            // Android 12未満の場合はデフォルトで権限があるため、直接setExactを使う
            alarmManager.setExact(AlarmManager.ELAPSED_REALTIME_WAKEUP, triggerAtMillis, operation);
        }
    }
setExact()を使用するには、SCHEDULE_EXACT_ALARMが必要になるためAndroidManifest.xmlに追記が必要です。
<uses-permission android:name="android.permission.SCHEDULE_EXACT_ALARM"/>
こちらのPermissionは、Unity側から許可ダイアログを出せないので、ユーザーにアラームとリマインダーの権限許可を促す必要があります。
その他の注意点
以上、簡単に紹介してきましたが、ここまでの機能は全てのAndroid端末で一律に機能するわけではなく、端末差があります。
またAndroidは、バックグラウンド状態での再生のようなバッテリーを著しく阻害する機能に厳しいため、OSアップデート時にPermission等の取扱いが変わる可能性があります。
他にも、一部端末ではバックグラウンド時に自動でバッテリー制御をしている端末でタスクキルの検知ができないというものがありました。
こちらは端末側の設定で解除できるようですが、複数のデバイスで実機テストするのは現実的ではないですよね。
私も途方に暮れていましたが、下記のサイトに分かりやすくまとまっていたので、ご参考までに共有しておきます。
GooglePlayConsoleでの審査対応
最後に審査対応についても軽く紹介しておきます。
Consoleにaabをアップロードすることで、AndroidManifest.xmlに追加したPermissionが検知されます。
その中にPlayStore公開前に審査が必要なものがある場合、別途対応する必要があります。
今回の場合は、foregroundServiceType="mediaPlayback"が審査の対象となるため、その対応方法について紹介します。
aabアップロード後からの対応の流れ

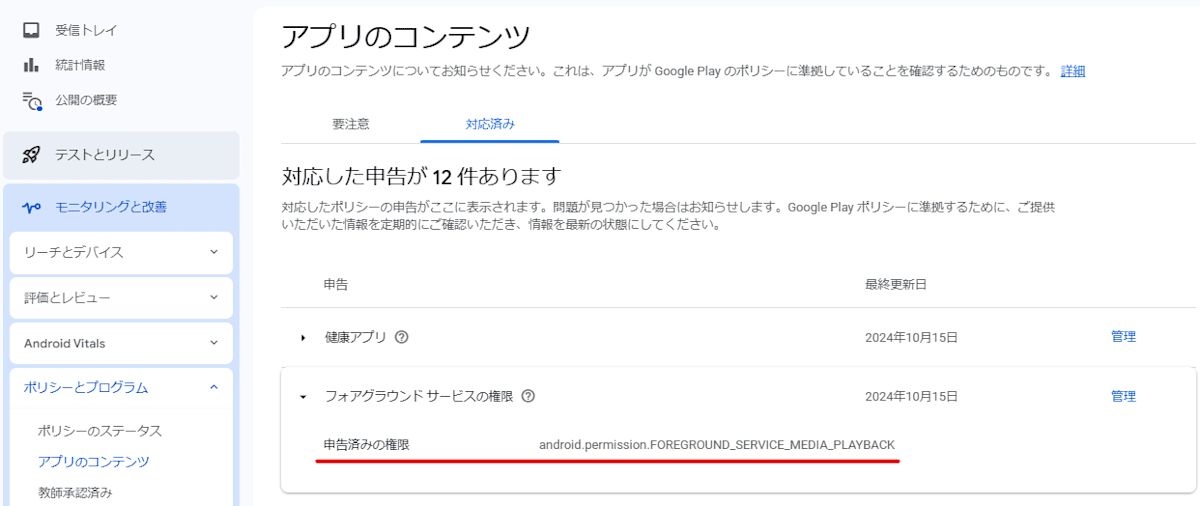
審査承認後は「対応済み」タブから確認可能
GooglePlayConsole側で検知後、上記画像の要注意タブに表示されます。
審査には実際のアプリ画面を撮影した動画のYouTubeのリンクが必要になります。
審査期間は2日程度でした。
まとめ
今回の実装は、Javaの知見が乏しい私にとって大きなチャレンジの1つでした。
実際にトライ&エラーの連続でしたが、小さな機能でも動いたときの感動は忘れられませんね...😿
この記事が、ネイティブ実装に抵抗を感じているUnityエンジニアに少しでも役立てていれば嬉しいです。
Discussion