Kubernetes(K8s)の構築 for Ubuntu24
前書き
趣味で構築したため、間違いやこうあるべきなどの意見があれば教えていただけると幸いです。
1. 環境
1-1. 今回使用するソフトウェアのバージョン一覧
OS:Ubuntu24.04
runC:v1.5.2
cni:1.6.2
containerd:2.0.2
Kubernetes(K8s):1.3.2
2. はじめに
2-1. 背景
仕事でkubernetesを使うことがあり、自宅で使いたく構築を決意。しかし、構築が思ったより難しかったため、備忘録的な意味も含めて記事にしようと思ったことが始まりになります。
3. Kubernetes(K8s)を構築するための前準備
3-1. そもそもKubernetes(K8s)とは?
ざっくりいうとコンテナを管理するオープンソースプロジェクトです。
Dockerなどの単一サーバのコンテナ管理ツールを複数サーバで効率的に管理するためのシステムだと認識しています。(間違っていたらすみません)
細かい説明は以下のqiitaの記事などを見ていただければと思います。
3-2. Kubernetesの構造
Kubernetesを構築するうえで、Kubernetesの構造を知らないと構築時になにをインストールしたらよいかわからず、難航します。
そこで、構造などを調べた結果Kubernetesなどのコンテナシステムは以下のような3層構造になることがわかりました。(違っていたらすみません)
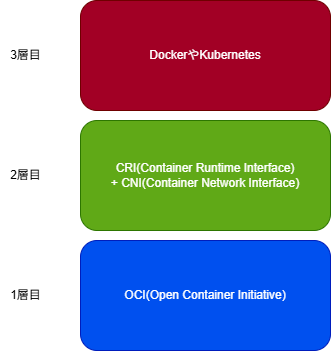
図1. Kubernetesの構造
上記の図を理解しておけば、dockerやnerdctlなどの他のコンテナ環境を構築する際に、どのソフトウェアが必要か迷わずに済みます。
私は上記の構造が理解できず、1度構築を挫折しました。
以下の記事に各用語の説明が記載されています。
3-3. Kubernetes(K8s)を構築するのに必要なソフトウェア
3-2をもとにKubernetesを構築するためには、最低限以下の3つのコンテナ関連のソフトウェアが必要になります。
・OCI(runC)
・CRI(Containerd)
・CNI
※ここで記載しているCNIはcontainerdに設定するCNIになります。そのため、kubernetes構築後に設定するCNI(calicoなど)とは別になります。
以下では3つのソフトウェア並びにKubernetesをインストールする手順を記載します。
4. 前準備
インストールを始める前に、Kubernetesをインストールするために確認事項やOSなどの設定が必要になります。
まずは、Kubernetesの公式サイトのインストール手順を見ておくといいと思います。
例えばですが、以下の画像のようにMACアドレスやhostnameは重複してはいけないという制約があります。(数台の構築であればほぼ被ることはないと思いますが、確認してみてください。)
 |
|---|
| 図2. Kubernetes公式サイトの注意事項(抜粋) |
公式ページにある手順でuuidやnicのmacアドレスが重複していないことを確認してください。念のため、手順を書いておきます。
※今回の記事では、複数nicを搭載したサーバを想定していないため、特定のnicで通信させるなどの設定は検証していません。(本来は想定するべき...)
4-1. kubernetesの注意事項確認
4-1-1. uuidの重複確認
サーバに払い出されたuuidが重複していないか確認します。
$ sudo cat /sys/class/dmi/id/product_uuid
6b863932-e3c7-5549-8ee1-6d9921f27516
6b86から始める文字列が他のサーバと重複していなければいいです。
重複していた場合は、別途調査してください。(被ったことないのですみません...)
4-1-2. nicのmacアドレス重複確認
今度はnicのmacアドレスが重複していないか確認します。
$ ip link
1: lo: <LOOPBACK,UP,LOWER_UP> mtu 65536 qdisc noqueue state UNKNOWN mode DEFAULT group default qlen 1000
    link/loopback 00:00:00:00:00:00 brd 00:00:00:00:00:00
2: enp0s3: <BROADCAST,MULTICAST,UP,LOWER_UP> mtu 1500 qdisc fq_codel state UP mode DEFAULT group default qlen 1000
    link/ether 08:00:27:88:f9:eb brd ff:ff:ff:ff:ff:ff
上記のコマンドの結果のenp0s3のlink/etherの[08:00:27:88:f9:eb]になります。
4-1-3. 通信用ポートの確認
Kubernetesでは6443ポートを使用するため、6443ポートが使われていないか確認します。
下記コマンドで「Connection refused」と出れば使われていない可能性が高いです。
$ nc 127.0.0.1 6443 -zv -w 2
nc: connect to 127.0.0.1 port 6443 (tcp) failed: Connection refused
4-1-4. カーネルモジュール等の設定変更
kubernetesをインストールするために、カーネル周りの設定を変更する必要があるため、そちらも設定します。
まず、overlayとbr_netfilterのカーネルモジュールをロードします。
$ cat <<EOF | sudo tee /etc/modules-load.d/k8s.conf
overlay
br_netfilter
EOF
カーネルモジュールの有効化
$ sudo modprobe overlay
$ sudo modprobe br_netfilter
カーネルモジュールの有効化確認
$ lsmod | grep br_netfilter
br_netfilter           32768  0
bridge                421888  1 br_netfilter

$ lsmod | grep overlay
overlay               212992  10
「lsmod | grep overlay」と「lsmod | grep br_netfilter」を実行して対象モジュールが表示されていればいいです。
次にネットワーク関連のカーネル設定を変更します。
$ cat <<EOF | sudo tee /etc/sysctl.d/k8s.conf
net.bridge.bridge-nf-call-iptables  = 1
net.bridge.bridge-nf-call-ip6tables = 1
net.ipv4.ip_forward                 = 1
EOF
設定追加後、反映させます。
$ sudo sysctl --system
設定反映後に以下のコマンドを実行して「net.bridge.bridge-nf-call-iptables」と「net.bridge.bridge-nf-call-ip6tables」の値が1になっていればよいです。
$ sysctl net.bridge.bridge-nf-call-iptables net.bridge.bridge-nf-call-ip6tables
net.bridge.bridge-nf-call-iptables = 1
net.bridge.bridge-nf-call-ip6tables = 1
4-2. aptパッケージのアップデート
$ sudo apt update
$ sudo apt upgrade -y
4-3. swapの無効
次にswapを無効にします。
これもKubernetes公式サイトのインストール手順に無効にする旨が書かれています。
4-3-1. fstabファイルのバックアップ
fstabはOS起動に必要なファイルのため、書き換えミスがあってもいいようにバックアップを作成します。
$ ls -l /etc/fstab*
-rw-r--r-- 1 root root 37 Feb 15 17:09 /etc/fstab

$ sudo cp -p /etc/fstab /etc/fstab_`date +%Y%m%d`
$ ls -l /etc/fstab*
-rw-r--r-- 1 root root 37 Feb 15 17:09 /etc/fstab
-rw-r--r-- 1 root root 37 Feb 15 17:09 /etc/fstab_20250314
4-3-2. Swapの無効
viコマンド等で/swap.imgと記載されている行をコメント化してください。
$ sudo vi /etc/fstab
4-3-3. Swapの削除
$ sudo rm /swap.img
削除できない場合が再起動などをして再度削除してみてください。
5. Containerdのインストール
ここからコンテナ関連のソフトウェアをインストールしていきます。
Containerdのインストールはaptでインストールすることも可能ですが、今回はGitHubにあるバイナリを使用していきます。(Dockerのリポジトリを追加すればできます。)
私はDockerのリポジトリを追加するのが嫌だっただけなので、ご自由にインストールしてください。
下記サイトにContainerdのインストール手順が記載されています。runCなどの手順やそのほかの手順も記載されています。一読してみてもいいと思います。
5-1. Containerdのダウンロードとインストール
5-1-2. Cotainerdのダウンロード
$ curl -OL https://github.com/containerd/containerd/releases/download/v2.0.2/containerd-2.0.2-linux-amd64.tar.gz
  % Total    % Received % Xferd  Average Speed   Time    Time     Time  Current
                                 Dload  Upload   Total   Spent    Left  Speed
  0     0    0     0    0     0      0      0 --:--:-- --:--:-- --:--:--     0
100 35.1M  100 35.1M    0     0  8236k      0  0:00:04  0:00:04 --:--:-- 10.2M
5-1-3. Containerdのインストール
$ sudo tar Cxzvf /usr/local containerd-2.0.2-linux-amd64.tar.gz
bin/
bin/ctr
bin/containerd
bin/containerd-stress
bin/containerd-shim-runc-v2
5-2. Containerdのサービスファイルの作成とサービス設定
Containerdはサービス起動が必要なため、サービスファイルの作成とサービス設定が必要です。(これもaptで入れれば手順を省略できます。)
5-2-1. Containerdのサービスファイルの作成
下記のサイトでサービスファイルのテンプレートがあるため、このファイルをダウンロードしてきます。
$ sudo curl -Lo /etc/systemd/system/containerd.service https://raw.githubusercontent.com/containerd/containerd/main/containerd.service
  % Total    % Received % Xferd  Average Speed   Time    Time     Time  Current
                                 Dload  Upload   Total   Spent    Left  Speed
100  1248  100  1248    0     0   2788      0 --:--:-- --:--:-- --:--:--  2791

$ ls -l /etc/systemd/system/containerd.service
-rw-r--r-- 1 root root 1248 Mar 14 10:01 /etc/systemd/system/containerd.service
5-2-2. Containerdのサービス設定
$ sudo systemctl daemon-reload
$ sudo systemctl enable --now containerd
Created symlink /etc/systemd/system/multi-user.target.wants/containerd.service → /etc/systemd/system/containerd.service.
サービス設定後Containerdのサービスが起動(Active)になっていればいいです。
$ sudo systemctl status containerd
● containerd.service - containerd container runtime
     Loaded: loaded (/etc/systemd/system/containerd.service; enabled; preset: enabled)
     Active: active (running) since Fri 2025-03-14 10:09:56 JST; 42s ago
       Docs: https://containerd.io
    Process: 2723 ExecStartPre=/sbin/modprobe overlay (code=exited, status=1/FAILURE)
   Main PID: 2724 (containerd)
      Tasks: 32
     Memory: 78.6M ()
     CGroup: /system.slice/containerd.service
             └─2724 /usr/local/bin/containerd
Containerdのインストールは以上になります。
6. runCのインストール
次にrunCをインストールしていきます。
runCもバイナリをOSに展開するため、以下のサイトでリリースされているバージョンを確認する必要があります。今回はv1.5.2を使用します。
6-1. runCのダウンロード
$ curl -OL https://github.com/opencontainers/runc/releases/download/v1.2.5/runc.amd64
  % Total    % Received % Xferd  Average Speed   Time    Time     Time  Current
                                 Dload  Upload   Total   Spent    Left  Speed
  0     0    0     0    0     0      0      0 --:--:-- --:--:-- --:--:--     0
100 10.6M  100 10.6M    0     0  5108k      0  0:00:02  0:00:02 --:--:-- 6572k
6-2. runCのインストール
$ sudo mkdir -p /opt/runc
$ sudo install -m 755 runc.amd64 /opt/runc
$ ls -l /opt/runc
total 10912
-rwxr-xr-x 1 root root 11172320 Mar 14 10:18 runc.amd64
インストールしたrunCのシンボリックリンクを作成する
$ sudo ln -s /opt/runc/runc.amd64 /usr/local/sbin/runc
$ ls -l /usr/local/sbin/runc
lrwxrwxrwx 1 root root 20 Mar 14 10:19 /usr/local/sbin/runc -> /opt/runc/runc.amd64
7. CNI(Container Networking Interface)のインストール
CNIのインストールも同様にバイナリをOSに展開します。下記参考にリリースされたバージョンがあるため、確認して下さい。今回は1.6.2を使用します。
$ sudo mkdir -p /opt/cni/bin
$ curl -OL https://github.com/containernetworking/plugins/releases/download/v1.6.2/cni-plugins-linux-amd64-v1.6.2.tgz
  % Total    % Received % Xferd  Average Speed   Time    Time     Time  Current
                                 Dload  Upload   Total   Spent    Left  Speed
  0     0    0     0    0     0      0      0 --:--:-- --:--:-- --:--:--     0
100 50.3M  100 50.3M    0     0  11.6M      0  0:00:04  0:00:04 --:--:-- 14.9M
$ sudo tar Cxzvf /opt/cni/bin cni-plugins-linux-amd64-v1.6.2.tgz
./
./ipvlan
./tap
./loopback
./host-device
./README.md
./portmap
./ptp
./vlan
./bridge
./firewall
./LICENSE
./macvlan
./dummy
./bandwidth
./vrf
./tuning
./static
./dhcp
./host-local
./sbr
8. Containerdの初期設定
次に、Containerdの初期設定をしていきます。
以下のコマンドもaptでインストールした場合は手順を省けるはずです。
$ sudo mkdir -p /etc/containerd/
$ sudo containerd config default | sudo tee /etc/containerd/config.toml >/dev/null
$ sudo ls -l /etc/containerd/*
-rw-r--r-- 1 root root 6836 Mar 14 10:26 /etc/containerd/config.toml

$ sudo systemctl restart containerd

$ sudo systemctl status containerd
● containerd.service - containerd container runtime
     Loaded: loaded (/etc/systemd/system/containerd.service; enabled; preset: enabled)
     Active: active (running) since Fri 2025-03-14 10:26:33 JST; 10s ago
       Docs: https://containerd.io
    Process: 14290 ExecStartPre=/sbin/modprobe overlay (code=exited, status=0/SUCCESS)
   Main PID: 14292 (containerd)
      Tasks: 31
     Memory: 95.3M ()
     CGroup: /system.slice/containerd.service
             └─14292 /usr/local/bin/containerd
9. Kubernetesのインストール
8章まででKubernetesをインストールするためのソフトウェアたちのインストールが完了しました。
Kubernetesではなくnerdctlなどを構築したい場合はここからnerdctlをインストールしていけばいいです。今回はKubernetesを構築するため以下に手順を示します。
9-1. kubernetesのインストール
Kuberntesはaptのデフォルトリポジトリにないため、リポジトリを追加してインストールします。
apt upgradeなどで勝手にアップデートされると動かなくなる可能性があるため、バージョンは固定します。
$ sudo apt install -y apt-transport-https ca-certificates curl gpg
$ sudo mkdir -p -m 755 /etc/apt/keyrings
$ sudo curl -fsSL https://pkgs.k8s.io/core:/stable:/v1.32/deb/Release.key | sudo gpg --dearmor -o /etc/apt/keyrings/kubernetes-apt-keyring.gpg
$ sudo echo 'deb [signed-by=/etc/apt/keyrings/kubernetes-apt-keyring.gpg] https://pkgs.k8s.io/core:/stable:/v1.32/deb/ /' | sudo tee /etc/apt/sources.list.d/kubernetes.list
deb [signed-by=/etc/apt/keyrings/kubernetes-apt-keyring.gpg] https://pkgs.k8s.io/core:/stable:/v1.32/deb/ /

$ sudo apt update
$ sudo apt install -y kubelet kubeadm kubectl
$ sudo apt-mark hold kubelet kubeadm kubectl
kubelet set on hold.
kubeadm set on hold.
kubectl set on hold.
9-2. コンテナ間通信用設定
次に、コンテナ間通信などで必要な設定を追加します。
/etc/crictl.yamlに以下の設定を追加してください。
runtime-endpoint: unix:///run/containerd/containerd.sock
$ sudo vi /etc/crictl.yaml
-
+ runtime-endpoint: unix:///run/containerd/containerd.sock
権限の更新とcontainerdの再起動
サービス再起動後containerdがActiveになっていればいいです。
$ sudo chmod 644 /etc/crictl.yaml
$ sudo systemctl restart containerd
$ sudo systemctl status containerd
● containerd.service - containerd container runtime
     Loaded: loaded (/etc/systemd/system/containerd.service; enabled; preset: enabled)
     Active: active (running) since Thu 2025-04-24 05:19:41 UTC; 8min ago
       Docs: https://containerd.io
    Process: 2034 ExecStartPre=/sbin/modprobe overlay (code=exited, status=0/SUCCESS)
   Main PID: 2037 (containerd)
      Tasks: 9
     Memory: 13.5M (peak: 17.3M)
        CPU: 1.868s
     CGroup: /system.slice/containerd.service
             └─2037 /usr/local/bin/containerd
9-3. grub(cgroup)の設定
次に、cgroupの設定を変更します。
以下の手順はcgroup v2の手順になります。cgroup v1は手順が異なるため、調べてください。
以下の手順はgrubを変更するため、ミスがあるとOSが起動しなくなる可能性があるため気をつけて操作してください。
/etc/default/grubファイルを以下のように変更します。
- GRUB_CMDLINE_LINUX=""
+ GRUB_CMDLINE_LINUX="systemd.unified_cgroup_hierarchy=1"
grub設定後設定内容を反映させます。
$ sudo update-grub
Sourcing file `/etc/default/grub'
Generating grub configuration file ...
Found linux image: /boot/vmlinuz-6.8.0-58-generic
Found initrd image: /boot/initrd.img-6.8.0-58-generic
Warning: os-prober will not be executed to detect other bootable partitions.
Systems on them will not be added to the GRUB boot configuration.
Check GRUB_DISABLE_OS_PROBER documentation entry.
Adding boot menu entry for UEFI Firmware Settings ...
done
doneが出れば成功です。
10. (余談)MasterNodeの初期設定
上記まででkubernetesのインストールは完了しています。
kubernetesのMasterNodeの初期化やWorkerNodeの追加等はできているので、とりあえず動くと思います。kubernetesの設定やpod間通信用のプラグイン(FlannelやCalico)などの設定手順は気が向いたら書こうと思います。
以下に、[kubeadm init]を実行した結果を書いておきます。
以下のような出力になれば問題なく初期がができていると思います。
$ sudo kubeadm init
I0424 05:44:57.641292    2466 version.go:261] remote version is much newer: v1.33.0; falling back to: stable-1.32
[init] Using Kubernetes version: v1.32.4
[preflight] Running pre-flight checks
[preflight] Pulling images required for setting up a Kubernetes cluster
[preflight] This might take a minute or two, depending on the speed of your internet connection
[preflight] You can also perform this action beforehand using 'kubeadm config images pull'
W0424 05:44:58.659701    2466 checks.go:846] detected that the sandbox image "" of the container runtime is inconsistent with that used by kubeadm.It is recommended to use "registry.k8s.io/pause:3.10" as the CRI sandbox image.
[certs] Using certificateDir folder "/etc/kubernetes/pki"
[certs] Generating "ca" certificate and key
[certs] Generating "apiserver" certificate and key
[certs] apiserver serving cert is signed for DNS names [kubernetes kubernetes.default kubernetes.default.svc kubernetes.default.svc.cluster.local] and IPs [xxx.xxx.xxx.xxx xxx.xxx.xxx.xxx]
[certs] Generating "apiserver-kubelet-client" certificate and key
[certs] Generating "front-proxy-ca" certificate and key
[certs] Generating "front-proxy-client" certificate and key
[certs] Generating "etcd/ca" certificate and key
[certs] Generating "etcd/server" certificate and key
[certs] etcd/server serving cert is signed for DNS names [kubernetes localhost] and IPs [192.168.239.229 127.0.0.1 ::1]
[certs] Generating "etcd/peer" certificate and key
[certs] etcd/peer serving cert is signed for DNS names [kubernetes localhost] and IPs [192.168.239.229 127.0.0.1 ::1]
[certs] Generating "etcd/healthcheck-client" certificate and key
[certs] Generating "apiserver-etcd-client" certificate and key
[certs] Generating "sa" key and public key
[kubeconfig] Using kubeconfig folder "/etc/kubernetes"
[kubeconfig] Writing "admin.conf" kubeconfig file
[kubeconfig] Writing "super-admin.conf" kubeconfig file
[kubeconfig] Writing "kubelet.conf" kubeconfig file
[kubeconfig] Writing "controller-manager.conf" kubeconfig file
[kubeconfig] Writing "scheduler.conf" kubeconfig file
[etcd] Creating static Pod manifest for local etcd in "/etc/kubernetes/manifests"
[control-plane] Using manifest folder "/etc/kubernetes/manifests"
[control-plane] Creating static Pod manifest for "kube-apiserver"
[control-plane] Creating static Pod manifest for "kube-controller-manager"
[control-plane] Creating static Pod manifest for "kube-scheduler"
[kubelet-start] Writing kubelet environment file with flags to file "/var/lib/kubelet/kubeadm-flags.env"
[kubelet-start] Writing kubelet configuration to file "/var/lib/kubelet/config.yaml"
[kubelet-start] Starting the kubelet
[wait-control-plane] Waiting for the kubelet to boot up the control plane as static Pods from directory "/etc/kubernetes/manifests"
[kubelet-check] Waiting for a healthy kubelet at http://127.0.0.1:10248/healthz. This can take up to 4m0s
[kubelet-check] The kubelet is healthy after 1.005062548s
[api-check] Waiting for a healthy API server. This can take up to 4m0s
[api-check] The API server is healthy after 12.003570303s
[upload-config] Storing the configuration used in ConfigMap "kubeadm-config" in the "kube-system" Namespace
[kubelet] Creating a ConfigMap "kubelet-config" in namespace kube-system with the configuration for the kubelets in the cluster
[upload-certs] Skipping phase. Please see --upload-certs
[mark-control-plane] Marking the node kubernetes as control-plane by adding the labels: [node-role.kubernetes.io/control-plane node.kubernetes.io/exclude-from-external-load-balancers]
[mark-control-plane] Marking the node kubernetes as control-plane by adding the taints [node-role.kubernetes.io/control-plane:NoSchedule]
[bootstrap-token] Using token: xxxxx.xxxxxxxxxxxxxxxxx
[bootstrap-token] Configuring bootstrap tokens, cluster-info ConfigMap, RBAC Roles
[bootstrap-token] Configured RBAC rules to allow Node Bootstrap tokens to get nodes
[bootstrap-token] Configured RBAC rules to allow Node Bootstrap tokens to post CSRs in order for nodes to get long term certificate credentials
[bootstrap-token] Configured RBAC rules to allow the csrapprover controller automatically approve CSRs from a Node Bootstrap Token
[bootstrap-token] Configured RBAC rules to allow certificate rotation for all node client certificates in the cluster
[bootstrap-token] Creating the "cluster-info" ConfigMap in the "kube-public" namespace
[kubelet-finalize] Updating "/etc/kubernetes/kubelet.conf" to point to a rotatable kubelet client certificate and key
[addons] Applied essential addon: CoreDNS
[addons] Applied essential addon: kube-proxy

Your Kubernetes control-plane has initialized successfully!

To start using your cluster, you need to run the following as a regular user:

  mkdir -p $HOME/.kube
  sudo cp -i /etc/kubernetes/admin.conf $HOME/.kube/config
  sudo chown $(id -u):$(id -g) $HOME/.kube/config

Alternatively, if you are the root user, you can run:

  export KUBECONFIG=/etc/kubernetes/admin.conf

You should now deploy a pod network to the cluster.
Run "kubectl apply -f [podnetwork].yaml" with one of the options listed at:
  https://kubernetes.io/docs/concepts/cluster-administration/addons/

Then you can join any number of worker nodes by running the following on each as root:

kubeadm join xxx.xxx.xxx.xxx:6443 --token xxxxxxxxxxxxxxxx \
        --discovery-token-ca-cert-hash sha256:xxxxxxxxxxxxxxxxxxxxxxxxxxxxxxxxxxxxxxxxxx
参考文献
Discussion