【AWS】Amplify・Vue3での認証機能構築方法
はじめに
AWS Amplify と Vue.3 系を使った Web アプリケーションの構築方法を記事にします。
今回は認証画面を作成するところまでが対象です。
Vue3 になってからの認証機能のカスタマイズ方法の記事数がまだそれほど多くない印象でしたのでその辺りも扱っています。
公式サイトを見るのに慣れてないのだけども、個人の記事は Vue2 系の内容が多くて困ってる!
といった方に参考になればと思い作成しました。
ぜひご活用ください 🙇
この記事でわかること
この記事を読む上での前提条件
この記事で取り扱わないこと
環境情報
- @aws-amplify/cli 12.0.0
- npm 8.9.0
- node 18.2.0
- @vue/cli 5.0.8
- vue ^3.2.13
- git version 2.39.2
- OS macOS ventura 13.4
GitHub
Amplify に認証機能を追加する
Amplify では認証機能をコマンド 1 つで構築可能です。
また、Amplify の認証機能は Cognito を使って実装されていますのでその辺りも確認してみます。
また Amplify の環境構築がまだの人は以下の記事を参照し構築を済ませてから実施ください。
では、以下のコマンドを実行ください。対話形式で各種設定項目を選択していきます。
$ amplify add auth
Cognito の設定の項目の選択方法を問われます。
ひとまず試したい方は Default configuration を選択すればこちらで終了ですが、今回はもう少し深掘りしたいのと今後 OAuth や SSO の実装を見越して Manual configuration で細かく設定していきます。
Using service: Cognito, provided by: awscloudformation

 The current configured provider is Amazon Cognito.

 Do you want to use the default authentication and security configuration?
  Default configuration
  Default configuration with Social Provider (Federation)
❯ Manual configuration
  I want to learn more.
使いたい認証サービスの種類を選択するよう問われます。
今回は User Sign-Up & Sign-In only (Best used with a cloud API only) を選択して Enter⏎ を押してください。
 Select the authentication/authorization services that you want to use:
  User Sign-Up, Sign-In, connected with AWS IAM controls (Enables per-user Storage features for images or other content, Analytics, and more)
❯ User Sign-Up & Sign-In only (Best used with a cloud API only)
  I want to learn more.
リソース(Cognito)のラベル名を入力するよう問われます。
今回はデフォルトで表示されている値をそのまま使うのでそのまま Enter⏎ を押します。
Provide a friendly name for your resource that will be used to label this category in the project: (appXXXXXX)
ユーザプール名の入力を問われます。
回はデフォルトで表示されている値をそのまま使うのでそのまま Enter⏎ を押します。
Provide a name for your user pool: (appXXX_userpool_XXX)
ユーザの Sign in 時に使用する項目を選択するよう問われます。
今回は Email を選択して Enter⏎ を押します。
※こちらは一度設定すると変更不可の項目になります。
Warning: you will not be able to edit these selections.
 How do you want users to be able to sign in?
  Username
❯ Email
  Phone Number
  Email or Phone Number
  I want to learn more.
ユーザプールグループの作成有無の選択を問われます。
今回は使用予定はないので No を選択し Enter⏎ を押します。
Do you want to add User Pool Groups?
  Yes
❯ No
  I want to learn more.
ユーザやグループへの追加などを管理する admin queries API を使用するかを問われます。
使用予定はないので No を選択し Enter⏎ を押します。
Do you want to add an admin queries API?
  Yes
❯ No
  I want to learn more.
多要素認証(MFA)の設定をするかを問われます。
ひとまず必要ないので OFF を選択し Enter⏎ を押します。
Multifactor authentication (MFA) user login options: (Use arrow keys)
❯ OFF
  ON (Required for all logins, can not be enabled later)
  OPTIONAL (Individual users can use MFA)
  I want to learn more.
ユーザ登録、パスワード再設定を可能にするかどうかを問われます。
今回は Enabled (Requires per-user email entry at registration) を選択し Enter⏎ を押します。
 Email based user registration/forgot password: (Use arrow keys)
❯ Enabled (Requires per-user email entry at registration)
  Disabled (Uses SMS/TOTP as an alternative)
メールでのコード認証の件名を入力するよう問われます。
今回はデフォルトで表示されている値でそのまま Enter⏎ を押します。
Specify an email verification subject: (Your verification code)
メールでのコード認証の本文メッセージを入力するよう問われます。
今回はデフォルトで表示されている値でそのまま Enter⏎ を押します。
Specify an email verification message: (Your verification code is {####})
パスワードポリシーを上書き設定するかを問われます。
ひとまずなしで良いので N を入力して Enter⏎ を押します。
Do you want to override the default password policy for this User Pool? (y/N) N
Sign up 時に設定が必要な属性値を複数選択するよう問われます。
Email のみを選択し、Enter⏎ を押します。
※こちらは一度設定すると変更不可の項目になります。
 Warning: you will not be able to edit these selections.
 What attributes are required for signing up? (Press <space> to select, <a> to toggle all, <i> to invert selection)
❯◉ Email
 ◯ Family Name (This attribute is not supported by Login With Amazon.)
 ◯ Middle Name (This attribute is not supported by Google, Login With Amazon, Sign in with Apple.)
 ◯ Gender (This attribute is not supported by Login With Amazon, Sign in with Apple.)
 ◯ Locale (This attribute is not supported by Facebook, Google, Sign in with Apple.)
 ◯ Given Name (This attribute is not supported by Login With Amazon.)
 ◯ Name
 ◯ Nickname (This attribute is not supported by Facebook, Google, Login With Amazon, Sign in with Apple.)
 ◯ Phone Number (This attribute is not supported by Facebook, Login With Amazon, Sign in with Apple.)
 ◯ Preferred Username (This attribute is not supported by Facebook, Google, Login With Amazon, Sign in with Apple.)
❯◯ Picture (This attribute is not supported by Login With Amazon, Sign in with Apple.)
 ◯ Profile (This attribute is not supported by Facebook, Google, Login With Amazon, Sign in with Apple.)
 ◯ Updated At (This attribute is not supported by Google, Login With Amazon, Sign in with Apple.)
 ◯ Website (This attribute is not supported by Facebook, Google, Login With Amazon, Sign in with Apple.)
 ◯ Zone Info (This attribute is not supported by Facebook, Google, Login With Amazon, Sign in with Apple.)
 ◯ Address (This attribute is not supported by Facebook, Google, Login With Amazon, Sign in with Apple.)
 ◯ Birthdate (This attribute is not supported by Login With Amazon, Sign in with Apple.)
アプリケーションのリクレッシュトークンの期限入力するよう問われます。
デフォルトで入力されている 30 のままで Enter⏎ を押します。
Specify the app's refresh token expiration period (in days): (30)
app で読み/書き可能なユーザの属性を指定するかどうかを問われます。
いったん必要ないので N で Enter⏎ を押します。
Do you want to specify the user attributes this app can read and write? (y/N) N
いくつかのオプションの機能を追加するかどうか選択を問われます。
必要になったら追加で良いのでひとまず何も選択せずに Enter⏎ を押します。
 Do you want to enable any of the following capabilities? (Press <space> to select, <a> to toggle all, <i> to invert selection)
❯◯ Add Google reCaptcha Challenge
 ◯ Email Verification Link with Redirect
 ◯ Add User to Group
 ◯ Email Domain Filtering (denylist)
 ◯ Email Domain Filtering (allowlist)
 ◯ Custom Auth Challenge Flow (basic scaffolding - not for production)
 ◯ Override ID Token Claims
OAuth フローを使うかの選択を問われます。
こちらは Yes を選択し Enter⏎ を押します。
 Do you want to use an OAuth flow? (Use arrow keys)
❯ Yes
  No
  I want to learn more.
Cognito で使用されるドメイン名を入力するよう問われます。
適宜入力し Enter⏎ を押します(今回はデフォルトで表示された値をそのまま採用してます)
What domain name prefix do you want to use? (app55448cb5-55448cb5)
Sign in 後のリダイレクト URL を入力するよう問われます。
amplify hosting && amplify publish した時にドメインが振られますのでそちらの URL を入力し Enter⏎ を押します。
※ Amplify は末尾の / が必要ですのでそちらをお忘れなく
Enter your redirect signin URI: https://dev.XXX.amplifyapp.com/
他の Sign in 後のリダイレクト先を指定するかを問われます。
特段必要ないので N を選択し Enter⏎ を押します。
? Do you want to add another redirect signin URI (y/N) N
Sign out 後のリダイレクト URL を入力するよう問われます。
amplify hosting && amplify publish した時にドメインが振られますのでそちらの URL を入力し Enter⏎ を押します。
※ Amplify は末尾の / が必要ですのでそちらをお忘れなく
Enter your redirect signout URI: https://dev.XXX.amplifyapp.com/
他の Sign out 後のリダイレクト先を指定するかを問われます。
特段必要ないので N を選択し Enter⏎ を押します。
? Do you want to add another redirect signout URI (y/N) N
OAuth フローでの grant type の選択を問われます。
Authorization code grant を選択し Enter⏎ を押します。
 Select the OAuth flows enabled for this project. (Use arrow keys)
❯ Authorization code grant
  Implicit grant
OAuth のスコープ範囲を選択するよう問われます。
そのまま全項目選択の状態で Enter⏎ を押します。
 Select the OAuth scopes enabled for this project. (Press <space> to select, <a> to toggle all, <i> to invert selection)
❯◉ Phone
 ◉ Email
 ◉ OpenID
 ◉ Profile
 ◉ aws.cognito.signin.user.admin
認証に使用するソーシャルプロバイダを選択するよう問われます。
ひとまずは選択なしでそのまま Enter⏎ を押します。
 Select the social providers you want to configure for your user pool: (Press <space> to select, <a> to toggle all, <i> to invert selection)
❯◯ Facebook
 ◯ Google
 ◯ Login With Amazon
 ◯ Sign in with Apple
Cognito の Lambda トリガーを設定するかを問われます。
使用予定はないので n を選択し Enter⏎ を押します。
? Do you want to configure Lambda Triggers for Cognito? (Y/n) n
以下のメッセージが表示されれば設定完了です。
✅ Successfully added auth resource appXXXXXX locally

✅ Some next steps:
"amplify push" will build all your local backend resources and provision it in the cloud
"amplify publish" will build all your local backend and frontend resources (if you have hosting category added) and provision it in the cloud
設定が完了したら以下のコマンドでデプロイします
$ amplify push
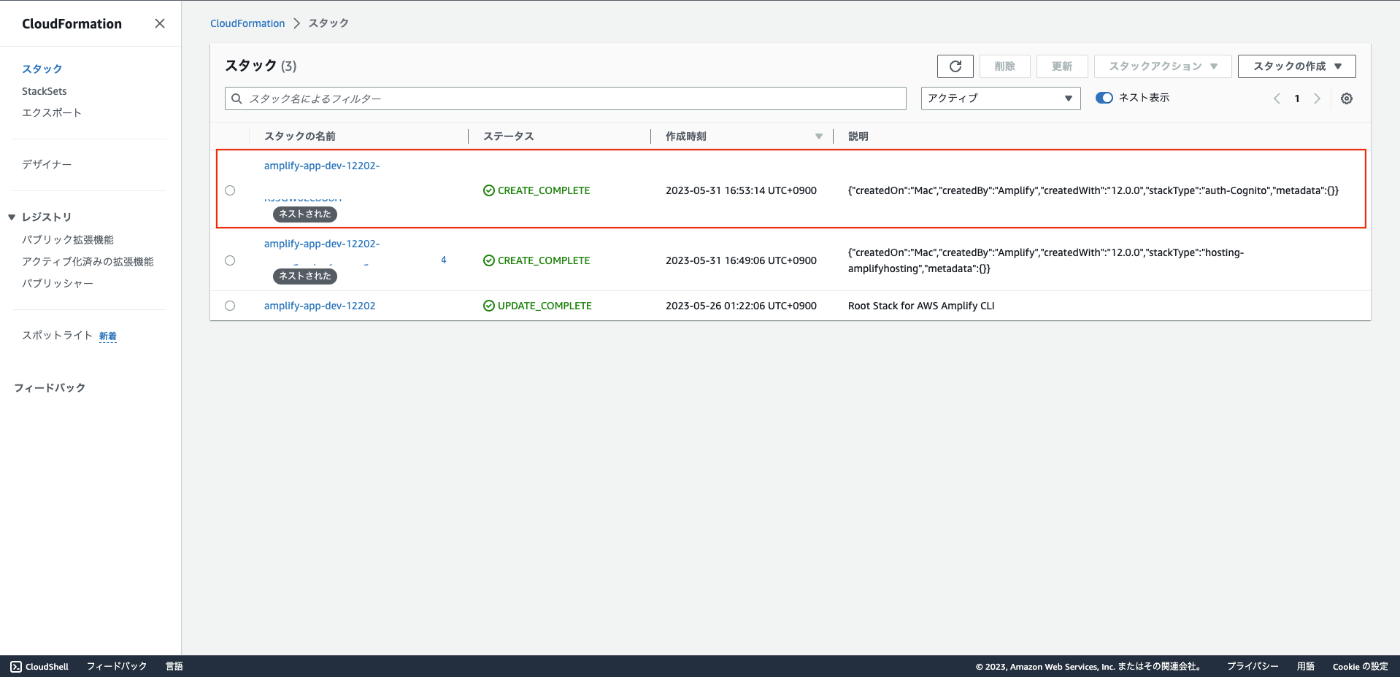
CloudFormation で諸々 Cognito のユーザプール設定やロールが作成されたことが確認できます。
CloudFormation(長いので折りたたみ)
{
  "Description": "Root Stack for AWS Amplify CLI",
  "AWSTemplateFormatVersion": "2010-09-09",
  "Parameters": {
    "DeploymentBucketName": {
      "Type": "String",
      "Default": "DeploymentBucket",
      "Description": "Name of the common deployment bucket provided by the parent stack"
    },
    "AuthRoleName": {
      "Type": "String",
      "Default": "AuthRoleName",
      "Description": "Name of the common deployment bucket provided by the parent stack"
    },
    "UnauthRoleName": {
      "Type": "String",
      "Default": "UnAuthRoleName",
      "Description": "Name of the common deployment bucket provided by the parent stack"
    }
  },
  "Outputs": {
    "Region": {
      "Description": "CloudFormation provider root stack Region",
      "Value": {
        "Ref": "AWS::Region"
      },
      "Export": {
        "Name": {
          "Fn::Sub": "${AWS::StackName}-Region"
        }
      }
    },
    "StackName": {
      "Description": "CloudFormation provider root stack ID",
      "Value": {
        "Ref": "AWS::StackName"
      },
      "Export": {
        "Name": {
          "Fn::Sub": "${AWS::StackName}-StackName"
        }
      }
    },
    "StackId": {
      "Description": "CloudFormation provider root stack name",
      "Value": {
        "Ref": "AWS::StackId"
      },
      "Export": {
        "Name": {
          "Fn::Sub": "${AWS::StackName}-StackId"
        }
      }
    },
    "AuthRoleArn": {
      "Value": {
        "Fn::GetAtt": ["AuthRole", "Arn"]
      }
    },
    "UnauthRoleArn": {
      "Value": {
        "Fn::GetAtt": ["UnauthRole", "Arn"]
      }
    },
    "DeploymentBucketName": {
      "Description": "CloudFormation provider root stack deployment bucket name",
      "Value": {
        "Ref": "DeploymentBucketName"
      },
      "Export": {
        "Name": {
          "Fn::Sub": "${AWS::StackName}-DeploymentBucketName"
        }
      }
    },
    "AuthRoleName": {
      "Value": {
        "Ref": "AuthRole"
      }
    },
    "UnauthRoleName": {
      "Value": {
        "Ref": "UnauthRole"
      }
    }
  },
  "Resources": {
    "DeploymentBucket": {
      "Type": "AWS::S3::Bucket",
      "Properties": {
        "BucketName": {
          "Ref": "DeploymentBucketName"
        },
        "BucketEncryption": {
          "ServerSideEncryptionConfiguration": [
            {
              "ServerSideEncryptionByDefault": {
                "SSEAlgorithm": "AES256"
              }
            }
          ]
        }
      },
      "UpdateReplacePolicy": "Retain",
      "DeletionPolicy": "Retain"
    },
    "AuthRole": {
      "Type": "AWS::IAM::Role",
      "Properties": {
        "AssumeRolePolicyDocument": {
          "Version": "2012-10-17",
          "Statement": [
            {
              "Sid": "",
              "Effect": "Deny",
              "Principal": {
                "Federated": "cognito-identity.amazonaws.com"
              },
              "Action": "sts:AssumeRoleWithWebIdentity"
            }
          ]
        },
        "RoleName": {
          "Ref": "AuthRoleName"
        }
      }
    },
    "UnauthRole": {
      "Type": "AWS::IAM::Role",
      "Properties": {
        "AssumeRolePolicyDocument": {
          "Version": "2012-10-17",
          "Statement": [
            {
              "Sid": "",
              "Effect": "Deny",
              "Principal": {
                "Federated": "cognito-identity.amazonaws.com"
              },
              "Action": "sts:AssumeRoleWithWebIdentity"
            }
          ]
        },
        "RoleName": {
          "Ref": "UnauthRoleName"
        }
      }
    },
    "hostingamplifyhosting": {
      "Type": "AWS::CloudFormation::Stack",
      "Properties": {
        "TemplateURL": "https://s3.amazonaws.com/amplify-app-dev-12202-deployment/amplify-cfn-templates/hosting/amplifyhosting-template.json",
        "Parameters": {
          "appId": "XXXXX",
          "type": "manual",
          "env": "dev"
        }
      }
    },
+    "authappea4ba3cdea4ba3cd": {
+      "Type": "AWS::CloudFormation::Stack",
+      "Properties": {
+        "TemplateURL": "https://s3.amazonaws.com/amplify-app-dev-12202-deployment/amplify-cfn-templates/auth/appXXXXXX-cloudformation-template.json",
+        "Parameters": {
+          "resourceNameTruncated": "appeXXXXXX",
+          "userPoolName": "appXXX_userpool_XXX",
+          "autoVerifiedAttributes": "email",
+          "mfaConfiguration": "OFF",
+          "mfaTypes": "SMS Text Message",
+          "smsAuthenticationMessage": "Your authentication code is {####}",
+          "smsVerificationMessage": "Your verification code is {####}",
+          "emailVerificationSubject": "Your verification code",
+          "emailVerificationMessage": "Your verification code is {####}",
+          "defaultPasswordPolicy": false,
+          "passwordPolicyMinLength": 8,
+          "passwordPolicyCharacters": "",
+          "requiredAttributes": "email",
+          "aliasAttributes": "",
+          "userpoolClientGenerateSecret": false,
+          "userpoolClientRefreshTokenValidity": 30,
+          "userpoolClientWriteAttributes": "email",
+          "userpoolClientReadAttributes": "email",
+          "userpoolClientLambdaRole": "appXXX_userpoolclient_lambda_role",
+          "userpoolClientSetAttributes": false,
+          "sharedId": "XXX",
+          "resourceName": "appXXXXXX",
+          "authSelections": "userPoolOnly",
+          "useDefault": "manual",
+          "usernameAttributes": "email",
+          "userPoolGroups": false,
+          "adminQueries": false,
+          "triggers": "{}",
+          "hostedUI": true,
+          "hostedUIDomainName": "appXXXXXX",
+          "authProvidersUserPool": "",
+          "hostedUIProviderMeta": "[]",
+          "oAuthMetadata": "{\"AllowedOAuthFlows\":[\"code\"],\"AllowedOAuthScopes\":[\"phone\",\"email\",\"openid\",\"profile\",\"aws.cognito.signin.user.admin\"],\"CallbackURLs\":[\"https://dev.d2dc9tdpp5wmu7.amplifyapp.com/\"],\"LogoutURLs\":[\"https://dev.XXXXXX.amplifyapp.com/\"]}",
+          "userPoolGroupList": "",
+          "serviceName": "Cognito",
+          "usernameCaseSensitive": false,
+          "useEnabledMfas": true,
+          "authRoleArn": {
+            "Fn::GetAtt": ["AuthRole", "Arn"]
+          },
+          "unauthRoleArn": {
+            "Fn::GetAtt": ["UnauthRole", "Arn"]
+          },
+          "breakCircularDependency": true,
+          "dependsOn": "",
+          "hostedUIProviderCreds": "[]",
+          "env": "dev"
+        }
+      }
+    }
  }
}
AWS 内からでも詳細を諸々確認可能です。
既に amplify add auth した Cognito に対して変更を行う場合は以下のコマンドを使用ください。
$ amplify update auth
項目説明内で米印などで記載した、作成後に変更不可の項目を変更したい場合は以下のコマンドで一度 auth を削除してから作成しなおしてください。
$ amplify remove auth
amplify ライブラリのインストール
フロント画面を実装していく上で今後使う amplify のライブラリをインストールしておきます。
$ npm install aws-amplify
【非推奨】@aws-amplify/ui-components での認証画面の作成
認証機能のための設定が完了しましたので画面に組み込んでみます。
Amplify では専用の UI コンポーネントが用意されています。
それでは試していきます。
まずは Amplify の UI コンポーネントを使ってみます。
以下のコマンドからインストールを実行します。
$ npm install @aws-amplify/ui-components
インストールが完了したら main.js に以下の修正を加えます。
import { createApp } from "vue";
import App from "./App.vue";
import { Amplify } from "aws-amplify";
import aws_exports from "./aws-exports";
import {
  applyPolyfills,
  defineCustomElements,
} from "@aws-amplify/ui-components/loader";

Amplify.configure(aws_exports);
applyPolyfills().then(() => {
  defineCustomElements(window);
});

createApp(App).mount("#app");
main.js 内で各種設定・ライブラリの読み込みを行いましたので App.vue に以下の変更を加えます。
<template>
  <amplify-authenticator>
    <img alt="Vue logo" src="./assets/logo.png" />
    <HelloWorld msg="Welcome to Your Vue.js App" />
  </amplify-authenticator>
</template>

<script>
import HelloWorld from "./components/HelloWorld.vue";

export default {
  name: "App",
  components: {
    HelloWorld,
  },
};

</script>

<style>
#app {
  font-family: Avenir, Helvetica, Arial, sans-serif;
  -webkit-font-smoothing: antialiased;
  -moz-osx-font-smoothing: grayscale;
  text-align: center;
  color: #2c3e50;
  margin-top: 60px;
}
</style>
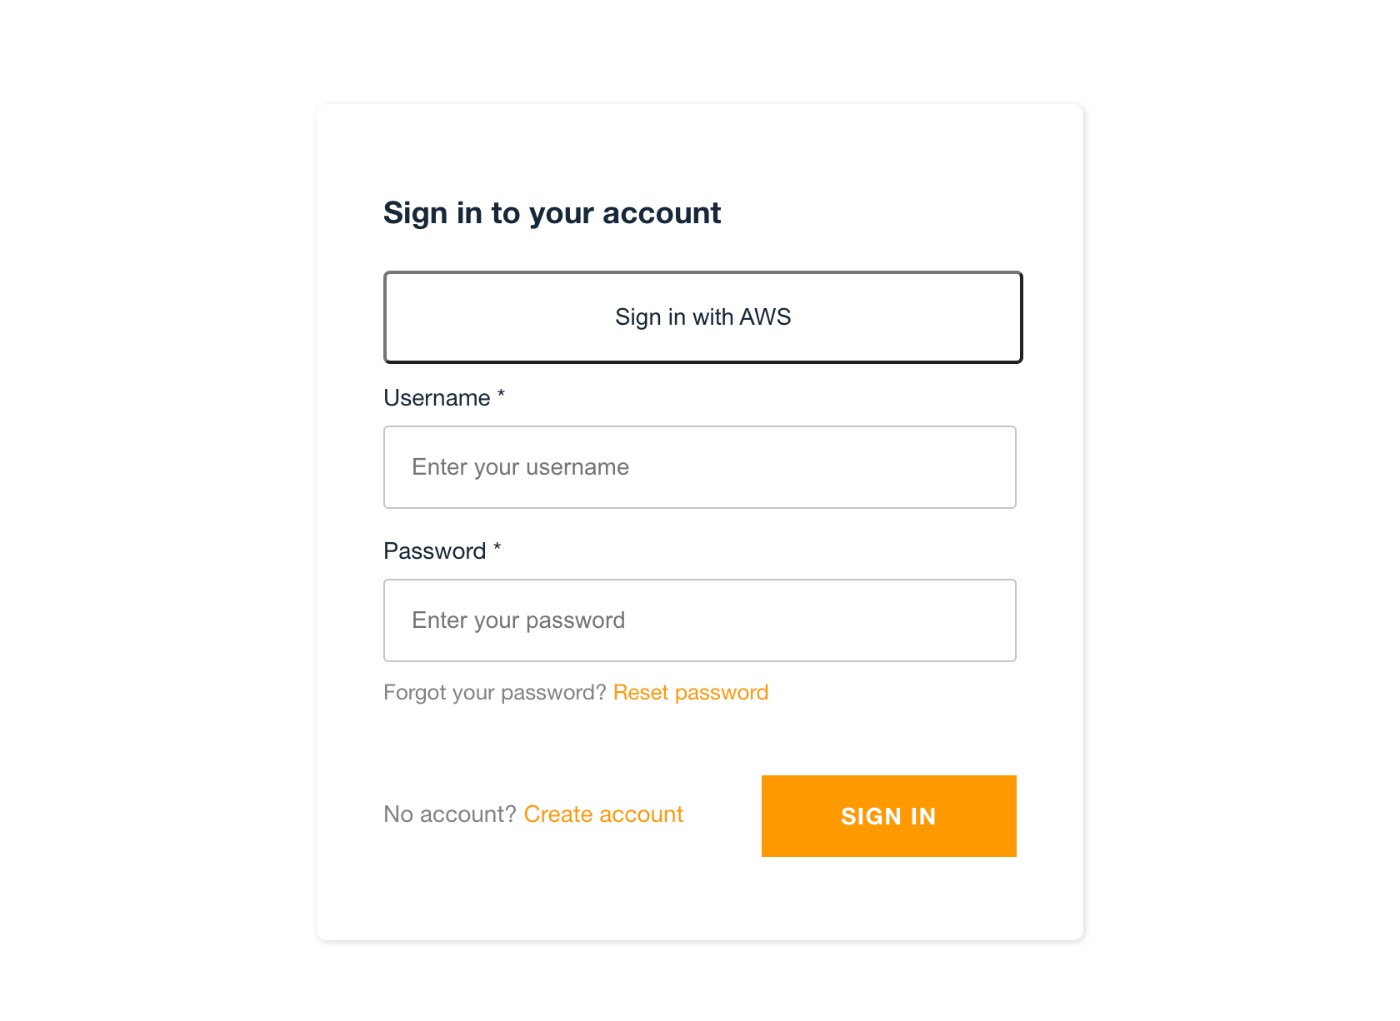
<amplify-authenticator> で囲むだけで認証機能を実装できます。
npm run serve を実行し localhost:8080 にアクセスすると以下の画面が表示されます。
@aws-amplify/ui-vue での認証画面の作成
Vue3 と Amplify でのアプリ開発に使用されるライブラリになります。
まずは以下のコマンドでライブラリのインストールを行います。
$ npm install @aws-amplify/ui-vue
インストールが完了したら main.js に以下の変更を加えます。
import { createApp } from "vue";
import App from "./App.vue";
import { Amplify } from "aws-amplify";
import aws_exports from "./aws-exports";
-import {
-  applyPolyfills,
-  defineCustomElements,
-} from "@aws-amplify/ui-components/loader";

Amplify.configure(aws_exports);
-applyPolyfills().then(() => {
-  defineCustomElements(window);
-});

createApp(App).mount("#app");
App.vue は以下にまるまる書き換えてください。
<template>
  <authenticator>
    <img alt="Vue logo" src="./assets/logo.png" />
    <HelloWorld msg="Welcome to Your Vue.js App" />
  </authenticator>
</template>

<script setup>
import HelloWorld from "./components/HelloWorld.vue";
import { Authenticator } from "@aws-amplify/ui-vue";
import "@aws-amplify/ui-vue/styles.css";
</script>

<style>
#app {
  font-family: Avenir, Helvetica, Arial, sans-serif;
  -webkit-font-smoothing: antialiased;
  -moz-osx-font-smoothing: grayscale;
  text-align: center;
  color: #2c3e50;
  margin-top: 60px;
}
</style>
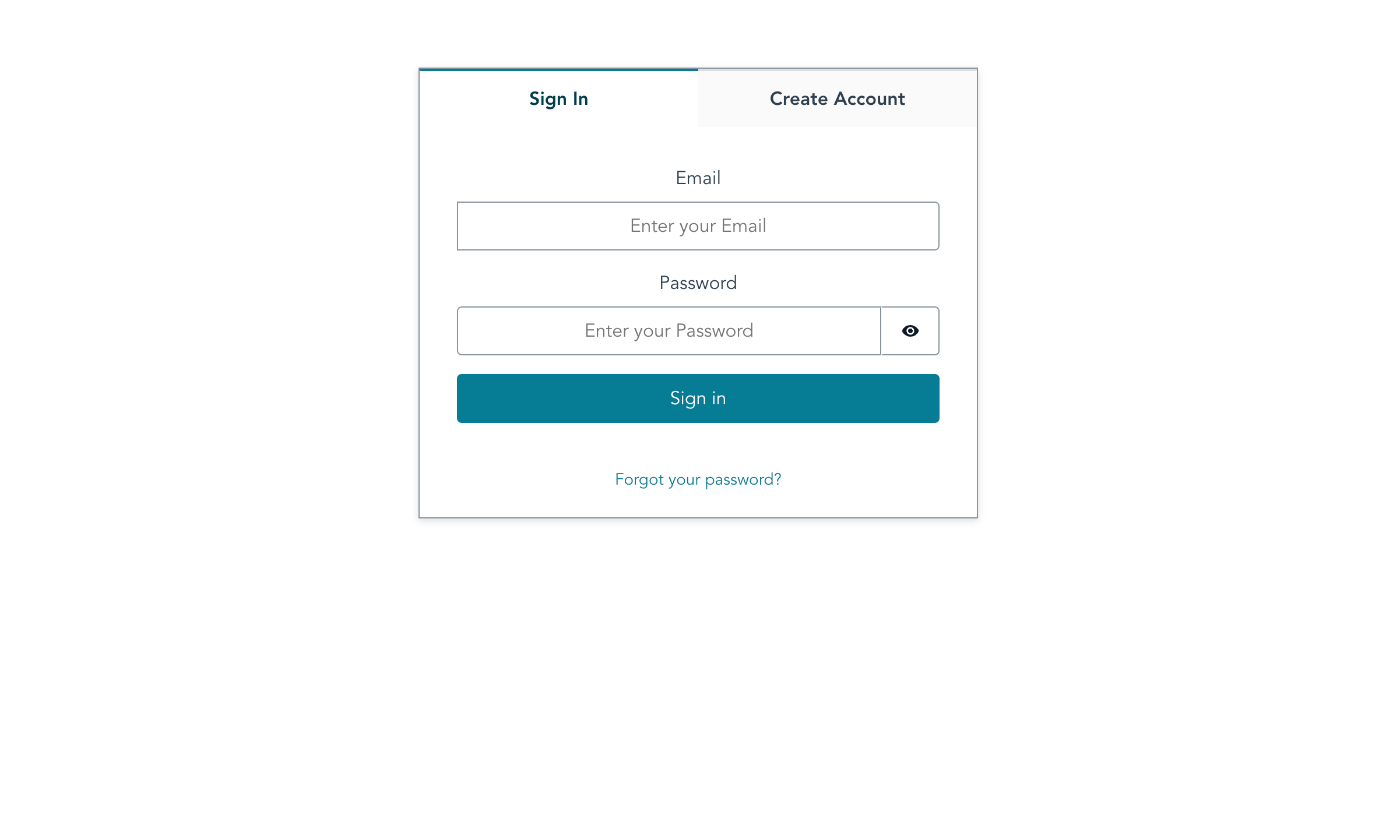
npm run serve を実行し localhost:8080 にアクセスすると以下の画面が表示されます。
認証処理の仕組みを確認
冒頭で Amplify の認証には Cognito が使用されると言いましたので登録処理を行い確認してみます。
イメージが湧きやすいように以下の記述を App.vue に追記してください。
import HelloWorld from "./components/HelloWorld.vue";
import { Authenticator } from "@aws-amplify/ui-vue";
import "@aws-amplify/ui-vue/styles.css";
+import { Hub } from "aws-amplify";
+
+const listener = (data) => {
+  const { payload } = data;
+  console.log(payload.data);
+  switch (payload.event) {
+    case "configured":
+      console.log(`event: ${payload.event}`);
+      break;
+    case "signIn":
+      console.log(`event: ${payload.event}`);
+      break;
+    case "signIn_failure":
+      console.log(`event: ${payload.event}`);
+      break;
+    case "signUp":
+      console.log(`event: ${payload.event}`);
+      break;
+    case "signUp_failure":
+      console.log(`event: ${payload.event}`);
+      break;
+    case "confirmSignUp":
+      console.log(`event: ${payload.event}`);
+      break;
+    case "completeNewPassword_failure":
+      console.log(`event: ${payload.event}`);
+      break;
+    case "autoSignIn":
+      console.log(`event: ${payload.event}`);
+      break;
+    case "autoSignIn_failure":
+      console.log(`event: ${payload.event}`);
+      break;
+    case "forgotPassword":
+      console.log(`event: ${payload.event}`);
+      break;
+    case "forgotPassword_failure":
+      console.log(`event: ${payload.event}`);
+      break;
+    case "forgotPasswordSubmit":
+      console.log(`event: ${payload.event}`);
+      break;
+    case "forgotPasswordSubmit_failure":
+      console.log(`event: ${payload.event}`);
+      break;
+    case "verify":
+      console.log(`event: ${payload.event}`);
+      break;
+    case "tokenRefresh":
+      console.log(`event: ${payload.event}`);
+      break;
+    case "tokenRefresh_failure":
+      console.log(`event: ${payload.event}`);
+      break;
+    case "cognitoHostedUI":
+      console.log(`event: ${payload.event}`);
+      break;
+    case "cognitoHostedUI_failure":
+      console.log(`event: ${payload.event}`);
+      break;
+    case "customOAuthState":
+      console.log(`event: ${payload.event}`);
+      break;
+    case "customState_failure":
+      console.log(`event: ${payload.event}`);
+      break;
+    case "parsingCallbackUrl":
+      console.log(`event: ${payload.event}`);
+      break;
+    case "userDeleted":
+      console.log(`event: ${payload.event}`);
+      break;
+    case "updateUserAttributes":
+      console.log(`event: ${payload.event}`);
+      break;
+    case "updateUserAttributes_failure":
+      console.log(`event: ${payload.event}`);
+      break;
+    case "signOut":
+      console.log(`event: ${payload.event}`);
+      break;
+  }
+};
+Hub.listen("auth", listener);
認証に関わる通信をリスンする処理です。(参考)
こちらで試しにまだサインアップしてない状態でログインを試してみますと以下の結果になります。

レスポンスとして POST https://cognito-idp.us-east-1.amazonaws.com/ 400 と Cognito の URL から 400 が返されることも確認できますし、先ほど仕込んだコンソールから ./node_modules/amazon-cognito-identity-js/es/Client.js から Exception がスローされたことも確認できますね。
Client.js も少しだけ覗いてみると以下のような endpoint を設定して fetch する準備をしているところからも Cognito の API を使用して認証をしようとしていることが推察できます。
  function Client(region, endpoint, fetchOptions) {
    this.endpoint = endpoint || "https://cognito-idp." + region + ".amazonaws.com/";
    var _ref = fetchOptions || {},
      credentials = _ref.credentials;
    this.fetchOptions = credentials ? {
      credentials: credentials
    } : {};
  }
サインアップを実行してみると以下のような流れになります。

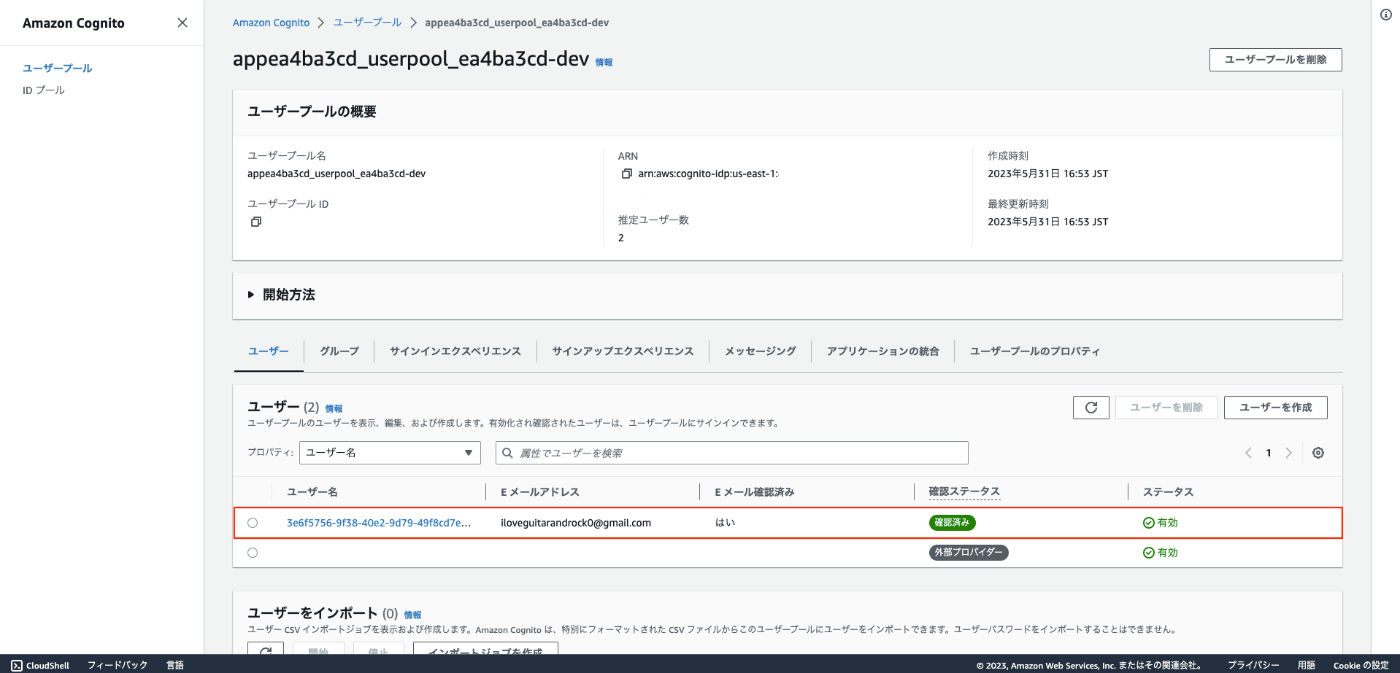
コンソール内の event が signUp → confirmSignUp → signIn → autoSignIn の順番で発生しそれぞれに CognitoUser が使用されていることが確認できます。
実際に Cognito の画面を確認してもユーザープールに追加されていることが確認できます。
画面のカスタマイズ
認証画面をカスタマイズしたい方はコンポーネントの機能を継承したままコンポーネントへの要素の追加やテキストの変更などを行えます。
ドキュメントは以下です。
いくつかピックアップして確認していってみます。
認証画面のヘッダー・フッターに要素を追加する。
v-slot を使用することで CSS や JS にコードを追加することなくカスタマイズ可能です。
こちらは目で確認した方が早いですので App.vue に以下の変更を加えた上で確認ください。
<template>
  <authenticator>
    <!-- ここから追加 -->
    <template v-slot:header>
      <div style="padding: var(--amplify-space-large); text-align: center">
        <img
          class="amplify-image"
          alt="Amplify logo"
          src="https://docs.amplify.aws/assets/logo-dark.svg"
        />
      </div>
    </template>
    <template v-slot:sign-in-header>
      <h3
        class="amplify-heading"
        style="padding: var(--amplify-space-xl) 0 0 var(--amplify-space-xl)"
      >
        ID / Password でのログイン
      </h3>
    </template>
    <template v-slot:footer>
      <div style="padding: var(--amplify-space-large); text-align: center">
        <p class="amplify-text" style="color: var(--amplify-colors-neutral-80)">
          © All Rights Reserved
        </p>
      </div>
    </template>
    <!-- ここまで追加 -->

    <template v-slot="{ signOut, user }">
      <img alt="Vue logo" src="./assets/logo.png" />
      <HelloWorld :user="user" />
      <button @click="signOut">Sign Out</button>
    </template>
  </authenticator>
</template>
追加内容は以下のように反映されます。

サインアップを非表示にする
コンシューマでなくエンタープライズのアプリケーションの場合、サインアップは自由にできず管理者が登録処理を行うようにするといった要件は頻出です。
Amplify では以下の CSS を追加することでサインアップ画面を非表示にすることが可能です。
<style>
/* 追加 */
.amplify-tabs {
  display: none;
}
</style>
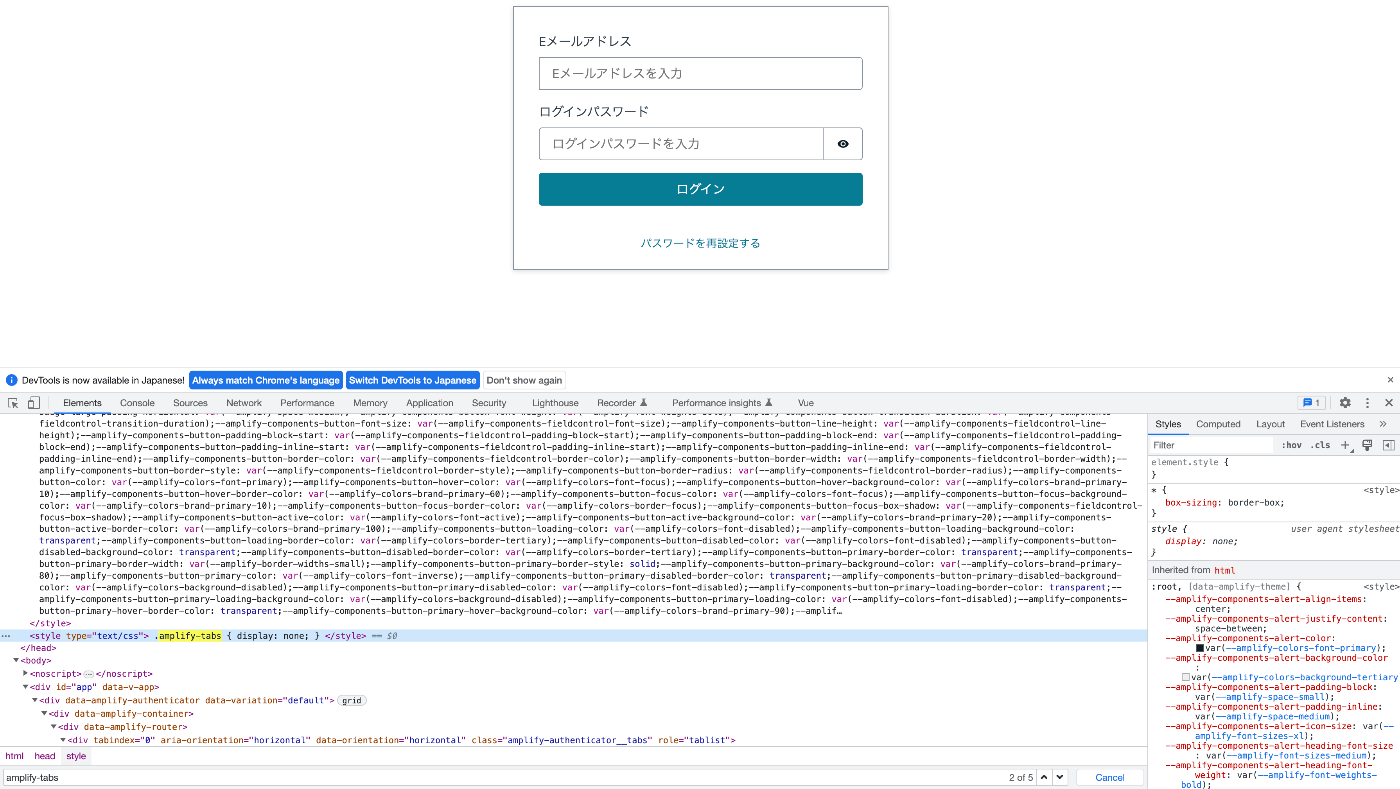
ただ、これでは CSS 上で .amplify-tabs を非表示にしているだけですので要素検証して対象要素の設定を変更してしまえばサインアップ画面を表示させることが可能です。
完全に機能として無くしたい場合は後続の「認証 API のオーバーライド」にてサインアップの API は何も処理しないようにオーバーライドするよう組み合わせることで実現可能になると思います。
日本語対応
amplify のライブラリに組み込まれている I18n モジュールを使用してカスタマイズします。
App.vue に以下の変更を加えてください。
import HelloWorld from "./components/HelloWorld.vue";
-import { Authenticator,translations } from "@aws-amplify/ui-vue";
import "@aws-amplify/ui-vue/styles.css";
import { Hub } from "aws-amplify";
+import { Authenticator, translations } from "@aws-amplify/ui-vue";
+import { I18n } from "aws-amplify";
+I18n.putVocabularies(translations);
+I18n.setLanguage("ja");
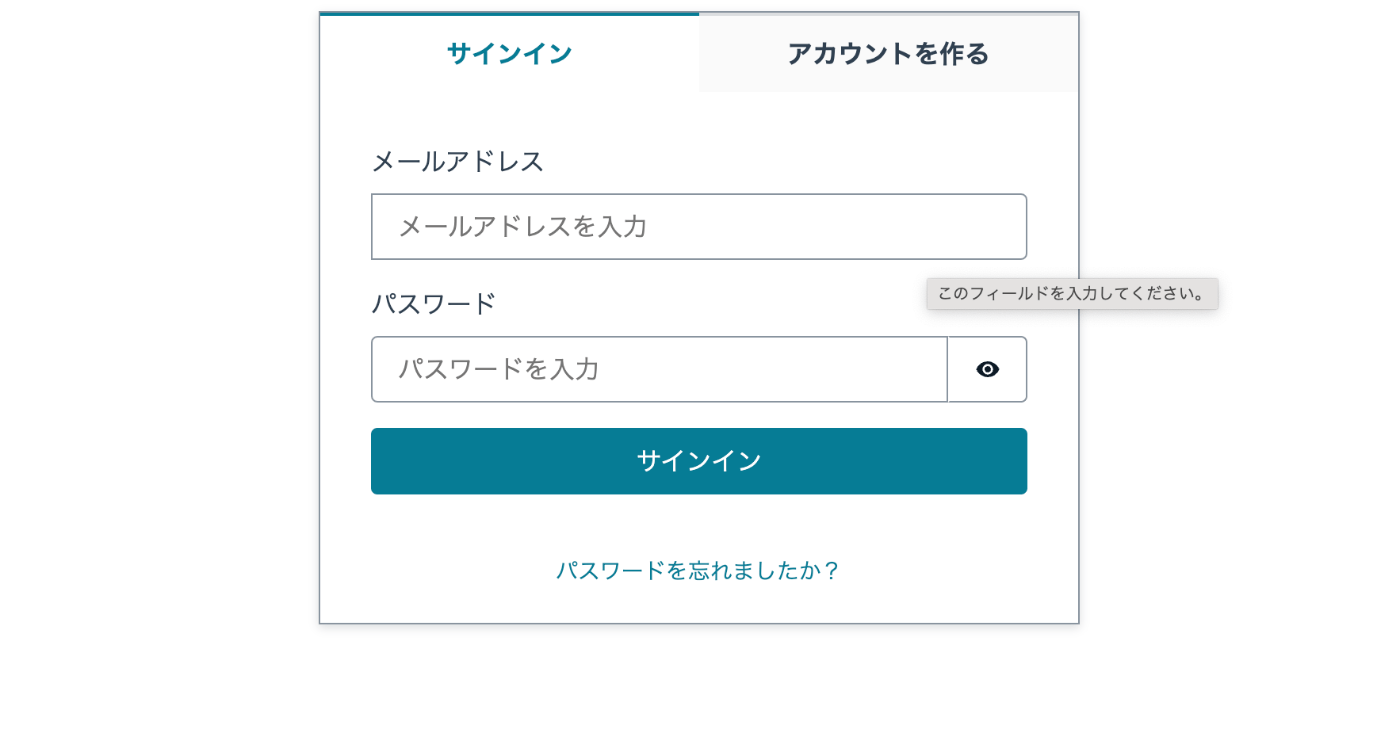
全体的によしなに日本語に翻訳されていますが、一部のテキストを変更したいなどの要望が出た時に変更することも可能です。
試しにサインイン画面の文言を変更してみます。以下の編集を加えてください。
import HelloWorld from "./components/HelloWorld.vue";
import "@aws-amplify/ui-vue/styles.css";
import { Hub } from "aws-amplify";
import { Authenticator, translations } from "@aws-amplify/ui-vue";
import { I18n } from "aws-amplify";
I18n.putVocabularies(translations);
I18n.setLanguage("ja");
+I18n.putVocabularies({
+  ja: {
+    "Sign In": "ログイン",
+    "Create Account": "アカウント作成",
+    Email: "Eメールアドレス",
+    "Enter your Email": "Eメールアドレスを入力",
+    Password: "ログインパスワード",
+    "Enter your Password": "ログインパスワードを入力",
+    "Sign in": "ログイン",
+    "Forgot your password?": "パスワードを再設定する",
+  },
+});
テキストが切り替わったことが確認できます。

以下の書き方でも OK です。
import HelloWorld from "./components/HelloWorld.vue";
import "@aws-amplify/ui-vue/styles.css";
import { Hub } from "aws-amplify";
import { Authenticator, translations } from "@aws-amplify/ui-vue";
import { I18n } from "aws-amplify";
I18n.putVocabularies(translations);
I18n.putVocabulariesForLanguage("ja", {
  "Sign In": "ログイン",
  "Create Account": "アカウント作成",
  Email: "Eメールアドレス",
  "Enter your Email": "Eメールアドレスを入力",
  Password: "ログインパスワード",
  "Enter your Password": "ログインパスワードを入力",
  "Sign in": "ログイン",
  "Forgot your password?": "パスワードを再設定する",
});
変更できるテキストの一覧はこちらから確認ください。
ログアウト機能を追加する
ログアウト機能も特段実装することなく追加可能です。
App.vue に以下の変更を加えます。
<template>
  <authenticator>
    <template v-slot="{ signOut }"> <!-- 追加 -->
      <img alt="Vue logo" src="./assets/logo.png" />
      <HelloWorld msg="Welcome to Your Vue.js App" />
      <button @click="signOut">Sign Out</button> <!-- 追加 -->
    </template> <!-- 追加 -->
  </authenticator>
</template>
ロジックを書くことなくこれだけで OK です。
認証 API のオーバーライド
既に一通りの認証機能は実装できました。
しかし、何がしかのイベントが発生した時に何がしかのロジックを組み込みたい。と言った要望も頻繁にあると思います(例えば、サインアップが完了した時に外部 API を叩くなど)
そんな時にメソッドをオーバーライドする機能が ui-vue では提供されているのでそちらを使用していきます。
やり方は特定の Auth API に対して決まった関数名を定義してあげその関数内で処理を記述するだけです。
Auth API は例えばこちらに記載されている Auth.signUp です。
各種 API に対してのオーバーライドするための関数名のマッピングは以下です。
| API | オーバーライド関数名 | フォームデータ |
|---|---|---|
| Auth.signUp | handleSignUp | {username, password, attributes } |
| Auth.signIn | handleSignIn | {username, password} |
| Auth.confirmSignIn | handleConfirmSignIn | {user, code, mfaType} |
| Auth.confirmSignUp | handleConfirmSignUp | {username, code} |
| Auth.forgotPassword | handleForgotPassword | {username} |
| Auth.forgotPasswordSubmit | handleForgotPasswordSubmit | {username, code, password} |
試しにAuth.signInした時のメソッドをオーバライドしてみます。
まず、App.vue に以下の変更を加えてください。
<template>
  <authenticator>
    <template v-slot="{ signOut, user }"> <!-- 変更 -->
      <img alt="Vue logo" src="./assets/logo.png" />
      <HelloWorld :user="user" /> <!-- 変更 -->
      <button @click="signOut">Sign Out</button>
    </template>
  </authenticator>
</template>
次に HelloWorld.vue に以下の変更を加えてください。
<template>
  <div class="hello">
    <h1>{{ user.attributes.email }}</h1> <!-- 変更 -->
    <!-- 省略 -->
  </div>
</template>

<script>
export default {
  name: "HelloWorld",
  // 変更
  props: {
    user: {
      type: Object,
    },
  },
};
</script>
元々は親コンポーネントから Welcome to Your Vue.js App と文字列を渡していた Props を amplify で認証した user オブジェクトを渡しアドレスを表示するようにする修正です。
ui-vue ではこの user はこちら側で定義しなくても内部的に参照可能な変数として保持していますが、こちらをオーバライドして明示的に返した時に同じ挙動になるのかを確認してみます。
App.vue に以下の変更を加えてください。
import HelloWorld from "./components/HelloWorld.vue";
import "@aws-amplify/ui-vue/styles.css";
-import { Hub } from "aws-amplify";
+import { Hub, Auth } from "aws-amplify";
import { Authenticator, translations } from "@aws-amplify/ui-vue";
import { I18n } from "aws-amplify";
I18n.putVocabularies(translations);
I18n.setLanguage("ja");
I18n.putVocabularies({
  ja: {
    "Sign In": "ログイン",
    "Create Account": "アカウント作成",
    Email: "Eメールアドレス",
    "Enter your Email": "Eメールアドレスを入力",
    Password: "ログインパスワード",
    "Enter your Password": "ログインパスワードを入力",
    "Sign in": "ログイン",
    "Forgot your password?": "パスワードを再設定する",
  },
});

+const services = {
+  async handleSignIn(formData) {
+    const { username, password } = formData;
+    try {
+      return await Auth.signIn(username, password);
+    } catch (error) {
+      console.log("error signing in", error);
+    }
+  },
+};
テンプレート側には以下の記述を追加します。
<template>
  <authenticator :services="services"> <!-- 変更 -->
    <!-- 省略 -->
    <template v-slot="{ signOut, user }">
      <img alt="Vue logo" src="./assets/logo.png" />
      <HelloWorld :user="user" />
      <button @click="signOut">Sign Out</button>
    </template>
  </authenticator>
</template>
先ほど JS で定義した services をバインドします。
こちらで変更前後どちらでも同じくログインした後にログインユーザのメールアドレスが表示されていることが確認できます。
さいごに
さいごまで読んでいただきありがとうございます。
認証機能はちゃんと作るとなると大変なのでこういった仕組みで簡単・安全に構築できるのはとてもありがたいですね。
裏側では Cognito で管理されているので OAuth や SSO の設定なども比較的低コストで実現できるのも魅力的です。
次のその辺りも触れた記事を作成しようかと思いますので、その際は読んでいただけると幸いです。
今回のサンプルは「GitHub」にもまとめているので併せてご確認ください。
間違いの指摘やリクエストなどありましたら加筆していきたので是非、ご意見をいただけたらと思います。
PS. vue のコードブロックで diff を使うとタグ <> が反応してしまって、うまいこと +- が表現できないのどうすればいいのか知ってる人教えてください。。
それではまた次の記事でお会いしましょう。
Discussion