Closure Library入門以前(備忘録)
経緯
この度、初めてインターンに参加することになり、Closure Libraryを使うことになりました。
インターンの前に予習をしようと思って、色々、調べたのですが、日本語で書かれた記事が、とても少ないです。
そこで、この記事では、「とりあえずClosure Libraryを始めたい!」というときに必要な環境構築や基本的な書き方、あとはReferenceとかの調べ方などを書きたいと思います。
ここに書いたように、私はClosure Libraryについては超初心者なので、内容についてはあくまで備忘録です。誤りなど見つけた方がいらっしゃいましたら、ご指摘いただけると嬉しいです。
なお、入門の内容以前の内容のため入門以前としています。
Closure Libraryとは何?[1]
Closure Libraryは十分にテストされ、モジュール化された様々なブラウザに対応した、フロントエンドのJavascriptライブラリです。
再利用が可能なUIコンポーネントやコントロール、DOM操作、サーバ通信、アニメーション、データ構造、ユニットテスト、リッチテキスト編集など幅広い用途から選択して利用することが可能です。
Closure Libraryはサーバーに依存せず、Closure Compilerと一緒に利用します。
Closure LibraryはGoogle、Gmail、Google Mapsなどを始め、様々なGoogleのプロダクトに使われており、オープンソース[2]で提供されています。
Closure Libraryは、自作のコンポーネント(DOM)をクラスにすることが可能で、オブジェクト指向のように扱えるのも特徴の一つです。
Closure Libraryを始めるための準備(環境導入)
この章では、Closure Libraryを始めるための環境導入について書きます。
環境導入については、"Getting Started with the Closure Library"[3]に書かれていますが1点だけ注意があります。
単に、以下に示す参考サイト[3:1]のコマンドでリポジトリをダウンロードして、HTMLファイルにリンクするだけでは、CROSでエラーが発生し利用できません。
git clone https://github.com/google/closure-library
cd closure-library
npm install
今回、Closure Libraryを使うのにNode.jsが必要になるので、Node.jsで静的ファイルの表示を行うことで、このエラーを回避しようと思います。
ディレクトリ構造とNode.jsのコードであるindex.jsのソースコードは以下の通りです。

ディレクトリ構造(VS Codeより)
const express = require("express");
const app = express();

app.use(express.static("public"));

app.listen(3000, () => {
    console.log("Listening on 3000.");
});
これで、準備は整いました。
Closure Libraryのチュートリアル[4][5]をやってみる
では、まずClosure Libraryのチュートリアルをやってみようと思います。
「自分で、英語の公式サイト読んでやってね!」でもいいのですが、次の章への伏線になるので、ざっと書きたいと思います。
アコーディオンパネル(最も簡単な例)[4:1]
"Building an Application with the Closure Library"[4:2]に書かれている、以下のような動作をする例をコメント付きで、貼り付けます。
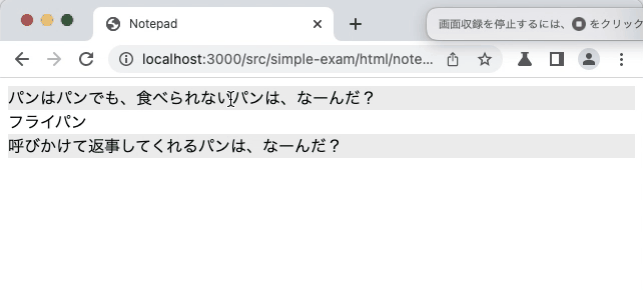
アコーディオンパネルの実装例
コードのソースは、GitHubでも公開しています。
<!--
 * This software includes the work that is distributed in the Apache License 2.0.
 * このソフトウェアは、 Apache 2.0ライセンスで配布されている製作物が含まれています。
 *
 * This source code is based on the source code which is distributed on
 * https://developers.google.com/closure/library/docs/tutorial with Japanese comment.
 * このソースコードは、https://developers.google.com/closure/library/docs/tutorial に記載・配布されている
 * コードに、日本語のコメントを追加したものです。
 *
 * このコードは、タイトルとコンテンツが含まれたノートを作成するものです。
 *
 * Author: Akira Kashihara <akira.kashihara@hotmail.com>
 * Date: 7th Sep. 2022 -
 -->
<html>
    <head>
        <title>Notepad</title>
        <!-- Closure Libraryの参照ファイル -->
        <script src="../../../lib/closure-library/closure/goog/base.js">
	</script>
        <!-- 作成したDOMの参照ファイル -->
        <script src="../js/notepad.js"></script>
    </head>
    <body>

        <!-- 作成したDOMを表示するDIV(作成したDOMの親要素のNODE) -->
        <div id="notes">
        </div>

        <script>
        function main() {
            // ノート(Note)に代入するコンテンツ
            var noteData = [
                {"title": "パンはパンでも、食べられないパンは、なーんだ?",
		"content": "フライパン"},
                {"title": "呼びかけて返事してくれるパンは、なーんだ?",
		"content": "食パン"}];

            var noteListElement
		= document.getElementById('notes');             // 親NODEの取得
            var notes
		= tutorial.notepad.makeNotes(noteData, noteListElement);  // ノートの作成
        }
        main();
        </script>
    </body>
</html>
/**
 * This software includes the work that is distributed in the Apache License 2.0.
 * このソフトウェアは、 Apache 2.0ライセンスで配布されている製作物が含まれています。
 *
 * This source code is based on the source code which is distributed on
 * https://developers.google.com/closure/library/docs/tutorial with Japanese comment.
 * このソースコードは、https://developers.google.com/closure/library/docs/tutorial に記載・配布されている
 * コードに、日本語のコメントを追加したものです。
 *
 * このコードは、タイトルとコンテンツが含まれたノートを作成するものです。
 *
 * Author: Akira Kashihara <akira.kashihara@hotmail.com>
 * Date: 7th Sep. 2022 -
 */

goog.provide("tutorial.notepad");       // ネームスペースを作成
goog.provide("tutorial.notepad.Note");  // ネームスペースを作成

goog.require("goog.dom");               // goog.domをインポートする
goog.require("goog.ui.Zippy");          // アコーディオンの動きをするZippyをインポートする

/**
 * ノートのデータとインタフェースを定義する。
 * タイトルやコンテンツなど、ノートを表示するための情報を定義。
 * @param {string} title - ノートのタイトル
 * @param {string} content - ノートに表示するコンテンツの内容を入れる
 * @param {Element} noteContainer - 作成するDOMの親NODEを入れる
 */
tutorial.notepad.Note = function(title, content, noteContainer) {
    this.title = title;
    this.content = content;
    this.parent = noteContainer;
}

/**
 * ノートDOMを作成する関数。
 */
tutorial.notepad.Note.prototype.makeNoteDom = function() {
    this.headerElement = goog.dom.createDom(goog.dom.TagName.DIV,
        {"style": "background-color: #EEE"}, this.title);           // タイトルを表示するヘッダーDOMを作成
    this.contentElement = goog.dom.createDom(goog.dom.TagName.DIV,
        null, this.content);                                        // ノートの内容を表示するコンテンツDOMを作成
    const newNote = goog.dom.createDom(goog.dom.TagName.DIV, null,
        this.headerElement, this.contentElement);                   // ヘッダーDOMとコンテンツDOMを内包するDOMを作成

    goog.dom.appendChild(this.parent, newNote);                     // 作成したDOMを親Nodeの下に入れる

    return new goog.ui.Zippy(this.headerElement, this.contentElement);  // アコーディオンの動きを付与
}

/**
 * ノートのデータオブジェクトを入れると、複数のノートを作成し、それらを包含したDOMを作成する。
 * @param {Array.<Object>} data - 複数のノートのデータ
 * @param {Element} noteContainer - 作成したDOMの親NODE
 * @returns {Array.<tutorial.notepad.Note>} - 作成したDOM(インスタンス)の結果
 */
tutorial.notepad.makeNotes = function(data, noteContainer) {
    let notes = [];
    for(let i = 0; i < data.length; i++) {
        const note =
            new tutorial.notepad.Note(data[i].title, data[i].content,
	    noteContainer);
        notes.push(note);
        note.makeNoteDom();
    }
    return notes;
}
コンテンツを編集可能にする(イベントハンドル)[5:1]
"Event Handling"[5:2]をもとに、さっきの節で作成したDOMのコンテンツを、編集可能にします。
先程の節で作った例をクラスにした上で、コンテンツの中身を変えられるようにします。動作イメージは以下です。
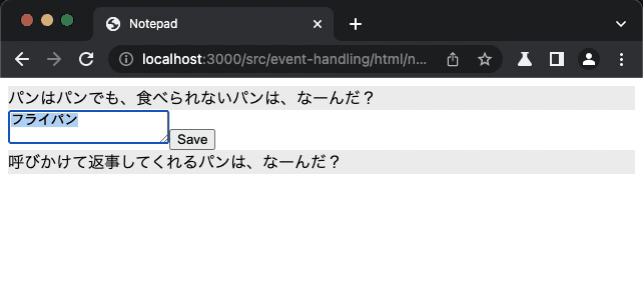
アコーディオンパネルのコンテンツを編集可能にした実装例
この実装コードは、GitHubに公開しています。
HTMLは、前の節とほとんど同じですので、変更した点以外は省略したいと思います。
...前略...
<html>
    <head>
        <title>Notepad</title>
        <!-- Closure Libraryの参照ファイル -->
        <script src="../../../lib/closure-library/closure/goog/base.js"></script>
        <!-- 作成したDOMの参照ファイル -->
        <script src="../js/notepad-event.js"></script>
    </head>
    <body>
...
/**
 * This software includes the work that is distributed in the Apache License 2.0.
 * このソフトウェアは、 Apache 2.0ライセンスで配布されている製作物が含まれています。
 *
 * This source code is based on the source code which is distributed on
 * https://developers.google.com/closure/library/docs/events_tutorial with Japanese comment.
 * このソースコードは、https://developers.google.com/closure/library/docs/events_tutorial に記載・配布されている
 * コードに、日本語のコメントを追加したものです。
 *
 * このコードは、タイトルとコンテンツが含まれたノートを作成するものです。
 *
 * Author: Akira Kashihara <akira.kashihara@hotmail.com>
 * Date: 7th Sep. 2022 -
 */

goog.provide("tutorial.notepad");       // ネームスペースを作成
goog.provide("tutorial.notepad.Note");  // ネームスペースを作成

goog.require("goog.dom");               // goog.domをインポートする
goog.require("goog.dom.TagName");       // goog.dom.TagNameをインポートする
goog.require("goog.ui.Zippy");          // アコーディオンの動きをするZippyをインポートする

/**
 * ノートのデータとインタフェースを定義する。
 * タイトルやコンテンツなど、ノートを表示するための情報を定義。
 * @param {string} title - ノートのタイトル
 * @param {string} content - ノートに表示するコンテンツの内容を入れる
 * @param {Element} noteContainer - 作成するDOMの親NODEを入れる
 */
tutorial.notepad.Note = class {

    /**
     * 作成する1つのNoteの情報を定義。インスタンス作成時に呼ばれる。
     * @param {Array.<Object>} data - 単体のNoteのデータ(表示情報)
     * @param {*} noteContainer - 作成したNote(DOM)の親NODE
     */
    constructor(data, noteContainer) {
        this.title = data.title;        // タイトル
        this.content = data.content;    // 表示するコンテンツ
        this.parent = noteContainer;    // 作成したDOMの親NODE
    }

    makeNoteDom() {
        // 表示するDOMの構造を作成
        this.headerElement =
            goog.dom.createDom(goog.dom.TagName.DIV,
		    {"style": "background-color: #EEE"}, this.title); // タイトル表示のDOM作成
        this.contentElement =
            goog.dom.createDom(goog.dom.TagName.DIV, null, this.content);   // コンテンツ表示のDOM作成

        // コンテンツを編集するためのテキストエリアと、保存するためのセーブボタンを作成
        this.editorElement =
            goog.dom.createDom(goog.dom.TagName.TEXTAREA);  // テキストエリア作成
        const saveBtn = goog.dom.createDom(
            goog.dom.TagName.INPUT, {"type": "button", "value": "Save"});   // セーブボタン作成
        this.editorContainer = goog.dom.createDom(
            goog.dom.TagName.DIV, {"style": "display: none;"},
		    this.editorElement, saveBtn);    // テキストエリアとセーブボタンを包括するDOMの作成

        this.contentContainer = goog.dom.createDom(
            goog.dom.TagName.DIV, null, this.contentElement,
		    this.editorContainer); // コンテンツと編集DOMを包括するDOMを作成

        const newNote = goog.dom.createDom(
            goog.dom.TagName.DIV, null, this.headerElement, this.contentContainer); // 新しいノート(DOM)の作成

        this.parent.appendChild(newNote);   // 親NODEに新しく作成したノートを挿入

        goog.events.listen(
            this.contentElement, goog.events.EventType.CLICK,
		    this.openEditor, false, this);    // コンテンツをクリックしたときのイベント

        goog.events.listen(
            saveBtn, goog.events.EventType.CLICK, this.save, false, this);  // セーブボタンが押されたときのイベント

        this.zippy = new goog.ui.Zippy(this.headerElement, this.contentContainer);  // アコーディオンパネルの動きを作成
    }

    /**
     * セーブボタンが押されたときのイベント
     * @param {goog.events.Event} e - イベントオブジェクト
     */
    save(e) {
        this.content = this.editorElement.value;    // テキストエリアに入力された文章を、コンテンツに代入
        this.closeEditor(); // エディタを閉じる
    }

    /**
     * コンテンツを編集したあと、エディタを閉じるための関数
     */
    closeEditor() {
        this.contentElement.innerHTML = this.content;   // 更新されたコンテンツをコンテンツエレメントに代入
        this.contentElement.style.display = "inline";   // コンテンツエレメントを表示する
        this.editorContainer.style.display = "none";    // エディタを非表示にする
    }

    /**
     * コンテンツをクリックしたときに、エディタを表示する関数
     * @param {goog.events.Event} e - イベントオブジェクト
     */
    openEditor(e) {
        this.editorElement.value = this.content;            // テキストエディタの中に、現在のコンテンツを代入
        this.contentElement.style.display = "none";         // コンテンツを表示するDOMを非表示にする
        this.editorContainer.style.display = "inline";      // テキストエディタを表示する
    }
}

/**
 * ノートのデータオブジェクトを入れると、複数のノートを作成し、それらを包含したDOMを作成する。
 * @param {Array.<Object>} data - 複数のノートのデータ
 * @param {Element} noteContainer - 作成したDOMの親NODE
 * @returns {Array.<tutorial.notepad.Note>} - 作成したDOM(インスタンス)の結果
 */
tutorial.notepad.makeNotes = function(data, noteContainer) {
    let notes = [];
    for(let i = 0; i < data.length; i++) {
        const note =
            new tutorial.notepad.Note(data[i], noteContainer);
        notes.push(note);
        note.makeNoteDom();
    }
    return notes;
}
独自のラーメンランキングサイトのフロントエンドを作ってみる
この章から、以下のような独自のフロントエンドのレイアウトを作っていきたいと思います。
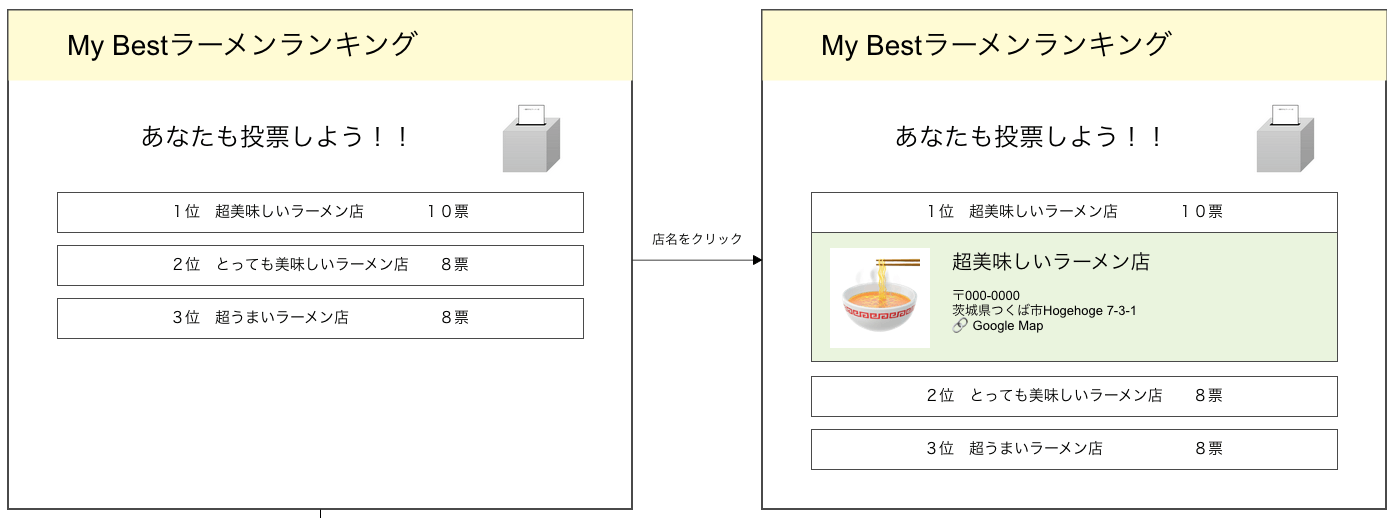
作成するフロントエンドのレイアウト
チュートリアルから書き方を変えたいところ
前の章で、いくつか、書き方を変えたいところがあったので、その部分を変えて実装していこうと思います。
以下が、書き方を変えたいところのリストです。
-
goog.dom.createDom内で指定されているCSSを、外部のCSSファイルで指定したい。 - HTMLファイルに書いているJavascriptを、外部のJavascriptファイルに書きたい。
Closure Libraryで実装するところ
他のページで使い回さないようなDOMを、Closure Libraryで実装しても仕方ないと思いますので、今回は、他のページでも使いまわしそうな、ヘッダーとフッター、そしてラーメン店情報のリスト(アイテム)をClosure Libraryで実装します。
実装イメージ(実装結果)
先に、実装結果をGIFで貼ります。
実装すると、こんな感じになります。
実装イメージ
実装内容
では、具体的な実装について説明していきます。
すべてのソースコードを貼り付けると、膨大な量になるため、各ファイルの実装については、GitHubにアクセスして御覧ください。
基本的な実装方法については、前の章で紹介したことと同じですが、今回書き方を変えたところについて少し紹介します。
CSSのコードを外部のCSSファイルに書く
Web Componentsと違い、Closure Libraryで作成したDOMは全て、あらゆるところからアクセス可能です。
つまり、CSSを外部ファイルに書いて、HTMLでインポートすれば使えるため、classやidの名前が衝突しないようにすることに気をつけていれば、それほど問題は起こりません。
そのため、以下のように書けばOKです。
...前略...
    <link href="../css/common.css" rel="stylesheet">
    <link href="../css/item-ramen-shop.css" rel="stylesheet">
...中略...
    <script src="../js/items-ramen-shop.js"></script>
...後略...
...前略...
    /**
    * Create the DOM structure for the item and adds it to the document.
    */
    makeItemDom() {

        // Ranking text display
        this.rankingElement = goog.dom.createDom(
            goog.dom.TagName.SPAN,
            {class: "item-in-header"},   //class名を指定
            this.ranking.toString() + "位"
        );
...後略...
...前略...
.item-in-header {
    margin: 0 0;
}
...後略...
全てのJavascriptを、外部のJavascriptファイルに書きたい
こちらも、普通に書けばOKです。以下のように書きます。
...前略...
    <script src="../js/index.js" defer></script>
</head>
...後略...
function main() {
const headerElement = common.components.makeHeader(document.getElementById("main-element"));
const footerElement = common.components.makeFooter(document.getElementById("main-element"));
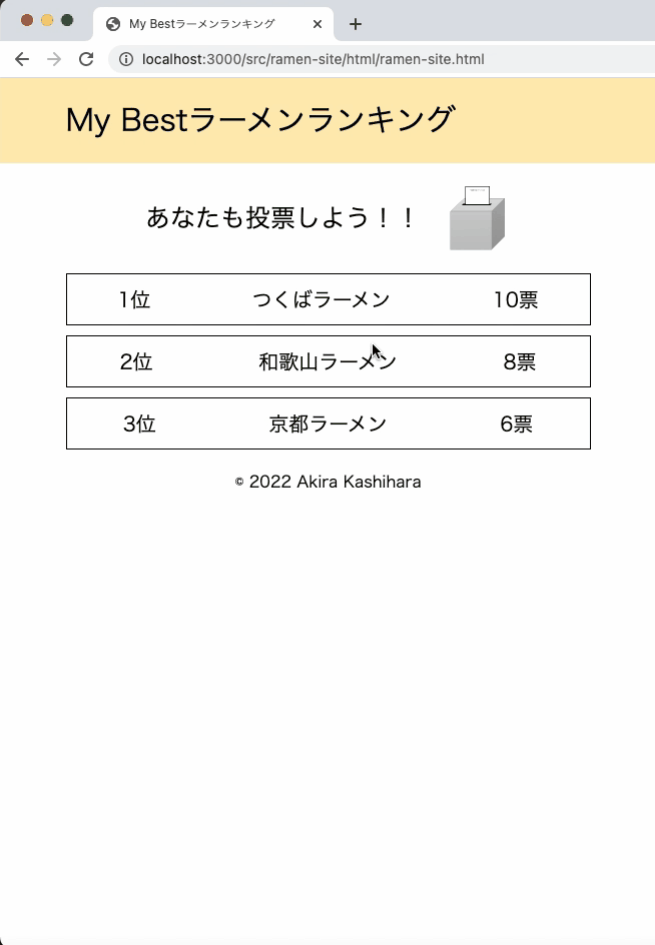
let storeData = [
{ ranking: 1, storeName: "つくばラーメン", votes: 10, urlImage: "../img/ramen.png",
zipCode: 123456, address: "茨城県つくば市猫町1−1−1", urlMap: "https://maps.google.com"},
{ ranking: 2, storeName: "和歌山ラーメン", votes: 8, urlImage: "../img/ramen.png",
zipCode: 123456, address: "和歌山県和歌山市猫町1−1−1", urlMap: "https://maps.google.com"},
{ ranking: 3, storeName: "京都ラーメン", votes: 6, urlImage: "../img/ramen.png",
zipCode: 123456, address: "京都府京都市猫町1−1−1", urlMap: "https://maps.google.com"}
];
let rankingElement = document.getElementById("rankingArea");
let rankings = ranking.ramen.makeItems(storeData, rankingElement);
}
main();
実装するときに、気をつけたほうがいいところや、参考にするサイトなどは、次の章 "Closure Libraryを使うときのTIPS" にまとめています。
Closure Libraryを使うときのTIPS
DOMの作成方法
goog.require("goog.dom");
goog.dom.createDom(タグ名, オプション, ...ノード(複数可))
CSSファイルを別ファイルにする
Web Componentsと違い、Closure Libraryで作成したDOMは全て、あらゆるところからアクセス可能です。
つまり、CSSを外部ファイルに書いて、HTMLでインポートすれば使えるため、classやidの名前が衝突しないようにすることに気をつけていれば、それほど問題は起こりません。
HTMLタグの属性(attribute)を指定する
以下のように、createDomのオプションに書けばOKです。
        this.ramenImageElement = goog.dom.createDom(
            goog.dom.TagName.IMG,
            {
                src: this.urlImage,
                class: "img-in-content"
            },
            null
        )
まとめ
使いこなせれば、とても便利なフレームワークだなと思いました。
通信やアニメーション、ユニットテストなども出来るそうなので、少しずつ開拓していこうと思います。
実は今回勉強するにあたって、一つ、アプリを作ろうと思って1週間かけて作っていたのですが、バックエンドも初めてのフレームワークを使っていたので、思ったより時間がかかり、こちらを分離して書くことに…
今作っている、サンプルのアプリもでき次第、記事にしようと思います。
-
Closure Libray / Google https://developers.google.com/closure/library (2022-09-06閲覧) ↩︎ ↩︎
-
closure-library / google on Github https://github.com/google/closure-library (2022-09-06閲覧) ↩︎
-
Getting Started with the Closure Library / Google https://developers.google.com/closure/library/docs/gettingstarted (2022-09-07閲覧) ↩︎ ↩︎
-
Building an Application with the Closure Library / Google https://developers.google.com/closure/library/docs/tutorial (2022-09-07閲覧) ↩︎ ↩︎ ↩︎
-
Event Handling / Google https://developers.google.com/closure/library/docs/events_tutorial (2022-09-07閲覧) ↩︎ ↩︎ ↩︎
Discussion