Vite+React+Amplifyの初期設定方法!
この記事の目的
爆速のビルドツールViteを試してみたい!
この記事では、普段自分が使っているReact+Amplifyの構成にてプロジェクトを開始する場合の手順を、個人的なメモとしてまとめました。
ソフトウェアのバージョン
主なソフトウェアのバージョンを記載します。
- node v18.9.0
- TypeScript 4.6.4
- Vite 3.1.0
- React 18.2.0
先にまとめ
AmplifyとReactを連携する場合に、Amplify公式ページではcreate-react-appを使う方法がガイドされています。Viteを使う場合も概ねこの方法が使えますが、そのままでは動かない箇所がいくつかあるため、エラー対応が必要となります。このセクションでは、エラー内容と対応の概略を記載します。具体的な手順は、「開発手順」のセクションで詳細に記載しています。
エラー発生箇所1 amplify pull
✖ There was an error initializing your environment.
Failed to pull the backend.
🛑 Must use import to load ES Module: /Users/xxxxxxxx/my_first_vite/src/aws-exports.js
require() of ES modules is not supported.
require() of /Users/xxxxxxxx/my_first_vite/src/aws-exports.js from /snapshot/repo/build/node_modules/amplify-frontend-javascript/lib/frontend-config-creator.js is an ES module file as it is a .js file whose nearest parent package.json contains "type": "module" which defines all .js files in that package scope as ES modules.
以下の対応を行います。
- aws-exports.js を aws-exports.ts にリネーム
- package.json から、"type": "module" の行を削除
Additional Info. (2022-10-13追記)
AWS AmplifyのDiscordコミュニティーから以下のコメントをいただきました。Amplify CLIのバージョンアップで一部解決されるようです。
For what it's worth, the ESM issue (where we have to remove "type": "module") is fixed with the latest version version of the CLI, 10.2.3
エラー発生箇所2 yarn dev
Uncaught ReferenceError: global is not defined
以下の対応を行います。
- index.htmlの変更
エラー発生箇所3 amplify publish
2: import { ProviderError } from "@aws-sdk/property-provider";
3: import { Buffer } from "buffer";
4: import { request } from "http";
            ^
5: /**
6:  * @internal
error during build:
Error: 'request' is not exported by __vite-browser-external, imported by node_modules/@aws-sdk/credential-provider-node/node_modules/@aws-sdk/credential-provider-imds/dist/es/remoteProvider/httpRequest.js
以下の対応を行います。
- vite.config.tsの修正
開発手順
ここからは具体的な手順の説明です。
前提として、node, Amplify CLI, Viteのインストールは済んでいるものとして、プロジェクト作成から記載します。
作業の流れは以下の通りです。
- Viteを用いてReactプロジェクトを作成する
- Amplifyのプロジェクトを作成する
- アプリの初期設定をする
- データモデル連携をする
- Amplify CLIを使ってホスティングする
Viteを用いてReactプロジェクトを作成する
コマンドは下記のようになります。
yarn create vite my_first_vite --template react-ts
"my_first_vite"というのがプロジェクト名になりますので、任意の値を指定してください。
--template react-tsでReactのTypeScriptテンプレートを適用しています。
なお、このコマンドを説明している公式サイト[1]もあわせてお読みください。
Amplifyのプロジェクトを作成する
Amplifyのプロジェクトの作成方法は複数ありますが、ここではAmplify Studioを用います。
AWSマネジメントコンソールでプロジェクトを作成
まずは、AWSのマネジメントコンソールから、AWS Amplify(以下Amplifyと呼ぶ)を選択し、
下図のように画面右上から[New app]>[Build an app]を選択します。

次に、以下の画面でApp nameを入力し、[Confirm deployment]を押下します。
ここでは、my_first_viteとしていますが、任意で構いません。

下図はデプロイ中の待機画面です。(5〜6分はかかります。)

画面が以下のように遷移したら、[Launch Studio]を押下し、Amplify Studioを立ち上げます。

Amplify Studio起動後の作業について
Amplify Studioではさまざまなバックエンドのリソースの設定が可能です。
ただ、これらを仔細に紹介するのが本記事の目的ではないので、ここでは簡単なデータモデルの定義だけを行います。
その他に、Figmaと連携してUIを生成する、Cognitoを用いて認証を組み込むといったことができますが、別記事[2]やAWSのチュートリアル[3]を参照ください。
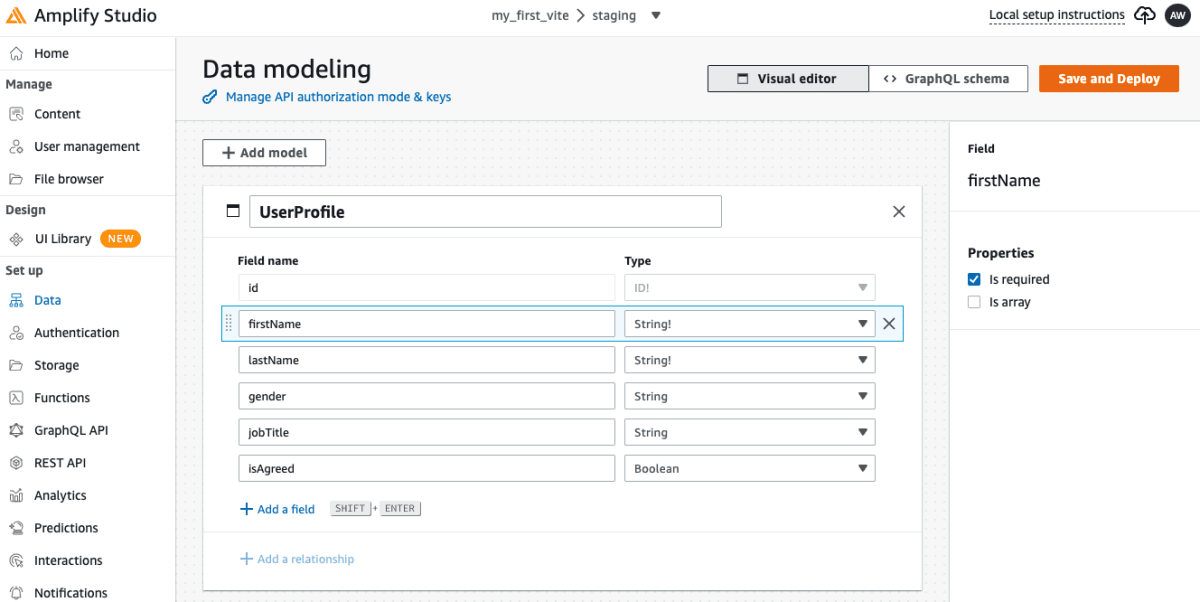
データモデルの定義
以下のように、データモデルの定義を行います。終わったら[Save and Deploy]を押下します。
デプロイ待ちの画面です。このタイミングでCloudFormationによりAppSyncやDynamoDBが作られますので、この処理は相応に時間がかかります。(10分くらいはかかるかもしれません)

デプロイが完了(成功)すると以下のような画面に遷移します。[Done]を押すと画面が閉じます。

ここで、②Update your app codeでプログラム言語、model、operationなどを選択すると、ソースコードの例がガイドされます。ただ、これは簡易的な内容なので、詳細はドキュメント[4]を確認した方が良いです。
Amplifyの資材をローカルにPullする
yarn create で作成したReactプロジェクトで、以下のように amplify pull コマンドを実行します。
(エラーが発生しますが、対処方法は後述します)
 amplify pull
? Select the authentication method you want to use: AWS profile

For more information on AWS Profiles, see:
https://docs.aws.amazon.com/cli/latest/userguide/cli-configure-profiles.html

? Please choose the profile you want to use default
? Which app are you working on? xxxxxxxxxxxxxx
Backend environment 'staging' found. Initializing...
? Choose your default editor: Visual Studio Code
? Choose the type of app that you're building javascript
Please tell us about your project
? What javascript framework are you using react
? Source Directory Path:  src
? Distribution Directory Path: dist *** ここはデフォルトだとbuildですが明示的に変更しています ***
? Build Command:  npm run-script build
? Start Command: npm run-script start
✅ GraphQL schema compiled successfully.

Edit your schema at /Users/xxxxxxxx/my_first_vite/amplify/backend/api/myfirstvite/schema.graphql or place .graphql files in a directory at /Users/xxxxxxxx/my_first_vite/amplify/backend/api/myfirstvite/schema
Successfully generated models. Generated models can be found in /Users/xxxxxxxx/my_first_vite/src
? Do you plan on modifying this backend? Yes
⠙ Fetching updates to backend environment: staging from the cloud.✅ GraphQL schema compiled successfully.

Edit your schema at /Users/xxxxxxxx/my_first_vite/amplify/backend/api/myfirstvite/schema.graphql or place .graphql files in a directory at /Users/xxxxxxxx/my_first_vite/amplify/backend/api/myfirstvite/schema
✔ Successfully pulled backend environment staging from the cloud.
✖ There was an error initializing your environment.
Failed to pull the backend.
🛑 Must use import to load ES Module: /Users/xxxxxxxx/my_first_vite/src/aws-exports.js
require() of ES modules is not supported.
require() of /Users/xxxxxxxx/my_first_vite/src/aws-exports.js from /snapshot/repo/build/node_modules/amplify-frontend-javascript/lib/frontend-config-creator.js is an ES module file as it is a .js file whose nearest parent package.json contains "type": "module" which defines all .js files in that package scope as ES modules.
Instead rename aws-exports.js to end in .cjs, change the requiring code to use import(), or remove "type": "module" from /Users/xxxxxxxx/my_first_vite/package.json.
Warn!
エラーが発生しますので、メッセージに従って対応します。
- aws-exports.js を aws-exports.ts にリネームします。(ただし、 amplify pull の都度、aws-eports.jsが作られるので、その都度リネームする必要があります)
- package.json から、"type": "module" の行を削除します。
{
  "name": "my_first_vite",
  "private": true,
  "version": "0.0.0",
-  "type": "module",
  "scripts": {
    "dev": "vite",
    "build": "tsc && vite build",
    "preview": "vite preview"
  },
  "dependencies": {
    "react": "^18.2.0",
    "react-dom": "^18.2.0"
  },
  "devDependencies": {
    "@types/react": "^18.0.17",
    "@types/react-dom": "^18.0.6",
    "@vitejs/plugin-react": "^2.1.0",
    "typescript": "^4.6.4",
    "vite": "^3.1.0"
  }
}
上記の修正を加えた後に、amplify pull を再実行します。
アプリの初期設定をする
このタイミングで一旦アプリを立ち上げてみます。
# 依存モジュールのインストール
yarn install

# 開発サーバーの起動
yarn dev
この時点でのアプリは以下のようになっています。

Amplifyを利用するようにアプリを変更します。
変更するファイルは以下の通りです。(プロジェクトルートを起点として記載)
- package.json
- src/index.css
- src/main.tsx
- src/App.tsx
package.jsonは差分を記載します。変更したら、yarn installを実行してください。
  "dependencies": {
+    "@aws-amplify/ui-react": "^3.5.4",
+    "aws-amplify": "^4.3.36",
    "react": "^18.2.0",
    "react-dom": "^18.2.0"
  },
index.cssは以下の内容で更新します。
@import url('https://fonts.googleapis.com/css2?family=Inter:slnt,wght@-10..0,100..900&display=swap');
body {
  margin: 0;
  font-family: -apple-system, BlinkMacSystemFont, 'Segoe UI', 'Roboto', 'Oxygen',
    'Ubuntu', 'Cantarell', 'Fira Sans', 'Droid Sans', 'Helvetica Neue',
    sans-serif;
  -webkit-font-smoothing: antialiased;
  -moz-osx-font-smoothing: grayscale;
}

code {
  font-family: source-code-pro, Menlo, Monaco, Consolas, 'Courier New',
    monospace;
}
main.tsxは差分を記載します。
import React from 'react'
import ReactDOM from 'react-dom/client'
+import { AmplifyProvider } from '@aws-amplify/ui-react';
+import { Amplify } from 'aws-amplify';
import App from './App'
import './index.css'
+import config from './aws-exports';

+Amplify.configure(config);

ReactDOM.createRoot(document.getElementById('root') as HTMLElement).render(
-  <React.StrictMode>
+  <AmplifyProvider
     <App />
+  </AmplifyProvider>
-  </React.StrictMode>
)
App.tsx は以下の内容で更新します。
import type { FC } from 'react';
import { Amplify } from 'aws-amplify';
// eslint-disable-next-line import/extensions
import '@aws-amplify/ui-react/styles.css';
import awsExports from './aws-exports';

Amplify.configure(awsExports);

const App: FC = () => {
  return (
    <h1>
      Hello Amplify+Vite!
    </h1>
  );
}

export default App;
Warn!
しかし、この状態で開発サーバーを起動(yarn dev)すると、以下のエラーが出ます。

index.htmlは差分を記載します。
<!DOCTYPE html>
<html lang="en">
  <head>
    <meta charset="UTF-8" />
    <link rel="icon" type="image/svg+xml" href="/vite.svg" />
    <meta name="viewport" content="width=device-width, initial-scale=1.0" />
    <title>Vite + React + TS</title>
  </head>
  <body>
    <div id="root"></div>
    <script type="module" src="/src/main.tsx"></script>
+    <script>
+      window.global = window;
+      window.process = {
+        env: { DEBUG: undefined },
+      };
+      var exports = {};
+    </script>
  </body>
</html>
これまでの結果として以下のような初期画面がブラウザーに表示されます。

この時点のソースコード
データモデル連携をする
データモデルとの連携は手順を記載するのが手間なので、ソースコードを参照ください。
ここでは、データの登録と一覧表示だけを行っています。
Amplify CLIを使ってホスティングする
以下の手順でホスティングします。
なお、AWSマネジメントコンソールでなく、Amplify CLIを使うのは、Cloud FrontにWAFを設置したいからです。
- amplify add hosting
- amplify publish
amplify add hosting
以下のコマンドを実行します。
amplify add hosting
✔ Select the plugin module to execute · Amazon CloudFront and S3
? Select the environment setup: PROD (S3 with CloudFront using HTTPS)
? hosting bucket name myfirstvite-xxxxxxxxxxxx-hostingbucket
Static webhosting is disabled for the hosting bucket when CloudFront Distribution is enabled.

You can now publish your app using the following command:
Command: amplify publish
amplify publish
以下のコマンドを実行します。
Warn!
ただし、これは失敗するので、後ほど修正を行います。
amplify publish

'request' is not exported by __vite-browser-external, imported by node_modules/@aws-sdk/credential-provider-node/node_modules/@aws-sdk/credential-provider-imds/dist/es/remoteProvider/httpRequest.js
file: /Users/xxxxxxxxmy_first_vite/node_modules/@aws-sdk/credential-provider-node/node_modules/@aws-sdk/credential-provider-imds/dist/es/remoteProvider/httpRequest.js:4:9
2: import { ProviderError } from "@aws-sdk/property-provider";
3: import { Buffer } from "buffer";
4: import { request } from "http";
            ^
5: /**
6:  * @internal
error during build:
Error: 'request' is not exported by __vite-browser-external, imported by node_modules/@aws-sdk/credential-provider-node/node_modules/@aws-sdk/credential-provider-imds/dist/es/remoteProvider/httpRequest.js
エラー対応
vite.config.ts に以下の修正を加えます。その後に、amplify publishを再実行します。
import { defineConfig } from 'vite'
import react from '@vitejs/plugin-react'

// https://vitejs.dev/config/
export default defineConfig({
+  resolve: {
+    alias: [
+      { find: './runtimeConfig', replacement: './runtimeConfig.browser' },
+      { find: '@', replacement: '/src' },
+    ],
+  },
  plugins: [react()]
})
手順は以上です。
感想
Viteはローカルの開発サーバーの起動も爆速(今回はコードベースが大して大きくないですが)なので使っていて快適です。
初期設定で多少の苦労はしますが、割に合うと感じました!
脚注
[1] Scaffolding your first vite project
[2] Amplify Studio & Figma
[3] AWS Amplify Studio Tutorial Blog
[4] Amplify DataStore Docs
Discussion