Fly.io に Asp.NET Core アプリをデプロイ
https://fly.io/ の無料枠で、ASP.NET Core のAPIサーバを動かしてみるところまで。
https://github.com/Arshu/ASP.NET-Core-In-Fly.io こちらの手順を参考に進める。
Fly.io のアカウントを作っておく
サインアップだけ。ペイメントの設定などはとりあえず何もしない。
Fly.io のCLIツールをインストール
https://fly.io/docs/hands-on/install-flyctl/ の手順に従う。
Windowsなので、Powershellから以下を実行。
>iwr https://fly.io/install.ps1 -useb | iex
C:\Users\USERNAME\.fly\ にインストールされた。
バージョンは以下。
>flyctl version
flyctl.exe v0.0.441 windows/amd64 Commit: 7a9ec7be BuildDate: 2022-12-16T19:24:02Z
以下のコマンドでログインしておく。
>flyctl auth login
プロジェクトの準備
新規 ASP.NET Core プロジェクト作成。
>dotnet new webapi -o APPNAME
csprojファイルの <PropertyGroup> に以下を追記し、GCを無効にしておく。
これをしておかないと、無料枠ではメモリ的に厳しいらしい( https://community.fly.io/t/deploying-asp-net-core-app-in-fly-io-in-free-tier/5856 )。
<ServerGarbageCollection>false</ServerGarbageCollection>
下記コマンドでビルド、発行。
linux-musl-x64 にしておくのがいいっぽいので踏襲。
>dotnet publish -r linux-musl-x64 -o "..\linux64_musl" --self-contained true -p:PublishSingleFile=true -p:PublishTrimmed=true
いろいろ警告が出るけど、テンプレートそのままビルドしただけなので知らん。
ひとつ上の階層に linux64_musl フォルダが出力されたことを確認しておく。
同じ階層(linux64_muslフォルダがある階層)に、Dockerfile を以下のとおり作成。
FROM mcr.microsoft.com/dotnet/runtime-deps:6.0-alpine-amd64

EXPOSE 8080

RUN mkdir /app
WORKDIR /app
COPY ./linux64_musl/. ./

RUN chmod +x ./APPNAME
CMD ["./APPNAME", "--urls", "http://0.0.0.0:8080"]
Fly.io にデプロイを実行
先に指定できる region のリストを確認しておく。
>flyctl platform regions
CODE    NAME                            GATEWAY
ams     Amsterdam, Netherlands          ✓
cdg     Paris, France                   ✓
den     Denver, Colorado (US)
dfw     Dallas, Texas (US)              ✓
ewr     Secaucus, NJ (US)
fra     Frankfurt, Germany              ✓
gru     São Paulo
hkg     Hong Kong, Hong Kong            ✓
iad     Ashburn, Virginia (US)          ✓
jnb     Johannesburg, South Africa
lax     Los Angeles, California (US)    ✓
lhr     London, United Kingdom          ✓
maa     Chennai (Madras), India         ✓
mad     Madrid, Spain
mia     Miami, Florida (US)
nrt     Tokyo, Japan                    ✓
ord     Chicago, Illinois (US)          ✓
otp     Bucharest, Romania
scl     Santiago, Chile                 ✓
sea     Seattle, Washington (US)        ✓
sin     Singapore, Singapore            ✓
sjc     San Jose, California (US)       ✓
syd     Sydney, Australia               ✓
waw     Warsaw, Poland
yul     Montreal, Canada
yyz     Toronto, Canada                 ✓
日本だと nrt でよさそうだ。
それでは、Dockerfile のあるディレクトリで、 flyctl launch コマンドを実行。
すると本来は App Name やら region やらを対話的に聞いてくれるはずだが、Windows環境だと、コマンドプロンプトでも git bash でも Powershellでも、以下のエラーになった。
Error name argument or flag must be specified when not running interactively
対話的にやってくれよ。。と思うが、どうも flyctl のバグっぽい?
- https://stackoverflow.com/questions/74323308/flyctl-launch-error-name-argument-or-flag-must-be-specified-when-not-running-in
- https://community.fly.io/t/when-i-run-fly-launch-to-my-project-i-get-the-following-error-error-name-argument-or-flag-must-be-specified-when-not-running-interactively/8909
対話的にやるのを諦め、パラメータでアプリ名と region を指定する。
なお今回はDBは使いません。
flyctl launch --name APPNAME --region nrt
しかし以下のエラー。
Error We need your payment information to continue! Add a credit card or buy credit: https://fly.io/dashboard/USERNAME/billing
おっと、、そうなの…。
こちらの記事によると、github連携でサインアップした場合はクレジットカード情報が必須になるとあったので、メアドでアカウント作り直してみたが、結果的に一緒だった。
なので諦めてダッシュボードページからクレジットカード情報を登録。
改めてコマンドを実行すると成功した。
Created app APPNAME in organization personal
Admin URL: https://fly.io/apps/APPNAME
Hostname: APPNAME.fly.dev
Wrote config file fly.toml
Your app is ready! Deploy with `flyctl deploy`
Dockerfile で 8080 以外のポートを指定した場合は、fly.toml 内の internal_port をそれに合わせておく。
flyctl deploy でデプロイ実行。
しかしここでもエラー。
Error failed to fetch an image or build from source: error fetching docker server info: Get "http://[XXXXXX]:2375/v1.41/info": context deadline exceeded
ダメじゃん、と思ったが、同じコマンド再実行したらいけた。ネットワークの問題か。
ビルドが終わるのをしばし待つ。
deployが終わったら、ブラウザからアクセスしてみて確認。
ASP.NET Core の Web API テンプレートだと最初から WeatherForecastController みたいなのがあるはずなので、これのGET APIにアクセスする。
URLは https://APPNAME.fly.dev/WeatherForecast 。
ブラウザでアクセスして以下のようなJSONが返ってくればOK。
[{"date":"2022-12-30T06:27:49.8812969+00:00","temperatureC":48,"temperatureF":118,"summary":"Balmy"},{"date":"2022-12-31T06:27:49.8874352+00:00","temperatureC":43,"temperatureF":109,"summary":"Scorching"},{"date":"2023-01-01T06:27:49.8874367+00:00","temperatureC":2,"temperatureF":35,"summary":"Balmy"},{"date":"2023-01-02T06:27:49.887437+00:00","temperatureC":-8,"temperatureF":18,"summary":"Balmy"},{"date":"2023-01-03T06:27:49.8874372+00:00","temperatureC":4,"temperatureF":39,"summary":"Mild"}]
結局普段の開発は Visual Studio (≠vscode) でやるんで、Publishの設定も Visual Studio 上で設定して PublishProfiles を作っておいたほうが便利かなと。
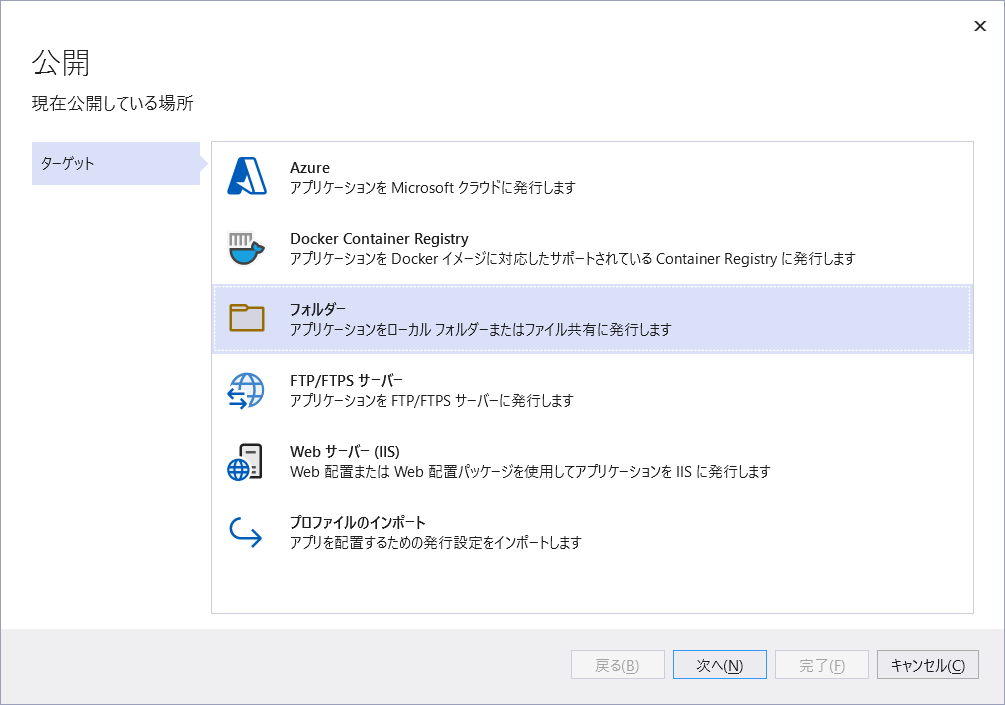
ビルド > (APPNAME) の発行 から

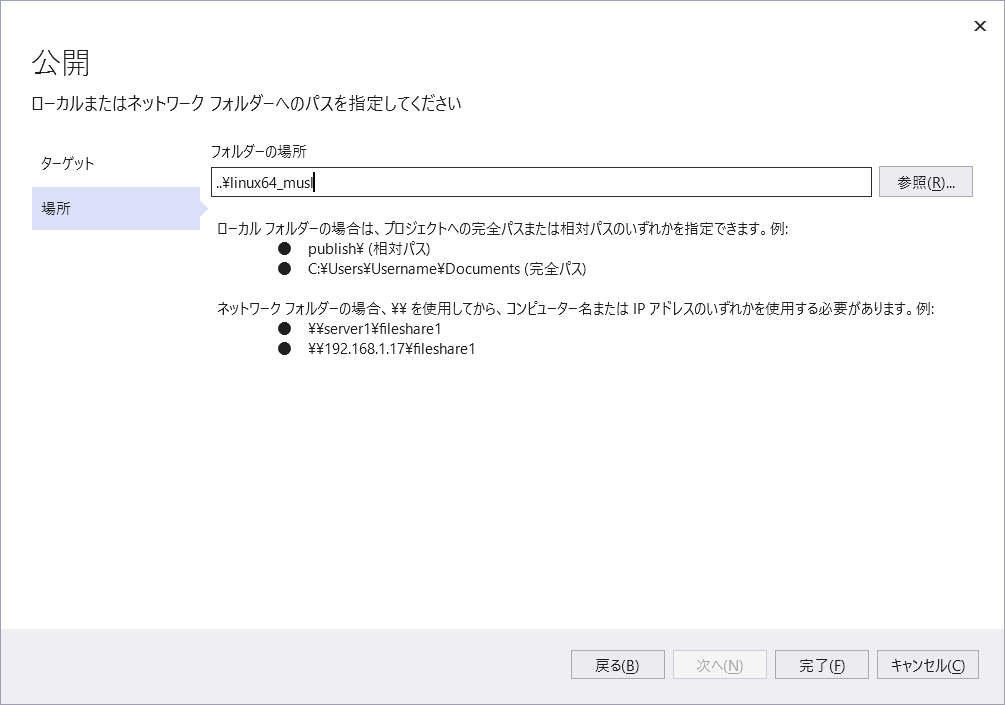
同じフォルダを指定。

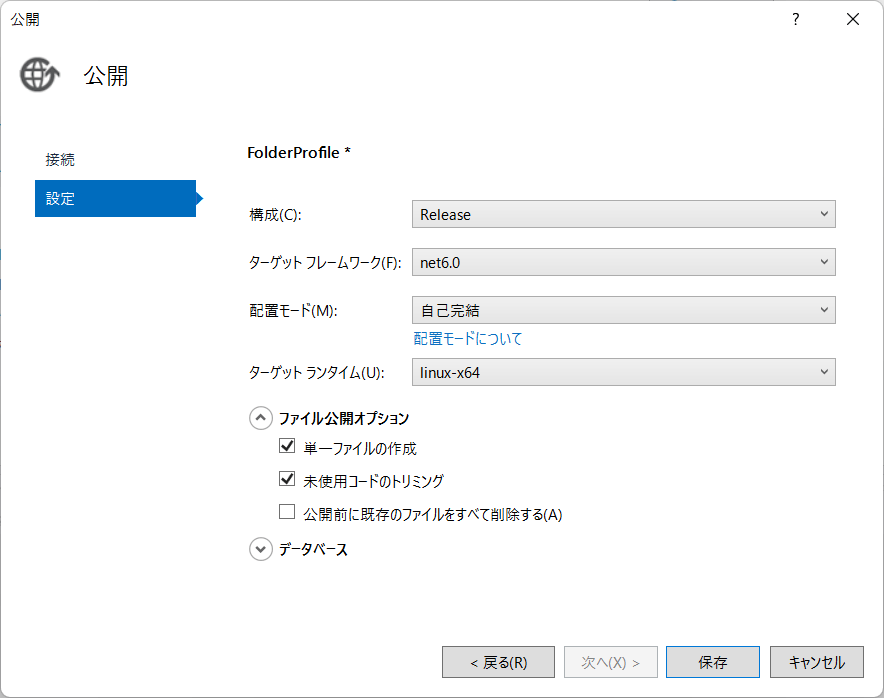
一度「完了」してから、「すべての設定を表示」。

(今使っているバージョンの)Visual Studio 2022 では「ターゲット ランタイム」に「linux-musl-x64」がなかった。
ドキュメント上は指定できることになっているので、一度保存して閉じてから、 FolderProfile.pubxml を直接開いて <RuntimeIdentifier> の部分を書き替えてしまう。
正しい方法なのかは不明。
Visual Studioで開き直して、「発行」を実行。
正しく linux64_musl フォルダに出力されていることを確認する。