Moby(Docker)をビルドしてruncとcontainerdを単体で動かしてコンテナの基礎を理解する
この記事を読んだらできること
- Mobyをビルドしてruncとcontainerdを動かせます。
- runcとcontainerdを使ってコンテナを動かすことでなんとなくコンテナの理解が深まります。
- 夏休みの自由研究にコンテナを動かす仕組みを自分で深く調べたくなります(たぶん)。
記事の背景
Dockerを使い、なるべく小さい薄いコンテナを作っていく中でDockerの中身を詳細に知りたいと思ったので、DockerのソースコードであるMobyをビルドしてコンテナ実行のコアの基盤ソフトであるrunc、containerdを動かしてみました。
1. コンテナのアーキテクチャと用語解説
まずMobyを動かす前にコンテナのアーキテクチャと用語を理解しておく必要があります
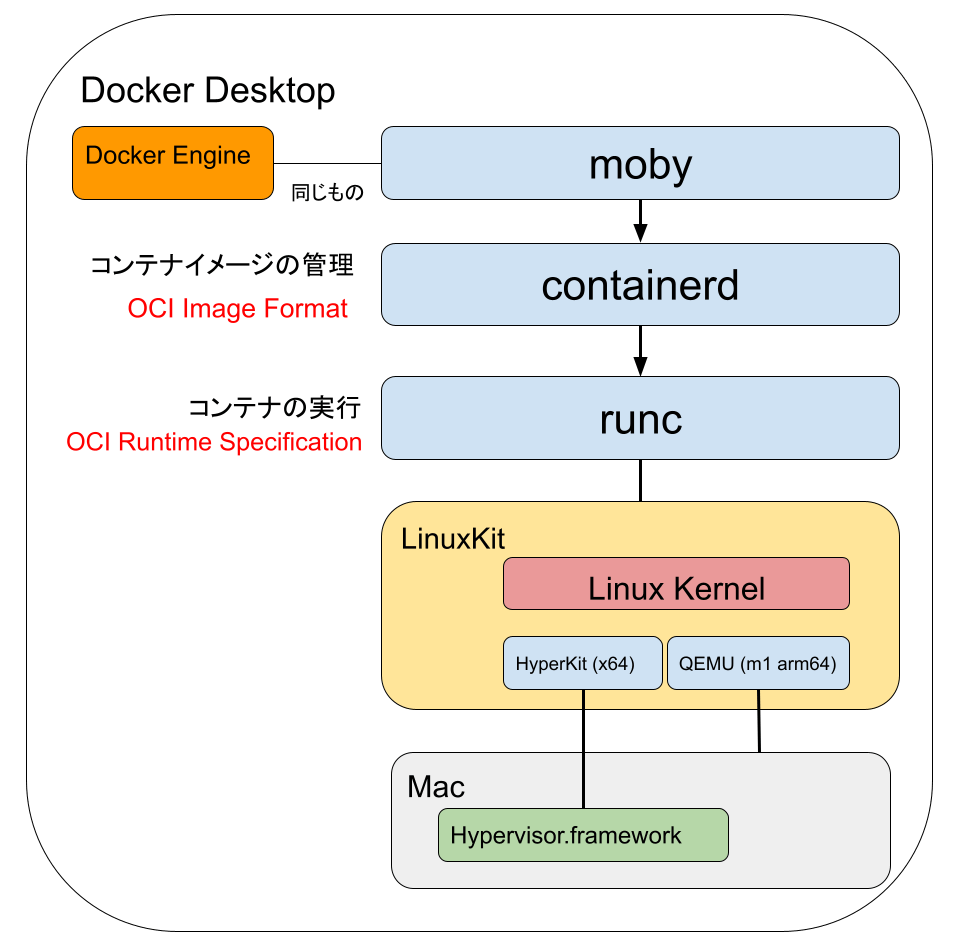
Docker Desktop(mac版)を俯瞰した図が上記となります。実際はDocker DesktopはKubernetes(k8s)も内包してたりするのですがDockerと一般的に言われている範囲に絞っています。
たくさん用語がでてきて頭が混乱してきましたね、表にして整理していきましょう。
| 用語 | 解説 |
|---|---|
| Docker Engine | Docker Desktopのコアプログラム。2022/08/14 時点でバージョンは20.10.17 |
| Moby | DockerのOSSプロジェクト。コピー亜種ではなくオリジナル。雑にいうとRedHatに対するFedoraのような立ち位置。最新のGitHub Releaseタグは20.10.17でDocker Engineと同じ。 |
| containerd | コンテナイメージ管理などを行うコンテナの高レベルランタイム。gRPCサーバーでコマンドインターフェースとやりとりする。Linux Foundation傘下のCloud Native Computing Foundation(CNCF)卒業プロジェクト(オープンなプロダクト) |
| OCI | Open Container Initiativeの略。「コンテナ」のフォーマット・ランタイムの業界標準策定を目的として設立されたイニシアチブである。Linux Foundationプロジェクトの1つ。 |
| OCI Image Format | OCIが定めるコンテナイメージの仕様。これによりDocker buildでビルドしたものがcontainerdで動作するという互換性が担保されている。 |
| runc | コンテナを実行する低レベルランタイム |
| OCI Runtime Specofocation | OCIが定めるランタイムの仕様、これによりcontainerdがrunc以外のランタイムを切り替えて実行できるようになっている。有名なのだとgoogleのgVisor(runsc) |
| LinuxKit | Docker=コンテナそのもの=runcより下のレイヤーはLinuxのnamespaceやcgroupに依存するのでLinuxでないと動きません。WindowsやMacでもDockerが使えるようにLinuxカーネルが入っています。 |
| HyperKit | Macの仮想化機能であるHypervisor.frameworkを使ってOS上にOS[Dockerを動かすホストOSであるLinux]を動かすライブラリ |
| QEMU | M1(ARM64)のMacではx64等のコンテナはそのまま動きませんのでその場合QEMEでのCPUエミュレーションが行われます。 |
わかりやすくゲーム機に例えると
| 用語 | ゲーム機でいうと |
|---|---|
| コンテナ | ゲームソフト(ニンテンドースイッチならカセットに相当) |
| OCI Image Format | ゲームソフトが守るべき仕様、ソフトのファイルリスト、アセットリストや、ソフトウェアが何でどうやって作られたか?などを記載 |
| containerd | ゲームソフトをゲーム機が動かせるように解凍、復号化する。またオンラインからソフトをダウンロードできる |
| runc | 解凍・復号化されたゲームソフトを実行するソフトウェア |
| ホストLinux | ゲーム機本体のOS |
いろいろありますが覚えるべきはcontainerdとrunc
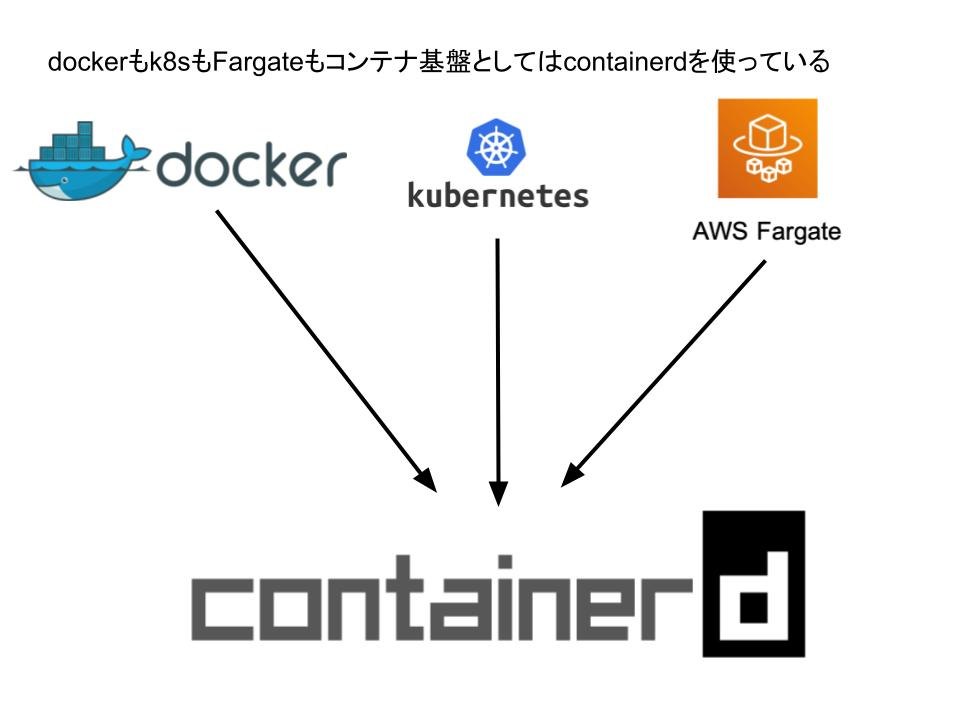
Dockerはコアとなる技術をオープンな団体に標準化を目的として寄贈しており、containerdはCNCF(Cloud Native Computing Foundation)に寄贈して生まれて、runcはOCIに寄贈して生まれています。そうなると 「Dockerとはいったい何なのか」 という状況になるのは当然で、多くの人が使っているコンテナそのもののコアはcontainerdが担い、k8sもAWS Fargate1.4もDockerそのものを使うことはやめてcontainerdを呼ぶ方式に現在はなっています。なのでコンテナ技術を覚えるにはDockerというよりはcontainerdとそこから実行されるコンテナランタイムのリファレンス実装であるruncを理解するのが良いと思います。
(参考)詳細: Fargate データプレーン
プラットフォームバージョン 1.4 で導入された変更点の 1 つは、Fargate のコンテナ実行エンジンとして、Docker Engine を Containerd に置き換えたことです。
https://aws.amazon.com/jp/blogs/news/under-the-hood-fargate-data-plane/
2. Mobyのビルドと接続
Mobyの中にruncもcontainerdもライブラリとしては内包されているのでMobyをビルドすればrunc、containerdも使えるようになります。
ではDockerのソースコードであるMobyをビルドしていきましょう。
環境はM1 Macで行っています。
ソースコードの取得
git clone git@github.com:moby/moby.git
cd moby
git checkout v20.10.17
v20.10.17が最新のため念の為それにチェックアウトを行います。
Dockerビルド
Linuxではそのままコンパイルできると思いますがLinuxの機能を使う以上Macでコンパイルして実行することは難しいのでDockerファイルを使ったビルドを行います。
なのでこの先はDocker内でDocker(Moby)を動かすということを実施することになります。
docker build -t moby .
Dockerファイルの中身は400行近くあり、ある程度は時間がかかります。Go言語で作られているソフトウェアなのでコンテナのベースイメージはgolangのイメージが使われています。
ビルドが終わったら docker imagesコマンドでサイズを確認します。
moby 2 days ago 2.04GB
2G近いイメージになっています。
コンテナイメージにはいる
docker run --rm --privileged -t -i moby bash
root@cdd5e11a42b0:/go/src/github.com/docker/docker#
cd ~
※privilegedオプションをつけているのは特権モードでないと入れないようになっているため
初期のフォルダはMobyのソースコードが入っているフォルダになっているため適当なところに移動して作業したほうがよいでしょう。
runc containerdを探す
/usr/local/bin/ にdockerやrunc、containerdがコンパイルされて格納されています
ls -o -g -l -h /usr/local/bin/
total 258M
-rwxr-xr-x 1  38M Aug 11 12:41 containerd
-rwxr-xr-x 1 7.4M Aug 11 12:41 containerd-shim
-rwxr-xr-x 1 9.5M Aug 11 12:41 containerd-shim-runc-v2
-rwxr-xr-x 1  23M Aug 11 12:41 ctr
-rwxr-xr-x 1 498K Aug 11 12:39 docker-init
-rwxr-xr-x 1 2.5M Aug 11 12:39 docker-proxy
-rwxr-xr-x 1  14K Aug 11 12:37 dockerd-rootless-setuptool.sh
-rwxr-xr-x 1 5.1K Aug 11 12:37 dockerd-rootless.sh
-rwxr-xr-x 1  29M Aug 11 12:40 golangci-lint
-rwxr-xr-x 1 6.2M Aug 11 12:39 gotestsum
-rwxr-xr-x 1  16M Aug 11 12:40 registry-v2
-rwxr-xr-x 1 9.9M Aug 11 12:39 rootlesskit
-rwxr-xr-x 1 6.4M Aug 11 12:39 rootlesskit-docker-proxy
-rwxr-xr-x 1  13M Aug 11 12:40 runc
-rwxr-xr-x 1 3.7M Aug 11 12:39 shfmt
-rwxr-xr-x 1  16M Aug 11 12:39 swagger
-rwxr-xr-x 1 2.8M Aug 11 12:39 tomlv
-rwxr-xr-x 1 7.2M Aug 11 12:39 vndr
-rwxr-xr-x 1  38M Feb  9  2021 vpnkit.aarch64
-rwxr-xr-x 1  33M Feb  9  2021 vpnkit.x86_64
-rwxr-xr-x 1  212 Aug 11 12:41 yamllint
「あれmobyをコンパイルしたのにmobyコマンドがないじゃん」 と思うかもしれません。それもそのはず結局のところmobyというのはdockerなのでmobyをコンパイルしてもできあがるのはdockerになります。
今回はdockerコマンドは使いません。この一覧で重要なのは runc、containerd、ctr(containerdを操作するツール)となります。
runcの動作確認
root@cdd5e11a42b0:~# runc -v
runc version 1.1.2
commit: v1.1.2-0-ga916309f
spec: 1.0.2-dev
go: go1.17.11
libseccomp: 2.5.1
🎉 おめでとうございます。runcは無事に動作できました。ここからruncを使ってコンテナを動かしていきましょう。
3 runcでコンテナを動かして理解する
runcの資料
runcのソースコード、及び資料はOCIのgithubから探すことになります。
もはやDocker=mobyの管理外ということです。
READMEに面白い記載があります
Using runc
Please note that runc is a low level tool not designed with an end user in mind. It is mostly employed by other higher level container software.
「runc(低レベル単ライム)はユーザーが直接実行することは想定されていません、高レベルランタイム(containerd)などから使ってください」と書いてあります。・・・が今回はコンテナのお勉強のため直接使っていきましょう。
真に薄いコンテナを作る
では早速コンテナを作っていきましょう。
mkdir /mycontainer
cd /mycontainer
mkdir rootfs
runc spec
- コンテナ用のフォルダを作って
- その中にルートファイルシステムを作る (中身は空)
- runc specでコンテナランタイムが動作する時の仕様ファイルを作る(自動でジェネレートしてくれる)
root@cdd5e11a42b0:/mycontainer# ls -lt
total 8
-rw-r--r-- 1 root root 2592 Aug 14 08:46 config.json
drwxr-xr-x 2 root root 4096 Aug 14 08:45 rootfs
config.jsonがコンテナランタイムの仕様ファイルとなります。中身を見てみましょう。少し長いですが何が書かれてあるかは割と重要なので全部貼っておきます。
cat config.json
{
	"ociVersion": "1.0.2-dev",
	"process": {
		"terminal": true,
		"user": {
			"uid": 0,
			"gid": 0
		},
		"args": [
			"sh"
		],
		"env": [
			"PATH=/usr/local/sbin:/usr/local/bin:/usr/sbin:/usr/bin:/sbin:/bin",
			"TERM=xterm"
		],
		"cwd": "/",
		"capabilities": {
			"bounding": [
				"CAP_AUDIT_WRITE",
				"CAP_KILL",
				"CAP_NET_BIND_SERVICE"
			],
			"effective": [
				"CAP_AUDIT_WRITE",
				"CAP_KILL",
				"CAP_NET_BIND_SERVICE"
			],
			"permitted": [
				"CAP_AUDIT_WRITE",
				"CAP_KILL",
				"CAP_NET_BIND_SERVICE"
			],
			"ambient": [
				"CAP_AUDIT_WRITE",
				"CAP_KILL",
				"CAP_NET_BIND_SERVICE"
			]
		},
		"rlimits": [
			{
				"type": "RLIMIT_NOFILE",
				"hard": 1024,
				"soft": 1024
			}
		],
		"noNewPrivileges": true
	},
	"root": {
		"path": "rootfs",
		"readonly": true
	},
	"hostname": "runc",
	"mounts": [
		{
			"destination": "/proc",
			"type": "proc",
			"source": "proc"
		},
		{
			"destination": "/dev",
			"type": "tmpfs",
			"source": "tmpfs",
			"options": [
				"nosuid",
				"strictatime",
				"mode=755",
				"size=65536k"
			]
		},
		{
			"destination": "/dev/pts",
			"type": "devpts",
			"source": "devpts",
			"options": [
				"nosuid",
				"noexec",
				"newinstance",
				"ptmxmode=0666",
				"mode=0620",
				"gid=5"
			]
		},
		{
			"destination": "/dev/shm",
			"type": "tmpfs",
			"source": "shm",
			"options": [
				"nosuid",
				"noexec",
				"nodev",
				"mode=1777",
				"size=65536k"
			]
		},
		{
			"destination": "/dev/mqueue",
			"type": "mqueue",
			"source": "mqueue",
			"options": [
				"nosuid",
				"noexec",
				"nodev"
			]
		},
		{
			"destination": "/sys",
			"type": "sysfs",
			"source": "sysfs",
			"options": [
				"nosuid",
				"noexec",
				"nodev",
				"ro"
			]
		},
		{
			"destination": "/sys/fs/cgroup",
			"type": "cgroup",
			"source": "cgroup",
			"options": [
				"nosuid",
				"noexec",
				"nodev",
				"relatime",
				"ro"
			]
		}
	],
	"linux": {
		"resources": {
			"devices": [
				{
					"allow": false,
					"access": "rwm"
				}
			]
		},
		"namespaces": [
			{
				"type": "pid"
			},
			{
				"type": "network"
			},
			{
				"type": "ipc"
			},
			{
				"type": "uts"
			},
			{
				"type": "mount"
			},
			{
				"type": "cgroup"
			}
		],
		"maskedPaths": [
			"/proc/acpi",
			"/proc/asound",
			"/proc/kcore",
			"/proc/keys",
			"/proc/latency_stats",
			"/proc/timer_list",
			"/proc/timer_stats",
			"/proc/sched_debug",
			"/sys/firmware",
			"/proc/scsi"
		],
		"readonlyPaths": [
			"/proc/bus",
			"/proc/fs",
			"/proc/irq",
			"/proc/sys",
			"/proc/sysrq-trigger"
		]
	}
最初にある args はコンテナ起動時に動作するプログラム。これはDockerfileと同じ感じですが、その他はコンテナが 「俺は本物のLinuxなんだ、誰がなんと言おうとホストLinuxなんだ」 と(誤)認識できるよう、/procファイルシステムや/devファイルシステムの設定が書かれてあります。
コンテナで動くプログラムの準備
さてconfig.jsonではshが初期起動するように書いてますが、どこかからshを持ってこないといけません。
runcのREADMEではこの後busyboxをdockerでダウンロードしてその中身を解凍した後でruncで動かす様に書いてますが、ここまできてdockerを動かすのもシンプルではないですし、別の方法を考えます。
別の方法としてmobyの中にあるsh(実態はdashのリンクになっているので移動する場合はdash)をコンテナファイルにいれてもいいのですがそのままもっていくとダイナミックライブラリも参照しているためダイナミックライブラリも移動しないといけないので面倒です。
そこで Go言語の真骨頂 、Go言語プログラムであればスタティックリンクでのシングルバイナリができますのでここではHelloプログラムを作ってruncコンテナで動かしたいと思います。
viを起動し、以下のプログラムをhello.goで保存。
package main

import ("fmt")

func main() {
	fmt.Println("Hello runc")
}
go build -o hello
./hello
Hello runc
mobyがgolangのコンテナイメージから生成されているのは前述しました。なのでgoはすでに入っていますのでGoのプログラムのコンパイルはmobyイメージの中で可能です。
helloプログラムの動作確認もできましたので、config.jsonのargを書き換えます。
config.jsonの書き換え
{
	"ociVersion": "1.0.2-dev",
	"process": {
		"terminal": true,
		"user": {
			"uid": 0,
			"gid": 0
		},
		"args": [
			"hello"  <-ここ
helloプログラムのコンテナへの移動
mv hello.go ~
mkdir rootfs/bin
mv hello rootfs/bin/
/mycontainer# ls -ltF
drwxr-xr-x 3 root root 4096 Aug 14 09:12 rootfs/
-rw-r--r-- 1 root root 2596 Aug 14 09:04 config.json
root@cdd5e11a42b0:/mycontainer# ls rootfs/bin/
hello
root@cdd5e11a42b0:/mycontainer# ls rootfs/
bin
- hello.goはコンテナ起動には不要なのでホームへ退避
- helloプログラムはルートファイルシステムの/binへ移動
- rootfsはbin以外は空なのを確認
runcでのコンテナ起動
ではruncを動かしてみましょう(ドキドキ)
※c01はコンテナIDなので任意の値
runc run c01
Hello runc
おめでとうございます🎉😚。世界一薄く理解しやすいコンテナが起動できました。
ここでrootfsを見るとdevフォルダなどが生成されます(中身は空)
ls -F rootfs/
bin/  dev/  proc/  sys/
runcで動かすコンテナのプログラム2
本当にコンテナで動作しているのか? を実感するためにルートディレクトリをlsするプログラムを作ってみましょう。
vi ~/ls.go
package main

import (
	"fmt"
	"io/ioutil"
)

func main() {
	ls("/")
}

func ls(dir string) {
	files, err := ioutil.ReadDir(dir)
	if err != nil {
		panic(err)
	}
	for _, file := range files {
		fmt.Println(file.Name())
	}
}
go build -o rootfs/bin/ls ~/ls.go
config.jsonを書き換えます。
		"args": [
			"ls"
		],
runcで実行します。
runc run c02
bin
dev
proc
sys
おめでとうございます🎉😚🍷。コンテナで動作していることが実感できますね。制限されたファイルシステムの中で動作していることが確認できました。ちなみにホストLinuxであるmobyのルートディレクトリは以下です
root@cdd5e11a42b0:ls /
bin  boot  dev	docker-frozen-images  etc  go  home  lib  media  mnt  mycontainer  opt	proc  root  run  sbin  srv  sys  tmp  usr  var
ホストLinuxのルートディレクトリとコンテナ内のルートディレクトリ構造が明らかに違っていることからもruncでコンテナが実行できていることが実感できました。
straceで念の為cgroupが動いていることを確認
これでもコンテナが動いているのか疑う人がいるかもしれません。そこでstrace(システムコールのトレースツール)を使って、コンテナの基礎技術であるLinuxのcgroups(プロセスグループのリソース(CPU、メモリ、ディスクI/Oなど)の利用を制限・隔離するLinuxカーネルの機能)が動いていることを確認してみましょう。
starceのダウンロード
apt-get update
apt-get install strace
apt-getでパッケージ情報のアップデートをしています。
strace -o ~/strace.txt runc run c03
cat ~/strace.txt |grep cgroup
statfs("/sys/fs/cgroup/unified", 0x40000bb880) = -1 ENOENT (No such file or directory)
statfs("/sys/fs/cgroup", {f_type=CGROUP2_SUPER_MAGIC, f_bsize=4096, f_blocks=0, f_bfree=0, f_bavail=0, f_files=0, f_ffree=0, f_fsid={val=[0, 0]}, f_namelen=255, f_frsize=4096, f_flags=ST_VALID|ST_NOSUID|ST_NODEV|ST_NOEXEC|ST_RELATIME}) = 0
newfstatat(AT_FDCWD, "/proc/self/ns/cgroup", {st_mode=S_IFREG|0444, st_size=0, ...}, 0) = 0
openat(AT_FDCWD, "/proc/self/cgroup", O_RDONLY|O_CLOEXEC) = 3
newfstatat(AT_FDCWD, "/sys/fs/cgroup/c03", 0x40002064b8, 0) = -1 ENOENT (No such file or directory)
readlinkat(AT_FDCWD, "/proc/self/fd/3", "/sys/fs/cgroup", 128) = 14
中身が長いので全部は記載しませんがcgroupを使って色々行われていることは確認できました。
ちなみにruncを使わずに直接lsを実行したときはもちろんcgroupは使われていません。
strace -o ~/strace-ntv.txt  rootfs/bin/ls
cat ~/strace-ntv.txt |grep cgroup
空
runcのヘルプを見てできることを俯瞰する
runcでコンテナは無事動かせましたので、最後にruncで何ができるかをヘルプを見てなんとなく理解しておきます。
runc --help
※一部抜粋

COMMANDS:
   checkpoint  checkpoint a running container
   create      create a container
   delete      delete any resources held by the container often used with detached container
   events      display container events such as OOM notifications, cpu, memory, and IO usage statistics
   exec        execute new process inside the container
   kill        kill sends the specified signal (default: SIGTERM) to the container's init process
   list        lists containers started by runc with the given root
   pause       pause suspends all processes inside the container
   ps          ps displays the processes running inside a container
   restore     restore a container from a previous checkpoint
   resume      resumes all processes that have been previously paused
   run         create and run a container
   spec        create a new specification file
   start       executes the user defined process in a created container
   state       output the state of a container
   update      update container resource constraints
   features    show the enabled features
   help, h     Shows a list of commands or help for one command
コンテナのpsやkillなどある程度の事はできるのが俯瞰できます。nginxのようなサービス・プログラムもrunc単体で動作させることもできそうです。
runcを動かした上でのまとめ。
- コンテナを動かすのにはruncがあれば可能ということがわかりました。
- 特定の領域であればコンテナの実行はruncだけでも十分な気がします。例えばgoプログラムや単純なバッチなど。
runcは13M程度のプログラムです。容量が制限される環境で特定の条件であればruncだけインストールしてコンテナ実行というのは利用ケースとして応用が効きそうです(組み込みとか)
ls -lth /usr/local/bin/runc
-rwxr-xr-x 1 root root 13M Aug 11 12:40 /usr/local/bin/runc
4. containerdでコンテナを動かして理解する
containerdの役割
ここで一つの疑問が生まれます。 「え、待ってコンテナ実行するのにcontainerdいらなくない?runcで十分では?」 と。しかし思い出してほしいのですがruncはフォルダに格納されたコンテナを直接実行していました。私達が通常使っているコンテナ、Docker Hubでpullしてきている”イメージ”と言われているものは少なくともtarファイルに固められています。つまりruncはコンテナの中身そのもの=実行プログラムを扱うことはできますが、コンテナ(箱)を扱うことができません。コーヒー豆が入った貨物コンテナをイメージしてほしいのですが貨物コンテナの仕様がOCI Image Format だとしたら、runcはそれを理解できず、コンテナの中身のコーヒー豆で直接コーヒーを作ることしかできません。

またできあがったコンテナイメージがどのCPUで動くのか?ということも管理しないといけません。そういった仕様をコンテナイメージに定義するのがOCI Image Formatであり、それを扱うことができるのがcontainerdになります。
containerdの実行
containerdを早速実行していきます。containerdはデーモン(サーバー)として稼働するためtmux(ターミナルマルチプレクサ)を入れて裏で動かすことにします。
apt-get install tmux
tmux new -s cntd
/usr/local/bin/containerd

~
INFO[2022-08-14T12:28:47.070342375Z] starting containerd                           revision=10c12954828e7c7c9b6e0ea9b0c02b01407d3ae1 version=v1.6.6
INFO[2022-08-14T12:28:47.084386375Z] loading plugin "io.containerd.content.v1.content"...  type=io.containerd.content.v1
INFO[2022-08-14T12:28:47.084833125Z] loading plugin "io.containerd.snapshotter.v1.aufs"...  type=io.containerd.snapshotter.v1
INFO[2022-08-14T12:28:47.085661708Z] skip loading plugin "io.containerd.snapshotter.v1.aufs"...  error="aufs is not supported (modprobe aufs failed: exec: \"modprobe\": executable file not found in $PATH \"\"): skip plugin" type=io.containerd.snapshotter.v1
~略
INFO[2022-08-14T12:28:47.094314375Z] Connect containerd service
INFO[2022-08-14T12:28:47.094361708Z] Get image filesystem path "/var/lib/containerd/io.containerd.snapshotter.v1.overlayfs"
ERRO[2022-08-14T12:28:47.095234958Z] failed to load cni during init, please check CRI plugin status before setting up network for pods  error="cni config load failed: no network config found in /etc/cni/net.d: cni plugin not initialized: failed to load cni config"
INFO[2022-08-14T12:28:47.095382917Z] Start subscribing containerd event
INFO[2022-08-14T12:28:47.095422750Z] Start recovering state
INFO[2022-08-14T12:28:47.095538125Z] Start event monitor
INFO[2022-08-14T12:28:47.095573792Z] Start snapshots syncer
INFO[2022-08-14T12:28:47.095582083Z] Start cni network conf syncer for default
INFO[2022-08-14T12:28:47.095585917Z] Start streaming server
INFO[2022-08-14T12:28:47.095762375Z] serving...                                    address=/run/containerd/containerd.sock.ttrpc
INFO[2022-08-14T12:28:47.095848167Z] serving...                                    address=/run/containerd/containerd.sock
INFO[2022-08-14T12:28:47.095868583Z] containerd successfully booted in 0.027349s

(Ctl+Bを押してDで端末を抜ける)
ctrコマンドでcontainerdを操作
runcはrunc単体で動きましたが、containerdはデーモンとして起動するため、それを操作するプログラムが別に必要となります。安心してください別にインストールする必要はなくctrコマンドというものが用意されています。HELPを見てみましょう。
ctr --help
ctr is an unsupported debug and administrative client for interacting
with the containerd daemon. Because it is unsupported, the commands,
options, and operations are not guaranteed to be backward compatible or
stable from release to release of the containerd project.

COMMANDS:
   plugins, plugin            provides information about containerd plugins
   version                    print the client and server versions
   containers, c, container   manage containers
   content                    manage content
   events, event              display containerd events
   images, image, i           manage images
   leases                     manage leases
   namespaces, namespace, ns  manage namespaces
   pprof                      provide golang pprof outputs for containerd
   run                        run a container
   snapshots, snapshot        manage snapshots
   tasks, t, task             manage tasks
   install                    install a new package
   oci                        OCI tools
   shim                       interact with a shim directly
   help, h                    Shows a list of commands or help for one command
oci、images、snapshots など高レベルランタイムにふさわしくdockerコマンドっぽい雰囲気になってきました。それぞれのオプションにさらにヘルプがあります。
$ctr images help

VERSION:
   v1.6.6

COMMANDS:
   check                    check existing images to ensure all content is available locally
   export                   export images
   import                   import images
   list, ls                 list images known to containerd
   mount                    mount an image to a target path
   unmount                  unmount the image from the target
   pull                     pull an image from a remote
   push                     push an image to a remote
   delete, del, remove, rm  remove one or more images by reference
   tag                      tag an image
   label                    set and clear labels for an image
   convert                  convert an image
pull an image from a remote という懐かしい文言がでてきました。そうですまさにこれがdocker pullと同じコマンドになります。 ctrを使えばdocker pullと同じことができそうなのがわかってきました。
ctrコマンドの参考となるページ:https://iximiuz.com/en/posts/containerd-command-line-clients/
ctrコマンドでbusyboxイメージをpullしてcontainerdで実行
いよいよctrコマンドでDocker Hubからみんな大好きbusyboxイメージをダウンロードして実行してみましょう。
ctr images pull docker.io/library/busybox:latest
無事成功したらイメージがあるかを確認します
ctr images list

docker.io/library/busybox:latest application/vnd.docker.distribution.manifest.list.v2+json sha256:ef320ff10026a50cf5f0213d35537ce0041ac1d96e9b7800bafd8bc9eff6c693 813.5 KiB linux/386,linux/amd64,linux/arm/v5,linux/arm/v6,linux/arm/v7,linux/arm64/v8,linux/mips64le,linux/ppc64le,linux/riscv64,linux/s390x -
イメージはローカルに格納されています。
では実行しbusyboxのコンテナに接続してみましょう。ドキドキ
ctr run --rm -t --snapshotter=native docker.io/library/busybox:latest busy1
- busy1はコンテナIDなので任意
- --snapshotter=nativeがないとエラーになる
/ #
ls /bin
〜略
crc32              flock              ipcrm              mkfs.ext2          pstree             showkey            tunctl
crond              fold               ipcs               mkfs.minix         pwd                shred              ubiattach
crontab            free               iplink             mkfs.vfat          pwdx               shuf               ubidetach
cryptpw            freeramdisk        ipneigh            mknod              raidautorun        slattach           ubimkvol
busyboxのコマンド群が確認できますね。
おめでとうございます🎉😘🍺。containerd+ctrコマンドで無事僕らが知っているコンテナイメージが実行できました。 素晴らしい!
いったんコンテナから抜けましょう。
exit
containerdのログを確認してみる
tmux a -t cntdで一度containerdのログを確認してみます。
time="2022-08-14T12:45:17.501084750Z" level=info msg="loading plugin \"io.containerd.event.v1.publisher\"..." runtime=io.containerd.runc.v2 type=io.containerd.event.v1
time="2022-08-14T12:45:17.501548458Z" level=info msg="loading plugin \"io.containerd.internal.v1.shutdown\"..." runtime=io.containerd.runc.v2 type=io.containerd.internal.v1
time="2022-08-14T12:45:17.501555333Z" level=info msg="loading plugin \"io.containerd.ttrpc.v1.task\"..." runtime=io.containerd.runc.v2 type=io.containerd.ttrpc.v1
time="2022-08-14T12:45:17.502490958Z" level=info msg="starting signal loop" namespace=default path=/run/containerd/io.containerd.runtime.v2.task/default/busy1 pid=1257 runtime=io.containerd.runc.v2
INFO[2022-08-14T12:50:59.166935964Z] shim disconnected                             id=busy1
WARN[2022-08-14T12:50:59.167300339Z] cleaning up after shim disconnected           id=busy1 namespace=default
INFO[2022-08-14T12:50:59.167333172Z] cleaning up dead shim
WARN[2022-08-14T12:50:59.181886089Z] cleanup warnings time="2022-08-14T12:50:59Z" level=info msg="starting signal loop" namespace=default pid=1300 runtime=io.containerd.runc.v2
先程のbusyboxイメージの起動にcontainerdが使われていることが確認できました。
僕の作った最強のhelloコンテナをcontainerdでうごかすには?
runcで使ったhelloコンテナをcontainerdで動かすにはどうしたらいいでしょうか?自分でruncで使ったディレクトリをtar化してctrコマンドでimportしてみましたがもちろんエラーになります(頭で理解するためにも是非一回やってみてください)。OCIイメージフォーマットに則ってないからです。OCIイメージフォーマットにあわせるにはtarファイルにいろいろ書き込まないといけなさそうです。
ctr images import --base-name hello-cnt/latest hello-cnt.tar
もちろんエラーになる
ctrコマンドを探してみましたがOCIイメージを作成する機能はなさそうなので別の手段を考えます、ここまできてdocker buildコマンドを使うのもアレなので今回はnerdctlを使用します。
dockerコマンド互換のnerdctlとは
containerdプロジェクトが提供するdockerコマンド互換でかつ機能を追加したcontainerdを操作するプログラムです。なので通常はctrコマンドを使わずにnerdctlを使うのが通常のようです。
README.mdに細かくDockerコマンドとの互換情報も書かれています。Dockerfileがそのまま使えることもわかります。
Helloコンテナ用のDockerfileとディレクトリの用意
nerdctlで動かすためのHelloコンテナ用のDockerfileを作成します
cd ~
mkdir hello-cnt
cd hello-cnt/
vi Dockerfile
FROM scratch
WORKDIR /usr/src/app
COPY hello .
helloプログラムはruncで使ったものをコピーしておきます
cp /mycontainer/rootfs/bin/hello .
ls
Dockerfile  hello
FROM scratch で動く最小のコンテナになります。
nerdctl、buildkitd、CNI pluginのインストール
ではまずnerdctlをインストールします。(さすがにmobyのイメージにnerdctlははいっていません)
リリースページから自身が使ってるマシンにあったCPUのやつを選びます。
cd ~
wget https://github.com/containerd/nerdctl/releases/download/v0.22.2/nerdctl-0.22.2-linux-arm64.tar.gz
tar xvf nerdctl-0.22.2-linux-arm64.tar.gz -C ./nerdctl
cp ./nerdctl/nerdctl /usr/local/bin/
解凍したらパスが通っている/usr/local/bin/に入れておきます。
ではいざ実行!すると・・・・
ERRO[0000] `buildctl` needs to be installed and `buildkitd` needs to be running, see https://github.com/moby/buildkit error="2 errors occurred:\n\t* failed to ping to host unix:///run/buildkit-default/buildkitd.sock: exec: \"buildctl\": executable file not found in $PATH\n\t* failed to ping to host unix:///run/buildkit/buildkitd.sock: exec: \"buildctl\": executable file not found in $PATH\n\n"
「buildkitdをいれてね!」とエラーになります。buildkitdデーモンを動かす必要とbuildkitのコマンドをパスに通す必要がありそうです。
こちらはmobyプロジェクトので管理されているようです。Releseページをみて最新をダウンロードします
wget https://github.com/moby/buildkit/releases/download/v0.10.3/buildkit-v0.10.3.linux-arm64.tar.gz
mkdir buildkit
tar xvf buildkit-v0.10.3.linux-arm64.tar.gz -C ./buildkit/
cd buildkit/bin/
root@cdd5e11a42b0:~/buildkit/bin# ls
buildctl	   buildkit-qemu-i386	 buildkit-qemu-mips64el  buildkit-qemu-riscv64	buildkit-qemu-x86_64  buildkitd
buildkit-qemu-arm  buildkit-qemu-mips64  buildkit-qemu-ppc64le	 buildkit-qemu-s390x	buildkit-runc
buildkitdを動かせばよさそうですがcontainerdと同じくデーモンのようなのでtmuxで今回は動かします。
tmux new -s buildkit
./buildkitd
INFO[2022-08-14T14:40:05Z] auto snapshotter: using native
WARN[2022-08-14T14:40:05Z] using host network as the default
INFO[2022-08-14T14:40:05Z] found worker "i9h4kc469l55yil54v7kykcuy", labels=map[org.mobyproject.buildkit.worker.executor:oci org.mobyproject.buildkit.worker.hostname:cdd5e11a42b0 org.mobyproject.buildkit.worker.network:host org.mobyproject.buildkit.worker.oci.process-mode:sandbox org.mobyproject.buildkit.worker.snapshotter:native], platforms=[linux/arm64 linux/amd64 linux/amd64/v2 linux/riscv64 linux/ppc64le linux/s390x linux/386 linux/mips64le linux/mips64 linux/arm/v7 linux/arm/v6]
WARN[2022-08-14T14:40:05Z] using host network as the default
INFO[2022-08-14T14:40:05Z] found worker "js5amtlsxus4aqn12rfin4ist", labels=map[org.mobyproject.buildkit.worker.containerd.namespace:buildkit org.mobyproject.buildkit.worker.containerd.uuid:e6c496c7-43c9-428c-b8e9-072c84a24f1b org.mobyproject.buildkit.worker.executor:containerd org.mobyproject.buildkit.worker.hostname:cdd5e11a42b0 org.mobyproject.buildkit.worker.network:host org.mobyproject.buildkit.worker.snapshotter:overlayfs], platforms=[linux/arm64 linux/amd64 linux/amd64/v2 linux/riscv64 linux/ppc64le linux/s390x linux/386 linux/mips64le linux/mips64 linux/arm/v7 linux/arm/v6]
INFO[2022-08-14T14:40:05Z] found 2 workers, default="i9h4kc469l55yil54v7kykcuy"
WARN[2022-08-14T14:40:05Z] currently, only the default worker can be used.
INFO[2022-08-14T14:40:05Z] running server on /run/buildkit/buildkitd.sock
Ctrl+B Dで端末を抜ける
さらにbuildkitコマンドを/usr/local/bin にコピーしておきます。(パスが通っているところに配置)
cp * /usr/local/bin/
またコンテナ実行時にCNI pluginが必要とエラーになるのでそれもダウンロードして展開しておきます
該当のエラー
FATA[0000] needs CNI plugin "bridge" to be installed in CNI_PATH ("/opt/cni/bin"), see https://github.com/containernetworking/plugins/releases: exec: "/opt/cni/bin/bridge": stat /opt/cni/bin/bridge: no such file or directory
mkdir ci
wget https://github.com/containernetworking/plugins/releases/download/v1.1.1/cni-plugins-linux-arm64-v1.1.1.tgz
tar xvf cni-plugins-linux-arm64-v1.1.1.tgz -C cni/
cd cni/
mkdir -p /opt/cni/bin
cp * /opt/cni/bin/
nerdctlでHelloコンテナビルド
では再度nerdctlでHelloコンテナをビルドしてみましょう(ドキドキ😳)
cd ~/hello-cnt/
nerdctl build -t hello-cnt .
[+] Building 0.3s (6/6) FINISHED
 => [internal] load build definition from Dockerfile                                                                                                  0.1s
 => => transferring dockerfile: 84B                                                                                                                   0.0s
 => [internal] load .dockerignore                                                                                                                     0.1s
 => => transferring context: 2B                                                                                                                       0.0s
 => [internal] load build context                                                                                                                     0.1s
 => => transferring context: 1.84MB                                                                                                                   0.0s
 => [1/2] WORKDIR /usr/src/app                                                                                                                        0.0s
 => [2/2] COPY hello .                                                                                                                                0.0s
 => exporting to oci image format                                                                                                                     0.1s
 => => exporting layers                                                                                                                               0.1s
 => => exporting manifest sha256:08b5cb9285295159c01ae678bae2b04dcf82e7832eaa442cfe291a2edfb6b916                                                     0.0s
 => => exporting config sha256:a01380c35705bc2e121c46086060d110a733b4bd7bab6a91b09c9bda75f62b1e                                                       0.0s
 => => sending tarball                                                                                                                                0.0s
unpacking docker.io/library/hello-cnt:latest (sha256:08b5cb9285295159c01ae678bae2b04dcf82e7832eaa442cfe291a2edfb6b916)...done
うまくいきました!ビルドは成功したようです🎉。
nerdctlで確認してみます
nerdctl images
REPOSITORY    TAG       IMAGE ID        CREATED               PLATFORM          SIZE       BLOB SIZE
busybox       latest    ef320ff10026    2 hours ago           linux/arm64/v8    1.4 MiB    813.5 KiB
hello-cnt     latest    08b5cb928529    About a minute ago    linux/arm64       1.8 MiB    937.3 KiB
ctrコマンドでも確認できます
ctr images list
REF                                TYPE                                                      DIGEST                                                                  SIZE      PLATFORMS                                                                                                                          LABELS
docker.io/library/busybox:latest   application/vnd.docker.distribution.manifest.list.v2+json sha256:ef320ff10026a50cf5f0213d35537ce0041ac1d96e9b7800bafd8bc9eff6c693 813.5 KiB linux/386,linux/amd64,linux/arm/v5,linux/arm/v6,linux/arm/v7,linux/arm64/v8,linux/mips64le,linux/ppc64le,linux/riscv64,linux/s390x -
docker.io/library/hello-cnt:latest application/vnd.docker.distribution.manifest.v2+json      sha256:08b5cb9285295159c01ae678bae2b04dcf82e7832eaa442cfe291a2edfb6b916 937.3 KiB linux/arm64
nerdctlでHelloコンテナ実行
ではいよいよnerdcrl+containerdでHelloコンテナを実行しましょう
cd ~/hello-cnt/
nerdctl run -it --rm  --snapshotter=native hello-cnt /usr/src/app/hello
Hello runc
🎉🎉🎉🎉🎉🎉🎉🎉お疲れ様でした🎉🎉🎉🎉🎉🎉🎉🎉。nerdctl+containerdでコンテナの実行ができました。
4. containerdを動かしてみてのまとめ
- containerdはデーモンプログラム。操作するには標準でctrコマンドがある。
- ctrコマンドは最低限の機能しかないので通常はnerdctlコマンドを使う。
- nerdctlはdockerコマンド互換のプログラム
- containerd + nerdcrlの組み合わせがほぼDockerと言われているものと同じことができる
5. OCI Image Formatの中身を見てみる
前章で自分でruncで使ったコンテナディレクトリをtar化してコンテナイメージを作るのを諦めnerdcrlを使ったわけですが、自分でコンテナイメージは作れないものなのでしょうか?。JSONかなにかをちょちょいと書けばできるのではないのでしょうか?。どういったフォーマットなのかを調べるためにhelloコンテナイメージをtar化して調べてみましょう。
ファイルの種類をいろいろ調べることになるので先にfileコマンドをインストールしておきます
apt-get install file
cd ~
nerdctl save -o hello.tar hello-cnt
mkdir extract-hello
tar xvf hello.tar -C extract-hello/
nerdctlでコンテナイメージからtarファイルを作成します。それをローカルフォルダに展開します。
blobs/
blobs/sha256/
blobs/sha256/08b5cb9285295159c01ae678bae2b04dcf82e7832eaa442cfe291a2edfb6b916
blobs/sha256/761cef6d37d14b1c609014d1e0b15191fd93c0739f2bd55b0961f46874600a18
blobs/sha256/a01380c35705bc2e121c46086060d110a733b4bd7bab6a91b09c9bda75f62b1e
blobs/sha256/ab4a5684214a134729aff4164ede721db84a8f5e62c9170c07efcd0f1a513a3b
index.json
manifest.json
oci-layout
何か嫌な予感がします😥。ファイルが思ってた以上に作られています。単純なhelloコンテナでしたが7個のファイルが格納されています。
cd extract-hello/
cat index.json  | jq .
{
  "schemaVersion": 2,
  "manifests": [
    {
      "mediaType": "application/vnd.docker.distribution.manifest.v2+json",
      "digest": "sha256:08b5cb9285295159c01ae678bae2b04dcf82e7832eaa442cfe291a2edfb6b916",
      "size": 733,
      "annotations": {
        "io.containerd.image.name": "docker.io/library/hello-cnt:latest",
        "org.opencontainers.image.created": "2022-08-14T14:47:20Z",
        "org.opencontainers.image.ref.name": "latest"
      }
    }
  ]
}
このファイルは特出すべき情報はありません
cat manifest.json | jq .
[
  {
    "Config": "blobs/sha256/a01380c35705bc2e121c46086060d110a733b4bd7bab6a91b09c9bda75f62b1e",
    "RepoTags": [
      "hello-cnt:latest"
    ],
    "Layers": [
      "blobs/sha256/ab4a5684214a134729aff4164ede721db84a8f5e62c9170c07efcd0f1a513a3b",
      "blobs/sha256/761cef6d37d14b1c609014d1e0b15191fd93c0739f2bd55b0961f46874600a18"
    ]
  }
]
こちらにはイメージレイヤーの情報が格納されているようです。もうこの時点で自分でイメージを作成するのが無理だと理解できました。手書きで書くのは不可能です。
cd blobs/sha256/
08b5cb9285295159c01ae678bae2b04dcf82e7832eaa442cfe291a2edfb6b916: JSON data
761cef6d37d14b1c609014d1e0b15191fd93c0739f2bd55b0961f46874600a18: gzip compressed data, original size 1843200
a01380c35705bc2e121c46086060d110a733b4bd7bab6a91b09c9bda75f62b1e: JSON data
ab4a5684214a134729aff4164ede721db84a8f5e62c9170c07efcd0f1a513a3b: gzip compressed data, original size 2560
blobsにはjsonファイル2つとgzipファイル2つが格納されています。
片方のJSONファイルはほぼDokcerfileの情報が入っていました。
root@cdd5e11a42b0:~/extract-hello/blobs/sha256# cat a01380c35705bc2e121c46086060d110a733b4bd7bab6a91b09c9bda75f62b1e | jq .
{
  "architecture": "arm64",
  "config": {
    "Env": [
      "PATH=/usr/local/sbin:/usr/local/bin:/usr/sbin:/usr/bin:/sbin:/bin"
    ],
    "WorkingDir": "/usr/src/app",
    "OnBuild": null
  },
  "created": "2022-08-14T14:47:20.734709512Z",
  "history": [
    {
      "created": "2022-08-14T14:47:20.66740322Z",
      "created_by": "WORKDIR /usr/src/app",
      "comment": "buildkit.dockerfile.v0"
    },
    {
      "created": "2022-08-14T14:47:20.734709512Z",
      "created_by": "COPY hello . # buildkit",
      "comment": "buildkit.dockerfile.v0"
    }
略
また76~からはじまるgzファイルは、helloプログラム本体、abから始まるgzファイルは/usr/src/appのフォルダのみが格納されていました。
6. まとめ
- runcはコンテナを実行できる、低レベルコンテナランタイム。ここでいうコンテナはコンテナイメージでなくディレクトリ、必要なのはスペックファイル。
- containerdはコンテナイメージを管理してくれる、pull push、コンテナイメージの展開ができる。
- cntはcontainerdの操作をやってくれる。dockerコマンド互換ではないので機能は限られる、コンテナイメージのビルドができない。
- nerdctlはdockerコマンド互換でdockerと同等の操作が可能。
※基本は最初の用語解説を再度参照しましょう
7. runcとcontainerdを動かしてみての感想
Go言語の勉強になるのでrunc、containerdのソースコードを読んで動かして理解するのは夏休みの自由研究にはピッタリだと思いました。(社会人の夏休みはもう終わりかもしれないですが。)
Docker自体が標準化を目的とした戦略の上でrunc、containerdを切り売りしてOSS化したことでDocker、mobyという其の物の権威や名称が薄れていっているのはOSSの戦略として難しいなぁという印象をうけました。
Discussion