2023年版! FirebaseでStandaloneなAngularをUniversal(SSR)デプロイする
バージョン16になったAngularですが、Standalone APIの導入などもあり、
一昔前と比べるとSSR周りのセッティング方法がわりと変わっています。
検証した結果、色々がんばるとStandalone AngularでSSRできることがわかりましたので、
Firebaseでこれを実現する一連の流れをまとめました。
環境・前提
筆者の環境はホストOSはArchLinuxです。 適宜お使いの環境に読み替えてください。
$ firebase --version
12.4.4

$ ng version

     _                      _                 ____ _     ___
    / \   _ __   __ _ _   _| | __ _ _ __     / ___| |   |_ _|
   / △ \ | '_ \ / _` | | | | |/ _` | '__|   | |   | |    | |
  / ___ \| | | | (_| | |_| | | (_| | |      | |___| |___ | |
 /_/   \_\_| |_|\__, |\__,_|_|\__,_|_|       \____|_____|___|
                |___/


Angular CLI: 16.1.4
Node: 18.12.1
Package Manager: npm 8.19.2
OS: linux x64

Angular: 16.1.5
... animations, common, compiler, compiler-cli, core, forms
... platform-browser, platform-browser-dynamic, platform-server
... router

Package                         Version
---------------------------------------------------------
@angular-devkit/architect       0.1601.4
@angular-devkit/build-angular   16.1.4
@angular-devkit/core            16.1.4
@angular-devkit/schematics      16.1.4
@angular/cli                    16.1.4
@angular/fire                   7.6.1
@nguniversal/builders           16.1.1
@nguniversal/express-engine     16.1.1
@schematics/angular             16.1.4
rxjs                            7.8.1
typescript                      5.1.6
Firebaseでプロジェクトを作成して、ローカル環境でログインする
まずはブラウザでFirebaseにログインし、プロジェクトの作成を行います。
https://console.firebase.google.com/ からプロジェクトを追加でプロジェクトを作ります。

名前をつけてプロジェクトを作成した後、ローカル環境でfirebaseにログインします。
$ firebase login
i  Firebase optionally collects CLI and Emulator Suite usage and error reporting information to help improve our products. Data is collected in accordance with Google's privacy policy (https://policies.google.com/privacy) and is not used to identify you.

? Allow Firebase to collect CLI and Emulator Suite usage and error reporting information? Yes
i  To change your data collection preference at any time, run `firebase logout` and log in again.

Visit this URL on this device to log in:
https://accounts.google.com/o/oauth2/auth?client_id=000000000000-xxxxxxxxxxxxxxxxxxxxxxxxxxxxxxxx.apps.googleusercontent.com&scope=email%20openid%20https%3A%2F%2Fwww.googleapis.com%2Fauth%2Fcloudplatformprojects.readonly%20https%3A%2F%2Fwww.googleapis.com%2Fauth%2Ffirebase%20https%3A%2F%2Fwww.googleapis.com%2Fauth%2Fcloud-platform&response_type=code&state=000000000&redirect_uri=http%3A%2F%2Flocalhost%3A9005

Waiting for authentication...

✔  Success! Logged in as example@example.com
ブラウザが立ち上がって、Googleアカウントでのログインを求められます。
Firebaseを利用するアカウントでログインしてAuthorizationを完了してください。
プロジェクトの準備
ローカル環境にAngularのStandaloneプロジェクトを作成します。
今回はexample-angular-universal-16というプロジェクト名にしました。
$ ng new example-angular-universal-16 --standalone
? Would you like to add Angular routing? Yes
? Which stylesheet format would you like to use? SCSS   [ https://sass-lang.com/documentation/syntax#scss                ]
            Standalone application structure is new and not yet supported by many existing 'ng add' and 'ng update' integrations with community libraries.
CREATE example-angular-universal-16/README.md (1079 bytes)
CREATE example-angular-universal-16/.editorconfig (274 bytes)
CREATE example-angular-universal-16/.gitignore (548 bytes)
CREATE example-angular-universal-16/angular.json (3175 bytes)
CREATE example-angular-universal-16/package.json (1059 bytes)
CREATE example-angular-universal-16/tsconfig.json (901 bytes)
CREATE example-angular-universal-16/tsconfig.app.json (263 bytes)
CREATE example-angular-universal-16/tsconfig.spec.json (273 bytes)
CREATE example-angular-universal-16/.vscode/extensions.json (130 bytes)
CREATE example-angular-universal-16/.vscode/launch.json (470 bytes)
CREATE example-angular-universal-16/.vscode/tasks.json (938 bytes)
CREATE example-angular-universal-16/src/main.ts (250 bytes)
CREATE example-angular-universal-16/src/favicon.ico (948 bytes)
CREATE example-angular-universal-16/src/index.html (311 bytes)
CREATE example-angular-universal-16/src/styles.scss (80 bytes)
CREATE example-angular-universal-16/src/app/app.component.scss (0 bytes)
CREATE example-angular-universal-16/src/app/app.component.html (23115 bytes)
CREATE example-angular-universal-16/src/app/app.component.spec.ts (954 bytes)
CREATE example-angular-universal-16/src/app/app.component.ts (390 bytes)
CREATE example-angular-universal-16/src/app/app.config.ts (228 bytes)
CREATE example-angular-universal-16/src/app/app.routes.ts (77 bytes)
CREATE example-angular-universal-16/src/assets/.gitkeep (0 bytes)
✔ Packages installed successfully.
    Successfully initialized git.
Angular用Firebaseクライアントのインストール
先ほど作成したプロジェクトに、@angular/fireを追加していきます。
ng add @angular/fireコマンドをシェルに入力すると、対話的に利用する機能を選ばされます。
お使いのプロジェクトに合わせて、適宜SPACEキーで選択しましょう。
$ cd example-angular-universal-16
$ ng add @angular/fire
✔ Packages installed successfully.
? What features would you like to setup? ng deploy -- hosting, Firestore, Cloud Functions (callable)
Using firebase-tools version 12.4.4
? Which Firebase account would you like to use? sasaki.ver1000000@gmail.com
✔ Preparing the list of your Firebase projects
? Please select a project: example-angular-universal
? Please select a hosting site: https://example-angular-universal.web.app
✔ Preparing the list of your Firebase WEB apps
? Please select an app: [CREATE NEW APP]
? What would you like to call your app? example-angular-universal
✔ Creating your Web app
✔ Downloading configuration data of your Firebase WEB app
CREATE src/environments/environment.ts (400 bytes)
CREATE .firebaserc (244 bytes)
UPDATE .gitignore (602 bytes)
UPDATE src/app/app.module.ts (823 bytes)
UPDATE angular.json (3197 bytes)
UPDATE firebase.json (133 bytes)
ここで一度コミットを行います。
$ git add .
$ git commit -m 'chore: ng add @angular/fire'
SSR用サーバライブラリのインストール
@nguniversal/express-engineをプロジェクトに追加します。
$ ng add @nguniversal/express-engine
ℹ Using package manager: npm
✔ Found compatible package version: @nguniversal/express-engine@16.1.1.
✔ Package information loaded.

The package @nguniversal/express-engine@16.1.1 will be installed and executed.
Would you like to proceed? Yes
✔ Packages successfully installed.
Option "appId" is deprecated: This option is no longer used.
CREATE src/main.server.ts (60 bytes)
CREATE src/app/app.server.module.ts (318 bytes)
CREATE tsconfig.server.json (272 bytes)
CREATE server.ts (2052 bytes)
UPDATE package.json (1587 bytes)
UPDATE angular.json (5194 bytes)
UPDATE src/app/app-routing.module.ts (291 bytes)
✔ Packages installed successfully.
@nguniversal/express-engineがプロジェクトにインストールされると、次のコマンドを用いることでSSRなサービングができるようになります。
$ npm run dev:ssr
コミットを行います。
$ git add .
$ git commit -m 'chore: ng add @nguniversal/express-engine'
firebaseの初期化
SSRを行うため、functionsの初期化と設定を行います。
$ firebase init functions

     ######## #### ########  ######## ########     ###     ######  ########
     ##        ##  ##     ## ##       ##     ##  ##   ##  ##       ##
     ######    ##  ########  ######   ########  #########  ######  ######
     ##        ##  ##    ##  ##       ##     ## ##     ##       ## ##
     ##       #### ##     ## ######## ########  ##     ##  ######  ########

You're about to initialize a Firebase project in this directory:

  /home/akai/Projects/example-angular-universal-16

Before we get started, keep in mind:

  * You are initializing within an existing Firebase project directory


=== Project Setup

First, let's associate this project directory with a Firebase project.
You can create multiple project aliases by running firebase use --add,
but for now we'll just set up a default project.

i  Using project example-angular-universal (example-angular-universal)

=== Functions Setup
Let's create a new codebase for your functions.
A directory corresponding to the codebase will be created in your project
with sample code pre-configured.

See https://firebase.google.com/docs/functions/organize-functions for
more information on organizing your functions using codebases.

Functions can be deployed with firebase deploy.

? What language would you like to use to write Cloud Functions? TypeScript
? Do you want to use ESLint to catch probable bugs and enforce style? Yes
✔  Wrote functions/package.json
✔  Wrote functions/.eslintrc.js
✔  Wrote functions/tsconfig.json
✔  Wrote functions/tsconfig.dev.json
✔  Wrote functions/src/index.ts
✔  Wrote functions/.gitignore
? Do you want to install dependencies with npm now? Yes

added 654 packages, and audited 655 packages in 35s

115 packages are looking for funding
  run `npm fund` for details

2 moderate severity vulnerabilities

To address all issues, run:
  npm audit fix

Run `npm audit` for details.

i  Writing configuration info to firebase.json...
i  Writing project information to .firebaserc...

✔  Firebase initialization complete!
Cloud Functionsまわりの設定
SSRで配信を行えるようにするためには、いくつかのファイルを変更する必要があります。
こちらに細かく手順が記載されていますが、
変更するファイルについてそれぞれ簡単な説明と注意点を交えつつ、
次にdiffを示します。
firebase.json Cloud Functionsにリクエストをプロキシする
ホスティングしているディレクトリに実ファイルがない場合、すべてのリクエストをSSRで処理できるようにします。
@@ -3,7 +3,10 @@
     {
       "target": "example-angular-universal-16",
       "source": ".",
-      "frameworksBackend": {}
+      "frameworksBackend": {},
+      "rewrites": [
+        { "source": "**", "function": "universal" }
+      ]
     }
   ],
   "functions": [
package.json アプリのビルドスクリプト
SSR用の生成物を作成するビルドスクリプトを追加します。
@@ -4,7 +4,9 @@
   "scripts": {
     "ng": "ng",
     "start": "ng serve",
-    "build": "ng build",
+    "build": "ng build && npm run build:ssr && npm run copy:hosting && npm run build:functions",
+    "copy:hosting": "cp -r ./dist/example-angular-universal-16/ ./public && rm -f ./public/index.html",
+    "build:functions": "npm run --prefix functions build",
     "watch": "ng build --watch --configuration development",
     "test": "ng test",
functions/package.json ビルドファイル配信スクリプト
@@ -1,8 +1,8 @@
 {
   "name": "functions",
   "scripts": {
-    "lint": "eslint --ext .js,.ts .",
-    "build": "tsc",
+    "lint": "eslint --ext .ts .",
+    "build": "rm -rf ./dist && cp -r ../dist . && tsc",
     "build:watch": "tsc --watch",
     "serve": "npm run build && firebase emulators:start --only functions",
     "shell": "npm run build && firebase functions:shell",
functions/src/index.ts SSRの実装
いよいよ、SSRのメイン部分であるコードを追加します。
Functionsが受け取ったリクエストを、
ng add @nguniversal/express-engineで作成されたserver.tsで読み込めるようにします。
@@ -8,7 +8,6 @@
  */

 import {onRequest} from "firebase-functions/v2/https";
-import * as logger from "firebase-functions/logger";

 // Start writing functions
 // https://firebase.google.com/docs/functions/typescript
@@ -17,3 +16,10 @@
 //   logger.info("Hello logs!", {structuredData: true});
 //   response.send("Hello from Firebase!");
 // });
+
+export const universal = onRequest(async (request, response) => {
+  const PROJECT_NAME = "example-angular-universal-16";
+  const path = `${process.cwd()}/dist/${PROJECT_NAME}/server/main`;
+  const server = await import(path);
+  server.app()(request, response);
+});
(オプション) .gitignore ビルドファイルをgit管理しない
SSRでリクエストを処理するだけの場合、
ビルド後のファイルはgit管理に含めたくない場合が多いと思うので、
適宜、/.gitignoreの末尾にビルドファイルを追加します。
@@ -45,3 +45,7 @@ Thumbs.db
 .firebase
 *-debug.log
 .runtimeconfig.json
+
+# SSR build files
+/public
+/functions/dist
動作確認とデプロイ
ここまで上手く進めば、npm run buildとfirebase serveを打つことで、
http://localhost:5000 からSSRサービングの動作をローカルで確認できるようになります。
サービングが開始され、http://localhost:5000 にアクセスしたあとは、
ブラウザでJavaScriptを無効化したり、
開発者ツールのネットワークから通信のプレビューを見たりすれば、
配信される静的htmlの表示も確認できます。
動作が確認できたら次のコマンドでデプロイしましょう。
$ firebase deploy # 初回のデプロイには結構時間がかかります
おつかれさまでした!
おまけ: Firestoreを用いた実装例 〜 Signalsを添えて 〜
実際にうごかせる、簡単なFirestoreを用いた実装の例を紹介します。
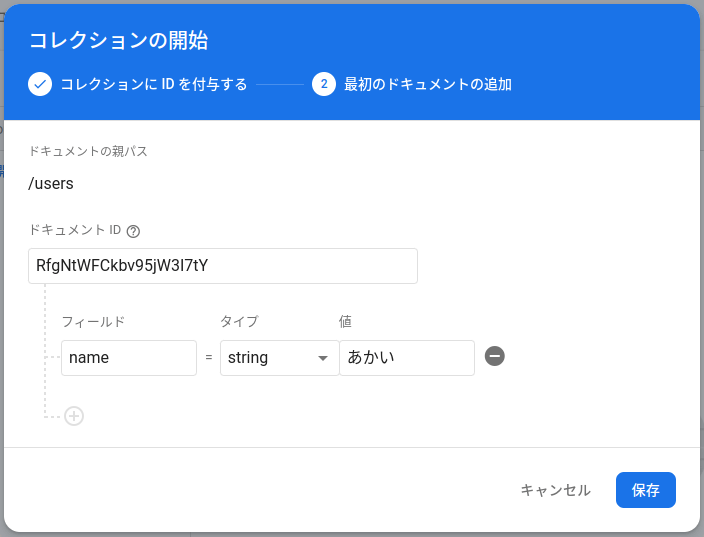
最初に、Firebase Consoleのサイドメニューから「構築 > Firestore Database」へと進み、データベースの作成ウィザードでよしなにデータベースを作成してください。
今回は試しにusersというコレクションを作成します。
Firestoreの設定ができたら、次のようにしてコンポーネントを作成します。
$ ng g component users
CREATE src/app/users/users.component.scss (0 bytes)
CREATE src/app/users/users.component.html (20 bytes)
CREATE src/app/users/users.component.spec.ts (547 bytes)
CREATE src/app/users/users.component.ts (294 bytes)
そして、実際にFirestoreを動かせるように、
- src/app/users/users.component.ts
- src/app/users/users.component.html
- src/app/app.routes.ts
- src/app/app.component.ts
- src/app/app.component.html
を実装していきます。
import { ChangeDetectionStrategy, Component, DestroyRef, inject, signal } from '@angular/core';
import { takeUntilDestroyed } from '@angular/core/rxjs-interop';
import { CommonModule } from '@angular/common';
import { Firestore, collection, collectionData, CollectionReference, doc, addDoc, deleteDoc } from '@angular/fire/firestore';

interface User {
  id?: string;
  name: string;
}

@Component({
  selector: 'app-users',
  standalone: true,
  templateUrl: './users.component.html',
  imports: [CommonModule],
  styleUrls: ['./users.component.scss'],
  changeDetection: ChangeDetectionStrategy.OnPush
})
export class UsersComponent {
  private readonly destroyRef = inject(DestroyRef);
  private readonly firestore = inject(Firestore);
  private readonly usersCollection = collection(this.firestore, 'users') as CollectionReference<User>;
  readonly users = signal<User[]>([]);

  ngOnInit(): void {
    const users$ = collectionData(this.usersCollection, { idField: 'id' });
    users$.pipe(takeUntilDestroyed(this.destroyRef)).subscribe(this.users.set);
  }

  addUser(name = ''): void {
    addDoc(this.usersCollection, { name });
  }

  deleteUser(user: User): void {
    const userDoc = doc(this.usersCollection, user.id);
    deleteDoc(userDoc);
  }
}
<section>
  <h2>Users</h2>
  <ul>
    <li *ngFor="let user of users()">
      {{ user.name }}({{ user.id }})
      <button type="button" (click)="deleteUser(user)">DELETE</button>
    </li>
    <li>
      <input type="text" (keydown.enter)="addUser(name.value)" #name>
      <button type="button" (click)="addUser(name.value)">ADD</button>
    </li>
  </ul>
</section>
import { Routes } from '@angular/router';

export const routes: Routes = [
  { path: 'users', loadComponent: () => import('./users/users.component').then((c) => c.UsersComponent) }
];
import { Component } from '@angular/core';
import { CommonModule } from '@angular/common';
import { RouterModule } from '@angular/router';

@Component({
  selector: 'app-root',
  standalone: true,
  imports: [CommonModule, RouterModule],
  templateUrl: './app.component.html',
  styleUrls: ['./app.component.scss']
})
export class AppComponent {
  title = 'example-angular-universal-16';
}
<main>
  <nav>
    <ul>
      <li><a routerLink="/">/</a></li>
      <li><a routerLink="/users">/users</a></li>
    </ul>
  </nav>

  <router-outlet></router-outlet>
</main>
事前レンダリング(Prerender)
SSRを行う際、URLごとにページを事前レンダリングすることで、
SSG的にファイルを配信できるので、サーバーでの計算コストを少なくすることができます。
具体的には、angular.jsonにprerenderするroutesを追記していくことで実現できます。
@@ -152,7 +152,8 @@
           "builder": "@nguniversal/builders:prerender",
           "options": {
             "routes": [
-              "/"
+              "/",
+              "/users"
             ]
           },
           "configurations": {
routesに該当するパスを付与したあとに、次のコマンドでprerenderします。
$ npm run prerender
prerenderをしたあとは、npm run serve:ssrなどで返す静的ファイルが、prerender時点の結果のものになるようです。
| アプリ画面 | Firestore Database |
|---|---|
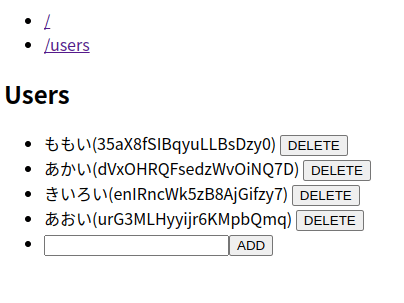 |
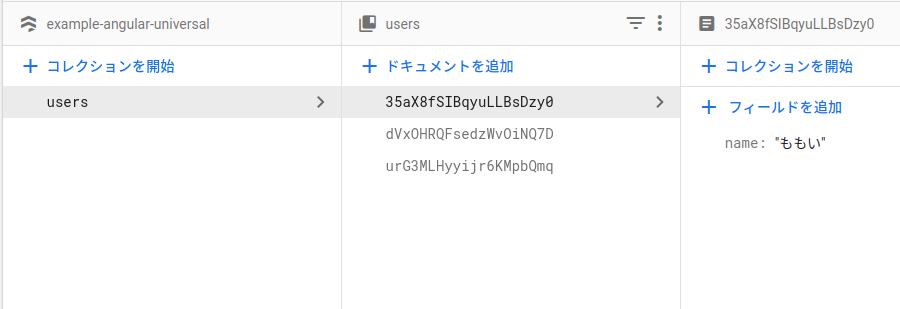 |
| データが削除される前にPrerenderしたため、古いUsersを保持している | 実データは3つしかない |
Discussion