[Rails]コミュニティサイト:イベント機能 実装②
昨日はここまで載せていました。
- 中間テーブルの役割とassociation
- ER図 / 必要なテーブルとカラムの作成
- associationの設定
- イベントの作成<CREAT>(controller と events/new view画面作成)
今日はshowからedit, destroy, まで行っていきます。
(参加の取り消し, 参加イベントリストの作成は、次回です。)
Event / creat
では昨日はここまでしましたね。参考までにコードのみトグルで表示いたします。
event controller / creat
<Events controler Create>
class Public::EventsController < ApplicationController
  def new
    @event = Event.new
  end

  def create
    @event = Event.new(event_params)
    @event.creator = current_user
    if @event.save
      redirect_to event_path(@event)
    else
      render "new"
    end
  end
:
:

private

  def event_params
    params.require(:event).permit(:event_name, :event_introduction, :date, :url)
  end
end
- 詳しくは昨日の投稿で確認して欲しいですが、簡単に書くと
@event.creator = current_userでcreator(class_name:"User")は
作成する今のuserだと定義しました。
new.html.erb
<div class="container mt-5">
  <div class="row justify-content-center">
    <div class="col-md-8">
      <h2 class="mt-3">Create events</h2>
      <%= form_with model: Event do |f| %>
        <div class="form-group">
          <label for="post_title">
            <h4>Event name</h4>
          </label>
          <%= f.text_field :event_name, class:'form-control event_title' %>
        </div>
        <div class="form-group">
          <label for="event_introduction">
            <h4>introduction</h4>
          </label>
          <%= f.text_area :event_introduction, rows: 10, cols: 10, class: "form-control" %>
        </div>
        <div class="form-group">
          <label for="url">
            <h4>URL</h4>
          </label>
          <%= f.text_field :url, class: "form-control" %>
        </div>
        <div class="form-group">
          <label for="introduction">
            <h4>開催日時</h4>
          </label>
          <%= f.datetime_field :date, class: "form-control" %>
        </div>
        <div class="form-group">
          <%= f.submit '投稿する' ,class: "btn btn-success"%>
        </div>
      <% end %>
    </div>
  </div>
</div>
Event / show
こんどはnewで作成したものを 表示させる showを作成すしていきます。
Event controller / show
def show
    @event = Event.find(params[:id])
    @attendee = Attendee.find_by(user_id: current_user.id, event_id: @event.id)

    if @attendee
      flash.now[:notice] = "#{@event.url}"
    else
      Attendee.create(user_id: current_user.id, event_id: @event.id)
    end
  end
-
@event = Event.find(params[:id])イベントIDの取得
-@attendee = Attendee.find_by(user_id: current_user.id, event_id: @event.id)
現在ログインしているユーザーがそのイベントに参加しているかどうかを調べるために記述。
この分は、viewの参加ボタンや参加取り消しボタンで使用するため記述。 -
今回はfind_byを使用したが、findとに違いは??!
今回は、複数条件での検索により1例のみが必要だったためfind_byを使用。
find_byと、findの違い
| find | find_by | |
|---|---|---|
| 検索条件 | idのみ。 | 複数の条件を指定可能。id以外でも可能 |
| 取得データ数 | 複数取得が可能。 | 最初にマッチした1件のみ。 |
| 検索結果がない場合の挙動 | 例外を発生させて処理を中断。 | nilを返すため処理は中断されない。 |
※より複雑な検索を行いたいときはwhereも使えます。 |
-
flash.now[:notice] = "#{@event.url}"
#{}を使用することによって、文字列中に変数や式を埋め込むことができ文字列として出力できる!
このパターンはviewも少し違うよ。
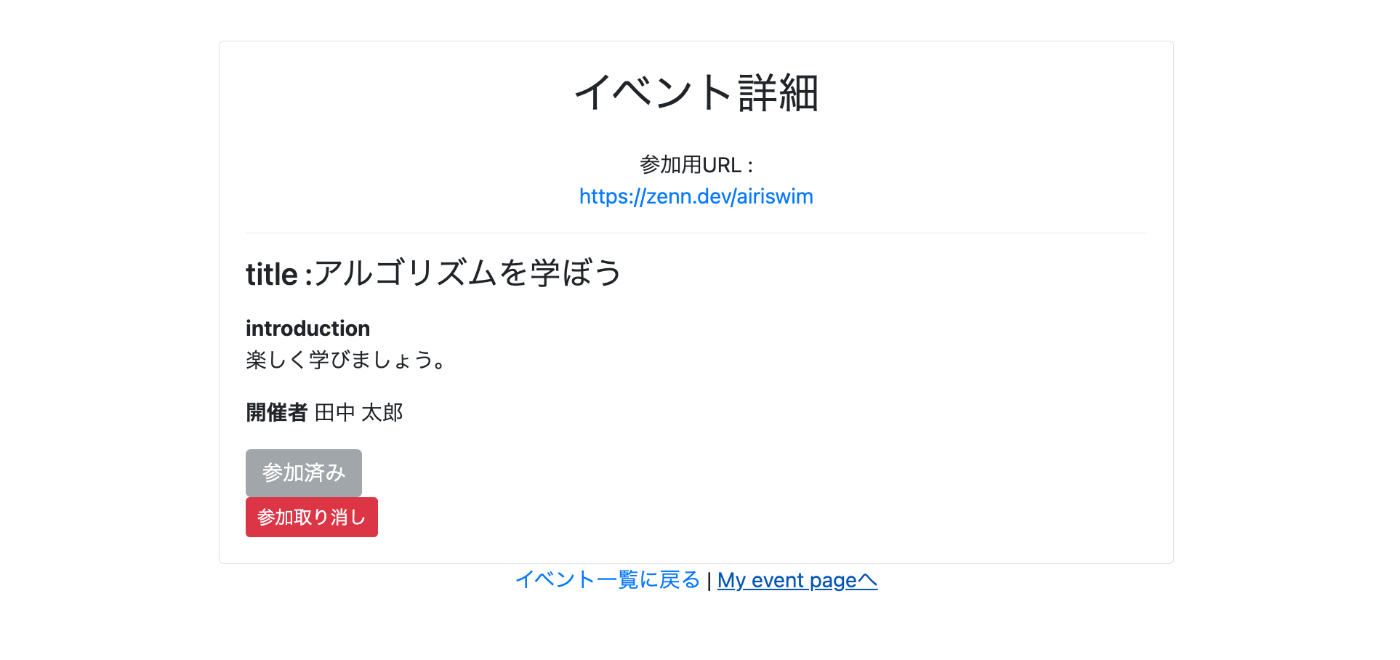
events / show (詳細ページ)
レイアウトは、まだ大まかにです。ご了承ください。

【 ここのviewのポイント 】
- 参加ボタンを押すと、参加用のzoomのURLが出現しみることができる仕組み。
- 参加決定後は、参加取り消しボタンを出しURLは消す。
- creatorのみ編集と削除ボタンの表示。
events show.html.erb
結構記述が多いので一旦トグルで全部載せて、下で分けて解説します。
events / show.html.erb
<div class="container">
  <div class="row justify-content-center">
    <div class="col-md-8">
      <div class="card">
        <div class="card-body">
          <h2 class="mb-4 text-center">イベント詳細</h2>
          <div class="message text-center">
            <% if flash.now[:notice] =~ /https?:\/\/[\S]+/ %>
              <% flash.now[:notice].scan(/https?:\/\/[\S]+/) do |url| %>
                <p>参加用URL : <br />
                  <%= link_to url, url %></p>
              <% end %>
            <% else %>
              <p class="mb-3"><%= flash.now[:notice] %></p>
            <% end %>
          </div>
          <hr>
          <h4 class="mb-3">
            title :<%= @event.event_name %>
          </h4>
          <p class="mb-3">
            <strong>introduction</strong><br />
            <%= @event.event_introduction %>
          </p>
          <p class="mb-3">
            <strong>開催者</strong>
            <%= @event.creator.full_name %>
          </p>
          <% if user_signed_in? %>
            <% if @event.creator.id != current_user.id %>
              <% if @attendee %>
                <%= button_to '参加済み', event_attendee_path(@event, @attendee), disabled: true, class: 'btn btn-secondary mr-3' %>
                <%= link_to "参加取り消し", event_attendee_path(@event, @attendee), class:'btn btn-sm btn-danger', method: :delete, data: { confirm: '本当に変更しますか?' } %>
              <% else %>
                <%= button_to '参加する', event_attendees_path(@event), class: 'btn btn-primary mr-3' %>
              <% end %>
            <% end %>
          <% else %>
            <%= link_to 'ログインして参加する', new_user_session_path, class: 'btn btn-primary mr-3' %>
          <% end %>
          <% if @event.creator_id == current_user.id %>
            <%= link_to "編集", edit_event_path(@event), class: 'btn btn-sm btn-success mr-3' %>
            <%= link_to "削除", event_path(@event), class:'btn btn-sm btn-danger', method: :delete, data: { confirm: '本当に削除しますか?' } %>
          <% end %>
        </div>
      </div>
      <div class="text-center">
        <%= link_to "イベント一覧に戻る", events_path %> |
        <%= link_to "My event pageへ", myevent_events_path %>
      </div>
    </div>
  </div>
</div>
- フラッシュメッセージでURLを表示させるコード。
<% if flash.now[:notice] =~ /https?:\/\/[\S]+/ %>
     <% flash.now[:notice].scan(/https?:\/\/[\S]+/) do |url| %>
         <p>参加用URL : <br />
         <%= link_to url, url %></p>
     <% end %>
<% else %>
     <p class="mb-3"><%= flash.now[:notice] %></p>
<% end %>
フラッシュメッセージで表示させたいURLを取得する方法は複数ある。
"コントローラーで作成した変数からURLを取得する場合"と、
"直接URLの文字列をflash.now[:notice]に設定する場合"で
viewへの書き方も違ってくるし、コントローラーでの定義の仕方も複数存在する。
詳しくは、ここで投稿したので見てください。
今回は以下のように条件分岐しました。
-
もしマッチする場合、URLをスキャンして、URLの数だけブロック内のコードを繰り返し実行。
link_toヘルパーを使って、URLを表示するテキストとリンクを生成。 -
もしマッチしない場合、flash.now[:notice]を表示するだけの<p>要素が生成。
※flash.nowは、flashハッシュとは異なり、現在のリクエストのみに対して有効なフラッシュメッセージを扱う。通常のflashハッシュは、リクエストを介してブラウザに保存され、次のリクエストでのみ有効。
<% if user_signed_in? %>
    <% if @event.creator.id != current_user.id %>
        <% if @attendee %>
            <%= button_to '参加済み', event_attendee_path(@event, @attendee), disabled: true, class: 'btn btn-secondary mr-3' %>
            <%= link_to "参加取り消し", event_attendee_path(@event, @attendee), class:'btn btn-sm btn-danger', method: :delete, data: { confirm: '本当に変更しますか?' } %>
         <% else %>
             <%= button_to '参加する', event_attendees_path(@event), class: 'btn btn-primary mr-3' %>
          <% end %>
     <% end %>
 <% else %>
     <%= link_to 'ログインして参加する', new_user_session_path, class: 'btn btn-primary mr-3' %>
<% end %>
<概略>
- 最初の
if user_signed_in?でサインしているuserなのか、そうでないのかで分け、
会員でなければログインで参加するボタン表示の設定。 - 次の
<% if @event.creator.id != current_user.id %>で、
creatorの表記と、そのほか参加userの表示内容を分けるように条件分岐。 - 3つ目の
<% if @attendee %>で参加済みか、参加がまだされていないかの条件分岐して参加ボタンの表示切り替え設定。
controllerで以下のように定義しましたね。
@attendee = Attendee.find_by(user_id: current_user.id, event_id: @event.id)
現在ログインしているユーザーがそのイベントに参加しているかどうか?を、条件分岐するため。
<%= button_to '参加済み', event_attendee_path(@event, @attendee), disabled: true, class: 'btn btn-secondary mr-3' %>
演算子
上記でも演算子を使用したので、演算子は簡単にこのように記載する。詳しくはこちらのRailsガイド参照でお願いします。
| 演算子 | 説明 |
|---|---|
| == | 等しい |
| === | 等しい |
| != | 等しくない |
| > | より大きい |
| >= | 等しいか、より大きい |
| < | より小さい |
| <= | 等しいか、より小さい |
| <=> | 小さいときはー1、等しいときは0、大きいときは1 |
| =~ | 世紀表現のパターンマッチ(一致) |
| !~ | 世紀表現のパターンマッチ(一致しない) |
さあでは、参加を押すと参加用URLも表示されました。
今度はしたのリンクから自分のイベント一覧ページ(myevent)へいきます。
が、先に似ているformを作ってしまいましょう。edit行きます。
Events / edit
ここはnewとviewはほぼ同じですね。
Events / edit.html.erb
<div class="container mt-5">
  <div class="row justify-content-center">
    <div class="col-md-8">
      <h2 class="mt-3">Edit</h2>
      <%= form_with model: @event, local: true, url: event_path(@event) do |f| %>
        <div class="form-group">
          <label for="post_title">
            <h4>Event name</h4>
          </label>
          <%= f.text_field :event_name, class:'form-control book_title' %>
        </div>
        <div class="form-group">
          <label for="post_title">
            <h4>Event introduction</h4>
          </label>
          <%= f.text_area :event_introduction, rows: 10, cols: 10, class: "form-control" %>
        </div>
        <div class="form-group">
          <label for="url">
            <h4>URL</h4>
          </label>
          <%= f.text_field :url, class: "form-control" %>
        </div>
        <div class="form-group">
          <label for="introduction">
            <h4>開催日時</h4>
          </label>
          <%= f.datetime_field :date, class: "form-control" %>
        </div>
        <div class="form-group">
          <%= f.submit '更新する',class: "btn btn-success"%>
        </div>
      <% end %>
    </div>
  </div>
</div>
Events / edit
ここの記述も特に変わったところはありません。
Events controller
def edit
    @event = Event.find(params[:id])
  end

  def update
    @event = Event.find(params[:id])
    @event.creator = current_user
    if @event.update(event_params)
      redirect_to event_path(@event)
    else
      render "edit"
    end
  end
Events / myevent (各参加イベント一覧ページ)
では次回から各userの、参加イベント一覧ページの作成に行きます!!!
Discussion