AWS Application Composer触ってみた!
はじめに
先日行われたAWS re:Invent 2022 にて、
AWS Application Composerがプレビューとして発表されました!
第一印象で非常に便利そうだと感じたため、
実際に触って確かめていきたいと思います!
AWS Application Composerとは
AWS Application Composer(以下Application Composer)は、
サーバーレスアプリケーションのためのビジュアル開発ツールです。
GUI上でドラッグ&ドロップしながらAWSの様々なサービスを繋げていくことで、
簡単にサーバーレスアプリケーションの構成を作ることができます。
なにができるか
Application Composerでは、主に下記3つのことを行うことができます。
- GUI上でのサーバーレスアプリケーションの構成図作成
- 既存のテンプレートを読み込み、GUIで表示
- 作成した構成図をVSCodeなどと連携し、IaCのコードとして出力
つまり、今までであれば
①draw.ioなどで構成図を作成
②構成図を見ながら、CloudFormationやSAMテンプレートなどのIaCのコードを記述
という流れで作成していたものを、
Application Composerで構成図を作成するだけで、コードの出力まで行ってくれるようになります。
さらに、コードは変更を行うごとにローカルのVSCodeに反映することもできるため、
非常に直感的にわかりやすくなっています。
(めちゃくちゃ便利、、!)
やってみた
何はともあれ触ってみたいと思います。
Application Composerでは、 File System Access APIを使うため、
Google ChromeかMicrosoft Edgeを使ってねとのことです。
※後述するconnected mode を使わない場合は、上記のブラウザでなくでも問題ないです
You can access Application Composer through any modern web browser. For the best experience, we recommend using Google Chrome or Microsoft Edge, which both support Application Composer's connected mode. This mode requires a browser that supports the File System Access API, which allows web applications to read, write, and save files in your local file system. For more information about connected mode and the browsers that support it, see Connected mode reference.
キャンバスの作成
まずは、AWSコンソールから Application Composer を検索します。

右上の「Create project」から新規のプロジェクトを作成していきます。

プロジェクトを作成すると、下記のようなモーダルが表示されます。
下の方にConnected と Unconnectedという2つのモードがあり、
それぞれ
- Connectedモード: ローカルのファイルと同期し、自動的にファイルを更新する
- Unconnectedモード: ローカルのファイルとは同期せず、手動でファイルをエクスポートする
モードとなっています。
今回はConnectedモードを試してみたいと思います。

左下の「Select folder」より、Application Composerと同期する、空のフォルダーを選択していきます。


ポップアップでパーミッションを許可して、満を辞して「Create」(ワクワク、、!)


もう一個ポップアップが出たので「Save changes」をクリック

Application Composerを編集するキャンバスの作成ができました。
ここに左側のアイコンをポチポチして編集していきます。
また、ローカルにはtemplate.yaml というファイルが作成されています。

Application Composerの編集
では早速編集していきます。
手始めにAPI Gatewayを置いていきます。

ダブルクリックすると右側のパネルからプロパティを設定することができます。
作成するAPI GatewayのパスやHTTPメソッドなども指定できます。(すげぇ〜!)

上側の「Template」をクリックすると、現状のコードを確認することができます。

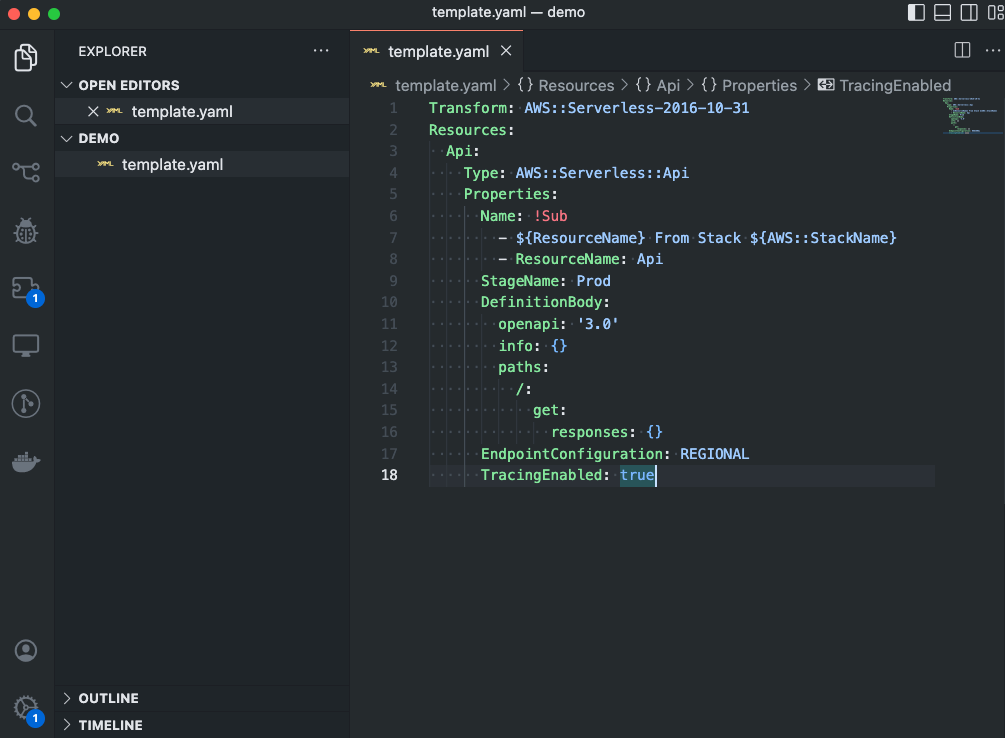
そしてなんと、ローカルのtemplate.yamlを開いてみると、同じ内容のコードが出力されています!(す、すげぇ!)

ちなみに、デフォルトの状態だと!Sub などに警告が表示されるため、
下記の記事を参考にsettings.json を編集しています。
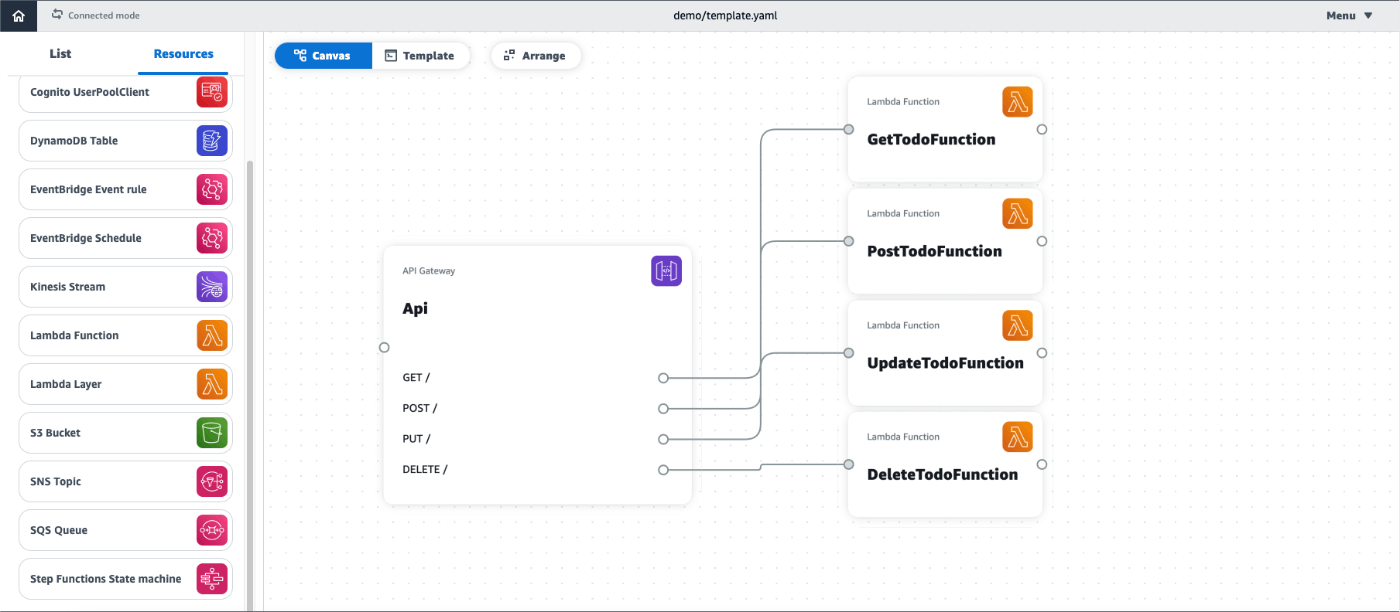
続いて、Lambdaもいくつか配置して、API Gatewayと接続していきます。
まず、API GatewayのMenuを開き、「Add route」よりパスを追加していきます。
今回は既にGetがあるので、Post、Put、Deleteの3つを追加し、「Save」を押します。

続いてLambdaを配置し、先ほど追加したパスと接続していきます。
(複数選択した状態で「Arrange」を押すと、整列できます。)

Lambdaの関数名やランタイム、タイムアウトなどもこの画面から編集することができます。
一つの画面で複数Lambdaの設定をできるのは便利ですね

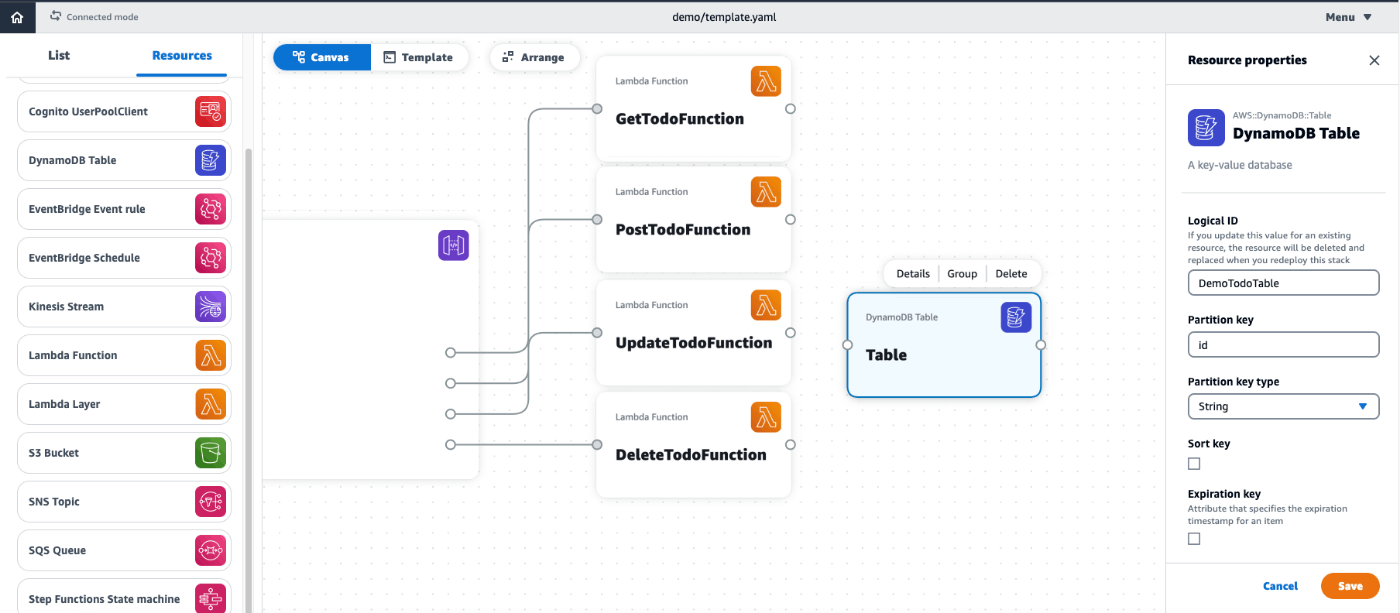
最後にDynamoDBを追加します。
こちらもPartition keyやSort keyを指定できます。
(この画面からその他の任意の属性を追加することはできなそうです)

LambdaとDynamoDBを接続して完了です!
最終的には下記のような構成になりました。

出力されたコードは下記の通りです。
結構行数ありますね、、
これを自力で書く場合(私の場合は)そこそこ時間かかりそうですが、
ポチポチしていくだけで作れてしまうため、かなり時間短縮することができました。
Transform: AWS::Serverless-2016-10-31
Resources:
  Api:
    Type: AWS::Serverless::Api
    Properties:
      Name: !Sub
        - ${ResourceName} From Stack ${AWS::StackName}
        - ResourceName: Api
      StageName: Prod
      DefinitionBody:
        openapi: '3.0'
        info: {}
        paths:
          /:
            get:
              x-amazon-apigateway-integration:
                httpMethod: POST
                type: aws_proxy
                uri: !Sub arn:${AWS::Partition}:apigateway:${AWS::Region}:lambda:path/2015-03-31/functions/${GetTodoFunction.Arn}/invocations
              responses: {}
            post:
              x-amazon-apigateway-integration:
                httpMethod: POST
                type: aws_proxy
                uri: !Sub arn:${AWS::Partition}:apigateway:${AWS::Region}:lambda:path/2015-03-31/functions/${PostTodoFunction.Arn}/invocations
              responses: {}
            put:
              x-amazon-apigateway-integration:
                httpMethod: POST
                type: aws_proxy
                uri: !Sub arn:${AWS::Partition}:apigateway:${AWS::Region}:lambda:path/2015-03-31/functions/${UpdateTodoFunction.Arn}/invocations
              responses: {}
            delete:
              x-amazon-apigateway-integration:
                httpMethod: POST
                type: aws_proxy
                uri: !Sub arn:${AWS::Partition}:apigateway:${AWS::Region}:lambda:path/2015-03-31/functions/${DeleteTodoFunction.Arn}/invocations
              responses: {}
      EndpointConfiguration: REGIONAL
      TracingEnabled: true
  GetTodoFunction:
    Type: AWS::Serverless::Function
    Properties:
      Description: !Sub
        - Stack ${AWS::StackName} Function ${ResourceName}
        - ResourceName: GetTodoFunction
      CodeUri: src/GetTodoFunction
      Handler: handler.handler
      Runtime: python3.9
      MemorySize: 3008
      Timeout: 30
      Tracing: Active
      Events:
        ApiGET:
          Type: Api
          Properties:
            Path: /
            Method: GET
            RestApiId: !Ref Api
      Environment:
        Variables:
          TABLE_NAME: !Ref DemoTodoTable
          TABLE_ARN: !GetAtt DemoTodoTable.Arn
      Policies:
        - DynamoDBCrudPolicy:
            TableName: !Ref DemoTodoTable
  GetTodoFunctionLogGroup:
    Type: AWS::Logs::LogGroup
    DeletionPolicy: Retain
    Properties:
      LogGroupName: !Sub /aws/lambda/${GetTodoFunction}
  PostTodoFunction:
    Type: AWS::Serverless::Function
    Properties:
      Description: !Sub
        - Stack ${AWS::StackName} Function ${ResourceName}
        - ResourceName: PostTodoFunction
      CodeUri: src/PostTodoFunction
      Handler: index.handler
      Runtime: python3.9
      MemorySize: 3008
      Timeout: 30
      Tracing: Active
      Events:
        ApiPOST:
          Type: Api
          Properties:
            Path: /
            Method: POST
            RestApiId: !Ref Api
      Environment:
        Variables:
          TABLE_NAME: !Ref DemoTodoTable
          TABLE_ARN: !GetAtt DemoTodoTable.Arn
      Policies:
        - DynamoDBCrudPolicy:
            TableName: !Ref DemoTodoTable
  PostTodoFunctionLogGroup:
    Type: AWS::Logs::LogGroup
    DeletionPolicy: Retain
    Properties:
      LogGroupName: !Sub /aws/lambda/${PostTodoFunction}
  UpdateTodoFunction:
    Type: AWS::Serverless::Function
    Properties:
      Description: !Sub
        - Stack ${AWS::StackName} Function ${ResourceName}
        - ResourceName: UpdateTodoFunction
      CodeUri: src/UpdateTodoFunction
      Handler: index.handler
      Runtime: python3.9
      MemorySize: 3008
      Timeout: 30
      Tracing: Active
      Events:
        ApiPUT:
          Type: Api
          Properties:
            Path: /
            Method: PUT
            RestApiId: !Ref Api
      Environment:
        Variables:
          TABLE_NAME: !Ref DemoTodoTable
          TABLE_ARN: !GetAtt DemoTodoTable.Arn
      Policies:
        - DynamoDBCrudPolicy:
            TableName: !Ref DemoTodoTable
  UpdateTodoFunctionLogGroup:
    Type: AWS::Logs::LogGroup
    DeletionPolicy: Retain
    Properties:
      LogGroupName: !Sub /aws/lambda/${UpdateTodoFunction}
  DeleteTodoFunction:
    Type: AWS::Serverless::Function
    Properties:
      Description: !Sub
        - Stack ${AWS::StackName} Function ${ResourceName}
        - ResourceName: DeleteTodoFunction
      CodeUri: src/DeleteTodoFunction
      Handler: index.handler
      Runtime: python3.9
      MemorySize: 3008
      Timeout: 30
      Tracing: Active
      Events:
        ApiDELETE:
          Type: Api
          Properties:
            Path: /
            Method: DELETE
            RestApiId: !Ref Api
      Environment:
        Variables:
          TABLE_NAME: !Ref DemoTodoTable
          TABLE_ARN: !GetAtt DemoTodoTable.Arn
      Policies:
        - DynamoDBCrudPolicy:
            TableName: !Ref DemoTodoTable
  DeleteTodoFunctionLogGroup:
    Type: AWS::Logs::LogGroup
    DeletionPolicy: Retain
    Properties:
      LogGroupName: !Sub /aws/lambda/${DeleteTodoFunction}
  DemoTodoTable:
    Type: AWS::DynamoDB::Table
    Properties:
      AttributeDefinitions:
        - AttributeName: id
          AttributeType: S
        - AttributeName: timestamp
          AttributeType: S
      BillingMode: PAY_PER_REQUEST
      KeySchema:
        - AttributeName: id
          KeyType: HASH
        - AttributeName: timestamp
          KeyType: RANGE
      StreamSpecification:
        StreamViewType: NEW_AND_OLD_IMAGES
Lambdaのハンドラーも作成されてました
import json
def handler(event, context):
    # Log the event argument for debugging and for use in local development.
    print(json.dumps(event))

    return {}
SAM CLIからのビルド&デプロイも確認できました
sam build

	SAM CLI now collects telemetry to better understand customer needs.

	You can OPT OUT and disable telemetry collection by setting the
	environment variable SAM_CLI_TELEMETRY=0 in your shell.
	Thanks for your help!

	Learn More: https://docs.aws.amazon.com/serverless-application-model/latest/developerguide/serverless-sam-telemetry.html

Building codeuri: /Users/xxxxxx/Desktop/demo/src/GetTodoFunction runtime: python3.9 metadata: {} architecture: x86_64 functions: GetTodoFunction
Running PythonPipBuilder:ResolveDependencies
Running PythonPipBuilder:CopySource
Building codeuri: /Users/xxxxxx/Desktop/demo/src/PostTodoFunction runtime: python3.9 metadata: {} architecture: x86_64 functions: PostTodoFunction
Running PythonPipBuilder:ResolveDependencies
Running PythonPipBuilder:CopySource
Building codeuri: /Users/xxxxxx/Desktop/demo/src/UpdateTodoFunction runtime: python3.9 metadata: {} architecture: x86_64 functions: UpdateTodoFunction
Running PythonPipBuilder:ResolveDependencies
Running PythonPipBuilder:CopySource
Building codeuri: /Users/xxxxxx/Desktop/demo/src/DeleteTodoFunction runtime: python3.9 metadata: {} architecture: x86_64 functions: DeleteTodoFunction
Running PythonPipBuilder:ResolveDependencies
Running PythonPipBuilder:CopySource

Build Succeeded

Built Artifacts  : .aws-sam/build
Built Template   : .aws-sam/build/template.yaml

Commands you can use next
=========================
[*] Validate SAM template: sam validate
[*] Invoke Function: sam local invoke
[*] Test Function in the Cloud: sam sync --stack-name {{stack-name}} --watch
[*] Deploy: sam deploy --guided
sam deploy --guided

Configuring SAM deploy
======================

~ 省略 ~

Successfully created/updated stack - application-composer-demo-20221209 in ap-northeast-1
また、GUI上では表示されていないものの、
下記のサービスなどもテンプレートに組み込むことで使用できるそうです。
- AWS::ECS::TaskDefinition
- AWS::CloudFront::Function
- AWS::CloudFront::Distribution
Hidden resources
Hidden resources are those that can be used to design and build with, but their complete feature set of properties and integrations with other resources may not be supported within Application Composer. Hidden resources are not available from the resource palette but will populate on the canvas when you load an existing template that includes them.
A few examples of hidden resources include:
- AWS::ECS::TaskDefinition
- AWS::CloudFront::Function
- AWS::CloudFront::Distribution
まとめ
今回はApplication Composerを触ってみました。
⌘ + z がGUIのコンポーネントに対して機能しないなど、若干今後に期待な箇所はありましたが、
全体的に直感的にわかりやすく、使いやすかったです。
また、いくつものAWSサービスを行き来することなく、一つの画面で設定ができることも魅力的でした。
- 爆速サーバーレス環境の立ち上げ
- CloudFormationやSAMテンプレートの学習
- ちょっとしたサンドボックス環境の作成
- 既存のテンプレートの確認
など、役立つ場面は多そうですね。
それでは、よきAWSライフを!
参考
Discussion