Claudeの新機能「computer use」でモックを作ってみる
こんにちは。
今回は、Anthropicがリリースしたcomputer useの活用シナリオを考えて実験してみました。
その内容を共有します。
1.シナリオ
新規にアプリ開発する際に、どんなイメージのものを作ろうとしているかをサクッと共有するためのモック制作をcomputer useで試してみました。
以下のような想定でモックを作ってもらいます。
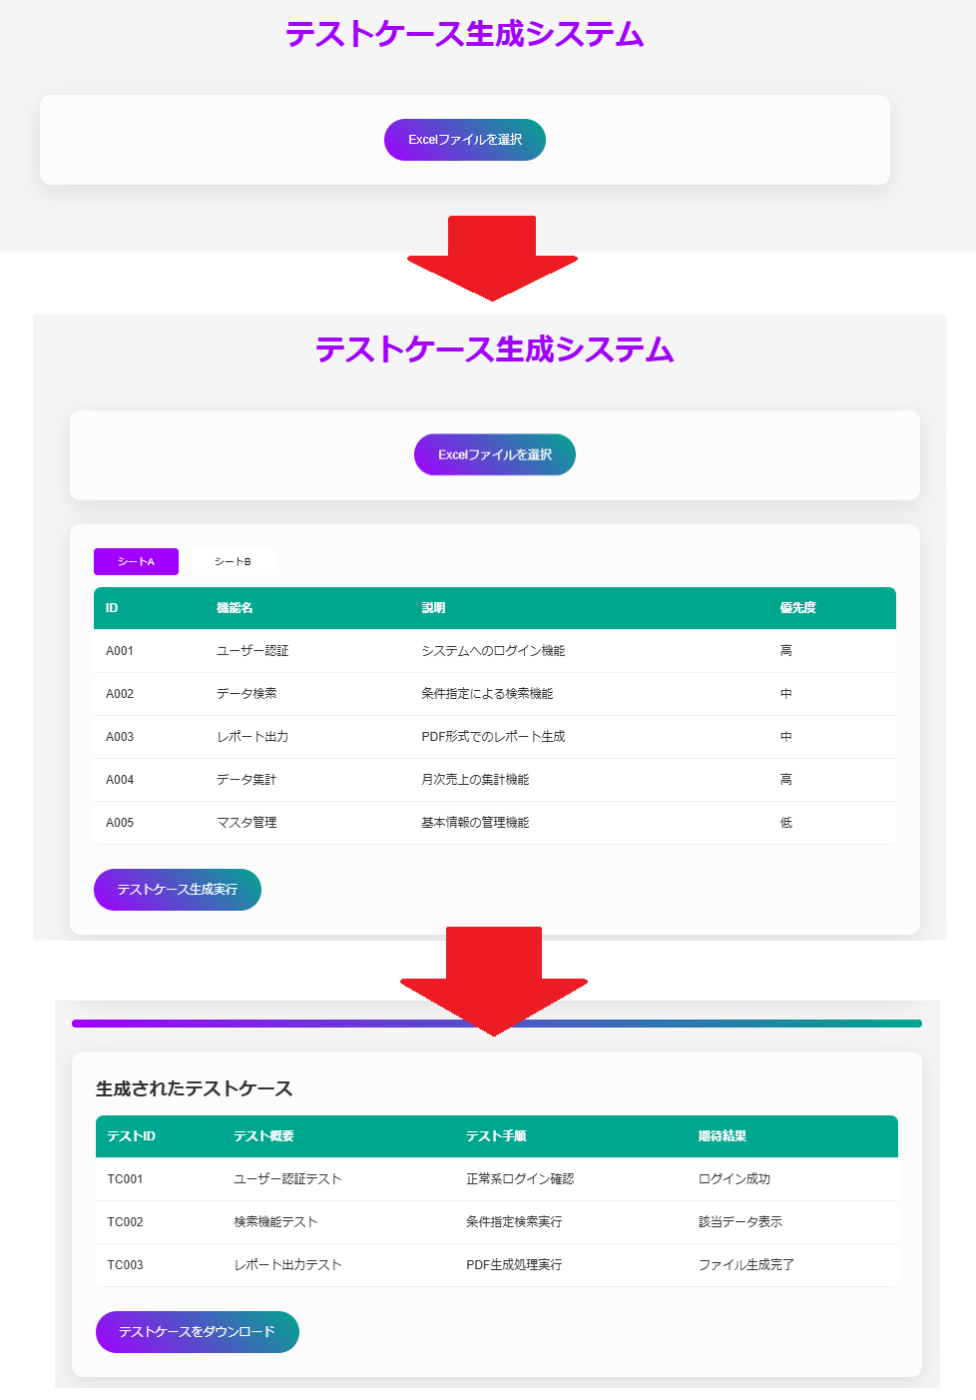
・Excelのシステム詳細設計書を元にテストケース一覧を生成するWEBアプリを作る
2.結果
最初に結果から示しますが、以下のような感じで効率化できそうなことがわかりました。

適切な指示出しさえすれば、めんどくさい手作業は全部自動化して完成版のモックファイルそのものがアウトプットとして出てくる感じに出来そうです。
APIコール数の制限にひっかかったりして今回は上手くできませんでしたが、今後、精度と改善が進めば実際にデモ自体を自動で操作してもらうといったこともできそうですね。
3.実行ステップ
3-1.ステップ1(要件からシーケンス図を作る)
まず、事前準備としてこれから開発したいアプリの要件を元に、ざっくりとした全体のシーケンス図を作成します。
これは、computer useではなく通常のclaudeのArtifactsで作ってもらいます。
以下はサンプルのプロンプトです。
これから開発を予定している以下の処理をシミュレートするモックのシーケンス図を作成して下さい。

①WEB画面のファイル選択ボタンを押してシステム設計書(Excel)をWEBサイトにアップロードする。
 ※ExcelにはシートAとシートBが存在するとします。
 ※シートAとシートBにはシステムの設計情報が記載されています。
②アップロードするとシートAとシートBの内容がWEB画面に表示されます(シートごとにタブが表示され表示を切り替えられるようにします。)
③内容確認後「実行」ボタンを押すと設計書情報を元にした網羅的なテストケースを自動生成する処理が実行される。
④生成されたテストケース一覧が画面に表示される。
⑤ダウンロードボタンを押すと④のテストケース情報をExcelファイルとしてダウンロードできる。
今回は以下のようなMermaidのシーケンスコードが生成されました。
Mermeidのシーケンス図コード
sequenceDiagram
    actor User as ユーザー
    participant Web as WEBブラウザ
    participant Server as サーバー
    participant Storage as ストレージ
    participant Generator as テストケース生成エンジン

    Note over User,Generator: ①Excelファイルのアップロード
    User->>Web: ファイル選択ボタンクリック
    User->>Web: Excelファイル選択
    Web->>Server: Excelファイルアップロード
    Server->>Storage: Excelファイル一時保存
    Server->>Server: Excel解析(シートA, シートB)

    Note over User,Generator: ②シート内容の表示
    Server->>Web: シートA, シートBのデータ送信
    Web->>Web: タブ付きで内容表示

    Note over User,Generator: ③テストケース生成実行
    User->>Web: 実行ボタンクリック
    Web->>Server: テストケース生成リクエスト
    Server->>Generator: 設計書データ送信
    Generator->>Generator: テストケース自動生成
    Generator->>Server: 生成テストケース返却

    Note over User,Generator: ④テストケース一覧表示
    Server->>Web: テストケース一覧データ送信
    Web->>Web: テストケース一覧表示

    Note over User,Generator: ⑤テストケースダウンロード
    User->>Web: ダウンロードボタンクリック
    Web->>Server: Excelダウンロードリクエスト
    Server->>Server: テストケースをExcel形式に変換
    Server->>Web: Excelファイル送信
    Web->>User: Excelファイルダウンロード
シーケンス図を描画することこんな感じになりました。
今回はこのシーケンス図をそのまま使ってみます。
3-2.ステップ2(モック制作をcomputer useに依頼)
ステップ①で作成してもらったシーケンス図を使って、ここからはcompputer useにモック制作を依頼します。
以下のようなプロンプトをcomputer useのチャット欄に入力して実行してみましょう。
以下の#シーケンス図はモック用のWEBアプリのシーケンス図です。
依頼内容に従いモックを作成してください。
処理途中の説明はすべて日本語で解説してください。


#依頼内容
①作業用のdemoフォルダ(/home/computeruse/demo)を作成して下さい。ここが以降の作業フォルダになります。
②デモ用の空のファイル(demo.ods)をコマンドで作成してください。
③以下の#要件でシーケンス図に基づいた、モダンでおしゃれなWEBアプリケーションのモックを作成してください。
---
#要件
##作成ファイル
- ファイル名:demo.html
- 保存場所:/home/computeruse/demo/demo.html
- 使用技術:HTML, CSS, Javascript のみ
##言語要件
- 全ての表示を日本語に統一

##デザイン要件
1. モダンでおしゃれなUI/UX
2. アクセンチュア風のデザイン(プロフェッショナルで洗練された印象)
  ※テーブル表にも上記デザインを適用する。
3. カラフルで視覚的に魅力的なWEB画面
4. レスポンシブ対応
5. アニメーションを効果的に使用
6. ガラスモーフィズムなどのモダンなデザイン要素の採用


#機能要件(シーケンス図に基づく)
1. Excelファイルのアップロード機能
2. シートA, シートBのタブ表示機能
3. テストケース生成プロセスの可視化
4. テストケース一覧の表示
5. Excelファイルのダウンロード機能
※各データ部は最初は非表示で、シーケンスに沿って適切なタイミングで画面に表示されるようにすること

##その他要件
1. サーバーとの通信は実際には行わず、モック動作でシミュレート
2. 適切なエラーハンドリングのUI表示
3. 各ステップでの適切なフィードバック表示
4. 直感的な操作性の実現
5. シートA, シートBにはサンプルの詳細設計情報を5件ずつ用意
---

③ファイルマネージャーを使ってdemoフォルダ(/home/computeruse/demo)をデスクトップ画面上に表示してください。

以上。

#シーケンス図
===
sequenceDiagram
    actor User as ユーザー
    participant Web as WEBブラウザ
    participant Server as サーバー
    participant Storage as ストレージ
    participant Generator as テストケース生成エンジン

    Note over User,Generator: ①Excelファイルのアップロード
    User->>Web: ファイル選択ボタンクリック
    User->>Web: Excelファイル選択
    Web->>Server: Excelファイルアップロード
    Server->>Storage: Excelファイル一時保存
    Server->>Server: Excel解析(シートA, シートB)

    Note over User,Generator: ②シート内容の表示
    Server->>Web: シートA, シートBのデータ送信
    Web->>Web: タブ付きで内容表示

    Note over User,Generator: ③テストケース生成実行
    User->>Web: 実行ボタンクリック
    Web->>Server: テストケース生成リクエスト
    Server->>Generator: 設計書データ送信
    Generator->>Generator: テストケース自動生成
    Generator->>Server: 生成テストケース返却

    Note over User,Generator: ④テストケース一覧表示
    Server->>Web: テストケース一覧データ送信
    Web->>Web: テストケース一覧表示

    Note over User,Generator: ⑤テストケースダウンロード
    User->>Web: ダウンロードボタンクリック
    Web->>Server: Excelダウンロードリクエスト
    Server->>Server: テストケースをExcel形式に変換
    Server->>Web: Excelファイル送信
    Web->>User: Excelファイルダウンロード
===
出来上がったモック画面

以下は、実際に上記プロンプトをcomputer useに投げてモック制作している様子のデモ動画です。
※実際はもっと時間がかかっていますが、途中の待ち時間はカットしています。
以下の操作をすべて自動で行ってくれています。
- demoフォルダ(/home/computeruse/demo)作成
- デモ用のファイル(demo.ods)作成
- モックアプリ(demo.html)作成
- 作成したファイルの表示
※フォルダ表示に必要なファイルマネージャー(Nautilus)のインストール
モックも想定しているシーケンスに沿った操作をシミュレーションしてくれるものが出来上がりました。

ちなみに、作成してもらったdemo.htmlはサンドボックス環境内に存在してるため、htmlファイルをそのままローカルのWindows環境側には持ってこれないようです・・・。
仕方ないので、以下のような追加の指示出しをしてhtmlコードを提示してもらった内容をコピーするしかなさそうです。


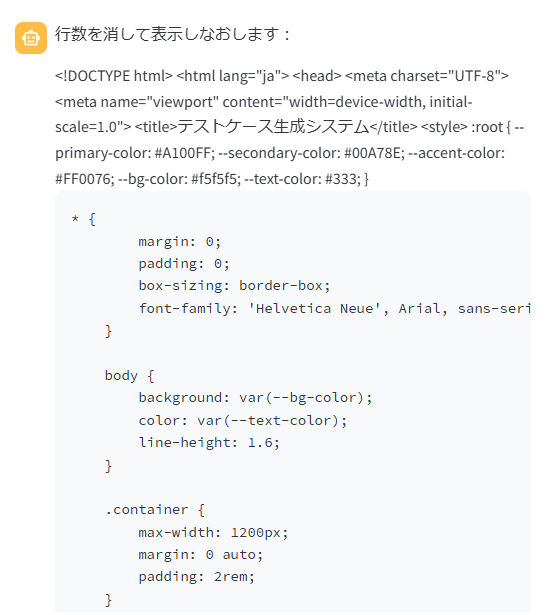
今回生成してもらったdemo.htmlの全コードは以下です。
コピペしてdemo.htmlとしてローカルPCに保存すれば、モックを動作させられます。
<html lang="ja">
<head>
<meta charset="UTF-8">
<meta name="viewport" content="width=device-width, initial-scale=1.0">
<title>テストケース生成システム</title>
<style>
:root {
--primary-color: #A100FF;
--secondary-color: #00A78E;
--accent-color: #FF0076;
--bg-color: #f5f5f5;
--text-color: #333;
}
* {
margin: 0;
padding: 0;
box-sizing: border-box;
font-family: 'Helvetica Neue', Arial, sans-serif;
}
body {
background: var(--bg-color);
color: var(--text-color);
line-height: 1.6;
}
.container {
max-width: 1200px;
margin: 0 auto;
padding: 2rem;
}
.glass-card {
background: rgba(255, 255, 255, 0.7);
backdrop-filter: blur(10px);
border-radius: 15px;
padding: 2rem;
box-shadow: 0 8px 32px rgba(0, 0, 0, 0.1);
margin-bottom: 2rem;
}
.header {
text-align: center;
margin-bottom: 3rem;
}
.header h1 {
font-size: 2.5rem;
color: var(--primary-color);
margin-bottom: 1rem;
animation: fadeIn 1s ease-in;
}
.upload-section {
text-align: center;
padding: 2rem;
}
.btn {
background: linear-gradient(45deg, var(--primary-color), var(--secondary-color));
color: white;
border: none;
padding: 1rem 2rem;
border-radius: 50px;
cursor: pointer;
font-size: 1rem;
transition: transform 0.3s ease;
}
.btn:hover {
transform: translateY(-2px);
}
.tabs {
display: none;
margin-top: 2rem;
}
.tab-buttons {
display: flex;
gap: 1rem;
margin-bottom: 1rem;
}
.tab-btn {
padding: 0.5rem 2rem;
border: none;
background: white;
cursor: pointer;
border-radius: 5px;
transition: all 0.3s ease;
}
.tab-btn.active {
background: var(--primary-color);
color: white;
}
.tab-content {
display: none;
}
.tab-content.active {
display: block;
}
table {
width: 100%;
border-collapse: collapse;
margin-top: 1rem;
background: white;
border-radius: 10px;
overflow: hidden;
}
th,
td {
padding: 1rem;
text-align: left;
border-bottom: 1px solid #eee;
}
th {
background: var(--secondary-color);
color: white;
}
.progress-bar {
display: none;
width: 100%;
height: 10px;
background: #eee;
border-radius: 5px;
margin: 2rem 0;
overflow: hidden;
}
.progress {
width: 0%;
height: 100%;
background: linear-gradient(45deg, var(--primary-color), var(--secondary-color));
transition: width 0.5s ease;
}
.result-section {
display: none;
}
@keyframes fadeIn {
from {
opacity: 0;
transform: translateY(-20px);
}
to {
opacity: 1;
transform: translateY(0);
}
}
@media (max-width: 768px) {
.container {
padding: 1rem;
}
.header h1 {
font-size: 2rem;
}
.tab-buttons {
flex-direction: column;
}
}
.notification {
position: fixed;
top: 20px;
right: 20px;
padding: 1rem 2rem;
border-radius: 5px;
background: white;
box-shadow: 0 4px 12px rgba(0, 0, 0, 0.1);
display: none;
animation: slideIn 0.3s ease;
}
@keyframes slideIn {
from {
transform: translateX(100%);
}
to {
transform: translateX(0);
}
}
</style>
</head>
<body>
<div class="container">
<div class="header">
<h1>テストケース生成システム</h1>
</div>
<div class="glass-card upload-section">
<input type="file" id="fileInput" accept=".xlsx, .xls" style="display: none;">
<button class="btn" onclick="document.getElementById('fileInput').click()">
Excelファイルを選択
</button>
</div>
<div class="glass-card tabs">
<div class="tab-buttons">
<button class="tab-btn active" onclick="showTab('sheetA')">シートA</button>
<button class="tab-btn" onclick="showTab('sheetB')">シートB</button>
</div>
<div id="sheetA" class="tab-content active">
<table>
<thead>
<tr>
<th>ID</th>
<th>機能名</th>
<th>説明</th>
<th>優先度</th>
</tr>
</thead>
<tbody>
<tr>
<td>A001</td>
<td>ユーザー認証</td>
<td>システムへのログイン機能</td>
<td>高</td>
</tr>
<tr>
<td>A002</td>
<td>データ検索</td>
<td>条件指定による検索機能</td>
<td>中</td>
</tr>
<tr>
<td>A003</td>
<td>レポート出力</td>
<td>PDF形式でのレポート生成</td>
<td>中</td>
</tr>
<tr>
<td>A004</td>
<td>データ集計</td>
<td>月次売上の集計機能</td>
<td>高</td>
</tr>
<tr>
<td>A005</td>
<td>マスタ管理</td>
<td>基本情報の管理機能</td>
<td>低</td>
</tr>
</tbody>
</table>
</div>
<div id="sheetB" class="tab-content">
<table>
<thead>
<tr>
<th>ID</th>
<th>テスト項目</th>
<th>前提条件</th>
<th>期待結果</th>
</tr>
</thead>
<tbody>
<tr>
<td>B001</td>
<td>正常ログイン</td>
<td>有効なアカウント</td>
<td>ログイン成功</td>
</tr>
<tr>
<td>B002</td>
<td>無効検索</td>
<td>存在しないデータ</td>
<td>該当なしメッセージ</td>
</tr>
<tr>
<td>B003</td>
<td>レポート形式</td>
<td>データ存在</td>
<td>PDF出力成功</td>
</tr>
<tr>
<td>B004</td>
<td>集計処理</td>
<td>月次データあり</td>
<td>正確な集計結果</td>
</tr>
<tr>
<td>B005</td>
<td>マスタ更新</td>
<td>管理者権限</td>
<td>更新成功</td>
</tr>
</tbody>
</table>
</div>
<button class="btn" onclick="generateTestCases()" style="margin-top: 2rem;">
テストケース生成実行
</button>
</div>
<div class="progress-bar">
<div class="progress"></div>
</div>
<div class="glass-card result-section">
<h2>生成されたテストケース</h2>
<table>
<thead>
<tr>
<th>テストID</th>
<th>テスト概要</th>
<th>テスト手順</th>
<th>期待結果</th>
</tr>
</thead>
<tbody>
<tr>
<td>TC001</td>
<td>ユーザー認証テスト</td>
<td>正常系ログイン確認</td>
<td>ログイン成功</td>
</tr>
<tr>
<td>TC002</td>
<td>検索機能テスト</td>
<td>条件指定検索実行</td>
<td>該当データ表示</td>
</tr>
<tr>
<td>TC003</td>
<td>レポート出力テスト</td>
<td>PDF生成処理実行</td>
<td>ファイル生成完了</td>
</tr>
</tbody>
</table>
<button class="btn" onclick="downloadTestCases()" style="margin-top: 2rem;">
テストケースをダウンロード
</button>
</div>
</div>
<div class="notification" id="notification"></div>
<script>
// ファイル選択時の処理
document.getElementById('fileInput').addEventListener('change', function (e) {
if (e.target.files.length > 0) {
showNotification('ファイルをアップロード中...');
setTimeout(() => {
document.querySelector('.tabs').style.display = 'block';
showNotification('ファイルの解析が完了しました');
}, 1500);
}
});
// タブ切り替え
function showTab(tabId) {
document.querySelectorAll('.tab-content').forEach(tab => {
tab.classList.remove('active');
});
document.querySelectorAll('.tab-btn').forEach(btn => {
btn.classList.remove('active');
});
document.getElementById(tabId).classList.add('active');
event.target.classList.add('active');
}
// テストケース生成
function generateTestCases() {
const progressBar = document.querySelector('.progress-bar');
const progress = document.querySelector('.progress');
progressBar.style.display = 'block';
let width = 0;
const interval = setInterval(() => {
if (width >= 100) {
clearInterval(interval);
document.querySelector('.result-section').style.display = 'block';
showNotification('テストケースの生成が完了しました');
} else {
width += 2;
progress.style.width = width + '%';
}
}, 50);
}
// テストケースダウンロード
function downloadTestCases() {
showNotification('テストケースをダウンロード中...');
setTimeout(() => {
showNotification('ダウンロードが完了しました');
}, 1500);
}
// 通知表示
function showNotification(message) {
const notification = document.getElementById('notification');
notification.textContent = message;
notification.style.display = 'block';
setTimeout(() => {
notification.style.display = 'none';
}, 3000);
}
</script>
</body>
</html>
4.所感
結構コストがかかる
雑な指示出しをすると、以下のような状況が発生する。
- 効率が悪い操作の発生
- 実行エラーになると自動修復を試みてくれるが、無限ループで途中で処理が止まる。
- やたらと画面キャプチャして解析が走る
ちなみに、この記事で利用したプロンプトはいろいろ試行錯誤した後に調整したプロンプトなので、1回実行で1-2円くらいのコストでしたが、雑に指示出しすると、大量のAPIリクエストが走って結構コストがかさみます。
APIコール数の上限にひっかかる
自動で操作してくれるのはうれしいですが、雑な指示出しをするといろんなアクションを自動試行するのですぐにAPIコール数の上限に引っ掛かり途中でエラーで処理が中止してしまいます。
画面操作を伴うような指示の場合は、都度、画面キャプチャをとってその内容をAPIコールして解析している感じに見えたので、APIコールの上限に到達しやすい&コストがかさむ印象でした。
効率的に操作させる適切な指示内容を用意しておく
Computer useを効率的に活用できる指示内容をあらかじめ用意しておくと、少ない操作回数でコストを抑えながら自動処理を行ってもらえるのではないかと感じました。
例えば、画面操作が伴うと都度キャプチャをとって状況を確認しているようなので以下のような点を考慮するとよいのかなと思います。
- できるだけ画面操作を伴わないような指示内容に置き換えて指示を出す。
- コマンド実行で済むものは実行してもらいたいコマンドを明記しておく。
Discussion
はやっぱりそうなんですね。。このバーチャル環境上で出来上がった成果物はどのように取り出すんだろう&このバーチャル環境を直接触れないのか??と気になっていました
あと、APIについては Anthropic API使ってますか?もしくはBedrock ClaudeのAPIでしょうか?その違いでAPI limitがちがったりするのかな、と素朴な疑問でした(すいません私自身で試せてないです
無理やり「samba使ってWindowsからファイル共有アクセスできるようにして」と依頼してみましたが、うまくいきませんでした(笑)
ただ、公式のデモ動画見ると、普通にWindowsっぽい環境上で自動操作してたので、そのうちWindowsそのものの環境を自動操作できるようになるのかな?なんて想像しました。
APIは、Anthropic APIを使いました。
あー、samba だめなんですね笑
なんかネット経由でファイル共有して。とかだったらいけるのかな。。