👤
【TouchDesigner】PyTorchでセマンティックセグメンテーション
TouchDesignerでPyTorchの学習済みモデルを用いてセマンティックセグメンテーションを行います。
この記事の内容は以下の環境で検証しています。
- OS: Windows 11 Home
- TouchDesigner: 2023.11340 (Python: 3.11.1)
はじめにPowershellで仮想環境を作成して必要なパッケージをインストールします。PowerShell以外を使用している場合は利用しているツールで同様の操作をしてください。また、ここではPyTorchをCUDA 12.1を用いる設定でインストールしていますが、PyTorch公式サイトのGet Startedを参考にして各々の環境に合わせてインストールしてください。
# TouchDesignerのファイルがあるフォルダへ移動
> cd \directory\to\touchdesigner\file
# pyenvでTouchDesignerのPythonバージョンに合わせる
> pyenv local 3.11.1
# 仮想環境の作成と有効化
> python -m venv .venv
> .\.venv\Scripts\activate
# 必要なパッケージのインストール
> pip install torch torchvision --index-url https://download.pytorch.org/whl/cu121
インストールしたパッケージを用いて、Script TOPで入力画像をセマンティックセグメンテーションします。
import sys, os

# 仮想環境にインストールしたパッケージの読み込み
# ref: http://satoruhiga.com/post/extending-touchdesigner/
path = os.path.join(os.path.abspath('.'), ".venv/Lib/site-packages")
if not path in sys.path:
	sys.path.append(path)
	print("Append new module search path: " + path)

import numpy as np
import torch
from PIL import Image


# セマンティックセグメンテーションに使用するモデルの読み込み

# DeepLabV3 model with a ResNet-50 backbone
from torchvision.models.segmentation import deeplabv3_resnet50, DeepLabV3_ResNet50_Weights
weights = DeepLabV3_ResNet50_Weights.DEFAULT
model = deeplabv3_resnet50(weights=weights)

## DeepLabV3 model with a ResNet-101 backbone
# from torchvision.models.segmentation import deeplabv3_resnet101, DeepLabV3_ResNet101_Weights
# weights = DeepLabV3_ResNet101_Weights.DEFAULT
# model = deeplabv3_resnet101(weights=weights)

## DeepLabV3 model with a MobileNetV3-Large backbone
# from torchvision.models.segmentation import deeplabv3_mobilenet_v3_large, DeepLabV3_MobileNet_V3_Large_Weights
# weights = DeepLabV3_MobileNet_V3_Large_Weights.DEFAULT
# model = deeplabv3_mobilenet_v3_large(weights=weights)

## Fully-Convolutional Network model with a ResNet-50 backbone
# from torchvision.models.segmentation import fcn_resnet50, FCN_ResNet50_Weights
# weights = FCN_ResNet50_Weights.DEFAULT
# model = fcn_resnet50(weights=weights)

## Fully-Convolutional Network model with a ResNet-101 backbone
# from torchvision.models.segmentation import fcn_resnet101, FCN_ResNet101_Weights
# weights = FCN_ResNet101_Weights.DEFAULT
# model = fcn_resnet101(weights=weights)

## Lite R-ASPP Network model with a MobileNetV3-Large backbone
# from torchvision.models.segmentation import lraspp_mobilenet_v3_large, LRASPP_MobileNet_V3_Large_Weights
# weights = LRASPP_MobileNet_V3_Large_Weights.DEFAULT
# model = lraspp_mobilenet_v3_large(weights=weights)

device = torch.device("cuda") if torch.cuda.is_available() else torch.device("cpu")
model.to(device)
model.eval()
preprocess = weights.transforms()

# セグメンテーションのカテゴリの確認
categories = weights.meta["categories"]
# ['__background__', 'aeroplane', 'bicycle', 'bird', 'boat', 'bottle', 'bus', 'car', 'cat', 'chair', 'cow', 'diningtable', 'dog', 'horse', 'motorbike', 'person', 'pottedplant', 'sheep', 'sofa', 'train', 'tvmonitor']
print(categories)
# 各カテゴリに対応する色をランダムに生成
color_palette = np.random.rand(len(categories), 3).astype(np.float32)

def onCook(scriptOp):
	# 一つ目のTOP入力の読み込み
	frame = scriptOp.inputs[0].numpyArray(delayed=True)
	if frame is None:
		return
	# アルファチャンネルの削除およびuint8型への変換、numpyArrayで取得できる配列は原点が左下なので上下反転
	frame = np.flipud((frame[:, :, :3] * 255.0).astype(np.uint8)).copy()
	input_batch = preprocess(Image.fromarray(frame)).unsqueeze(0).to(device)

	with torch.no_grad():
		prediction = model(input_batch)["out"][0]
	# セグメンテーション結果のカテゴリ・インデックスへの変換
	prediction_index = prediction.argmax(0).cpu().numpy().astype(np.uint8)
	# セグメンテーション結果の色付け
	segmentation_frame = color_palette[prediction_index]
	# 上下反転を戻す
	segmentation_frame = np.flipud(segmentation_frame).copy()

	scriptOp.copyNumpyArray(segmentation_frame)
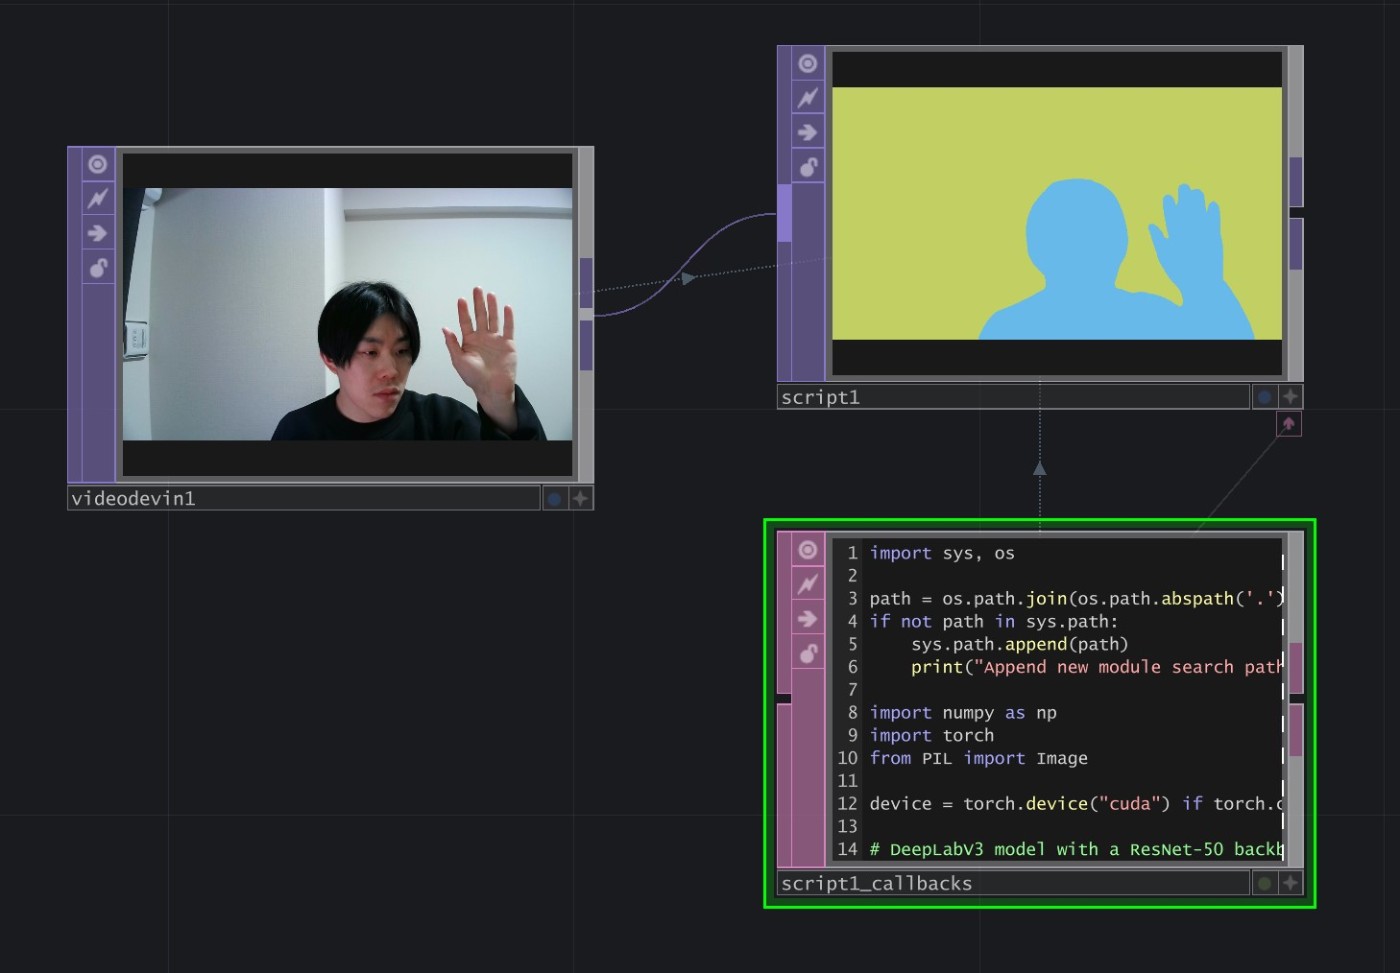
Webカメラの映像をセマンティックセグメンテーションすると以下のようになりました。


Discussion