AWS 請求通知 BOT を AWS Lambda + AWS SDK + Go で作る ~ 実装編 ~
AWS 請求通知 BOT を AWS Lambda + AWS SDK + Go で作る ~ 実装編 ~
あらまし
世の中に AWS 請求額が設定ミスで多額の請求が来てしまったという事故が多々見受けられる、その対策として、現在の請求額を通知する BOT を作るのも有効な対策手段の一つである。
前回 AWS Cost Explorer の SDK に関して調査を行った。
今回はその続編として、実際に請求額通知 BOT の実装を行なった。
構成
まずは全体をイメージするために構成図を見ていこう。

使用している技術スタック、サービス
- Go
- aws-sdk-go
- aws-lambda-go
- slack-go
- go-chart
- AWS Lambda
- AWS SAM
- AWS SSM Parameter Store
- AWS CloudWatch Logs
- AWS Cost Explorer
- AWS EventBridge
- AWS S3
- open exchange rates API
- Slack API
Lambda の構成について
- MainFunction
- GetCostFunction
- NotifyFunction
- PutRateFunction
SSM Parameter Store のパラメータについて
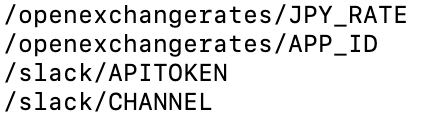
1, /openexchangerates/JPY_RATE
- 1USD ベースの日本円
2, /openexchangerates/APP_ID
- open exchange rates の API を叩くために必要な APP_ID
3, /slack/APITOKEN
- Slack の APITOKEN
4, /slack/CHANNEL
- 通知したい Slack チャンネルの名称
EventBridge の設定について
- 毎日日本時間午前 9:00 に MainFunction を実行
- 毎日日本時間午前 6:00 に PutRateFunction を実行
SAM で Lambda を立てる
ディレクトリ構造
.
├── Makefile
├── README.md
├── go.mod
├── go.sum
├── invoke-obj
│   ├── getcost
│   │   └── main.go
│   ├── main
│   │   └── main.go
│   ├── notify
│   │   └── main.go
│   └── putrate
│       └── main.go
├── pkg
│   ├── aws
│   │   └── sdk
│   │       └── ce
│   │           └── costandusage
│   │               ├── calc
│   │               │   └── sum.go
│   │               ├── getcost
│   │               │   └── getcost.go
│   │               ├── granularity
│   │               │   └── elem.go
│   │               ├── group
│   │               │   └── elem.go
│   │               ├── metric
│   │               │   └── elem.go
│   │               └── term
│   │                   ├── elem.go
│   │                   └── term.go
│   └── openexchangerates
│       └── getrates.go
├── renew.yaml
└── template.yaml
SAM や Lambda については以下を参照せよ。
GetCostFunction を実装しよう
まず、AWS SDK 接続用のセッションを作成する。
const Region = "ap-northeaset-1"
sess := session.Must(session.NewSessionWithOptions(session.Options{
    Config: aws.Config{
        Region: aws.String(Region),
    },
    SharedConfigState: session.SharedConfigEnable,
}))
今回は、 session の オプションとして Config にデフォルトリージョンを設定する。
また、 SharedConfigState を設定することによって、環境変数(AWS_SDK_LOAD_CONFIG)が設定されているかのようにセッションが作成されるので、ローカル環境でテストする際に役立つ。
$ sam local invoke GetCostFunction
aws.String に疑問を持たれるかもしれないが、これは単に渡した文字列のポインタを返すだけの便利関数である。
// String returns a pointer to the string value passed in.
func String(v string) *string {
	return &v
}
次に、AWS Cost Explorer をサービスとして宣言する。
宣言時に先程バインドした sess を引数として渡す。
svce := costexplorer.New(sess)
今度は、指定した期間の金額を AWS Cost Explorer から取得する。
あらかじめ、 pkg にて実装しておいた、実行した月の初日から実行日の前日までの期間を start 、 end にバインドする。
また、 getcost からパラメータを c にバインドしておく。
GetCost 関数を c から呼び出し、先程宣言した svce と、 start 、 end を渡してコストを取得する。
// The start date is inclusive, but the end date is exclusive.
start, end, _, err := term.CreateThisMonthRange(jst)
c := getcost.Params{}
cost, err := c.GetCost(svce, start, end)
CreateThisMonthRange 関数に関しては次のように実装した。
package term

import (
	"errors"
	"time"

	"github.com/aws/aws-sdk-go/aws"
)

func beginningOfMonth(day time.Time) time.Time {
	return time.Date(day.Year(), day.Month(), 1, 0, 0, 0, 0, day.Location())
}

func CreateThisMonthRange(zone *time.Location) (*string, *string, string, error) {
	now := time.Now().UTC().In(zone)
	start := beginningOfMonth(now)
	end := now

	if start.Unix() > end.Unix() {
		return nil, nil, "", errors.New("error: Time Range")
	}

	s := start.Format(Format.String())
	e := end.Format(Format.String())

	// The start date is inclusive, but the end date is exclusive.
	// https://docs.aws.amazon.com/ja_jp/aws-cost-management/latest/APIReference/API_GetCostAndUsage.html
	p := end.AddDate(0, 0, -1).Format(Format.String())
	return aws.String(s), aws.String(e), p, nil
}
GetCost 関数に関しては次のように実装した。
func (c Params) GetCost(svc costexploreriface.CostExplorerAPI, start *string, end *string) (*costexplorer.GetCostAndUsageOutput, error) {
	c.Granularity = granularity.Monthly.String()

	c.Metrics = []*string{
		metric.UnblendedCost.String(),
	}

	c.Term = &costexplorer.DateInterval{
		Start: start,
		End:   end,
	}

	service := costexplorer.GroupDefinition{
		Key:  group.Service.Key(),
		Type: group.Dimention.Type(),
	}
	c.Groups = append(c.Groups, &service)

	input := costexplorer.GetCostAndUsageInput{
		Granularity: c.Granularity,
		TimePeriod:  c.Term,
		Metrics:     c.Metrics,
		GroupBy:     c.Groups,
	}

	result, err := svc.GetCostAndUsage(&input)
	if err != nil {
		return nil, err
	}
	return result, nil
}
また、GetCost をはじめとした、各種関数内に展開されるリテラルに関しては、あらかじめ elem.go に分離してパラメータを宣言した。
実装例として、granularity/elem.go を以下に提示する。
package granularity

import "github.com/aws/aws-sdk-go/aws"

type CE int

const (
	Daily CE = iota
	Monthly
	Hourly
)

func (ce CE) String() *string {
	switch ce {
	case Daily:
		return aws.String("DAILY")
	case Monthly:
		return aws.String("MONTHLY")
	case Hourly:
		return aws.String("HOURLY")
	default:
		return nil
	}
}
次に、AWS SSM Parameter Store をサービスとして宣言する。
sess を引数として渡す。
svc := ssm.New(sess)
後述するが、あらかじめ、PutRateFunction にて open exchange rates API で取得した 1USD ベースの日本円を AWS SSM Parameter Store から取得する。
このパラメータは暗号化の必要がないため、プレーンテキストで処理する。
この場合 WithDecryption を false に設定する。
rawjpy, err := svc.GetParameter(&ssm.GetParameterInput{
    Name:           aws.String("/openexchangerates/JPY_RATE"),
    WithDecryption: aws.Bool(false),
})
また、SSM Parameter Store から取得したパラメータは String 型で返ってくるので、Float 型にコンバートが必要。
jpy, err := strconv.ParseFloat(*rawjpy.Parameter.Value, 64)
最後に Lambda からのレスポンスとして、値を返却する。
return Response{
        Message: Succcess,
        Cost:    cost,
        Rate:    jpy,
    },
    nil
PutRateFunction を実装しよう
AWS SDK の通信用にセッションを sess にバインドする。
上述したので割愛する。
次に、あらかじめ実装しておいた、 PutOpenexchangeratesJpy 関数を用いて AWS SSM Parameter Store に 1USD ベースの JPY をパラメータとしてストアする。
// Put Base of USD JPY Rate to ssm parameter store with OpenExchangeRates API
if err := openexchangerates.PutOpenexchangeratesJpy(sess); err != nil {
    return Response{
            Message: ErrPutOpenExchangeRates,
        },
        err
}
PutOpenexchangeratesJpy 関数に関しては次のように実装した。
func PutOpenexchangeratesJpy(sess *session.Session) error {
	// Base URL: see https://docs.openexchangerates.org
	base := "https://openexchangerates.org/api/latest.json?app_id=%s"
	// Application id: https://docs.openexchangerates.org/docs/authentication
	// Using ssm parametor store: https://ap-northeast-1.console.aws.amazon.com/systems-manager/parameters
	svc := ssm.New(sess)
	app_id, err := svc.GetParameter(&ssm.GetParameterInput{
		Name:           aws.String("/openexchangerates/APP_ID"),
		WithDecryption: aws.Bool(true),
	})
	if err != nil {
		return err
	}
	// Create Request url
	url := fmt.Sprintf(base, *app_id.Parameter.Value)

	// Start Request
	resp, err := http.Get(url)
	if err != nil {
		return err
	}
	defer resp.Body.Close()

	source, err := ioutil.ReadAll(resp.Body)
	if err != nil {
		return err
	}

	// Parse json
	desc := Schema{}
	json.Unmarshal(source, &desc)

	// Cache rates in ssm parametor store
	cache := strconv.FormatFloat(desc.Rates.JPY, 'f', 2, 64)
	svc.PutParameter(&ssm.PutParameterInput{
		Name:      aws.String("/openexchangerates/JPY_RATE"),
		Value:     aws.String(cache),
		Overwrite: aws.Bool(true),
	})
	if err != nil {
		return err
	}
	return nil
}
解説すると、まず、AWS SSM Parameter Store から open exchange rates API へのアクセスキーを取得する。
レート取得には open exchange rates を使用している。
あらかじめ、アクセスキーを取得して、 AWS SSM Parameter Store に格納しておく必要がある。
- open exchange rates URL にアクセス
- アカウントを取得
- Integration -> App IDs にアクセス
- Generate New App ID をクリック
- 「App ID」が API key なので、こちらをコピー
- API key を SSM Parameter Store に設定して完了
アクセスキーに関しては、セキュアストリングを使用しているので、復号が必要となる。
そのため、WithDecryption を true にする必要がある。
次に、アクセスキーを含んだアクセス URL を作成するため、fmt パッケージの Sprintf 関数を使って url へバインドしている。
この url を使って http get リクエストを発行する。
レスポンスを読み込んで Json を構造体 Schema へ Unmarshal する。
type Schema struct {
	Rates Rate `json:"rates"`
}

type Rate struct {
	JPY float64 `json:"JPY"`
}
最後に取得できたレートを AWS SSM Parameter Store に上書きして完了。
NotifyFunction を実装しよう
今回、通知先を Slack にしたいので、 Slack API を利用する。
Slack API の手続き方法
- Slack アプリを作成
- 左サイドバーの「OAuth & 権限」タブをクリック
- 「ボットトークンのスコープ」にあるスコープを少なくとも 1 つ選択したら、「OAuth スコープを追加する」をクリック
- 左サイドバーの「App Home」タブをクリックして、追加したボットユーザーと設定を確認
- 取得したトークンを AWS SSM Parameter Store に設定
- 通知したいチャンネル名を AWS SSM Parameter Store に設定
各種パラメータを AWS SSM Parameter Store に格納できたら次は、Lambda を立てる。
まず、上述した Lambda 関数から NotifyFunction に値を渡す必要があるが、その際、値取得状況によって通知可能かどうかをチェックする必要がある。
event から値を取得できるので、受け取りたい値を、構造体 Event として定義する。
type Event struct {
	Cost *costexplorer.GetCostAndUsageOutput
	Rate float64
}
次に、AWS Cost Explorer から取得した値と、 open exchange rates から値を取得できていない場合は nil 及び ゼロ値 なため、その値の場合はエラーを返す。
func handler(event Event) (Response, error) {
	// Check event value
	if event.Cost == nil || event.Rate == 0 {
		return Response{
				Message: ErrEvent,
			},
			nil
	}
~ ommit
また、通知時に表示用の期間を改めて計算する。
start, _, endexclusivedate, err := term.CreateThisMonthRange(jst)
次に、通知用のテキストを作っていく。
// Create Notify Contents
var notifyText string
var list []chart.Value
for _, group := range event.Cost.ResultsByTime[0].Groups {
    label := *group.Keys[0]
    amount, err := strconv.ParseFloat(*group.Metrics[*metric.UnblendedCost.String()].Amount, 64)
    if err != nil {
        return Response{
                Message: ErrParseAmount,
            },
            err
    }
    // Create Text
    text := fmt.Sprintf("・ %s: %.2f 円\n", label, amount*event.Rate)
    notifyText += text
    // Create GraphList
    // Avoid strings longer than 12 characters that cannot be drawn correctly with go-chart
    if len(label) > 10 && !strings.Contains(label, " ") {
        label = label[:11] + " " + label[11:]
    }
    list = append(list, chart.Value{
        Value: amount * event.Rate,
        Label: label,
    })
}
// Create Title
total := calc.Sum(event.Cost, event.Rate)
notifyTitle := fmt.Sprintf("%s 〜 %s の請求額(1 USD = %.2f JPYで計算)\n%s", *start, endexclusivedate, event.Rate, total)
ここで、 calc.Sum に関してだが、 総額を AWS Cost Explorer から取得するためには、リクエストを 2 回行わなければならないため、 Lambda 関数内で計算することにした。
func Sum(cost *costexplorer.GetCostAndUsageOutput, jpy float64) (total string) {
	var sum float64
	for _, c := range cost.ResultsByTime[0].Groups {
		amount, _ := strconv.ParseFloat(*c.Metrics["UnblendedCost"].Amount, 64)
		sum += amount
	}
	total = fmt.Sprintf("▷ Total: %.2f 円", sum*jpy)
	return total
}
さて、通知部分を書いていこう。
まず、 AWS SSM Parameter Store から、 Slack API に必要なアクセス TOKEN と CHANNEL 名を取得する。
- Slack APITOKEN
// Post Message
// Create SSM session
svc := ssm.New(sess)
// Get Paramater from ssm
SLACKAPITOKEN, err := svc.GetParameter(&ssm.GetParameterInput{
    Name:           aws.String("/slack/APITOKEN"),
    WithDecryption: aws.Bool(true),
})
- Slack CHANNEL 名
// Get Paramater from ssm
SLACKCHANNEL, err := svc.GetParameter(&ssm.GetParameterInput{
    Name:           aws.String("/slack/CHANNEL"),
    WithDecryption: aws.Bool(false),
})
次に、Slack の Session を作成する。
// Creat session of Slack
api := slack.New(*SLACKAPITOKEN.Parameter.Value)
Slack API の Attachement 構造体に通知したいコンテンツをアタッチする。
attachment := slack.Attachment{
    Pretext: notifyTitle,
    Text:    notifyText,
}
通知を行う。
_, _, err = api.PostMessage(
    *SLACKCHANNEL.Parameter.Value,
    slack.MsgOptionAttachments(attachment),
    slack.MsgOptionAsUser(true),
)
おまけ
金額の通知をテキストで行なったが、せっかくなのでグラフも作って通知してみたい。
AWS CloudWatch などを使えば、グラフを取得できたりするが、今回は JPY に変換したデータを使って、自前でグラフを用意する。
グラフ生成には、 go-chart パッケージを利用した。
まず、グラフ生成の際に、描画可能な上限、下限を定める。
AWS のサービス数はおおよそ 200 程度なので、利用サービス 1 ~ 200 件を描画できる範囲とする。
// Create Graph
if len(list) >= 200 || len(list) <= 1 {
    return Response{
        Message: ErrPost,
    }, errors.New("Can't plot graph")
}
次にグラフのレイアウトを決める。
今回は棒グラフとして、描画する。
ここら辺は好みの問題になると思うので、参考程度に実装例を以下に提示する。
baseHeight, baseWidth := 100, 100
if len(list) <= 5 {
    baseHeight, baseWidth = 200, 200
}
graph := chart.BarChart{
    Title: "AWS Price per Service",
    Background: chart.Style{
        Padding: chart.Box{
            Top: 50,
        },
    },
    Height:   len(list) * baseHeight / 2,
    Width:    len(list) * baseWidth,
    BarWidth: 90,
    Bars:     list,
}
レイアウトを決めたら、グラフをレンダリングする。
buf := bytes.NewBuffer([]byte{})
err = graph.Render(chart.PNG, buf)
最後に、再度 Slack API を用いてレンダリングしたグラフを送信して完了。
// Post Graph
_, err = api.UploadFile(
    slack.FileUploadParameters{
        Reader:   buf,
        Filename: "awscost-" + endexclusivedate + ".png",
        Channels: []string{*SLACKCHANNEL.Parameter.Value},
    })
MainFunction を実装しよう
それぞれ機能ごとに Lambda を分離したので、 MainFunction という Lambda を立てて、ワークロード用の関数を立てる。
今回は、 Lambda を立てるが、StepFunctions などを利用しても良いだろう。
まず、それぞれ機能ごとの Lambda を呼び出す際のリクエスト、レスポンス用の構造体を定義する。
type getCostItemsResponse struct {
	Message string                              `json:"message"`
	Cost    *costexplorer.GetCostAndUsageOutput `json:"cost"`
	Rate    float64                             `json:"rate"`
}

type getNotifyItemsRequest struct {
	Cost *costexplorer.GetCostAndUsageOutput
	Rate float64
}

type getNotifyItemsResponse struct {
	Message string `json:"message"`
}
流れとしては、AWS Cost Explorer 、 open exchange rates を利用して取得したデータを GetCostFunction 関数から受け取る。
次に、NotifyFunction に受け取った値を渡す。
最後に メッセージの送信の結果を受け取る。
Lambda 関数内から Lambda 関数を呼び出すには、aws-lambda-go パッケージを利用する。
まず、セッションを作成し、サービスを宣言する。
svcl := lambda.New(sess)
- GetCostFunction を Invoke する。
// Invoke getcostfunction
result, err := svcl.Invoke(
    &lambda.InvokeInput{
        FunctionName: aws.String("GetCostFunction"),
    },
)
var getcostresp getCostItemsResponse
err = json.Unmarshal(result.Payload, &getcostresp)
まず、Invoke したい Lambda 関数名を InvokeInput 構造体の FunctionName に設定。
受け取った Payload を先程用意した getCostItemsResponse 構造体へ Unmarshal する。
- NotifyFunction を Invoke する。
// Invoke notifyfunction
request := getNotifyItemsRequest{
Cost: getcostresp.Cost,
Rate: getcostresp.Rate,
}
payload, _ := json.Marshal(request)
result, err = svcl.Invoke(
&lambda.InvokeInput{
FunctionName: aws.String("NotifyFunction"),
Payload: payload,
},
)
var notifyresp getNotifyItemsResponse
err = json.Unmarshal(result.Payload, ¬ifyresp)
リクエストに渡したい値を Payload にセットして、Lambda 関数を Invoke する。
同様に、Invoke したい Lambda 関数名を InvokeInput 構造体の FunctionName に設定。
受け取った Payload を先程用意した getCostItemsResponse 構造体へ Unmarshal する。
以上で通知 BOT の実装は完了。
sam local invoke コマンド等でテストできる。
※注意点
- 今回は解説の際の見通しを良くするために エラー処理を省いて解説している部分があるが、きちんとエラー処理を書くこと。
Lambda 関数をデプロイ
各 Lambda 関数の実装ができたら、次にデプロイだ。
template.yaml を記述しよう。
今回は AWS SAM を使うので、 Transform を設定すること。
次にそれぞれの関数のタイムアウトを適当に 20 sec に設定。
今回は割愛するが、それぞれの Lambda 関数内に適切なタイムアウトも設定すること。
AWSTemplateFormatVersion: "2010-09-09"
Transform: AWS::Serverless-2016-10-31
Globals:
  Function:
    Timeout: 20
次に、Resorces を定義する。
Resources:
まず、 MainFunction の IamRole を定義する。
MainFunction 内で呼び出す Lambda 関数は GetCostFunction と NotifyFunction なので、Resorce にそれぞれの関数の ARN を指定する。
  MainFunctionIamRole:
    Type: AWS::IAM::Role
    Properties:
      AssumeRolePolicyDocument:
        Version: "2012-10-17"
        Statement:
          - Effect: Allow
            Principal:
              Service: lambda.amazonaws.com
            Action: "sts:AssumeRole"
      Policies:
        - PolicyName: "MainFunctionLambdaPolicy"
          PolicyDocument:
            Version: "2012-10-17"
            Statement:
              - Effect: Allow
                Action:
                  - "lambda:InvokeFunction"
                Resource:
                  - !GetAtt GetCostFunction.Arn
                  - !GetAtt NotifyFunction.Arn
また、AWS CloudWatch logs にログを書き出したいため、追加で WriteLimitedAccessToCloudWatch Policy を定義しておく。
        - PolicyName: "WriteLimitedAccessToCloudWatch"
          PolicyDocument:
            Version: "2012-10-17"
            Statement:
              - Effect: Allow
                Action:
                  - "logs:CreateLogGroup"
                  - "logs:CreateLogStream"
                  - "logs:PutLogEvents"
                Resource:
                  - arn:aws:logs:ap-northeast-1:<ommit>:log-group:*
この IAM ロールを作成するには GetCostFunction と NotifyFunction の ARN が存在しないと適切に作成できないので、 DependsOn の設定を忘れないように。
    DependsOn:
      - GetCostFunction
      - NotifyFunction
次に、Lambda 本体である、 MainFunction を定義する。
  MainFunction:
    Type: AWS::Serverless::Function
    Properties:
      FunctionName: MainFunction
      CodeUri: invoke-obj/main
      Handler: app.lambda_handler
      Runtime: go1.x
      Architectures:
        - x86_64
      Role: !GetAtt MainFunctionIamRole.Arn
      Events:
        Main:
          Type: Schedule
          Properties:
            Schedule: cron(0 0 ? * * *) #09:00JST,Everyday.
  MainFunctionLogGroup:
    Type: AWS::Logs::LogGroup
    Properties:
      LogGroupName: !Sub /aws/lambda/${MainFunction}
      RetentionInDays: 30
プロパティに関数名と、コードの場所、今回は Go で実装しているため、ランタイムに go1.x を指定。
Role には、先程定義した MainFunctionIamRole の ARN を指定する。
Events には、今回、毎日日本時間 AM 9:00 に通知を行うため、 Schedule 部分に Cron 式を記述する。
また、LogGroup を定義して、関数ごとにログを分ける。
RetentionInDays を設定して、一ヶ月のみログを保存するライフサイクルを記述しておこう。
以上の要領で、残りの GetCostFunction 、 PutRateFunction 、 NotifyFunction を定義しよう。
今回は比較的手軽に使用できる AWS CLI を使ってデプロイする。
まず、template.yaml に文法的な間違いがないか validate を使って確認する。
.PHONY: valid
valid:
	sam validate -t template.yaml
次に、sam build でビルド済みの実行ファイルを S3 にアップロードする。
また、CodeUri を S3 に書き換える必要があるため、別途 template ファイルを出力してデプロイ時にそちらを使用する。
.PHONY: package
package:
	sam package --output-template-file renew.yaml --s3-bucket <hoge>
最後にデプロイを行う。今回は IAM Role を作成する必要があるため、 CAPABILITY_IAM を指定する。
.PHONY: deploy
deploy: package
	sam deploy --template-file renew.yaml --stack-name <hoge> --capabilities CAPABILITY_IAM --region ap-northeast-1
以上でデプロイが完了。
- 通知の様子

まとめ
今回は Lambda 関数を実装してデプロイまで行った。
AWS を利用したサービス設計時、ある程度正しい見積もりができないと大きな損害を生む可能性があるので、信用を失うことになりかねない。
日々 BOT 等を活用し、関係者に通知を送ることによって責任を分散させていければ良いなと思う。
次回は、CI/CD 編を書く予定。
Discussion