🖌️
VitePressをブログサイトとして使う
はじめに
- Vite製の静的サイトジェネレータである「VitePress」を、ブログシステムとして使いたいと考えた。
- Vitepressのインストール時に導入されるデフォルトテーマの設定により、トップページ(home)テンプレートやナビゲーションバーなど、ブログとして使うにはリッチすぎる機能が含まれている。
- また、ブログシステムでよくある「記事一覧を表示する機能」はデフォルトで搭載されておらず、自作する必要がある。
- 以下に、VitePressをシンプルなブログとして使うための初期設定や設定方法をまとめる。
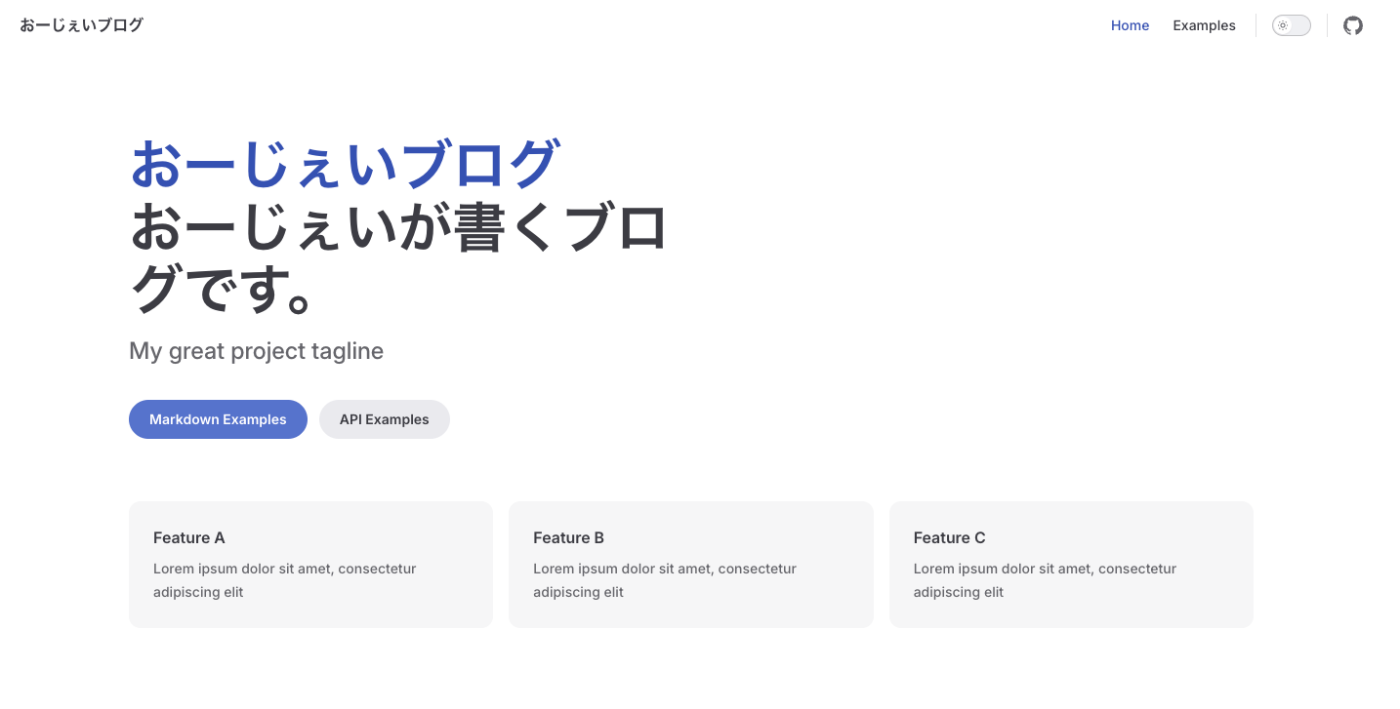
ゴールはこんな感じ。

セットアップ
- 新しく空のリポジトリを作成し、以下を実行する。
npm add -D vitepress
npx vitepress init
- vitepress init コマンドでは、いくつか質問事項があるので、以下のように回答する。
┌  Welcome to VitePress!
│
◇  Where should VitePress initialize the config?
│  ./
│
◇  Site title:
│  おーじぇいブログ
│
◇  Site description:
│  おーじぇいが書くブログです。
│
◇  Theme:
│  Default Theme
│
◇  Use TypeScript for config and theme files?
│  Yes
│
◇  Add VitePress npm scripts to package.json?
│  Yes
│
└  Done! Now run npm run docs:dev and start writing.
- 最後に
.gitignoreファイルを作成し、以下を記載する。
node_modules/
.vitepress/dist
.vitepress/cache
-
npm run docs:devを実行すると、 http://localhost:5173 で立ち上がる。
設定をブログ用に書き換える
フォルダ構成を考える
- 今回は、ルートディレクトリ配下に
articlesディレクトリを作成し、その中に記事のMarkdownファイルを配置していくことにした。シンプル・イズ・ベストな構成。
.
├── .vitepress
│   ├── config.mts # Vitepressの設定を書く
│   └── loader # データローダスクリプトを配置(後述)
│       └── articles.data.ts # 記事一覧を出力するためのスクリプト(後述)
├── articles # この中に記事のMarkdownファイルを配置する
│   └── 20240212_test.md # YYYYMMDD_記事slug.md 形式で名前をつける
├── index.md # トップページ
├── package-lock.json
└── package.json
ESMとして機能するようにpackage.jsonを変更
- もしかしたら不要かもしれないが、自環境ではエラーが出たので、
package.jsonに"type": "module"を追加する。
{
  "devDependencies": {
    "vitepress": "^1.6.3"
  },
  "scripts": {
    "docs:dev": "vitepress dev",
    "docs:build": "vitepress build",
    "docs:preview": "vitepress preview"
-  }
+  },
+  "type": "module"
}
記事一覧を取得するデータローダスクリプトを作成
- トップページに記事一覧が表示できるよう、データローダスクリプトを作成する。
- データローダスクリプト: ビルド時にのみ実行され、任意のデータを読み込んでページやコンポーネントからimportするできる機能(参考)
- 外部APIのデータを取得したり、配置されているファイルに基づいてメタデータの生成ができる
- この中の
createContentLoaderヘルパーを利用することで、全てのエントリを取得できる
- データローダスクリプト: ビルド時にのみ実行され、任意のデータを読み込んでページやコンポーネントからimportするできる機能(参考)
- データローダスクリプトは
(任意の名前).data.tsファイルとして、ここでは.vitepress/loader/ディレクトリ配下に配置する。
.vitepress/loader/articles.data.ts
import { createContentLoader } from "vitepress";

const ARTICLES_PATH = "articles/**/*.md";

export default createContentLoader(ARTICLES_PATH, {
  includeSrc: true,
});
テスト記事を作成する
- データローダスクリプトの挙動を確かめるために、
articles/20250212_test.mdという名前で、以下のMarkdownを書いてみた。
articles/20250212_test.md
---
title: テスト記事
description: テスト記事のdescriptionをこのように指定しています。
lang: ja-JP
date: 2025-02-12T00:00:00+09:00
head:
  - - meta
    - property: og:image
      content: ./imgs/20250212_test/ogp.png
---

# テスト記事の見出し1

みなさんこんにちは、これはテスト記事です。
データローダスクリプトをトップページで読み込む
- トップページのMarkdownファイル(index.md)を開き、一度全ての内容を削除する。
- まずはメタデータを記述する。
-
themeにはpageを指定する。これにより、空白ページとして余分なスタイルが適用されない。(参考) -
next,prevともにfalseを指定し、ページ下部の遷移リンクを削除する。
-
index.md
---
theme: page
title: おーじぇいブログ
next: false
prev: false
---
- scriptタグを追加し、以下を記載する。
index.md
<script setup lang="ts">
import { data as articles } from "./.vitepress/loader/articles.data.ts";
console.log(articles)
</script>
- この状態で開発サーバを立ち上げ、ページを開いてみると、仕込んだconsole.logで先ほど追加したテスト記事の内容が出力されていることがわかる。
- この中の
frontmatterの値を使って、記事一覧を作成すると良さそう。
- この中の
[
    {
        "src": "---\ntitle: テスト記事\ndescription: テスト記事のdescriptionをこのように指定しています。\nlang: ja-JP\nhead:\n  - - meta\n    - property: og:image\n      content: ./imgs/20250212_test/ogp.png\n---\n\n# テスト記事の見出し1\n\nみなさんこんにちは、これはテスト記事です。\n",
        "frontmatter": {
            "title": "テスト記事",
            "description": "テスト記事のdescriptionをこのように指定しています。",
            "lang": "ja-JP",
            "date": "2025-02-15T00:00:00+09:00"
            "head": [
                [
                    "meta",
                    {
                        "property": "og:image",
                        "content": "./imgs/20250212_test/ogp.png"
                    }
                ]
            ]
        },
        "url": "/articles/20250212_test.html"
    }
]
記事一覧をトップページに表示させる
- あとは煮るなり焼くなり自由に実装すれば良し。
- 自分は以下の機能を実装した。
- 記事を日付順に並び替える
- ページネーション(10件ごとにページ切り替え)
- いい感じのCSS
- VitepressではVue3の機能(Composition API)が使えるので、
refやcomputedを使い、SPAライクに実装している。(参考)
トップページ `index.md` のソース全文
index.md
---
theme: page
title: おーじぇいブログ
next: false
prev: false
aside: false
---

<script setup lang="ts">
import { ref, computed } from "vue"
import { data as articles } from "./.vitepress/loader/articles.data.ts";

// 1ページあたりの記事数
const ITEMS_PER_PAGE = 5;

// 現在のページ番号(デフォルトは1)
const currentPage = ref(1);

// 記事を日付順に並び替え
const sortedArticles = [...articles].sort((a, b) => {
  return new Date(b.frontmatter.date).getTime() - new Date(a.frontmatter.date).getTime();
});

// 総ページ数を計算
const totalPages = Math.ceil(sortedArticles.length / ITEMS_PER_PAGE);

// 現在のページの記事を取得
const currentArticles = computed(() => {
  const start = (currentPage.value - 1) * ITEMS_PER_PAGE;
  const end = start + ITEMS_PER_PAGE;
  return sortedArticles.slice(start, end);
});

// ページ変更関数
const changePage = (page: number) => {
  currentPage.value = page;
  window.scrollTo(0, 0);
};

// 日付フォーマット用の関数
const formatDate = (dateStr: string) => {
  const date = new Date(dateStr);
  return date.toLocaleDateString('ja-JP', {
    year: 'numeric',
    month: '2-digit',
    day: '2-digit'
  });
};
</script>

# おーじぇいブログ

## 記事一覧

<div class="articles-list">
  <div v-for="article in currentArticles" :key="article.url" class="article-item">
    <a :href="article.url" class="article-content">
      <div class="article-image">
        <img
          :src="article.frontmatter.head?.[0]?.[1]?.content || '/imgs/no_image_yoko.jpg'"
          :alt="article.frontmatter.title"
        >
      </div>
      <div class="article-text">
        <h3>{{ article.frontmatter.title }}</h3>
        <p class="date">{{ formatDate(article.frontmatter.date) }}</p>
        <p class="description">{{ article.frontmatter.description }}</p>
      </div>
    </a>
  </div>

  <!-- ページネーションUI -->
  <div class="pagination">
    <button :disabled="currentPage === 1" @click="changePage(currentPage - 1)" class="page-button">前へ</button>
    <span v-for="page in totalPages" :key="page">
      <button @click="changePage(page)" class="page-button" :class="{ active: currentPage === page }">{{ page }}</button>
    </span>
    <button :disabled="currentPage === totalPages" @click="changePage(currentPage + 1)" class="page-button">次へ</button>
  </div>
</div>

<style scoped>
.articles-list {
  margin: 0 auto;
  padding: 20px;
}

.article-item {
  margin-bottom: 2rem;
  padding: 1rem;
  border-bottom: 1px solid #eee;
}

.article-content {
  display: flex;
  gap: 1.5rem;
  text-decoration: none;
  color: inherit;
}

.article-content:hover {
  opacity: 0.8;
  transition: opacity 0.2s;
}

.article-image {
  flex: 0 0 200px;
}

.article-image img {
  width: 100%;
  height: 150px;
  object-fit: contain;
  border-radius: 8px;
}

.article-text {
  flex: 1;
}

.article-item h3 {
  margin: 0 0 0.5rem 0;
}

.article-item a {
  text-decoration: none;
}

.description {
  color: #666;
  margin: 0;
}

.date {
  color: #666;
  font-size: 0.9em;
  margin: 0.2rem 0;
}

/* スマホ向けのスタイルを追加 */
@media (max-width: 768px) {
  .article-content {
    flex-direction: column;
    gap: 1rem;
  }

  .article-image {
    flex: none;
    width: 100%;
  }

  .article-image img {
    width: 100%;
    height: 200px;
    object-fit: cover;
  }

  .articles-list {
    padding: 0;
  }
}

/* ページネーションのスタイル */
.pagination {
  display: flex;
  justify-content: center;
  gap: 0.5rem;
  margin-top: 2rem;
}

.page-button {
  padding: 0.5rem 1rem;
  border: 1px solid var(--vp-c-divider);
  background: var(--vp-c-bg);
  color: var(--vp-c-text-1);
  cursor: pointer;
  border-radius: 4px;
}

.page-button:disabled {
  background: var(--vp-c-bg-soft);
  color: var(--vp-c-text-3);
  cursor: not-allowed;
}

.page-button.active {
  background: var(--vp-c-brand);
  color: var(--vp-c-white);
  border-color: var(--vp-c-brand);
}

.page-button:hover:not(:disabled) {
  background: var(--vp-c-bg-soft);
}

.page-button.active:hover {
  background: var(--vp-c-brand-dark);
}
</style>
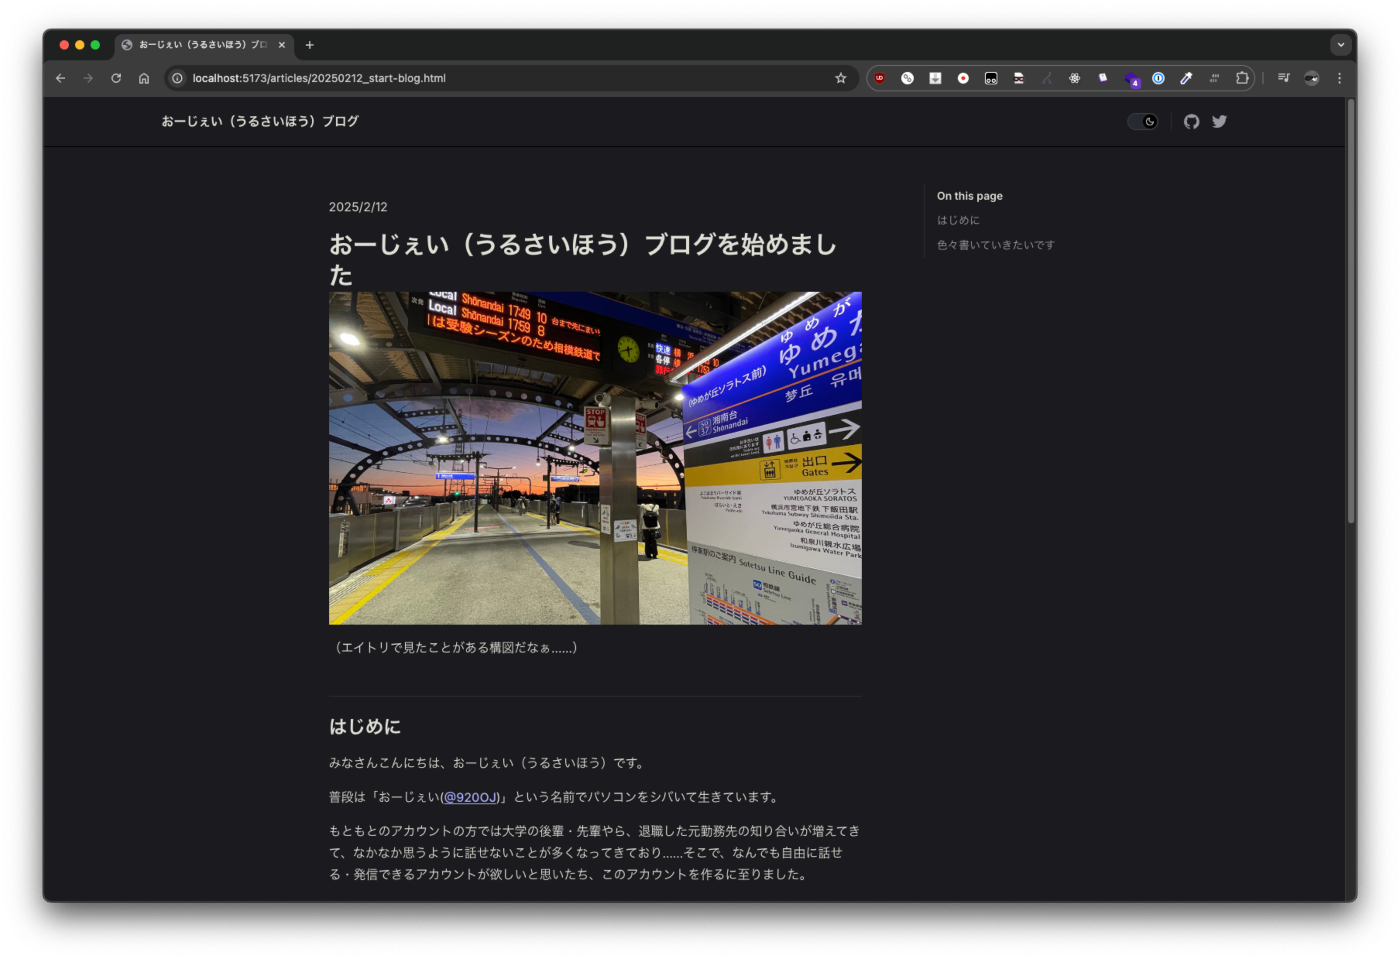
記事冒頭に日付・タイトル・アイキャッチ画像を挿入する
- Vitepressでは、デフォルトテーマを拡張する形でテーマを変更する
Layout機能が備わっている。- それぞれのLayoutはVueコンポーネントの形で書くことができる。
-
.vitepress/.theme/index.tsを作成し、以下のように記述する。- ここでは
articles/配下の記事のみLayoutを適用するように条件分岐を記載している。
- ここでは
.vitepress/.theme/index.ts
import { h } from "vue";
import { useData } from 'vitepress'
import DefaultTheme from "vitepress/theme";
import ArticleHeader from "./articleHeader.vue";
import ArticleFooter from "./articleFooter.vue";

export default {
  extends: DefaultTheme,
  Layout() {
    return h(DefaultTheme.Layout, null, {
      'doc-before': () => { # 記事冒頭に載せるもの
        const { page } = useData()
        if (page.value.relativePath.startsWith('articles/')) {
          return h(ArticleHeader)
        }
      },
      'doc-after': () => { # 記事終わりに載せるもの
        const { page } = useData()
        if (page.value.relativePath.startsWith('articles/')) {
          return h(ArticleFooter)
        }
      }
    })
  },
};
- 記事ヘッダのLayoutファイルは以下の通り。
-
vp-docclassを付与することで、Vitepressのデフォルトテーマのスタイルが当たる -
useData()composable から、各記事のmeta情報が取得できる
-
articleHeader.vue
<script setup lang="ts">
import { useData } from "vitepress";
const { frontmatter } = useData();

const date = new Date(frontmatter.value.date).toLocaleDateString("ja-JP");
</script>

<template>
  <div class="vp-doc">
    <p>
      <span>{{ date }}</span>
    </p>
    <h1>{{ frontmatter.title }}</h1>
    <img :src="frontmatter.head[0][1].content" />
  </div>
</template>
- 記事フッタのLayoutファイルは以下の通り。
- ここではシェアボタンと著者紹介を作成している
フッタのLayoutファイル全文
articleFooter.vue
<script setup lang="ts">
import { useData } from "vitepress";
const { frontmatter, page } = useData();

// シェアURL等の計算
const currentUrl = typeof window !== 'undefined' ? window.location.href : '';
const encodedUrl = encodeURIComponent(currentUrl);
const encodedTitle = encodeURIComponent(frontmatter.value.title || '');
</script>

<template>
  <div class="vp-doc">
    <div class="share-buttons">
      <h2>シェアする</h2>
      <div class="share-buttons-container">
        <a :href="`https://twitter.com/intent/tweet?url=${encodedUrl}&text=${encodedTitle}`"
           target="_blank"
           rel="noopener noreferrer"
           class="share-button twitter">
          X(Twitter)でシェア
        </a>
        <a :href="`https://www.facebook.com/sharer/sharer.php?u=${encodedUrl}`"
           target="_blank"
           rel="noopener noreferrer"
           class="share-button facebook">
          Facebookでシェア
        </a>
        <a :href="`https://b.hatena.ne.jp/entry/${currentUrl}`"
           target="_blank"
           rel="noopener noreferrer"
           class="share-button hatena">
          はてブに追加
        </a>
      </div>
    </div>
    <div class="author-card">
      <h2>この記事を書いた人</h2>
      <div class="author-info">
        <img src="/imgs/icon.jpg" alt="おーじぇい(うるさいほう)">
        <div class="author-info-content">
          <p class="author-name">おーじぇい(うるさいほう)</p>
          <p class="author-social">X: <a href="https://x.com/c7yQuBe00440161">https://x.com/c7yQuBe00440161</a></p>
          <p class="author-description">@920OJ のうるさい方のアカウント。ガジェットとかプログラムとかボカロとかエイトリとかゼンゼロとかの話題を話します。</p>
        </div>
      </div>
    </div>
  </div>
</template>

<style scoped>
h2 {
  padding-top: 0;
  border-top: 0;
}

.author-card {
  background: var(--vp-c-bg);
  border-radius: 12px;
  padding: 24px;
  box-shadow: 0 4px 6px rgba(0, 0, 0, 0.1);
  margin: 32px 0;
  border: 1px solid var(--vp-c-divider);
}

.author-card h2 {
  margin-top: 0;
  font-size: 1.5rem;
  color: var(--vp-c-text-1);
  margin-bottom: 16px;
}

.author-info {
  display: grid;
  grid-template-columns: 120px 1fr;
  gap: 24px;
  align-items: start;
}

.author-info img {
  width: 120px;
  height: 120px;
  border-radius: 60px;
  object-fit: cover;
}

.author-info-content {
  display: flex;
  flex-direction: column;
  gap: 12px;
}

.author-name {
  font-size: 1.2rem;
  font-weight: 600;
  margin: 0;
}

.author-social {
  margin: 0;
}

.author-social a {
  color: var(--vp-c-brand);
  text-decoration: none;
}

.author-social a:hover {
  text-decoration: underline;
}

.author-description {
  margin: 0;
  line-height: 1.6;
  color: var(--vp-c-text-2);
}

@media (max-width: 640px) {
  .author-info {
    grid-template-columns: 1fr;
    text-align: center;
  }

  .author-info img {
    width: 100px;
    height: 100px;
    margin: 0 auto;
  }
}

.share-buttons {
  margin: 32px 0;
}

.share-buttons h2 {
  font-size: 1.5rem;
  margin-bottom: 16px;
}

.share-buttons-container {
  display: flex;
  gap: 12px;
  flex-wrap: wrap;
}

.share-button {
  display: inline-flex;
  align-items: center;
  padding: 8px 16px;
  border-radius: 6px;
  color: white;
  text-decoration: none;
  font-weight: 600;
  transition: opacity 0.2s;
}

.share-button:hover {
  opacity: 0.8;
}

.twitter {
  background-color: #1DA1F2;
}

.facebook {
  background-color: #1877F2;
}

.hatena {
  background-color: #00A4DE;
}

@media (max-width: 640px) {
  .share-buttons-container {
    flex-direction: column;
  }

  .share-button {
    text-align: center;
    justify-content: center;
  }
}
</style>
- ここまでできたらある程度のブログの体は成してきたのでは、と感じたので公開。
- 自分はCloudflare Pagesで公開しています。転送量無制限で無料。太っ腹。
参考にさせていただいたサイト
Discussion