【Flutter】Sliverの仕組みを理解する
Sliverを扱うのは、基本的にCustomScrollViewを使う時に限定されます。ゆえに「SliverはCustomScrollViewとセットで使われる」程度で説明されることも多いですが、実際のところListViewやGridView、PageViewも内部を見ればSliverで作られています。
Sliverの仕組みを深く理解することで、直接的なSliverの扱い方だけではなく、これらの汎用的なWidgetの扱い方も正確に把握できるようになると考えています。
今回の記事では、Sliverがどのように使われ、どのようにレイアウトを行なっているかを具体的に掘り下げ、その仕組みについて説明します。
Sliverとは
この記事ではsliver protocolに基づいてレイアウトを行う、RenderObject、Element、Widgetの総称をSliverと呼びます。(公式にはハッキリと書いてないので、あくまで私的なものとします)
sliver protocolはRenderSliverの持つアルゴリズムで、これによってスクロール時に表示部分のみ描画するように制御したり、スクロールに応じて動的にアイテムのサイズや位置を変更ができます。
このprotocolという概念はSliver特有のものではなく、SizedBoxやContainerといった一般的なWidgetを使う際はRenderBoxのbox protocolに従って描画をしています。(同じ理屈でSizedBoxやColumn,ContainerはBoxと呼べます)
box protocolの場合はBoxConstraintsとSizeによって描画を行いますが、sliver protocolはSliverConstraintsとSliverGeometryがそれらの役割を担っています。ここら辺の詳細は後ほど説明します
Sliverの活用例
Sliverが使われるWidgetの多くは、ScrollViewという抽象クラスを継承しています。ScrollViewはユーザーのジェスチャーを検知するScrollableとそれを元に描画を行うViewportを保持していて、そこにoverrideされたbuildSliversを渡すという仕組みになっています。
CustomScrollView
CustomScrollViewの場合はこのbuildSliversを引数から指定できるようにしただけです。
class CustomScrollView extends ScrollView {
const CustomScrollView({
super.key,
super.scrollDirection,
super.reverse,
super.controller,
super.primary,
super.physics,
super.scrollBehavior,
super.shrinkWrap,
super.center,
super.anchor,
super.cacheExtent,
this.slivers = const <Widget>[],
super.semanticChildCount,
super.dragStartBehavior,
super.keyboardDismissBehavior,
super.restorationId,
super.clipBehavior,
});
List<Widget> buildSlivers(BuildContext context) => slivers;
}
ListView & GridView
ListViewとGridViewの場合はBoxScrollViewを継承しています。
class ListView extends BoxScrollView { /* 省略 */ }

class GridView extends BoxScrollView { /* 省略 */ }
BoxScrollViewはScrollViewのbuildSliversに単一のSliverを入れたListを返すようにoverrideしたクラスです。ListViewではbuidSliversにSliverList, GridViewではSliverGridが以下のbuildChildLayoutでoverrideされて、最終的にbuildSliversで使われます。
/// ListViewではこれがSliverList, GridViewではSliverGridを返すように継承される
Widget buildChildLayout(BuildContext context);
上のbuildChildLayoutによって用意されたSliverが、paddingがnullでない場合はSliverPaddingにラップされ、最終的に単数の配列として返されてることが以下のbuildSliversにて確認できます。
List<Widget> buildSlivers(BuildContext context) {
Widget sliver = buildChildLayout(context);
EdgeInsetsGeometry? effectivePadding = padding;
if (padding == null) {
final MediaQueryData? mediaQuery = MediaQuery.maybeOf(context);
if (mediaQuery != null) {
// Automatically pad sliver with padding from MediaQuery.
final EdgeInsets mediaQueryHorizontalPadding =
mediaQuery.padding.copyWith(top: 0.0, bottom: 0.0);
final EdgeInsets mediaQueryVerticalPadding =
mediaQuery.padding.copyWith(left: 0.0, right: 0.0);
// Consume the main axis padding with SliverPadding.
effectivePadding = scrollDirection == Axis.vertical
? mediaQueryVerticalPadding
: mediaQueryHorizontalPadding;
// Leave behind the cross axis padding.
sliver = MediaQuery(
data: mediaQuery.copyWith(
padding: scrollDirection == Axis.vertical
? mediaQueryHorizontalPadding
: mediaQueryVerticalPadding,
),
child: sliver,
);
}
}
if (effectivePadding != null) {
sliver = SliverPadding(padding: effectivePadding, sliver: sliver);
}
return <Widget>[ sliver ];
}
PageView
PageViewの場合はScrollViewを継承せずにPageView内部でScrollableとViewportを持っています。SliverFillViewportをViewportのsliversに単数で返しているだけなので、ここの構造自体はListView,GridViewと同じです。
Widget build(BuildContext context) {
/* 省略 */
child: Scrollable(
dragStartBehavior: widget.dragStartBehavior,
axisDirection: axisDirection,
controller: widget.controller,
physics: physics,
restorationId: widget.restorationId,
scrollBehavior: widget.scrollBehavior ?? ScrollConfiguration.of(context).copyWith(scrollbars: false),
viewportBuilder: (BuildContext context, ViewportOffset position) {
return Viewport(
cacheExtent: widget.allowImplicitScrolling ? 1.0 : 0.0,
cacheExtentStyle: CacheExtentStyle.viewport,
axisDirection: axisDirection,
offset: position,
clipBehavior: widget.clipBehavior,
slivers: <Widget>[
SliverFillViewport(
viewportFraction: widget.controller.viewportFraction,
delegate: widget.childrenDelegate,
padEnds: widget.padEnds,
),
],
);
},
);
}
ちなみにSingleChildScrollViewの場合はSliverは介入しません。SingleChildViewportという、sliversを持たないViewportが使われています。
sliver protocolの構成
冒頭で述べた通り、RenderBoxではBoxConstraintsとSizeによってレイアウトが行われますが、RenderSliverではSliverConstraintsとSliverGeometryが使われています。
Sliverの仕組みを理解するには、先ずこれらの責務を把握しておく必要があります。
SliverConstraints
SliverConstraintsは、Sliverから見たViewportの現在のスクロール状態を持ちます。
/// 簡略化しています
class SliverConstraints extends Constraints {
  final AxisDirection axisDirection;
  final GrowthDirection growthDirection;
  final ScrollDirection userScrollDirection;
  final double scrollOffset;
  final double precedingScrollExtent;
  final double overlap;
  final double remainingPaintExtent;
  final double crossAxisExtent;
  final AxisDirection crossAxisDirection;
  final double viewportMainAxisExtent;
  final double cacheOrigin;
  final double remainingCacheExtent;
}
SliverGeometry
SliverGeometryは、Viewport内で実際にSliverが占めるスペースの状態を保ちます。
/// 簡略化しています
class SliverGeometry with Diagnosticable {
  final double scrollExtent;
  final double paintOrigin;
  final double paintExtent;
  final double layoutExtent;
  final double maxPaintExtent;
  final double maxScrollObstructionExtent;
  final double hitTestExtent;
  final bool visible;
  final bool hasVisualOverflow;
  final double? scrollOffsetCorrection;
  final double cacheExtent;
}
Constraints go down, Geometries go up
RenderSliverもRenderObjectを継承しているので、レイアウトの計算の順番はbox protocolの"Constraints go down, sizes go up"と同じです。
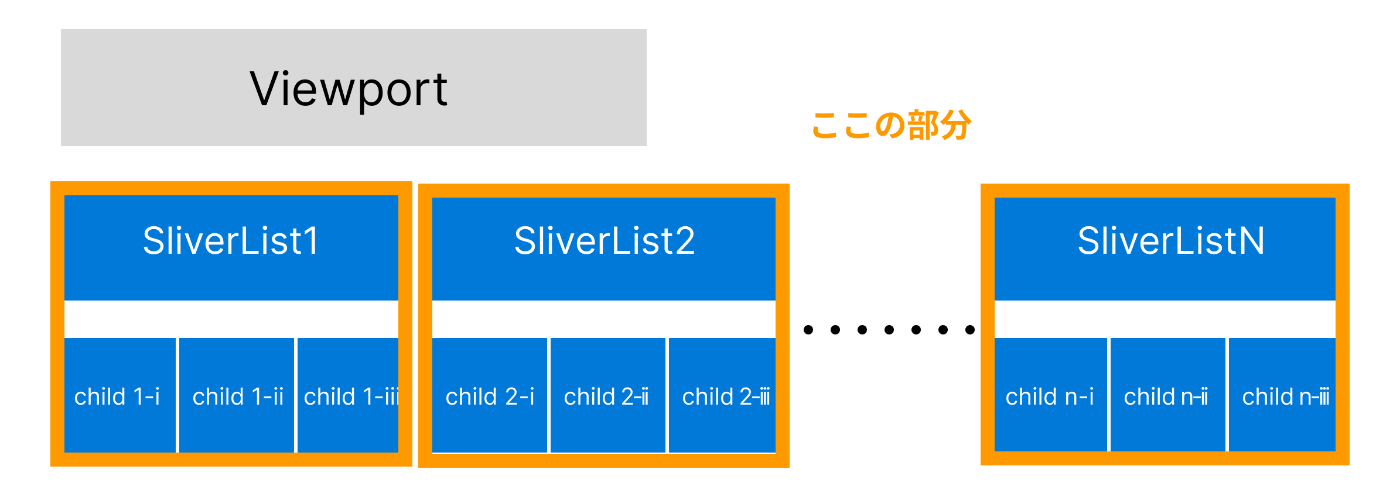
Viewportが複数のSliverの描画を制御する仕組み
sliver protocolの大枠を確認したところで、次はViewportが複数のSliverたちの描画をどのように行なっているのかを説明します。
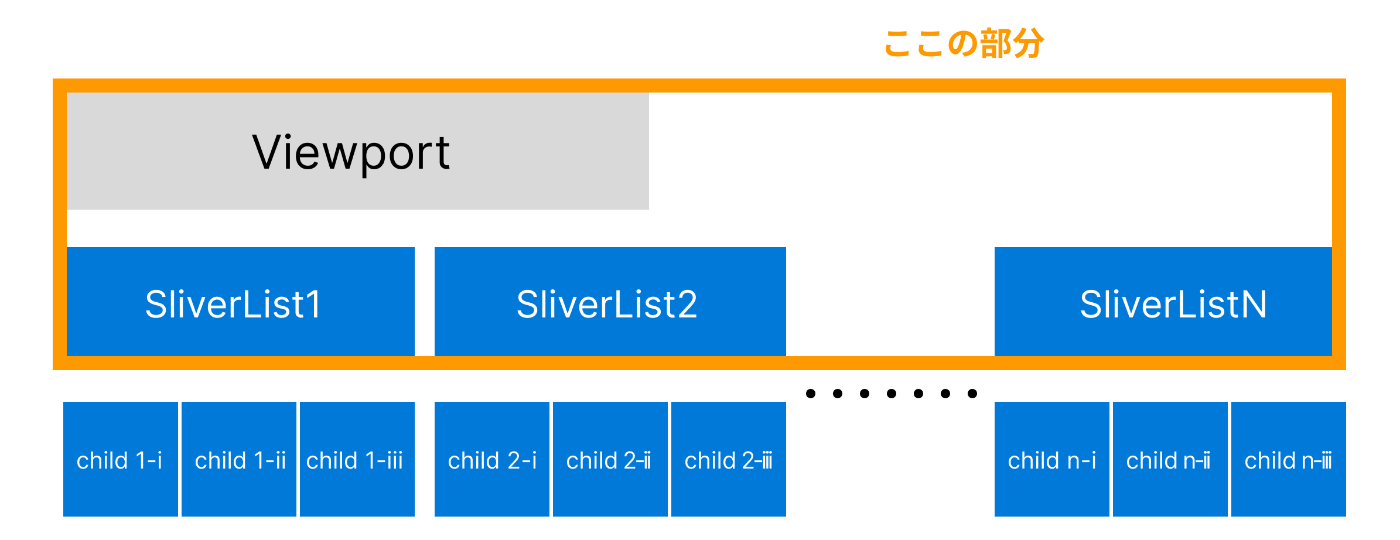
Viewportは保有するSliverを全てレイアウトした後に、表示領域内にあるもののみを描画します。
cacheExtentが0の場合です
レイアウトの処理はRenderViewportのlayoutChildSequenceを見ると確認できます。
    while (child != null) {

      /* ~~~~~~省略~~~~~~ */

       // child(sliver)にSliverConstraintsを渡す
      child.layout(SliverConstraints(
        axisDirection: axisDirection,
        growthDirection: growthDirection,
        userScrollDirection: adjustedUserScrollDirection,
        scrollOffset: sliverScrollOffset,
        precedingScrollExtent: precedingScrollExtent,
        overlap: maxPaintOffset - layoutOffset,
        remainingPaintExtent: math.max(0.0, remainingPaintExtent - layoutOffset + initialLayoutOffset),
        crossAxisExtent: crossAxisExtent,
        crossAxisDirection: crossAxisDirection,
        viewportMainAxisExtent: mainAxisExtent,
        remainingCacheExtent: math.max(0.0, remainingCacheExtent + cacheExtentCorrection),
        cacheOrigin: correctedCacheOrigin,
      ), parentUsesSize: true);

      // layoutしたsliverからgeometryを取得
      final SliverGeometry childLayoutGeometry = child.geometry!;

      /* ~~~~~~以降大部分省略~~~~~~ */

      // geometryから次のsliverのconstraintsとなる値を変更
      maxPaintOffset = math.max(effectiveLayoutOffset + childLayoutGeometry.paintExtent, maxPaintOffset);
      scrollOffset -= childLayoutGeometry.scrollExtent;
      precedingScrollExtent += childLayoutGeometry.scrollExtent;
      layoutOffset += childLayoutGeometry.layoutExtent;


      // 次のsliverに移る
      child = advance(child);
    }
これによって全てのchildのSliverGeometryが確定した後に、現在の表示領域にあるSliverのみを描画していきます。
  void _paintContents(PaintingContext context, Offset offset) {
    for (final RenderSliver child in childrenInPaintOrder) {
      if (child.geometry!.visible) {
        context.paintChild(child, offset + paintOffsetOf(child));
      }
    }
  }
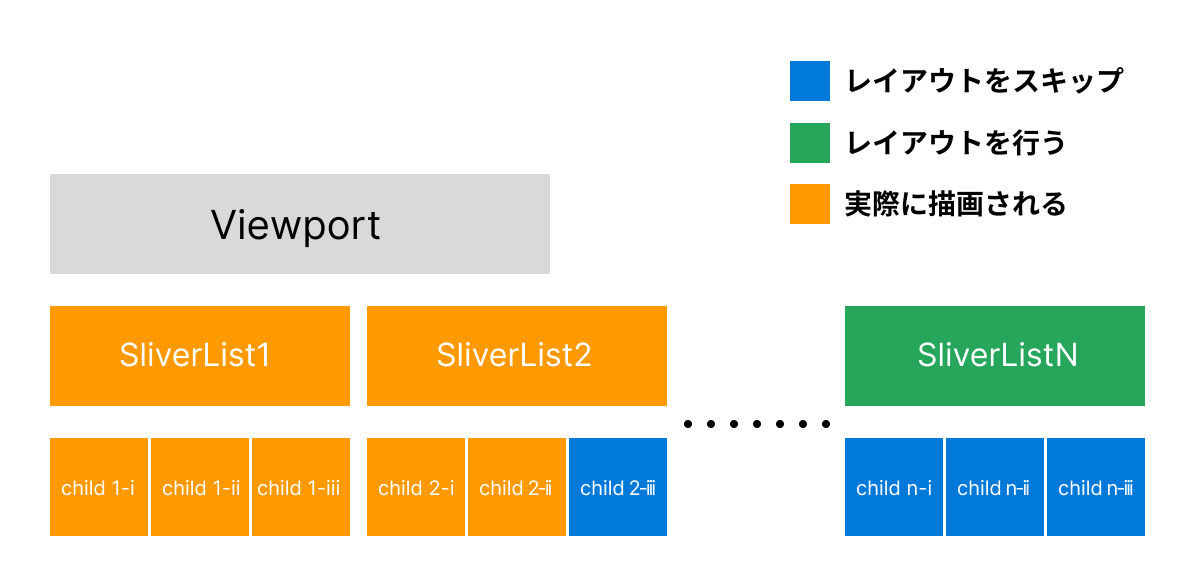
ちなみに上の図ではSliverListのみを使っているためViewport外のchildのレイアウトはスキップされていますが、SliverToBoxAdapterの場合はそのような制御はされないため、どこにあろうとchildのレイアウトまでは必ず行われます。
このためSliverToBoxAdapterを連続して並べることは公式で非推奨とされています。SliverListで括れば非表示部分のchildのレイアウト計算はスキップされますが、sliversに並べられているSliverToBoxAdapterは表示・非表示に関わらずレイアウト計算が行われます。
SliverListが複数のchildのレイアウトを制御する仕組み
ここからは実際にSliverが各自でどのように複数のchildのレイアウトを制御しているかを説明します。
今回は例としてSliverListを扱いますが、SliverGrid等も同じSliverMultiBoxAdaptorWidgetを継承しているので他のSliverの挙動もこの例で把握できると思います。
SliverListはスクロールに応じてchildrenを描画する際に、表示部分のみを描画して非表示部分を破棄します。SliverListがどのようにそれを実現しているかは以下のRenderSliverListのperformLayoutを見ると書いてありますが、複雑なので段階的かつ要所をおさえる形で処理の内容を解説します。
1. SliverConstraintsから表示領域を取得
ここで決定された範囲に基づいて、後続のレイアウト計算が行われます。
final double scrollOffset = constraints.scrollOffset + constraints.cacheOrigin;
assert(scrollOffset >= 0.0);
final double remainingExtent = constraints.remainingCacheExtent;
assert(remainingExtent >= 0.0);
final double targetEndScrollOffset = scrollOffset + remainingExtent;
-
scrollOffset: 現在のスクロール位置とcacheOrigin(キャッシュの開始位置)を加算した値です。これにより、どの地点からアイテムを表示すべきかを示します。 -
remainingExtent:constraints.remainingCacheExtentは、現在のスクロール位置からビューポートの終わりまでの距離を表します。これにより、どの程度の領域をカバーする必要があるかが分かります。 -
targetEndScrollOffset: 上2つscrollOffsetとremainingExtentを合算した値で、これが実際にSliverがカバーすべきスクロール領域の終わりを示します。
cacheExtentはデフォルトで250.0が指定されているため、何も設定しなければ各Sliverは実際にデバイスで表示される領域の先端と後端+250pxまでを表示領域として捉えます。
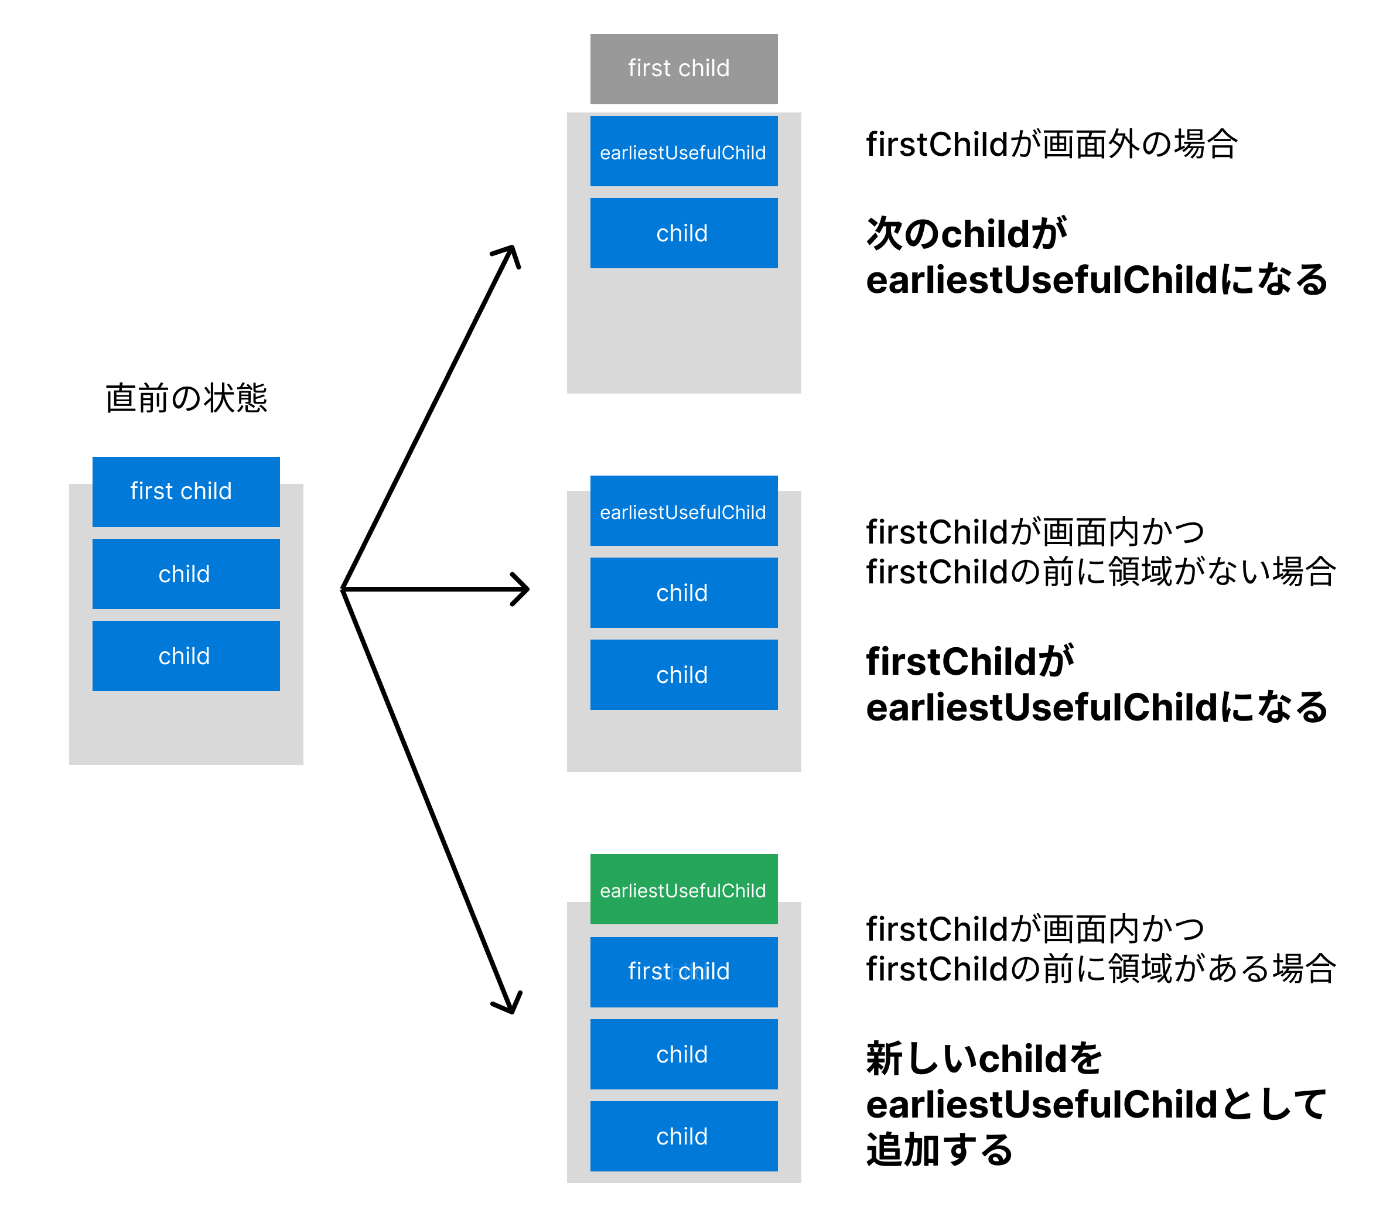
2. 表示領域内の最初のchildを特定
RenderSliverListはfirstChildという変数を持っています。firstChildには前回のperformLayout時点の表示領域で一番最初にいたchildが代入されます。 もしfirstChildがnullの場合はindex0のchildが代入されます。index0のchildがなければ空っぽのgeometryを返して処理は終了します。
このfirstChildの表示位置と、最初に取得した表示領域の値を比較して、現在の表示領域内で表示できる最初のchildであるearliestUsefulChildを特定します。
earliestUsefulChildの更新パターンは主にこの3つで、以下の図で把握できると思います。
 cacheExtentが0の場合です
3. 最後のchildまでレイアウト
earliestUsefulChildが確定したら、それを先頭として順繰りに次のchildのレイアウト計算を行なって、表示領域内の最後のchildが来たところでレイアウトを終了します。
この計算はendScrollOffsetという変数を使い、ここにchildのサイズを順繰りに加算していき、それが最初に計算したtargetEndScroll(表示領域の末端)を超えた時にループが終了します。
このループは以下のadvance()という関数を繰り返すことによって実装されています。advance()は次のchildが存在すればendScrollOffsetを加算しtrueを返します。次のchildがなければfalseを返します。
    bool inLayoutRange = true;
    RenderBox? child = earliestUsefulChild;
    int index = indexOf(child!);
    double endScrollOffset = childScrollOffset(child)! + paintExtentOf(child);
    bool advance() { // returns true if we advanced, false if we have no more children
      // This function is used in two different places below, to avoid code duplication.
      assert(child != null);
      if (child == trailingChildWithLayout) {
        inLayoutRange = false;
      }
      child = childAfter(child!);
      if (child == null) {
        inLayoutRange = false;
      }
      index += 1;
      if (!inLayoutRange) {
        if (child == null || indexOf(child!) != index) {
	  // レイアウト済みの次のchildが存在しない場合、または想定する順序と異なる場合
	  // Elementから次のchildのレイアウトを行ってもらう
          child = insertAndLayoutChild(childConstraints,
            after: trailingChildWithLayout,
            parentUsesSize: true,
          );
	  // 次のchildが存在しない場合falseを返して
	  // この関数の値を基とするwhileのループが終了する
          if (child == null) {
            // We have run out of children.
            return false;
          }
        } else {
          child!.layout(childConstraints, parentUsesSize: true);
        }
        trailingChildWithLayout = child;
      }
      assert(child != null);
      // 以前レイアウトしたことのあるchildは再利用する
      final SliverMultiBoxAdaptorParentData childParentData = child!.parentData! as SliverMultiBoxAdaptorParentData;
      childParentData.layoutOffset = endScrollOffset;
      assert(childParentData.index == index);
      endScrollOffset = childScrollOffset(child!)! + paintExtentOf(child!);
      return true;
    }
このadvance()がfalseを返す(childが尽きる)か、advance()によって加算されたendScrollOffsetがtargetEndScrollOffsetを越す(表示領域が尽きる)までループします。
    // Now find the first child that ends after our end.
    while (endScrollOffset < targetEndScrollOffset) {
      if (!advance()) {
        reachedEnd = true;
        break;
      }
    }
4. 不要になったchildの破棄
表示するchildが出揃ったところで、不要になったその他を破棄していきます。
performLayout()内ではleadingGarbageとtrailingGarbageという変数が用意されており、それぞれ先端側と末端側で破棄するchildの数として扱われます。
leadingGarbageはfirstChildが表示領域外にあった場合にincrementされています。
    // Find the first child that ends after the scroll offset.
    while (endScrollOffset < scrollOffset) {
      leadingGarbage += 1;
      // advance()がfalseの場合はfirstChildしかchildが存在しないことになるので
      // この時点でgeometryを更新してperformLayoutを終了
      if (!advance()) {
        assert(leadingGarbage == childCount);
        assert(child == null);
        // we want to make sure we keep the last child around so we know the end scroll offset
        collectGarbage(leadingGarbage - 1, 0);
        assert(firstChild == lastChild);
        final double extent = childScrollOffset(lastChild!)! + paintExtentOf(lastChild!);
        geometry = SliverGeometry(
          scrollExtent: extent,
          maxPaintExtent: extent,
        );
        return;
      }
    }
trailingGarbageは末端のchildが確定した後に、その後ろにレイアウトされてるchildの数だけincrementされます
    // Finally count up all the remaining children and label them as garbage.
    if (child != null) {
      child = childAfter(child!);
      while (child != null) {
        trailingGarbage += 1;
        child = childAfter(child!);
      }
    }
これらの変数が確定したのちにcollectGarbageが呼ばれ、これによって画面外のchildの破棄が完了します。
collectGarbage(leadingGarbage, trailingGarbage);
折角なのでcollectGarbageが何をしているのかを見てみましょう。
void collectGarbage(int leadingGarbage, int trailingGarbage) {
assert(_debugAssertChildListLocked());
assert(childCount >= leadingGarbage + trailingGarbage);
invokeLayoutCallback<SliverConstraints>((SliverConstraints constraints) {
while (leadingGarbage > 0) {
_destroyOrCacheChild(firstChild!);
leadingGarbage -= 1;
}
while (trailingGarbage > 0) {
_destroyOrCacheChild(lastChild!);
trailingGarbage -= 1;
}
// Ask the child manager to remove the children that are no longer being
// kept alive. (This should cause _keepAliveBucket to change, so we have
// to prepare our list ahead of time.)
_keepAliveBucket.values.where((RenderBox child) {
final SliverMultiBoxAdaptorParentData childParentData = child.parentData! as SliverMultiBoxAdaptorParentData;
return !childParentData.keepAlive;
}).toList().forEach(_childManager.removeChild);
assert(_keepAliveBucket.values.where((RenderBox child) {
final SliverMultiBoxAdaptorParentData childParentData = child.parentData! as SliverMultiBoxAdaptorParentData;
return !childParentData.keepAlive;
}).isEmpty);
});
}
見ての通りleadingGarbageとtrailingGarbageの数だけ_destroyOrCacheChildという関数を呼んでいます。この関数内でkeepAliveがtrueのchildはキャッシュし、それ以外は破棄しています。
その後の_keepAliveBucketに関する処理は、過去にキャッシュしたchildの中でkeepAliveがfalseに更新されているものがあれば破棄する処理を行なっています。
5. geometryを更新
レイアウト結果を元にgeometryを更新して処理を終了します。これを元に親のViewportが次のSliverに渡すConstraintsを決めます。(Viewportが複数のSliverのレイアウトを制御する仕組みで記述)
    final double estimatedMaxScrollOffset;
    if (reachedEnd) {
      estimatedMaxScrollOffset = endScrollOffset;
    } else {
      estimatedMaxScrollOffset = childManager.estimateMaxScrollOffset(
        constraints,
        firstIndex: indexOf(firstChild!),
        lastIndex: indexOf(lastChild!),
        leadingScrollOffset: childScrollOffset(firstChild!),
        trailingScrollOffset: endScrollOffset,
      );
      assert(estimatedMaxScrollOffset >= endScrollOffset - childScrollOffset(firstChild!)!);
    }
    final double paintExtent = calculatePaintOffset(
      constraints,
      from: childScrollOffset(firstChild!)!,
      to: endScrollOffset,
    );
    final double cacheExtent = calculateCacheOffset(
      constraints,
      from: childScrollOffset(firstChild!)!,
      to: endScrollOffset,
    );
    final double targetEndScrollOffsetForPaint = constraints.scrollOffset + constraints.remainingPaintExtent;
    geometry = SliverGeometry(
      scrollExtent: estimatedMaxScrollOffset,
      paintExtent: paintExtent,
      cacheExtent: cacheExtent,
      maxPaintExtent: estimatedMaxScrollOffset,
      // Conservative to avoid flickering away the clip during scroll.
      hasVisualOverflow: endScrollOffset > targetEndScrollOffsetForPaint || constraints.scrollOffset > 0.0,
    );
おわりに
FlutterにおけるSliverの重要性とその活用方法について詳しく説明しました。Sliverは殆どのスクローラブルなWidgetの構造に関与しています。このため、Sliverの仕組みを理解することは、効果的で洗練されたUI設計に直結すると思っています。
この記事が、読者の皆様がFlutterでより高度なUIを実装する上での参考となり、開発の助けとなることを願っています。最後まで読んでいただきありがとうございました。
参考
Discussion