Open3
【Flutter】ShellRoute についてのチラシ裏
go_router 5.0.0からShellRouteが正式に導入。
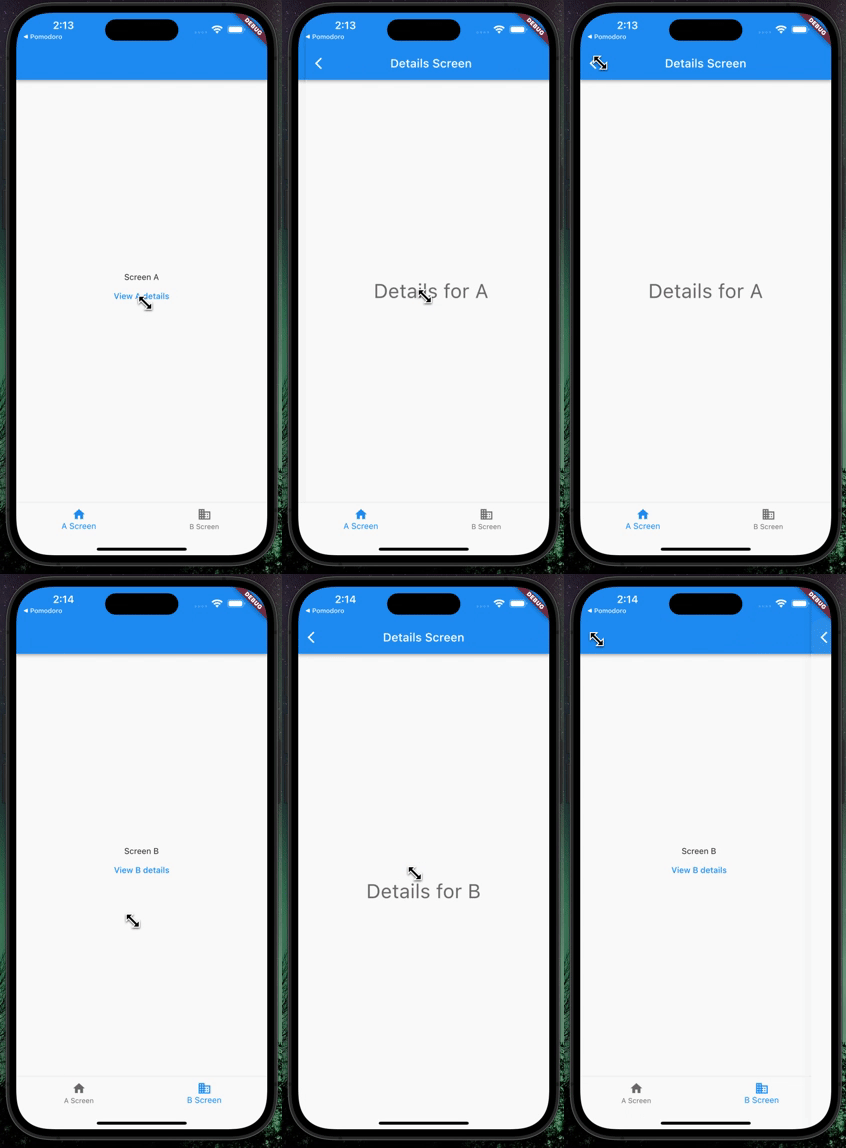
Nested Navigationや、ボトムバーの永続化 / ボトムバーを隠す画面遷移がかんたんにできるように。

ボトムバーの永続化 / ボトムバーを隠す画面遷移
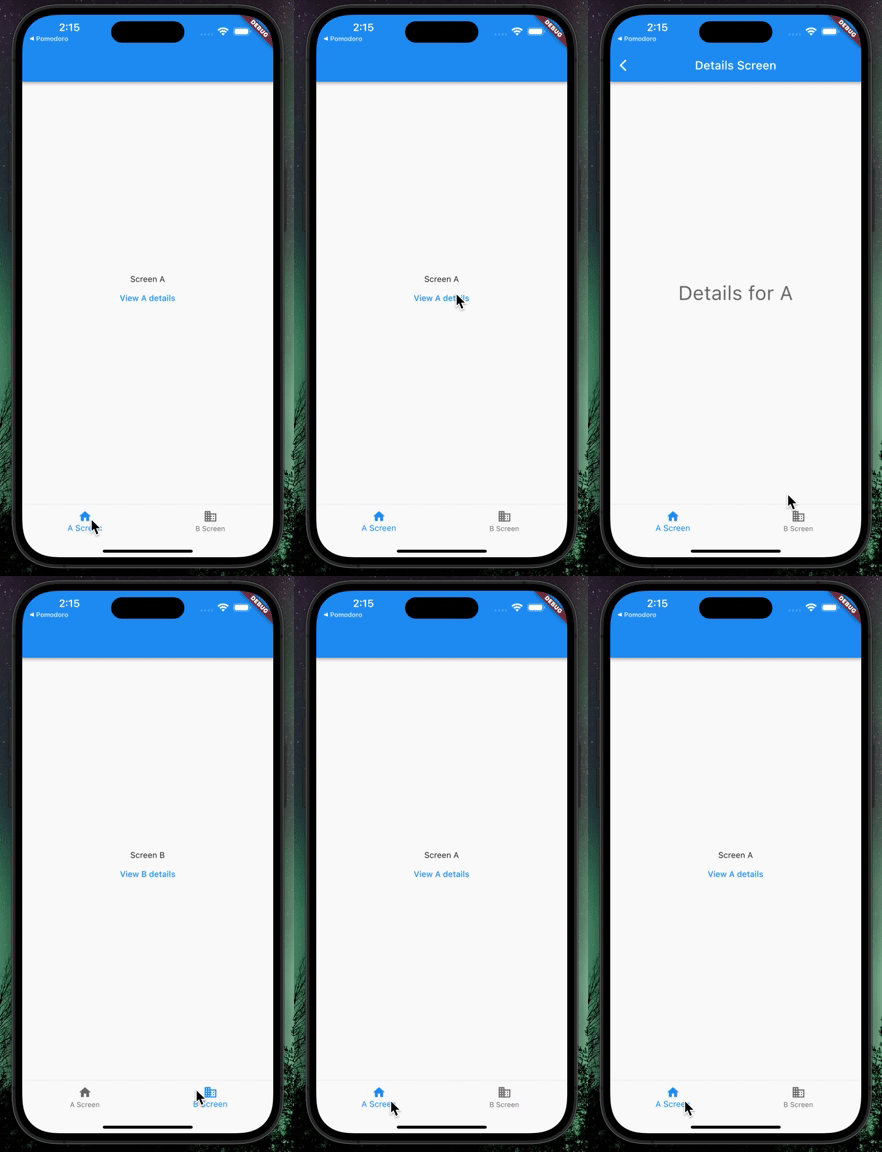
ただボトムバーのタブで遷移するとそのたびにインスタンスが生成されてしまい画面の状態を保持しておけない。このあたり Riverpod で実装した例などありましたら共有いただきたいですmm。

インスタンスが再生成される
上記 GIF のソースコード
// Copyright 2013 The Flutter Authors. All rights reserved.
// Use of this source code is governed by a BSD-style license that can be
// found in the LICENSE file.
import 'package:flutter/material.dart';
import 'package:go_router/go_router.dart';
final GlobalKey<NavigatorState> _rootNavigatorKey =
GlobalKey<NavigatorState>(debugLabel: 'root');
final GlobalKey<NavigatorState> _shellNavigatorKey =
GlobalKey<NavigatorState>(debugLabel: 'shell');
// ShellRoute を使用してネストされたナビゲーションを実装する方法を説明する。
// これは、追加のナビゲータをウィジェットツリーに配置しルートナビゲータの代わりに使用するパターンである。
// これにより、ディープリンクでページを BottomNavigationBar などの他の UI コンポーネントと一緒に表示することができる。
// 'parentNavigatorKey' を使用することによって、別のナビゲータ(ルートナビゲータなど)を使用して画面をプッシュする方法を示す。
void main() {
runApp(ShellRouteExampleApp());
}
class ShellRouteExampleApp extends StatelessWidget {
ShellRouteExampleApp({Key? key}) : super(key: key);
final GoRouter _router = GoRouter(
navigatorKey: _rootNavigatorKey,
initialLocation: '/a',
routes: <RouteBase>[
ShellRoute(
navigatorKey: _shellNavigatorKey,
builder: (BuildContext context, GoRouterState state, Widget child) {
return ScaffoldWithNavBar(child: child);
},
routes: <RouteBase>[
/// ボトムバーの 1 つ目の画面
GoRoute(
path: '/a',
builder: (BuildContext context, GoRouterState state) {
return const ScreenA();
},
routes: <RouteBase>[
// 内側のナビゲータに重ねて表示する詳細画面。
// 画面 A にかぶさる形で表示されるが、アプリケーションシェルはカバーされない。
GoRoute(
path: 'details',
builder: (BuildContext context, GoRouterState state) {
return const DetailsScreen(label: 'A');
},
),
],
),
/// ボトムバーの 2 つ目のタブが選択されたとき
GoRoute(
path: '/b',
builder: (BuildContext context, GoRouterState state) {
return const ScreenB();
},
routes: <RouteBase>[
/// a/details と同じだが、[parentNavigatorKey]を指定することで
/// ルートナビゲータに表示される。
/// よって画面 B とアプリケーションシェルの両方がカバーされる。
GoRoute(
path: 'details',
parentNavigatorKey: _rootNavigatorKey,
builder: (BuildContext context, GoRouterState state) {
return const DetailsScreen(label: 'B');
},
),
],
),
],
),
],
);
Widget build(BuildContext context) {
return MaterialApp.router(
title: 'Flutter Demo',
theme: ThemeData(
primarySwatch: Colors.blue,
),
routerConfig: _router,
);
}
}
/// BottomNavigationBar を持つ Scaffold を構築することによって、
/// アプリの「シェル」を構築し、Scaffold の本体に[child]を配置する。
class ScaffoldWithNavBar extends StatelessWidget {
const ScaffoldWithNavBar({
required this.child,
Key? key,
}) : super(key: key);
/// Scaffold の body に表示する Widget のこと。
/// つまりここでは Navigator を意味する。
final Widget child;
Widget build(BuildContext context) {
return Scaffold(
body: child,
bottomNavigationBar: BottomNavigationBar(
items: const <BottomNavigationBarItem>[
BottomNavigationBarItem(
icon: Icon(Icons.home),
label: 'A Screen',
),
BottomNavigationBarItem(
icon: Icon(Icons.business),
label: 'B Screen',
),
],
currentIndex: _calculateSelectedIndex(context),
onTap: (int idx) => _onItemTapped(idx, context),
),
);
}
static int _calculateSelectedIndex(BuildContext context) {
final GoRouter route = GoRouter.of(context);
final String location = route.location;
if (location.startsWith('/a')) {
return 0;
}
if (location.startsWith('/b')) {
return 1;
}
return 0;
}
void _onItemTapped(int index, BuildContext context) {
switch (index) {
case 0:
GoRouter.of(context).go('/a');
break;
case 1:
GoRouter.of(context).go('/b');
break;
}
}
}
/// ボトムバーの 1 つ目の画面
class ScreenA extends StatelessWidget {
const ScreenA({Key? key}) : super(key: key);
Widget build(BuildContext context) {
return Scaffold(
appBar: AppBar(),
body: Center(
child: Column(
mainAxisSize: MainAxisSize.min,
children: <Widget>[
const Text('Screen A'),
TextButton(
onPressed: () {
GoRouter.of(context).go('/a/details');
},
child: const Text('View A details'),
),
],
),
),
);
}
}
/// ボトムバーの 2 つ目の画面
class ScreenB extends StatelessWidget {
const ScreenB({Key? key}) : super(key: key);
Widget build(BuildContext context) {
return Scaffold(
appBar: AppBar(),
body: Center(
child: Column(
mainAxisSize: MainAxisSize.min,
children: <Widget>[
const Text('Screen B'),
TextButton(
onPressed: () {
GoRouter.of(context).go('/b/details');
},
child: const Text('View B details'),
),
],
),
),
);
}
}
/// A, B いずれかの詳細画面
class DetailsScreen extends StatelessWidget {
const DetailsScreen({
required this.label,
Key? key,
}) : super(key: key);
final String label;
Widget build(BuildContext context) {
return Scaffold(
appBar: AppBar(
title: const Text('Details Screen'),
),
body: Center(
child: Text(
'Details for $label',
style: Theme.of(context).textTheme.headlineMedium,
),
),
);
}
}
参考
9.0.0にアップグレードして色々と実験。Riverpodと組み合わせてRoutingPathの定数化もした。
NavigationBarを隠す画面、隠さない画面を出し分けてみた。
要点
- parentNavigatorKeyを設定する
/// main.dart

...
return MaterialApp.router(
    ...
    routerConfig: ref.watch(routerProvider),
    builder: (_, child) => child!,
);
/// routing_path.dart

class RoutingPath {
  /// ホーム
  static const home = '/';

  /// チャット
  static const chat = '/chat';
...
/// router.dart

final _rootNavigatorKey = GlobalKey<NavigatorState>(debugLabel: 'root');
final _shellNavigatorKey = GlobalKey<NavigatorState>(debugLabel: 'shell');

final routerProvider = Provider(
  (ref) {
    return GoRouter(
      navigatorKey: _rootNavigatorKey,
      initialLocation: RoutingPath.splash,
      routes: [
        /// 下タブを表示するページ
        ShellRoute(
          navigatorKey: _shellNavigatorKey,
          builder: (_, __, child) =>
              // bottomNavigationBarを実装したScaffold
              ScaffoldWithNavigationBar(child: child),
          routes: [
            GoRoute(
              parentNavigatorKey: _shellNavigatorKey,
              path: RoutingPath.home,
              pageBuilder: (_, __) => NoTransitionPage(
                child: HomePage(),
              ),
            ),
            GoRoute(
              parentNavigatorKey: _shellNavigatorKey,
              path: RoutingPath.chat,
              pageBuilder: (_, __) =>
                  const NoTransitionPage(child: UsersPage()),
            ),
            GoRoute(
              parentNavigatorKey: _shellNavigatorKey,
              path: RoutingPath.myPage,
              pageBuilder: (_, __) => const NoTransitionPage(
                child: MyPage(),
              ),
              routes: [
                GoRoute(
                  /// 下タブを表示しないページ
                  parentNavigatorKey: _rootNavigatorKey,
                  path: RoutingPath.profileEdit,
                  builder: (_, __) => const ProfileEditPage(),
              ],
            ),
          ],
        ),
        /// 下タブを表示しないページ
        GoRoute(
          parentNavigatorKey: _rootNavigatorKey,
          path: RoutingPath.auth,
          pageBuilder: (_, __) => const NoTransitionPage(child: AuthPage()),
        ),
      ],
    );
  },
);
/// scaffold_with_navigation_bar.dart
class ScaffoldWithNavigationBar extends HookConsumerWidget {
const ScaffoldWithNavigationBar({super.key, required this.child});
final Widget child;
Widget build(BuildContext context, WidgetRef ref) {
final currentTabIndex = useState<int>(1);
void onItemTapped(int index, BuildContext context) {
switch (index) {
case 0:
GoRouter.of(context).go(RoutingPath.chat);
currentTabIndex.value = 0;
break;
...
}
return Scaffold(
body: child,
bottomNavigationBar: NavigationBar(
selectedIndex: currentTabIndex.value,
onDestinationSelected: (int index) => onItemTapped(index, context),
destinations: const <NavigationDestination>[
NavigationDestination(
label: 'chat',
icon: Icon(Icons.chat),
),
...
],
...
go_router_builderへの移行。
ShellRoute(StatefulShellRoute) x go_router_builder の日本語の解説記事がなかったため不安だったが、公式のサンプルにやりたいことが全部載っていて問題なかった。
NavigationBarを隠す上でのポイントは以下のstatic keyであり、これがないとNavigationBarを隠すことができない。
class AaaRoute extends GoRouteData {
const AaaRoute();
/// NavigationBarを覆うためのkey
static final GlobalKey<NavigatorState> $parentNavigatorKey =
_rootNavigatorKey;
Widget build(BuildContext context, GoRouterState state) => Container(
width: 200,
height: 200,
color: Colors.teal,
);
}