Cloudflare x Next.js x microCMS 爆速ブログ作成備忘録
事前準備
- Cloudflareアカウント
- microCMSアカウント
- Githubアカウント
- Node.jsのインストール
Next.jsプロジェクトの作成
npm create cloudflare@latest tech-blog -- --framework=next
プロジェクト作成オプションは、Cloudflareにデプロイするか以外は全てデフォルト
Do you want to deploy your application?
no deploy via `npm run pages:deploy`
※デプロイするを選択すると、Cloudflare上にプロジェクトが作成されるが、Github連携ができない?
SettingsにBuild & deploymentsメニューもでなくなる。
プロジェクト開始時にしかGithubの設定はできないのだろうか。要調査。
リポジトリの作成
Githubにtech-blogリポジトリを作成
git remote add origin git@github.com:アカウント名/tech-blog.git
git push origin main
Cloudflareとリポジトリの連携
省略
セットアップとデプロイ
Project name: tech-blog
Production branch: main
Build settings:
Next.jsを選択
Build command(選択したときのデフォルトまま)
npx @cloudflare/next-on-pages@1
Build output directory(選択したときのデフォルトまま): .vercel/output/static
初回のデプロイが開始され成功はするが、Node.JS Compatibility Errorというエラーが出て画面は確認できない状態。
Compatibility flagsの登録
Settings > Functions > Compatibility flags
nodejs_compatを入力し、保存
再デプロイ
Deployments
Productionのデプロイ履歴のメニューからRetry deploymentを選択
画面が表示される
それなりの見た目にする
ここらへんの装飾はお好みで
@tailwind base;
@tailwind components;
@tailwind utilities;
import type { Metadata } from "next";
import "./globals.css";

export const metadata: Metadata = {
  title: "tdTomatoのブログ",
  description: "tdTomatoのブログです",
};

export default function RootLayout({
  children,
}: Readonly<{
  children: React.ReactNode;
}>) {
  return (
    <html lang="en">
      <body>
        <div className="max-w-5xl mx-auto p-8">{children}</div>
      </body>
    </html>
  );
}
export default function Home() {
  return (
    <main>
      <h1 className="text-2xl font-bold my-4">ブログ</h1>
    </main>
  );
}
mainブランチにプッシュして、デプロイされていることを確認。
microCMSでAPI作成
一から作成するを選択
サービス情報を入力
サービス名: ブログ
サービスID: デフォルトのまま
APIを作成
ブログテンプレートを使用
メニューの権限管理からAPIキーを確認しておく
Cloudflareの環境変数の登録
Settings > Environment variables
microCMSのサービスドメインとAPIキーを登録

Next.jsとmicroCMSの連携
SDKのインストール
npm install microcms-js-sdk
.env.localファイルの作成
.env.localにサービスドメインとAPIキーを記入
SERVICE_DOMAIN=microCMSのサービスドメイン
API_KEY=microCMSのAPIキー
clientの作成
import { createClient } from "microcms-js-sdk";

export const client = createClient({
  serviceDomain: process.env.SERVICE_DOMAIN ?? "",
  apiKey: process.env.API_KEY ?? "",
});
型の定義
interface Blog {
  id: string;
  title: string;
  content: string;
  eyecatch: {
    url: string;
    height: number;
    width: number;
  };
  category: Category;
  createdAt: string;
  updatedAt: string;
  publishedAt: string;
}

interface Category {
  id: string;
  name: string;
}
page.tsxの変更
ブログタイトルをリストとして表示
import { client } from "@/libs/client";
import Link from "next/link";

export default async function Home() {
  const blogs: Blog[] = await client
    .get({ endpoint: "blogs" })
    .then((res) => res.contents);

  return (
    <main>
      <h1 className="text-2xl font-bold my-4">ブログ</h1>
      <ul>
        {blogs.map((blog) => (
          <li key={blog.id}>
            <Link href={`/blog/${blog.id}`}>{blog.title}</Link>
          </li>
        ))}
      </ul>
    </main>
  );
}

ブログ詳細ページの作成
non-static routesなのでexport const runtime = "edge";を記述する必要がある。
export const runtime = "edge";

import { client } from "@/libs/client";
import Link from "next/link";

export default async function BlogPage({
  params: { id },
}: Readonly<{
  params: {
    id: string;
  };
}>) {
  const blog: Blog = await client.get({ endpoint: "blogs", contentId: id })

  return (
    <main>
      <Link href="/">戻る</Link>
      <h1 className="text-2xl font-bold my-4">{blog.title}</h1>
      <div
        className="my-4"
        dangerouslySetInnerHTML={{
          __html: blog.content,
        }}
      />
    </main>
  );
}

ビルドが通ったら、そのままコミットしてプッシュ。
デプロイされた画面を確認してみる。
参考
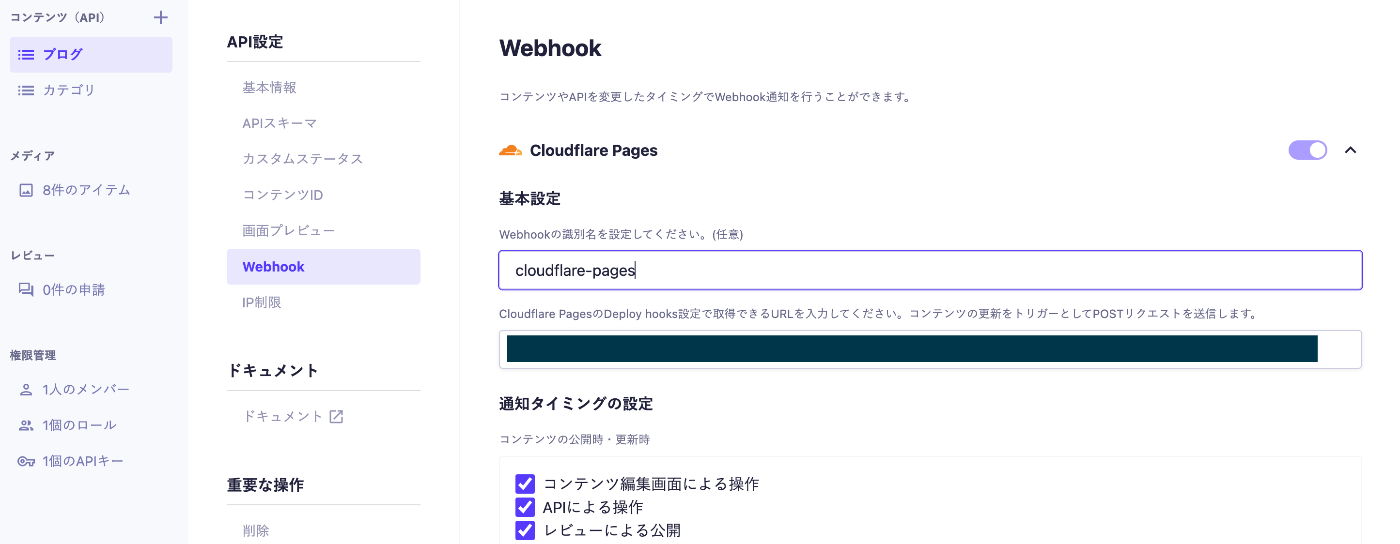
microCMSとCloudflareの連携(Webhook)
Cloudflare側
Settings > Builds & deployments > Deploy hooks
適当なHooks名を入力して追加

URLをコピーする

microCMS側
ブログ > API設定 > Webhookから追加
Cloudflare Pagesを選択し、webhook名とさきほどコピーしたURLを入力して設定。
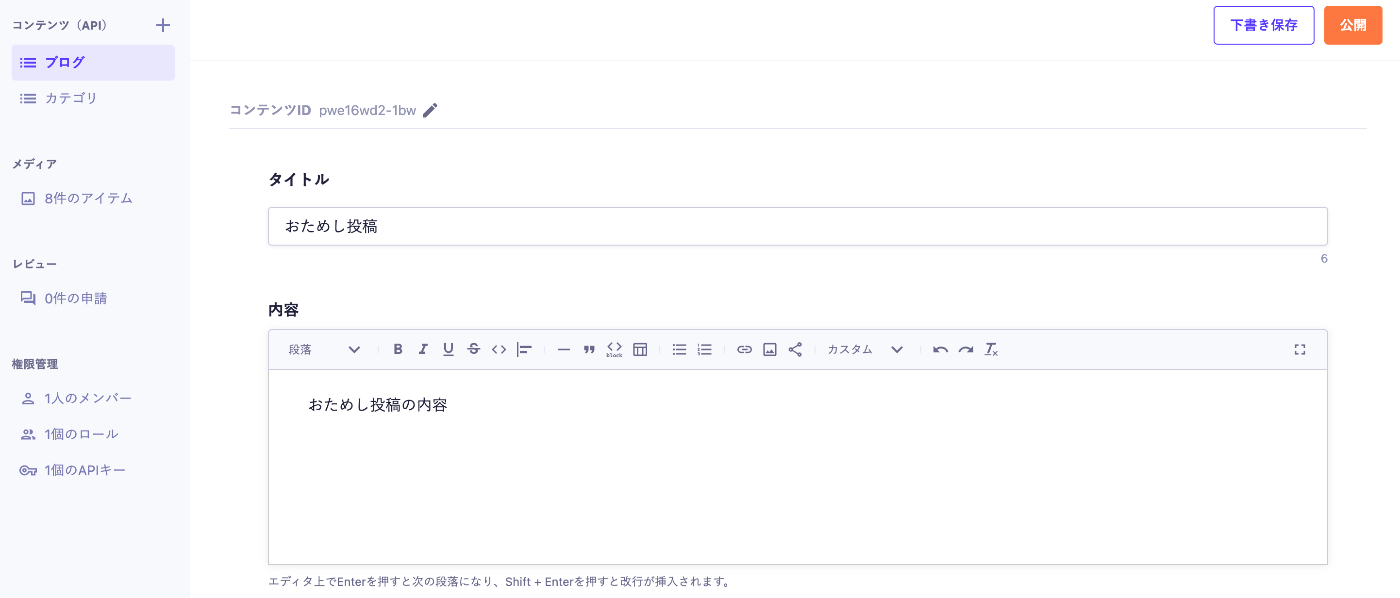
micoCMSで、試しに1つ記事を作成し公開してみる。
Cloudflareでビルドが走る。

これでmicroCMSでブログ記事を投稿すると、勝手にブログが更新されるようになる。
Cloudflareのデプロイについて
After you have selected a GitHub/GitLab repository for your Pages application, it cannot be changed. Delete your Pages project and create a new one pointing at a different repository if you need to update it.
あとからリポジトリの設定変更はできないとあるから、同様にデプロイにDirect Uploadを設定したあとはGithubの設定の追加ができないということか。
現在はwranglerを使ってCI/CDすることが想定されている。多分。
参考