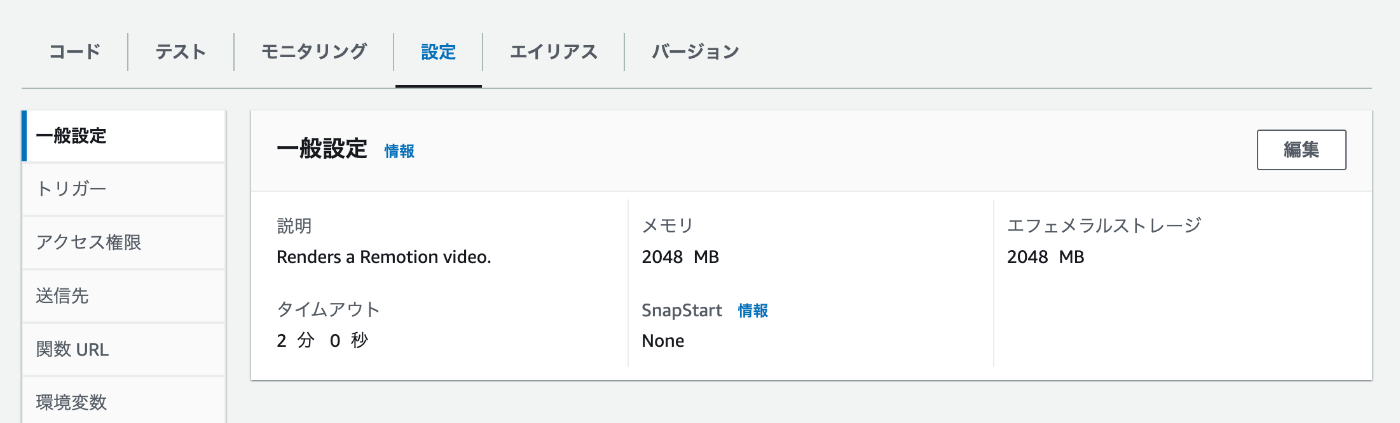
Remotionお試し備忘録
Remotionとは
Reactで動画を生成できるライブラリ。
canvasにReactコンポーネントを描画し、それをフレームごとに画像に変換、動画として出力する。
ブラウザを用いた編集・プレビュー機能などが付いている。
The idea of Remotion is to give you a frame number and a blank canvas, to which you can render anything you want using React.
Remotionを利用した事例
ゆっくり解説動画を作っている人がいる。
ブラウザ動画編集ツールの提供をしている事例が、公式から紹介されている。
Typesframes
Remotionプロジェクトの作成
クイックスタートに倣う。
テンプレートを用いてプロジェクトを作成。
npx create-video@latest
選択肢が豊富。ただ、Next.js (App dir) を選択したら502エラーが返された(3/17/2024時点)。
今回は一番上のHello Worldを選択。
? Choose a template: › - Use arrow-keys. Return to submit.
❯   Hello World               A "Hello World" starter template
    Next.js (App dir)         SaaS template for video generation apps
    Next.js (Pages dir)       SaaS template for video generation apps
    Blank                     Nothing except an empty canvas
    Hello World (JavaScript)  The default starter template in plain JS
    Remix                     Remotion + Remix Starter Kit
    React Three Fiber         Remotion + React Three Fiber Starter Template
    Still images              Dynamic PNG/JPEG template with built-in server
    TTS (Azure)               Turns text into speech and makes a video
    TTS (Google)              Turns text into speech and makes a video
    Audiogram                 Text and waveform visualization for podcasts
    Skia                      React Native Skia starter
    Tailwind                  TypeScript and Tailwind starter
    Overlay                   Overlays for video editing software
    Stargazer                 Celebrate your repo stars with a video
    TikTok                    Generate animated word-by-word captions
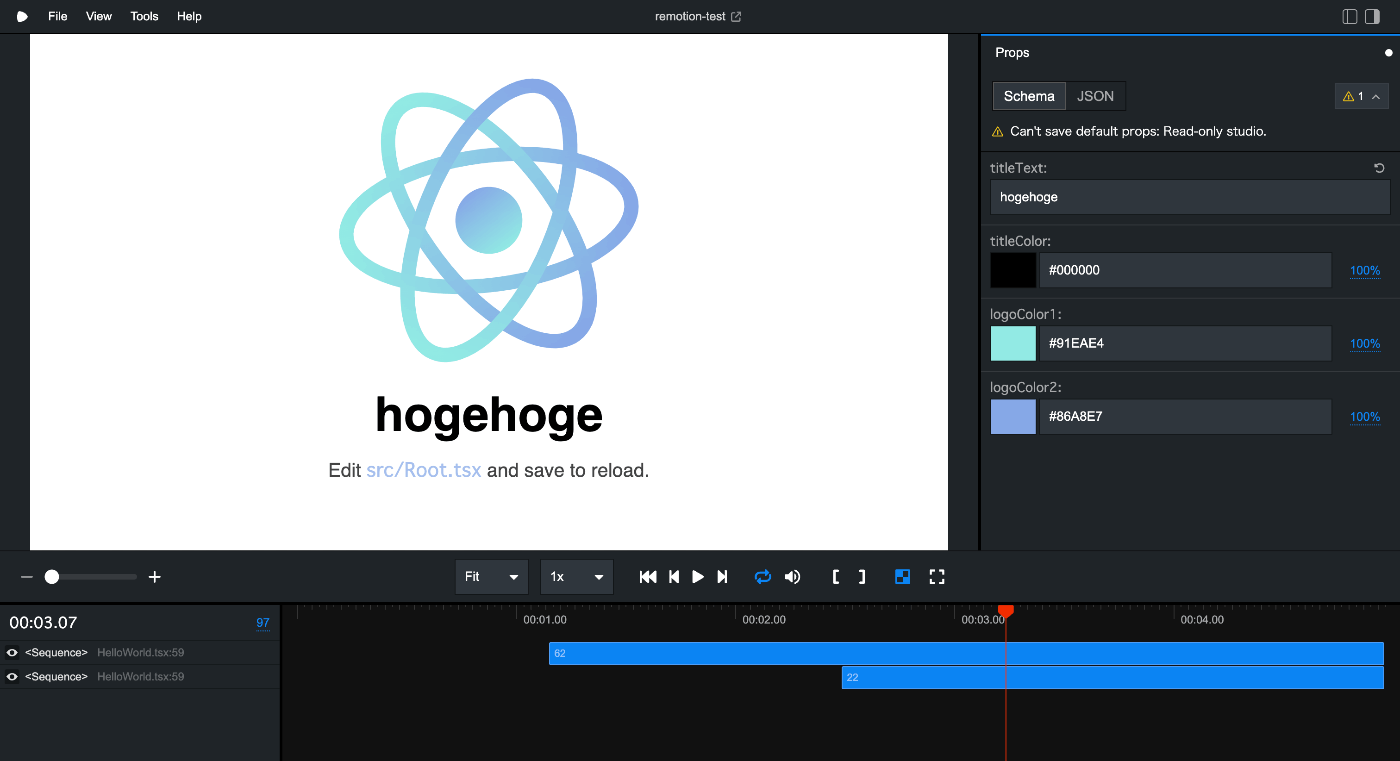
Remotion Studioを立ち上げて動画を確認。
npm start
各コンポーネントは後で触るとして、概要を掴んでいく。
Remotion Studioとは
npm start(npx remotion studio)を実行すると、本格的な動画編集画面が表示される。
これはremotionのビデオエディタRemotion Studioで、@remotion/cliパッケージに含まれている。
Remotion Studio自体をStatic Siteとしてデプロイできるらしい。※ available from v4.0.97
やってみよう。
RemotionプロジェクトのVercelへのデプロイ
リポジトリの作成は割愛する。
Next.jsでプロジェクトを作成し、Build and Output Settingsの部分をドキュメントどおりにオーバーライドする。

無事、Webページが表示された。
コンポーネントの文字の書き換えなどはできたが、ローカルのサーバと異なりRenderタブが無かった(mp4書き出しができない)。
レンダリングはブラウザでできるか
結論、できない。
レンダリング環境は、ローカルまたはサーバーサイド(AWS Lambdaなど)で別途用意する必要がある。
Lambdaを用いたレンダリング環境の構築
AWS LambdaにRemotionのレンダリング環境を構築する。
すべてドキュメントの手順通りに進めた。
パッケージのインストール
npm i --save-exact @remotion/lambda@4.0.126
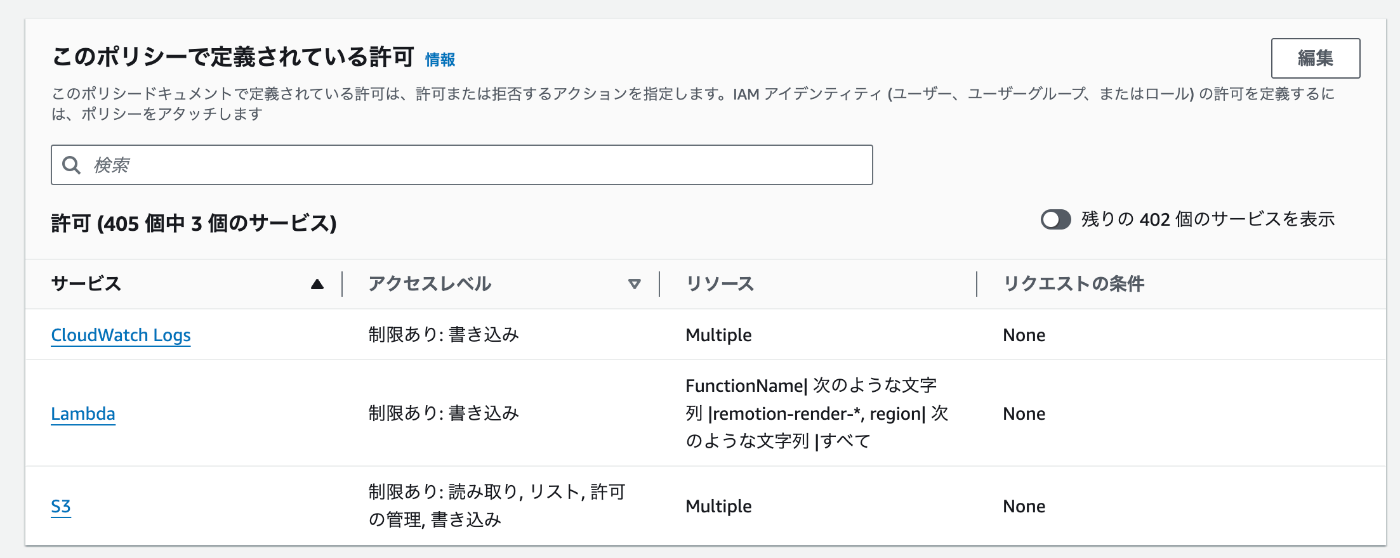
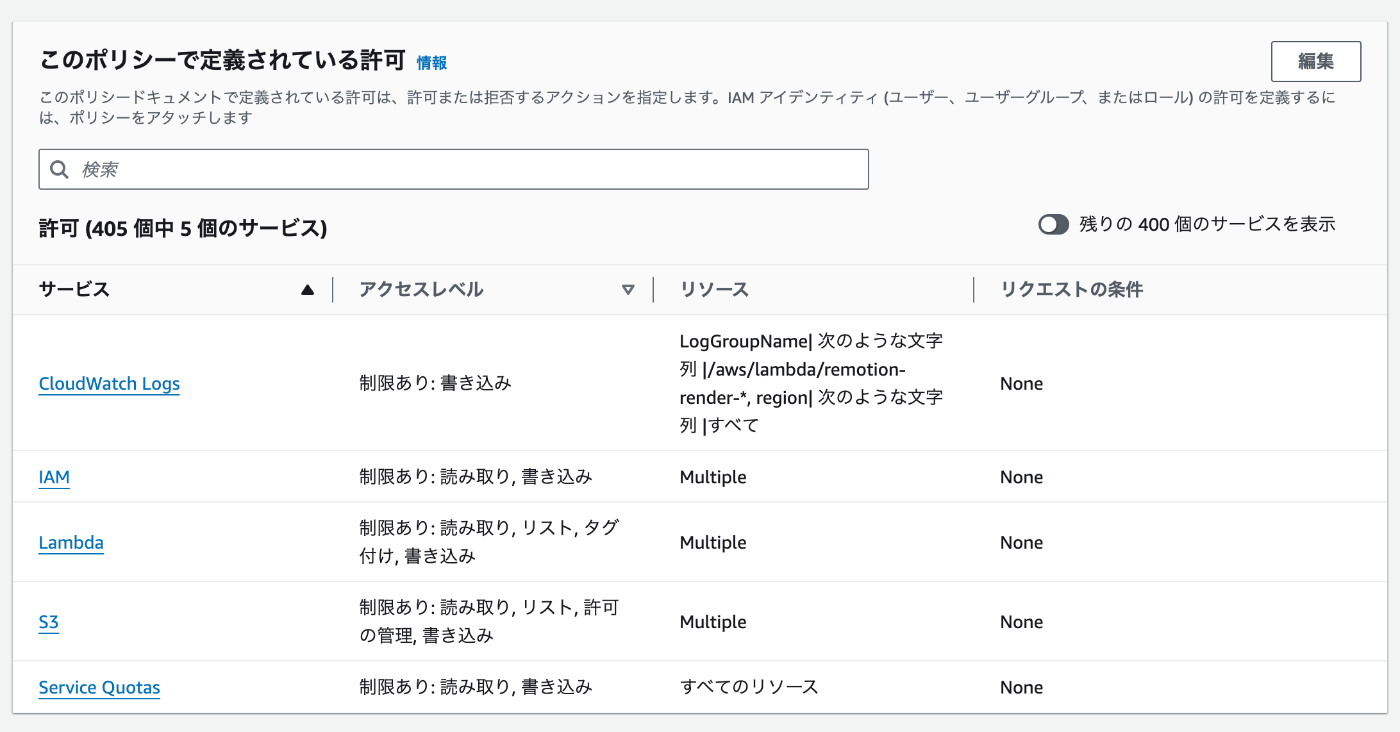
IAMポリシーの作成
Lambdaのポリシー作成に必要なJSONを出力(コピーしておく)
npx remotion lambda policies role
AWSでポリシーの新規作成。さきほどのJSONを貼り付けて、名前はremotion-lambda-policyとして作成。
許可は以下のとおり。
IAMロールの作成
IAMロールを作成する。
ユースケースはLambdaを選択。
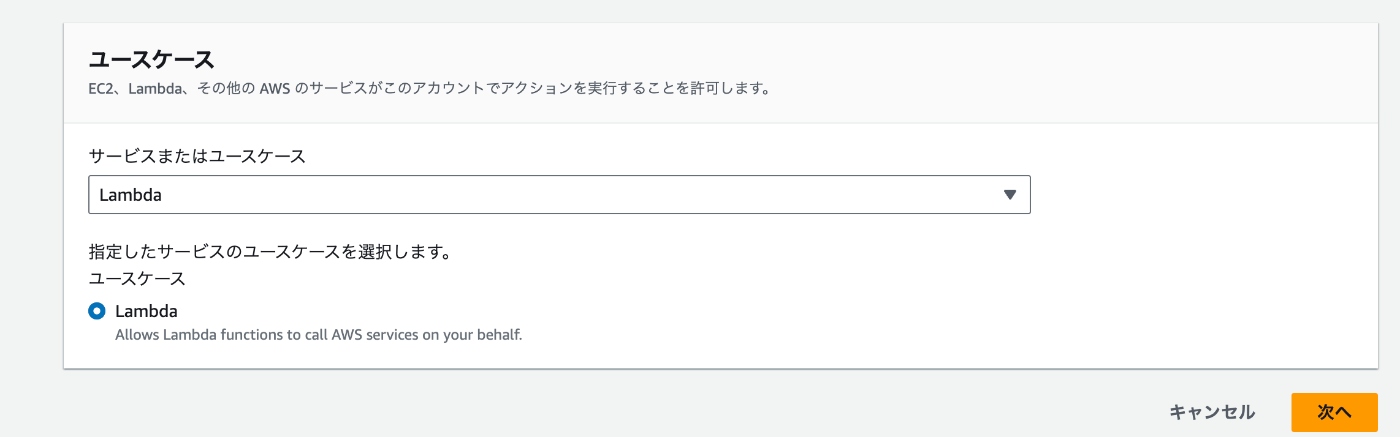
ポリシーは先ほど作成したremotion-lambda-policyにチェックを入れる。
名前を必ずremotion-lambda-roleにして作成。
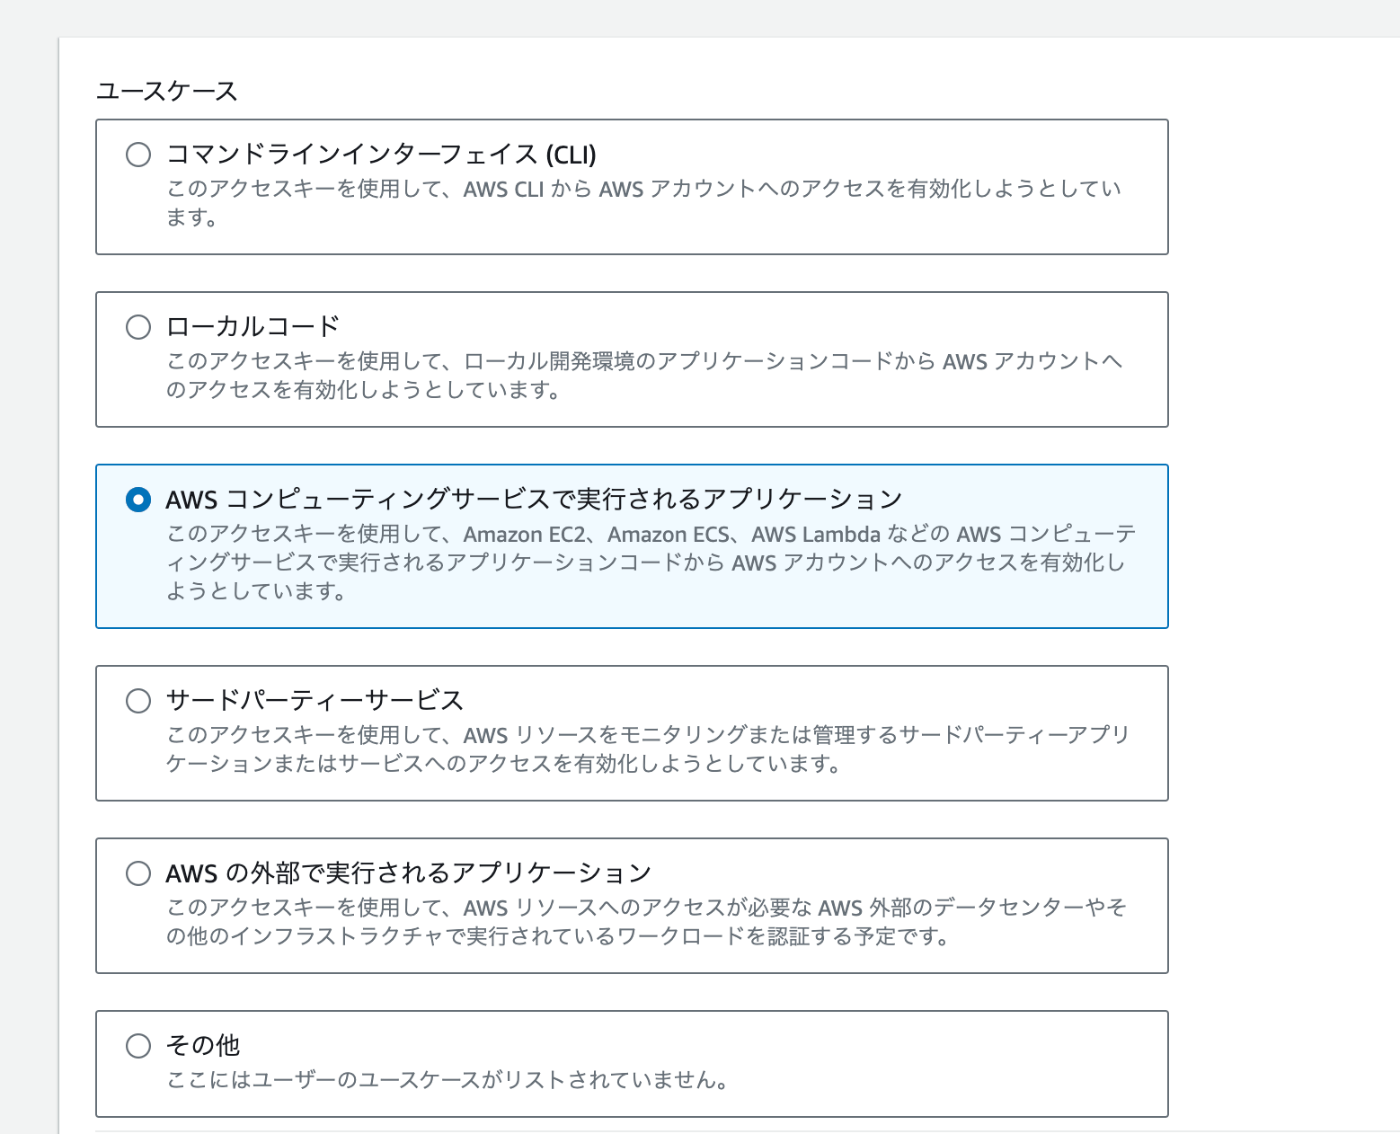
IAMユーザーの作成
ユーザーも新規に作成する。
名前はremotion-userにし、コンソールログインは不要であとデフォルトのまま作成。
アクセスキーを発行し、コピーしておく。
プロジェクト直下に.envファイルを作成して、さきほどのアクセスキーとシークレットアクセスキーを貼り付け。
REMOTION_AWS_ACCESS_KEY_ID=<Access key ID>
REMOTION_AWS_SECRET_ACCESS_KEY=<Secret access key>
さらにremotion-userにポリシーを追加する。
プロジェクトで下記コマンドを実行し、出力されるJSONをコピー。
npx remotion lambda policies user
インラインポリシーを追加から、JSONを貼り付けてremotion-user-policyとして作成。
許可は以下の通り。
権限の確認
下記コマンドを実行し、すべての項目に✅がつくかを確認する。
npx remotion lambda policies validate
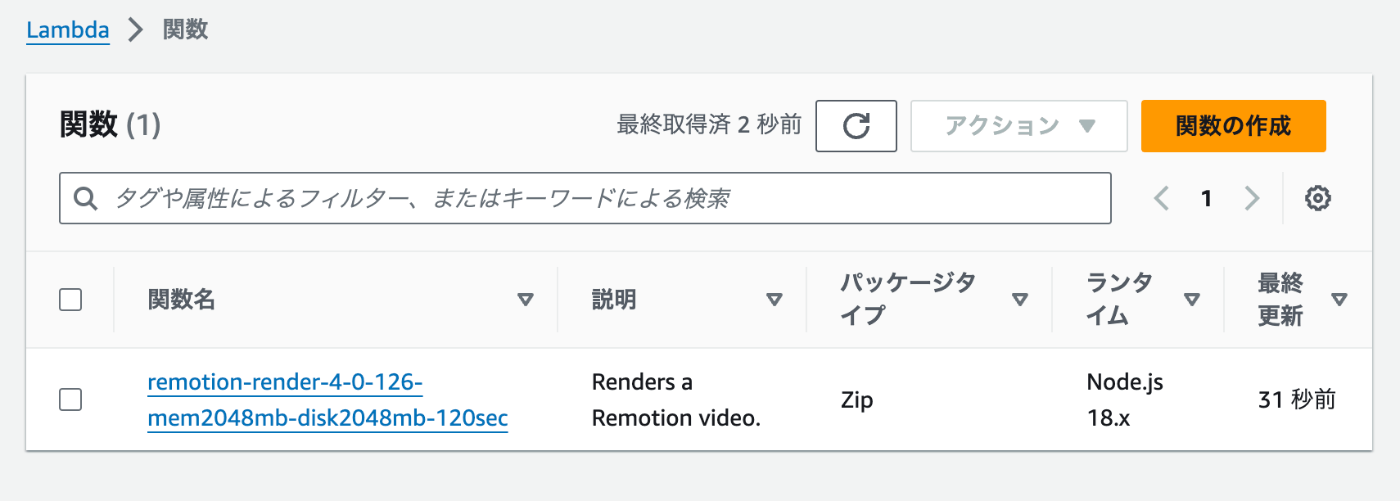
関数のデプロイ
Lambdaに関数をデプロイする。us-east-1に作成される。
npx remotion lambda functions deploy
Remotion Studioサイトのデプロイ
S3を利用してRemotion Studioサイトを公開できる。
npx remotion lambda sites create src/index.ts --site-name=my-video
出力にurl(https://remotionlambda...)が含まれるので、アクセスしてみる。
Vercel同様、RenderタブのないRemotion Studioが表示された。
レンダリングの実行
S3にあるCompositionデータから、Lambdaの関数を用いてmp4に書き出してみる。
<serve-url>は先ほどのs3のページURL、<composition-id>はCompositionコンポーネントのid。デフォルトで作成したアプリケーションだとHelloWorldになっている。
npx remotion lambda render <serve-url> <composition-id>
S3のバケットにrenders/[id]/out.mp4として作成される。
ローカル環境ではレンダリングまで完結してブラウザから行うことができるが、クラウド環境では別途構築が必要。面倒だ。
望むらくはブラウザにRenderボタンを設けmp4に出力せんことを。
レンダリング時間の計測
ローカル
レンダリングにはどれくらい時間がかかるのだろうか。
まず30分の動画をローカルでレンダリングしてみる。
スペック Apple M1 Pro, RAM 16GB
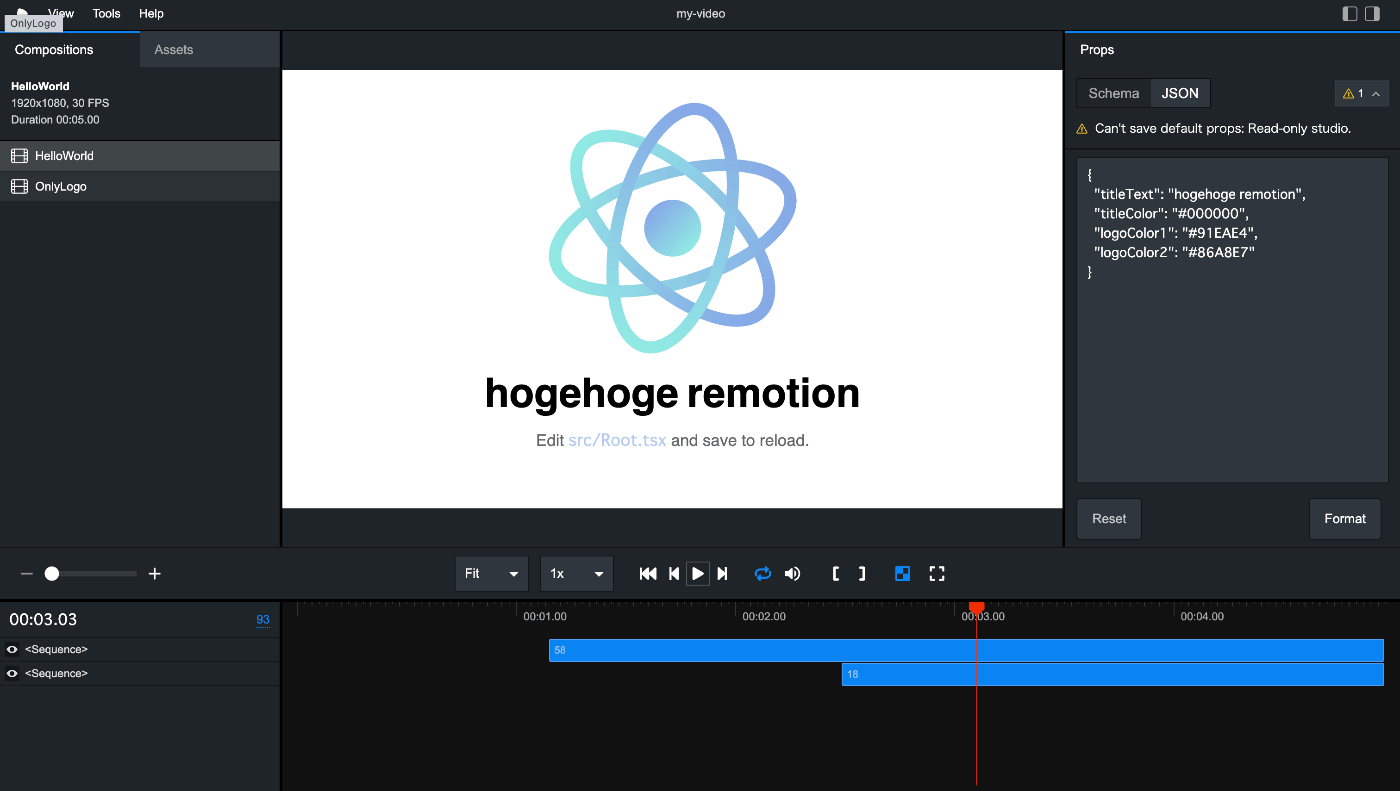
テンプレートのプロジェクトをそのまま使って、durationInFramesを54000(30分)に変更する。
<Composition
    // You can take the "id" to render a video:
    // npx remotion render src/index.ts <id> out/video.mp4
    id="HelloWorld"
    component={HelloWorld}
    durationInFrames={54000} // 30分
    fps={30}
    width={1920}
    height={1080}
    // You can override these props for each render:
    // https://www.remotion.dev/docs/parametrized-rendering
    schema={myCompSchema}
    defaultProps={{
        titleText: 'hogehoge remotion',
        titleColor: '#000000',
        logoColor1: '#91EAE4',
        logoColor2: '#86A8E7',
    }}
/>
レンダリングを実行。
npx remotion render HelloWorld
20分強経過したところでTime Outした。
Error: Timeout exceeded rendering the component at frame 40056.
マルチスレッドで処理させないときつそう。
concurrency(同時実行数)を指定して再実行する。
npx remotion render HelloWorld --concurency=2
成功した。フレームレンダリングに38分、ビデオエンコーディングに3分かかった。
(1/3) ╭───────────────────╮ Bundled code 828ms
Composition = HelloWorld (Passed as argument), Codec = h264 (default), Output = out/HelloWorld.mp4
(2/3) ╭───────────────────╮ Rendered frames (4x) 2304142ms
(3/3) ╭───────────────────╮ Encoded video 188954ms
予想はしていたが、長い。
AWS Lambda
Lambdaならマルチスレッドでさくさくエンコーディングできるだろう(願望)。
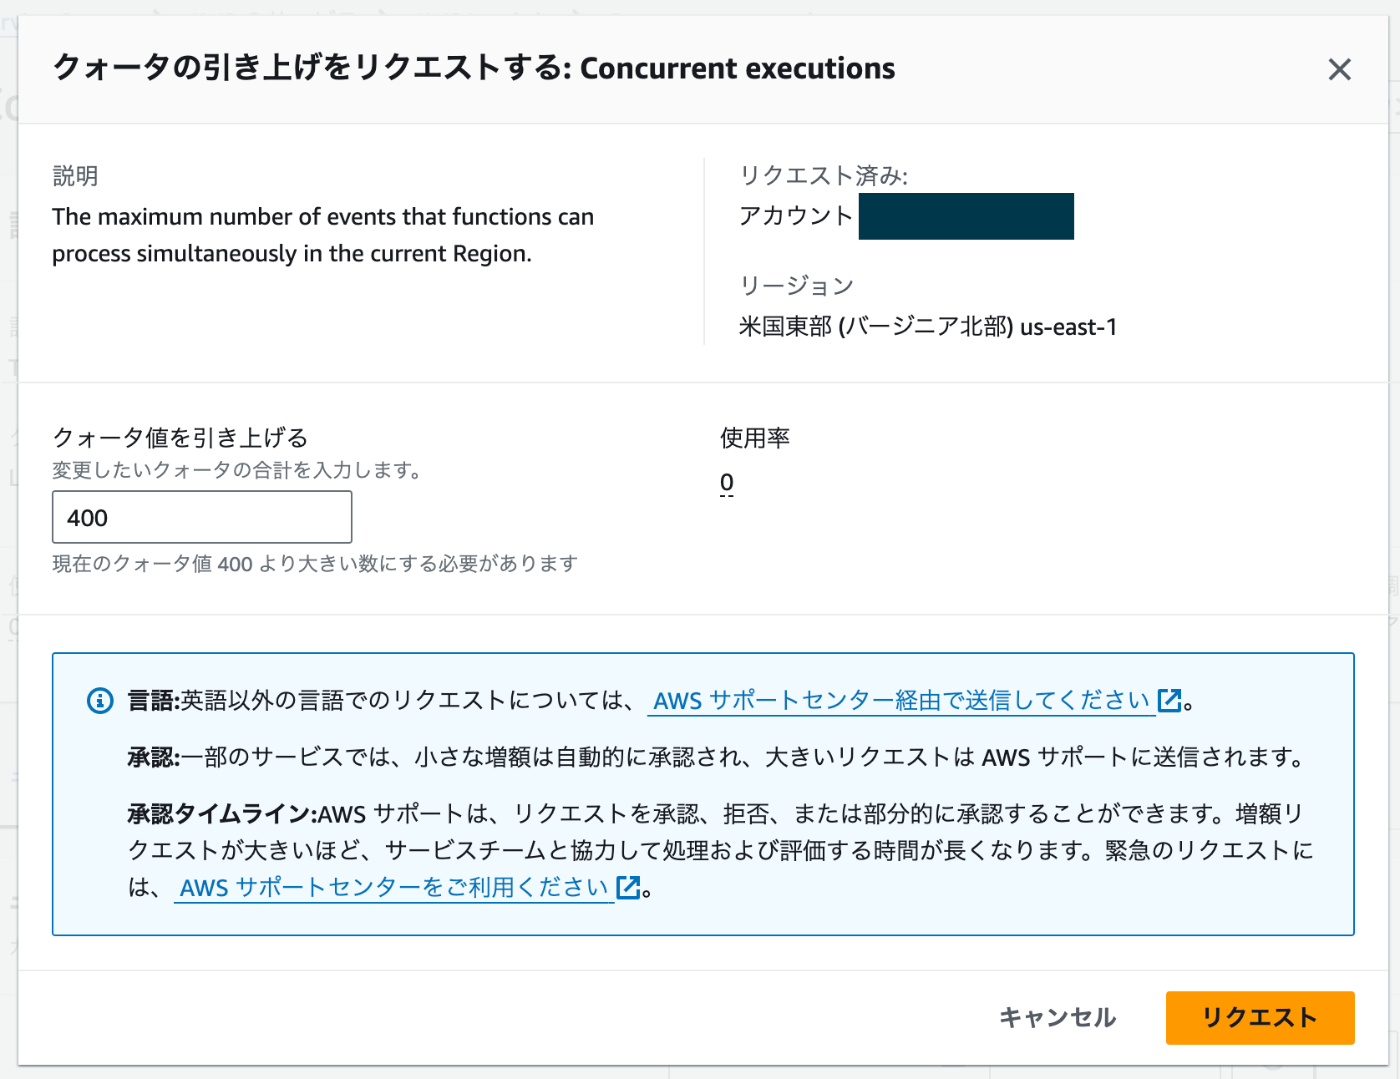
まずLambdaのconcurrencyを確認してみる。
 npx remotion lambda quotas

Region = us-east-1

Concurrency limit: 400 - Increase recommended!
The maximum amount of Lambda functions which can concurrently execute.
Run `npx remotion lambda quotas increase` to ask AWS to increase your limit.

Burst concurrency: 3000, but only 1000 effective because of concurrency limit
The maximum amount of concurrency increase in 10 seconds
現在は400。3000まで上げられるようだが、実質効果あるのは1000とのこと。
AWS Service Quotes > AWS Lambdaから上限を400→1000に引き上げられるようだ(申請から反映まで時間がかかるらしい)。今回は触らずに400で試してみる。
現在の30分の動画の状態をS3のサイトにデプロイする。
createコマンドを使っているがページが新規作成されるわけではなく、--site-nameオプションを使う場合、同じサイト名があるなら元のページに上書きするようになっている。
npx remotion lambda sites create src/index.ts --site-name=my-video
では、30分の動画をエンコーディングしてみる。
結果、Timeoutで失敗(2分)。しかも70円かかった。
% npx remotion lambda render https://remotionlambda-useast1-xxxx
bucket = remotionlambda-useast1-atx3f3tmn9, function = remotion-render-xxx
renderId = xxxx, codec = h264 (default)
(1/5) ╭───────────────────╮ Invoking lambdas 100%
(2/5) ╭────────────────╴    Rendering frames (45810/54000)
(3/5) ╭──────               Encoding chunks 30%

Symbolicating minified error message...
The main function timed out after 119999ms.
略
Accrued costs until error was thrown: $0.516.
Lambdaの設定でタイムアウトが2分になっているので、これを変更して15分にする。
結果、成功。4分半かかった。コストは90円程度。
npx remotion lambda render https://remotionlambda-useast1-xxxx.s3.amazonaws.com/sites/my-video/index.html HelloWorld

bucket = remotionlambda-useast1-xxxxx, function = remotion-render-xxxx
renderId = xxxxx, codec = h264 (default)
(1/5) ╭───────────────────╮ Invoking lambdas 100%
(2/5) ╭───────────────────╮ Rendered frames 222953ms
(3/5) ╭───────────────────╮ Encoded chunks 222953ms
(4/5) ╭───────────────────╮ Combined videos 45359ms
(5/5) ╭───────────────────╮ Cleaned up artifacts 1203ms

Done! https://s3.us-east-1.amazonaws.com/remotionlambda-useast1-xxxx/renders/xxxx/out.mp4
151 λ's used, 279.14sec, Estimated cost $0.599
まとめると、30分の動画を出力するのに
ローカル: 計40分強、0円
AWS Lambda: 計4分強、90円
先駆者様
@remotion/lambda
Lambdaでのレンダリングの仕組み
- AWS上にLambda関数とS3バケットが作成される
- RemotionプロジェクトがウェブサイトとしてS3バケットにデプロイされる。
- Lambda関数が呼び出され、Remotionプロジェクトを開く。
- 多数のLambda関数が並行して作成され、それぞれがビデオの小さな部分をレンダリングする。
- 初期のLambda関数がビデオをダウンロードし、それらを繋ぎ合わせる。
- 最終的なビデオがS3にアップロードされ、ダウンロード可能になる。
A Lambda function and a S3 bucket is created on AWS.
A Remotion project gets deployed to a S3 bucket as a website.
The Lambda function gets invoked and opens the Remotion project.
A lot of Lambda functions are created in parallel which each render a small part of the video
The initial Lambda function downloads the videos and stitches them together.
The final video gets uploaded to S3 and is available for download.
制限事項
重要な制限事項として、作成できる動画(Full HD)は約2時間である。これはLambdaのエフェメラルストレージが最大10GBであるため。
You only have up to 10GB of storage available in a Lambda function. This must be sufficient for both the separated chunks and the concatenated output, therefore the output file can only be about 5GB maximum, limiting the maximum video length to around 2 hours of Full HD video.
レイヤー
関数には2つのレイヤー付随している。フォントとChromeのバイナリ。
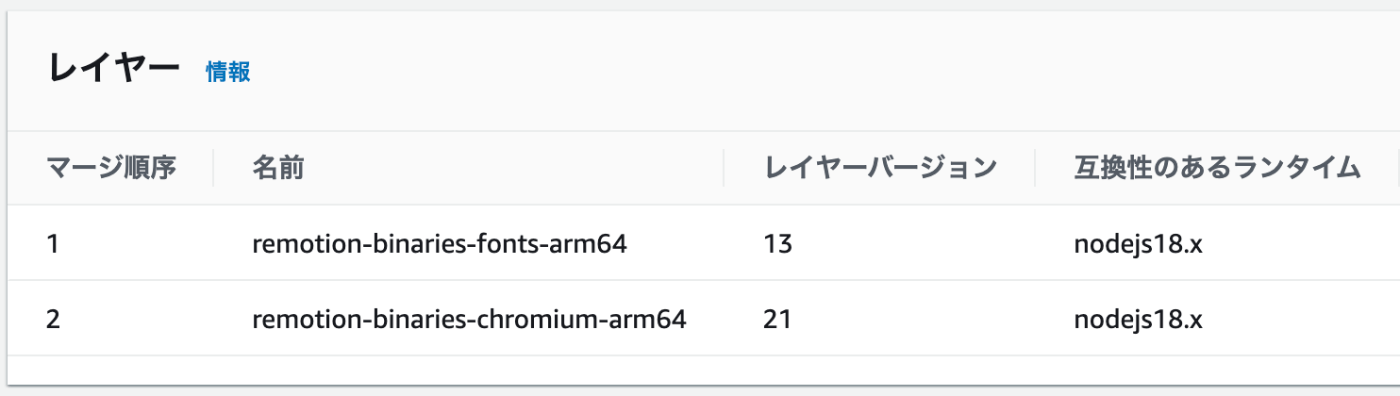
それぞれカスタマイズも可能。
Remotionの核となるReactコンポーネントについて見ていく。
Composition
Remotionの中心的な概念で、動画としてデータを扱えるようにするコンポーネント。
- id コンポジションの一意の識別子。レンダリング時にどのidのコンポーネントをレンダリングするか指定する必要がある。
- fps コンポジションを何フレームでレンダリングするか
- durationInFrames コンポジションの長さ(フレーム)
- height コンポジションの高さ (ピクセル)
- width コンポジションの幅 (ピクセル)
- Component Reactコンポーネントで、動画のビジュアルを定義する
import { Composition } from "remotion";
import { MyComp } from "./MyComp";

export const MyVideo = () => {
  return (
    <>
      <Composition
        id="my-comp"
        component={MyComp}
        width={1080}
        height={1080}
        fps={30}
        durationInFrames={3 * 30}
      />
    </>
  );
};
補足: 動画の長さに合わせてdurationInFramesの値を変える
動画の尺はCompositionにわたされるdurationInFramesの数値で定義される。
しかし、動画の長さは後述のComponents次第で変えたいので、その場合はcalculateMetadataにコールバック関数を渡し、上書きする。
参考: https://www.remotion.dev/docs/calculate-metadata
Component
動画のデザインはCompositionのcomponent属性で定義され、それはReactコンポーネントである。
import React from 'react';
import {Sequence} from 'remotion';

const MyComp = () => {
    return (
        <div style={{flex: 1, backgroundColor: '#000', justifyContent: 'center', alignItems: 'center', display: 'flex'}}>
            <Sequence from={0} durationInFrames={90}>
                <h1 style={{color: '#fff'}}>Welcome to My Video</h1>
            </Sequence>
            <Sequence from={90} durationInFrames={90}>
                <h1 style={{color: '#fff'}}>Thanks for Watching</h1>
            </Sequence>
        </div>
    );
};

export default MyComp;
各APIや関数を使って表示タイミングを調整したり、画像や音楽を挿入できる。
逐次ドキュメントを参照すること。
Componentへのデータの受け渡し
componentにはpropsを受け渡すことができる。
これによって動画内の文字や音楽をレンダリングごとに変更することができ、動画のテンプレート化が可能になる。
import React from 'react';
import {Sequence} from 'remotion';

const MyComp = ({text1, text2}) => {
    return (
        <div style={{flex: 1, backgroundColor: '#000', justifyContent: 'center', alignItems: 'center', display: 'flex'}}>
            <Sequence from={0} durationInFrames={90}>
                <h1 style={{color: '#fff'}}>{text}</h1>
            </Sequence>
            <Sequence from={90} durationInFrames={90}>
                <h1 style={{color: '#fff'}}>{text2}</h1>
            </Sequence>
        </div>
    );
};

export default MyComp;
レンダリング時のpropsの受け渡し
レンダリング時にpropsがどう解決されるかを図示したページ。
ローカル
ローカルでは@remotion/cliのrenderコマンドで動画をレンダリングする。
その際propsオプションを用いることで、Componentに値を渡すことができる。
npx remotion render --props
要素の表示
配置 AbsoluteFill
ComponentではReactコンポーネントが普通に表示される。デザインをする場合はCSSを当てれば良い。
動画の要素は重ねて表示されるので、Remotionにはあらかじめposition:absoluteが適用されたラッパーコンポーネント<AbsoluteFill>が提供されている。
<AbsoluteFill>
  <AbsoluteFill>
    <Img src={staticFile("bg.png")} />
  </AbsoluteFill>
  <AbsoluteFill>
    <h1>This text appears on top of the video!</h1>
  </AbsoluteFill>
</AbsoluteFill>
並列に記述された<AbsoluteFill>要素は、コードで下にあるほどレイヤーで上に配置される。
表示時間 Sequence
要素の表示時間を変更する場合、<Sequence>を利用する。<Sequence>はデフォルトで<AbsoluteFill>でラップされている。
<Sequence from={60} durationInFrames={40}>
    <h1>This text appears after 60 frames!</h1>
</Sequence>
- from 開始フレーム数
- durationInFrames 表示するフレーム数
<Sequence>をネストさせることで、相対時間で表示を調整できる。
<Sequence from={60} durationInFrames={60}>
    <Sequence from={30} durationInFrames={30}>
        <h1>This text appears after 90 frames!</h1>
    </Sequence>
</Sequence>