shadcn/uiから学んだ再利用性の高いコンポーネントの作り方tips
最近shadcn/uiを使ってみているのですが、再利用性の高いコンポーネントの作り方が参考になったので、備忘録としてまとめます。
本記事は筆者の解釈でまとめていますので、純粋なshadcn/uiの設計思想については公式ドキュメントやThe anatomy of shadcn/uiを参照ください。
shadcn/uiとは
コンポーネントのコレクションです。一般的なコンポーネントライブラリではありません。
インストールは不要で、コピペだけで利用でき、依存関係を気にせず欲しいコンポーネントのみ利用できるのが強みです。
shadcn/uiには、ボタンからデータテーブルまで様々なコンポーネントが用意されていますが、そのデザインシステムは一貫した考えに基づいています。
shadcn/uiから学んだこと
構造・動作レイヤーとスタイルレイヤーを分離する
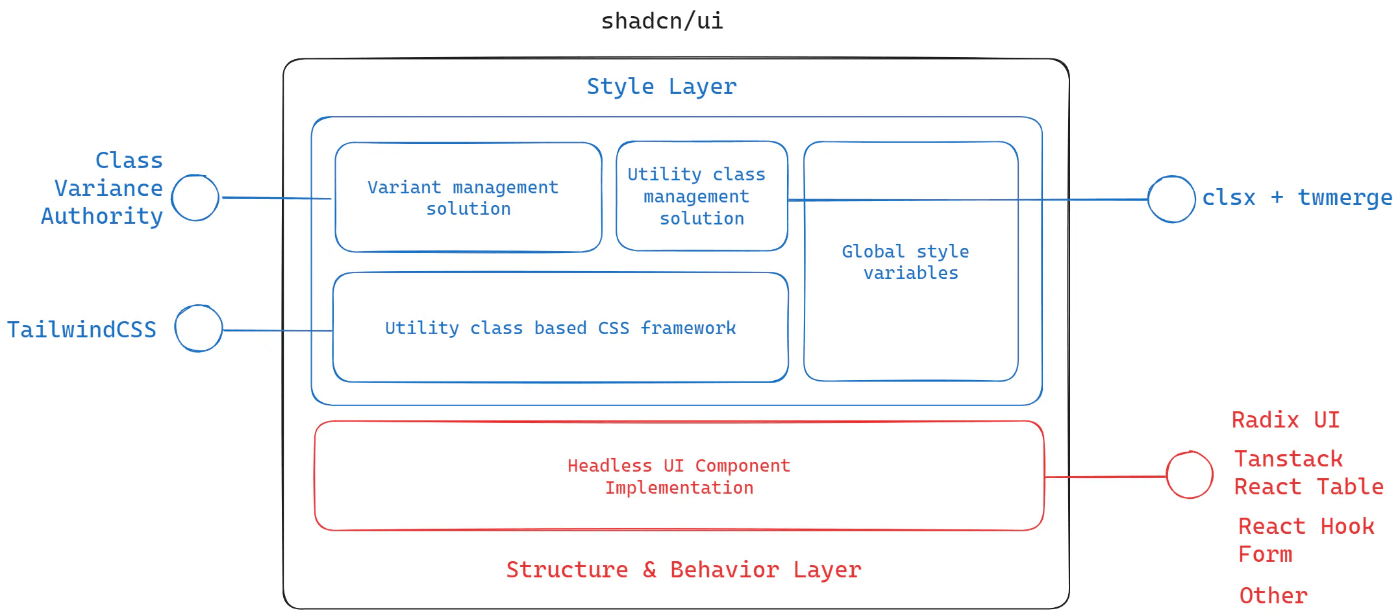
shadcn/uiのすべてのコンポーネントはStructure & Behavior Layer (構造・動作レイヤー)とStyle Layer (スタイルレイヤー)の2層レイヤーで構成されています。

https://manupa.dev/blog/anatomy-of-shadcn-ui
これは コンポーネントは実装から分離されるべきである(The design of your components should be separate from their implementation) という考えに基づいています。
構造・動作レイヤー
コンポーネントの構成要素と、その振る舞いがカプセル化されているレイヤーです。
このレイヤーは ヘッドレス(スタイルなし) で定義されています。
Buttonコンポーネントの例でいうと、実際の関数コンポーネントの宣言がそれにあたります。
HTML要素の<button>で構成されること、childを<button>でラップして表示すること、さらにasChildによってポリモーフィックコンポーネントとして利用可能であること、が定義されています。
const Button = React.forwardRef<HTMLButtonElement, ButtonProps>(
  ({ className, variant, size, asChild = false, ...props }, ref) => {
    const Comp = asChild ? Slot : "button"
    return (
      <Comp
        className={cn(buttonVariants({ variant, size, className }))}
        ref={ref}
        {...props}
      />
    )
  }
)
スタイルレイヤー
コンポーネントの見た目を定義するレイヤーです。
基本的なスタイルに加え、secondaryやoutlineなどのスタイルがあります。
それらはバリアント(variants)として実装されます。
バリアントの管理にはClass Variance Authority (CVA) APIが使われています。
const buttonVariants = cva(
  "inline-flex items-center justify-center whitespace-nowrap rounded-md text-sm font-medium transition-colors focus-visible:outline-none focus-visible:ring-1 focus-visible:ring-ring disabled:pointer-events-none disabled:opacity-50",
  {
    variants: {
      variant: {
        default:
          "bg-primary text-primary-foreground shadow hover:bg-primary/90",
        destructive:
          "bg-destructive text-destructive-foreground shadow-sm hover:bg-destructive/90",
        outline:
          "border border-input bg-background shadow-sm hover:bg-accent hover:text-accent-foreground",
        secondary:
          "bg-secondary text-secondary-foreground shadow-sm hover:bg-secondary/80",
        ghost: "hover:bg-accent hover:text-accent-foreground",
        link: "text-primary underline-offset-4 hover:underline",
      },
      size: {
        default: "h-9 px-4 py-2",
        sm: "h-8 rounded-md px-3 text-xs",
        lg: "h-10 rounded-md px-8",
        icon: "h-9 w-9",
      },
    },
    defaultVariants: {
      variant: "default",
      size: "default",
    },
  }
)
さらにCVAのVariantPropsを利用してpropsの型定義を行っています。
export interface ButtonProps
  extends React.ButtonHTMLAttributes<HTMLButtonElement>,
    VariantProps<typeof buttonVariants> {
  asChild?: boolean
}
Buttonコンポーネントでは、propsで渡されたvariantに基づいて、TailwindCSSのデザインを組み立てるようになっています。
const Button = React.forwardRef<HTMLButtonElement, ButtonProps>(
  ({ className, variant, size, asChild = false, ...props }, ref) => {
    const Comp = asChild ? Slot : "button"
    return (
      <Comp
        className={cn(buttonVariants({ variant, size, className }))}
        ref={ref}
        {...props}
      />
    )
  }
)
注目ポイントは、 ButtonコンポーネントがbuttonVariantsの詳細に依存せず、VariantPropsという抽象を挟んでいる ことです。
これはSOLID原則の 依存性逆転の原則(DIP) にあてはまります。
スタイルとロジックの詳細が明確に分離されているので、スタイル(バリアント)の変更がコンポーネントの動作に影響を与えるリスクが減少し、メンテナンスしやすいコンポーネントになっています。
スタイルに柔軟性をもたせる
コンポーネントを使う際、classNameで追加でスタイルを適用できるようになっています。
const labelVariants = cva(
  "text-sm font-medium leading-none peer-disabled:cursor-not-allowed peer-disabled:opacity-70"
)

const Label = React.forwardRef<
  React.ElementRef<typeof LabelPrimitive.Root>,
  React.ComponentPropsWithoutRef<typeof LabelPrimitive.Root> &
    VariantProps<typeof labelVariants>
>(({ className, ...props }, ref) => (
  <LabelPrimitive.Root
    ref={ref}
    className={cn(labelVariants(), className)}
    {...props}
  />
))
ここで使われている関数cnはTailwindCSSのtwMerge()を拡張したユーティリティ関数です。
import { type ClassValue, clsx } from "clsx";
import { twMerge } from "tailwind-merge";

export function cn(...inputs: ClassValue[]) {
  return twMerge(clsx(inputs));
}
clsxとtailwind-mergeをあわせて使うことで、条件付きクラス名の組み立てと、tailwindCSSのクラス名の上書きができるようになります。
非常に便利なので、shadcn/uiに限らず利用していきたいですね。
import React from "react";
import { twMerge } from "tailwind-merge";
import clsx from "clsx";

const Link = ({ isActive, children }: { isActive: boolean, children: React.ReactNode }) => {
  return <a className={twMerge(clsx("text-lg text-grey-800", { "text-blue-500": isActive }))}>{children}</a>;
};
ヘッドレスUIライブラリの利用とカスタマイズ
前述のとおり、コンポーネントの振る舞いはヘッドレスで実装される必要があります。
そのため、shadcn/uiでは、ネイティブブラウザ要素のほかにヘッドレスUIライブラリのRedix UIやReact Hook Formを採用し、内部的に利用しています。
さらに、Formコンポーネントが分かりやすいのですが、ライブラリのAPIをラップ、拡張し、利用しやすい形で公開する工夫が見られます。
例. React Hook Formと独自に定義したContextを利用して、自動的にエラーメッセージが表示されるようにしたFormMessageコンポーネント
const FormMessage = React.forwardRef<
  HTMLParagraphElement,
  React.HTMLAttributes<HTMLParagraphElement>
>(({ className, children, ...props }, ref) => {
  const { error, formMessageId } = useFormField()
  const body = error ? String(error?.message) : children

  if (!body) {
    return null
  }

  return (
    <p
      ref={ref}
      id={formMessageId}
      className={cn("text-[0.8rem] font-medium text-destructive", className)}
      {...props}
    >
      {body}
    </p>
  )
})
Compound Componentsとして作る
これはshadcn/uiに限らずですが、再利用性が高いコンポーネントはコンポジション(children propsを受け取るコンポーネント)として作られています。
デザインパターンのCompound Components Patterですね。
たとえばCardコンポーネントは、CardHeaderやCardContentなどのパーツを組み合わせて使うようになっています。
export function CardDemo() {
  return (
    <Card>
      <CardHeader>
        <CardTitle>Card Title</CardTitle>
        <CardDescription>Card Description</CardDescription>
      </CardHeader>
      <CardContent>
        <p>Card Content</p>
      </CardContent>
      <CardFooter>
        <p>Card Footer</p>
      </CardFooter>
    </Card>
  );
}
その反対はプロパティベース(というんでしょうか?)で、propsで各子要素を受け取る形が想定されます。
<Card
  title="Card Title"
  description="Card Description"
  content={<p>Card Content</p>}
  footer={<p>Card Footer</p>}
/>
この時点で明らかに、Compound Componentsのほうが
- 直感的に構造が理解できる
- 柔軟に利用できる
といえます。
逆に、ProfileCardなど特定の用途に特化したコンポーネントで、propsに制限をかけたい場合は、後者で作る必要があります。
Discussion