前に ASP.NET Core Blazor Server でオレオレ ログインを作りたい という記事を書きました。この時はログイン画面は ASP.NET Core Razor Pages で作成をしていましたが、.NET 8 になって Blazor でも静的サーバーサイドレンダリングがサポートされたのでログイン画面まで含めて Blazor で作成することが出来るようになりました。ここでは、その方法と Static SSR/InteractiveServer/InteractiveWebAssmelby 間でログイン情報を受け渡す方法を紹介します。
プロジェクトの作成
Blazor Web App プロジェクトテンプレートでアプリケーションを作成します。
以下の画面の内容でプロジェクトを作成します。この段階では認証はつけないでください。

ここに手を加えて最終的には InteractiveServer/InteractiveWebAssembly/Static SSR の全モードで認証が動作するようにします。
Cookie ベースの認証の有効化
Program.cs に AddAuthentication メソッドや UseAuthentication/UseAuthorization メソッドを使って認証に必要なサービスの追加や、認証認可のミドルウェアを追加します。
using Microsoft.AspNetCore.Authentication.Cookies;
using OreoreAuthBlazorApp.Client.Pages;
using OreoreAuthBlazorApp.Components;

var builder = WebApplication.CreateBuilder(args);

// Add services to the container.
builder.Services.AddRazorComponents()
    .AddInteractiveServerComponents()
    .AddInteractiveWebAssemblyComponents();

// 認証系サービスの追加
builder.Services
    .AddAuthentication(CookieAuthenticationDefaults.AuthenticationScheme)
    .AddCookie();

var app = builder.Build();

// Configure the HTTP request pipeline.
if (app.Environment.IsDevelopment())
{
    app.UseWebAssemblyDebugging();
}
else
{
    app.UseExceptionHandler("/Error", createScopeForErrors: true);
    // The default HSTS value is 30 days. You may want to change this for production scenarios, see https://aka.ms/aspnetcore-hsts.
    app.UseHsts();
}

app.UseHttpsRedirection();

app.UseStaticFiles();
app.UseAntiforgery();

// 認証認可のミドルウェアを追加
app.UseAuthentication();
app.UseAuthorization();

app.MapRazorComponents<App>()
    .AddInteractiveServerRenderMode()
    .AddInteractiveWebAssemblyRenderMode()
    .AddAdditionalAssemblies(typeof(OreoreAuthBlazorApp.Client._Imports).Assembly);

app.Run();
ログイン画面の作成
では、ログイン画面を作っていきます。ログイン画面は静的サーバーサイドレンダリングで作ります。静的サーバーサイドレンダリングじゃないと HttpContext に触れないので今回の ASP.NET Core の認証の仕組みに乗せるためにはログイン画面を静的サーバーサイドレンダリングで作る必要があります。
サーバーサイドのプロジェクトに Components/Pages/Login.razor を追加して以下のような感じで実装しました。
@page "/login"
@using System.ComponentModel.DataAnnotations
@using Microsoft.AspNetCore.Authentication
@using Microsoft.AspNetCore.Authentication.Cookies
@using System.Security.Claims
@inject NavigationManager NavigationManager

<h3>Login</h3>

<EditForm EditContext="EditContext" FormName="login-form" OnValidSubmit="LoginAsync">
    <DataAnnotationsValidator />
    <ValidationSummary Model="Model" />
    <div>
        <label>
            ユーザー名:
            <InputText @bind-Value="Model.UserName" />
            <ValidationMessage For="() => Model.UserName" />
        </label>
    </div>
    <div>
        <label>
            パスワード:
            <InputText @bind-Value="Model.Password" type="password" />
            <ValidationMessage For="() => Model.Password" />
        </label>
    </div>
    <div>
        <button type="submit">ログイン</button>
    </div>
</EditForm>

@code {
    [SupplyParameterFromForm]
    private LoginForm Model { get; set; } = default!;
    private EditContext EditContext { get; set; } = default!;
    private ValidationMessageStore ValidationMessageStore { get; set; } = default!;

    [CascadingParameter]
    private HttpContext? HttpContext { get; set; }

    protected override void OnInitialized()
    {
        Model ??= new();
        EditContext = new(Model);
        ValidationMessageStore = new(EditContext);
    }

    private async Task LoginAsync(EditContext editContext)
    {
        _ = HttpContext ?? throw new InvalidOperationException("Static SSR で実行してください。");

        ClaimsIdentity? identity = null;
        // 本来であればここでログイン処理をするような機能を呼び出す
        if (Model.UserName == "admin" && Model.Password == "P@ssw0rd!")
        {
            identity = new(
                [new Claim(ClaimTypes.Name, Model.UserName), new Claim(ClaimTypes.Role, "Administrator")],
                CookieAuthenticationDefaults.AuthenticationScheme);
        }
        else if (Model.UserName == "user" && Model.Password == "P@ssw0rd!")
        {
            identity = new(
                [new Claim(ClaimTypes.Name, Model.UserName), new Claim(ClaimTypes.Role, "User")],
                CookieAuthenticationDefaults.AuthenticationScheme);
        }

        if (identity != null)
        {
            // ログイン成功!
            await HttpContext.SignInAsync(
                CookieAuthenticationDefaults.AuthenticationScheme,
                new ClaimsPrincipal(identity)
            );
            NavigationManager.NavigateTo(
                "",
                forceLoad: true
            );
        }
        else
        {
            // ログイン失敗
            ValidationMessageStore.Add(EditContext.Field(""), "ログインに失敗しました。");
        }
    }

    class LoginForm
    {
        [Required(ErrorMessage = "ユーザー名を入力してください。")]
        public string UserName { get; set; } = "";
        [Required(ErrorMessage = "パスワードを入力してください。")]
        public string Password { get; set; } = "";
    }
}
これで admin/P@ssw0rd! か user/P@ssw0rd! でログインできるようになりました。
/Components/Layout/NavMenu.razor に以下のようなログイン画面へのリンクを追加します。
        <div class="nav-item px-3">
            <NavLink class="nav-link" href="login">
                <span class="bi bi-list-nested-nav-menu" aria-hidden="true"></span> ログイン
            </NavLink>
        </div>
実行すると以下のように動きます。ログインが出来るようになりました!
ユーザー名の表示
今のままだとログインした、しても何も表示が変わらないので、ログインしたユーザー名を表示するようにします。
現状ではログイン後に HttpContext.User にログインユーザーの情報が入っています。Blazor では AuthenticationStateProvider を設定することで、この HttpContext.User に入っているデータを Blazor の世界に持ってくることが出来ます。そして CascadingParameter として認証情報を受け渡せるようにすることで認証系のコンポーネントが動くようになります。
サーバーサイドのプロジェクトの Program.cs に以下の行を追加して、これらの設定を有効化します。。
// Blazor用の認証情報を提供するためのコンポーネント
builder.Services.AddScoped<AuthenticationStateProvider, ServerAuthenticationStateProvider>();
// 認証情報を CascadingParameter で渡すようにする
builder.Services.AddCascadingAuthenticationState();
そして認証関係のコンポーネントを使えるようにするために、サーバーサイドのプロジェクトにある /Components/_Imports.razor に以下の using を追加します。
@using Microsoft.AspNetCore.Components.Authorization
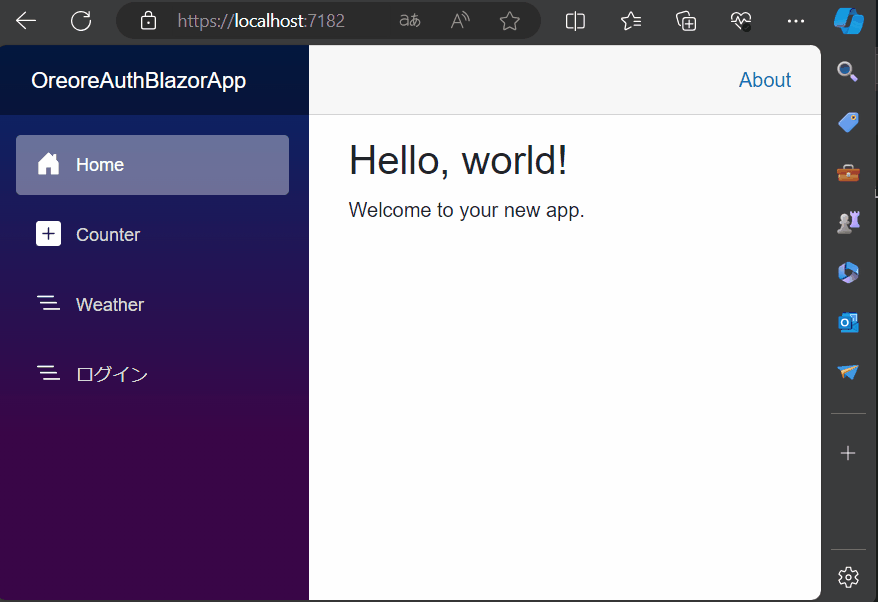
サーバーサイドのプロジェクトの/Components/Pages/Home.razor に AuthorizedView コンポーネントを追加して認証されている場合にはユーザー名とロールを表示するコードを追加します。
@page "/"

<PageTitle>Home</PageTitle>

<h1>Hello, world!</h1>

Welcome to your new app.

<div>
    <AuthorizeView>
        @context.User.Identity!.Name さん、こんにちは。
    </AuthorizeView>

    <AuthorizeView Roles="Administrator">
        あなたのロールは管理者です。
    </AuthorizeView>

    <AuthorizeView Roles="User">
        あなたのロールは一般ユーザーです。
    </AuthorizeView>
</div>
実行してログインを行うと以下のように Home.razor にログインユーザーの名前とロールが表示されるようになります。

InteractiveServer ページでのログイン情報の使用方法
これで静的サーバー サイド レンダリングのページでログインしたユーザーに関する情報が取得できるようになりました。次は InteractiveServer を設定したページでログイン情報を使う方法を紹介します。
といっても現状ですでに出来るようになっています。試しに以下のような画面を追加してみました。
@page "/interactiveserver"
@rendermode InteractiveServer

<h3>InteractiveServerPage</h3>

<AuthorizeView>
    <Authorized>
        <p>こんにちは @context.User.Identity!.Name さん。InteractiveServer のページでのカウンターページを楽しんでください。</p>
        <p>Current count: @currentCount</p>
        <button @onclick="IncrementCount">インクリメント</button>
    </Authorized>
    <NotAuthorized>
        認証されてませんよ?
    </NotAuthorized>
</AuthorizeView>

@code {
    private int currentCount = 0;
    private void IncrementCount() => currentCount++;
}
適当に NavMenu.razor に、このページへのリンクを追加して実行すると、以下のようになります。
ログインしていない状態だと以下のようにログインしていない旨のメッセージが出ます。

ログインしている状態だと以下のようにカウンター画面が出てきます。

InteractiveWebAssembly ページでのログイン情報の使用方法
次に InteractiveWebAssembly を設定したページでログイン情報を使う方法を紹介します。
まずは、クライアントサイドのプロジェクトで認証系のコンポーネントが使えるようにします。
クライアントサイドのプロジェクトには認証系コンポーネントのアセンブリはデフォルトでは追加されていないので以下の NuGet パッケージの参照を追加します。
- Microsoft.AspNetCore.Components.Authorization
そしてクライアント側のプロジェクトの _Imports.razor に以下のように using を追加して認証系のコンポーネントを名前空間無しで使えるようにします。
@using Microsoft.AspNetCore.Components.Authorization
現状だとサーバーサイドではユーザーのログイン状態などを取得して利用することが出来るようになっていますが、ブラウザー上ではログイン状態を取得することが出来ません。そこで、サーバーサイドでログイン情報を取得して、それをブラウザー側に渡すようにします。まずはクライアント側のプロジェクトにある Pages/Counter.razor を以下のようにして変更してログインしている状態と、していない状態で表示が変わるようにします。
@page "/counter"
@rendermode InteractiveWebAssembly

<PageTitle>Counter</PageTitle>

<h3>InteractiveWebAssembly</h3>

<AuthorizeView>
    <Authorized>
        <p>こんにちは @context.User.Identity!.Name さん。InteractiveWebAssembly のページでのカウンターページを楽しんでください。</p>
        <p>Current count: @currentCount</p>
        <button @onclick="IncrementCount">インクリメント</button>
    </Authorized>
    <NotAuthorized>
        認証されてませんよ?
    </NotAuthorized>
</AuthorizeView>

@code {
    private int currentCount = 0;
    private void IncrementCount() => currentCount++;
}
この状態で実行して Counter ページにアクセスすると以下のようにエラーになります。最初はちゃんと表示されるのですが、これはプリレンダリングがサーバーサイドで動いているためです。プリレンダリング後に WebAssembly で動き始めると以下のようにエラーになってしまいます。
未ログイン状態でアクセスした場合は以下のようになります。

ログイン済みの状態でアクセスした場合は以下のようになります。

このエラーは AuthenticationStateProvider や認証情報が CascadingParameter として取得できるようになっていないため起きています。これを解消するために、まずはサーバーサイドからクライアントサイドに情報を渡すようにしてみましょう。情報の受け渡しには色々なやり方がありますが認証を有効にして Blazor Web App を新規作成したときに追加されるコードでは PersistentComponentState を使って情報を受け渡しているので、それを使って行おうと思います。
まずは、サーバーサイドとクライアントサイドで受け渡すユーザーの情報を格納するためのクラスを定義します。サーバーサイドとクライアントサイドの両方から参照するクラスになるので、クライアントサイドのプロジェクトに UserInfo.cs を作成して以下のようなコードを書きます。
namespace OreoreAuthBlazorApp.Client;

public record UserInfo(string Name, string Role);
そして、サーバーサイドのプロジェクトに PersistingServerAuthenticationStateProvider.cs を作成して以下のようなコードを書きます。
using Microsoft.AspNetCore.Components.Authorization;
using Microsoft.AspNetCore.Components.Server;
using Microsoft.AspNetCore.Components;
using Microsoft.AspNetCore.Identity;
using Microsoft.Extensions.Options;
using System.Diagnostics;
using Microsoft.AspNetCore.Components.Web;
using System.Security.Claims;
using OreoreAuthBlazorApp.Client;

namespace OreoreAuthBlazorApp;

internal sealed class PersistingServerAuthenticationStateProvider : ServerAuthenticationStateProvider, IDisposable
{
    private readonly PersistentComponentState _state;

    private readonly PersistingComponentStateSubscription _subscription;

    private Task<AuthenticationState>? _authenticationStateTask;

    public PersistingServerAuthenticationStateProvider(
        PersistentComponentState persistentComponentState)
    {
        _state = persistentComponentState;

        AuthenticationStateChanged += OnAuthenticationStateChanged;
        _subscription = _state.RegisterOnPersisting(OnPersistingAsync, RenderMode.InteractiveWebAssembly);
    }

    private void OnAuthenticationStateChanged(Task<AuthenticationState> task)
    {
        _authenticationStateTask = task;
    }

    private async Task OnPersistingAsync()
    {
        if (_authenticationStateTask is null)
        {
            throw new UnreachableException($"Authentication state not set in {nameof(OnPersistingAsync)}().");
        }

        var authenticationState = await _authenticationStateTask;
        var principal = authenticationState.User;

        if (principal.Identity?.IsAuthenticated == true)
        {
            var name = principal.FindFirst(ClaimTypes.Name)?.Value;
            var role = principal.FindFirst(ClaimTypes.Role)?.Value;

            if (name != null && role != null)
            {
                _state.PersistAsJson(nameof(UserInfo), new UserInfo(name, role));
            }
        }
    }

    public void Dispose()
    {
        _subscription.Dispose();
        AuthenticationStateChanged -= OnAuthenticationStateChanged;
    }
}
そして、サーバーサイドのプロジェクトの Program.cs で AuthenticationStateProvider のサービスを追加している行で PersistingServerAuthenticationStateProvider を使うように変更します。
// Blazor用の認証情報を提供するためのコンポーネント
// builder.Services.AddScoped<AuthenticationStateProvider, ServerAuthenticationStateProvider>(); もともとはデフォルト実装を使ってた
builder.Services.AddScoped<AuthenticationStateProvider, PersistingServerAuthenticationStateProvider>();
これで認証情報がプリレンダリング時にサーバーサイドからクライアントサイドに渡されるようになりました。クライアントサイドでも、この情報を使うような AuthenticationStateProvider を実装します。クライアントサイドのプロジェクトに PersistentAuthenticationStateProvider.cs を作成して以下のようなコードを実装します。
using Microsoft.AspNetCore.Components.Authorization;
using Microsoft.AspNetCore.Components;
using System.Security.Claims;

namespace OreoreAuthBlazorApp.Client;

internal class PersistentAuthenticationStateProvider : AuthenticationStateProvider
{
    private static readonly Task<AuthenticationState> defaultUnauthenticatedTask =
        Task.FromResult(new AuthenticationState(new ClaimsPrincipal(new ClaimsIdentity())));

    private readonly Task<AuthenticationState> authenticationStateTask = defaultUnauthenticatedTask;

    public PersistentAuthenticationStateProvider(PersistentComponentState state)
    {
        if (!state.TryTakeFromJson<UserInfo>(nameof(UserInfo), out var userInfo) || userInfo is null)
        {
            return;
        }

        Claim[] claims = [
            new Claim(ClaimTypes.Name, userInfo.Name),
            new Claim(ClaimTypes.Role, userInfo.Role)
        ];

        authenticationStateTask = Task.FromResult(
            new AuthenticationState(new(
                new ClaimsIdentity(claims, nameof(PersistentAuthenticationStateProvider)))));
    }

    public override Task<AuthenticationState> GetAuthenticationStateAsync() => authenticationStateTask;
}
そして、クライアントサイドのプロジェクトの Program.cs で作成した PersistentAuthenticationStateProvider を AuthenticationStateProvider としてサービスに追加します。さらに CascadingParameter として認証情報を渡すようにして、認可系のサービスも追加します。
using Microsoft.AspNetCore.Components.Authorization;
using Microsoft.AspNetCore.Components.WebAssembly.Hosting;
using OreoreAuthBlazorApp.Client;

var builder = WebAssemblyHostBuilder.CreateDefault(args);

// 以下の3行を追加
builder.Services.AddScoped<AuthenticationStateProvider, PersistentAuthenticationStateProvider>();
builder.Services.AddCascadingAuthenticationState();
builder.Services.AddAuthorizationCore();

await builder.Build().RunAsync();
これでログイン情報が InteractiveWebAssembly ページで使えるようになりました。実行して表示すると正しく表示されます。ログインしていない状態だと以下のように表示されます。

ログインして Counter ページにアクセスすると以下のようにログインユーザーの名前とロールが表示されるようになります。

ソースコード一式
GitHub の以下のリポジトリにソースコードを置いています。
まとめ
今回は .NET 8 の Blazor でログイン機能を追加する方法を紹介しました。静的サーバーサイドレンダリングでログイン画面を作成し、ログイン情報を InteractiveServer と InteractiveWebAssembly で使えるようにしました。
.NET 8 の Blazor の色々な機能を駆使してる感があるので難しいと思いますが Static SSR/InteractiveServer/InteractiveWebAssembly/InteractiveAuto を組み合わせたアプリケーションでログイン機能を実装する場合には、この記事を参考にしてみてください。
それでは楽しい Blazor ライフを!
続きも書きました。
宣伝
2024/05/20 にC#ユーザーのためのWebアプリ開発パターン ASP.NET Core Blazorによるエンタープライズアプリ開発という名前の本がインプレスさんから出版されます。この本に少しだけですが関わらせていただいたので、著者欄に名前を載せていただいています。もし、ご興味がある方は是非手に取ってみてください。


Discussion
すばらしい記事ありがとうございます。
ドンピシャでほしい情報でした。
SSRからWASMにどうやって情報を渡していいかわからず困っていました。
AAD B2Cを使っていますが、認証がBlazorと相性が悪くオレオレに移行したいと思っていました。
AAD B2C だと OpenID Connect 使うと思うんですけど、感覚としてはそこまで難しくないかもと思ってます。まだやったことはないのですが…。
Blaozr serverでログイン処理を実装中でして、
本サイトの記事およびサンプルコードが非常に役立ちました。
ありがとうございました。
書籍も購入しております。