spring-security v6+KotlinでHelloWorld
はじめに
本記事ではspring-securityを使ったハンズオンを行います
spring-securityは2022年12月20日にversion 6.0へと変わり、いままでの設定ファイルと大きく変わることになりました。
筆者はKotlinの学習をはじめた2023年1月、ネットにほとんど情報がない中で試行錯誤したので、今回は簡単なチュートリアルという形でv6の設定ファイルについて紹介していきます
spring-securityの学習
spring-securityがそもそもなんなのか、どのように使えるのかなどは設定ファイルが古くはなりますが以下のサイトが参考になります
また学習を進める上で以下の書籍は大変参考になりました。まずはこの書籍で概要を掴んでから実装を勧めてみるのがおすすめです
開発環境
- IntelliJ IDEA Community Edition
- open jdk version 18
プロジェクト作成
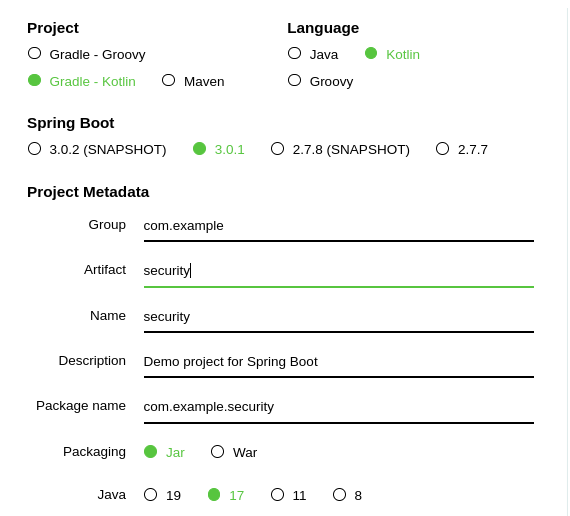
まずはSpringBootのプロジェクト作成です
こちらのサイトにアクセスして以下の設定をします
| 項目 | 値 |
|---|---|
| Project | Gradle-Kotlin |
| Language | Kotlin |
| Artifact | security |
| Name | security |
そして依存関係を追加します
「ADD DEPENDENCIES」をクリックして、「Spring Web」、「Spring Security」を追加します
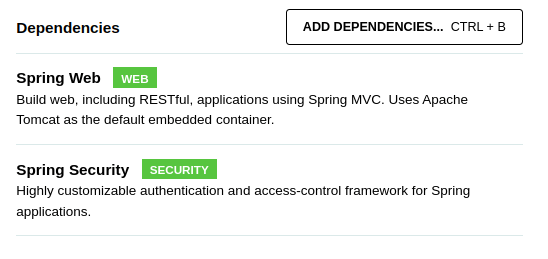
「GENERATOR」をクリックしてダウンロードをします
適当な場所に解凍して、IntelliJでフォルダを開きます
APIの準備
今回は2つのAPIを用意します
まずは/src/main/kotlin/com/example/securityにToDoController.ktを作成して以下にします
package com.example.security

import org.springframework.web.bind.annotation.GetMapping
import org.springframework.web.bind.annotation.RestController

@RestController
class ToDoController() {
    @GetMapping("/hello")
    fun hello(): String {
        return "Hello"
    }

    @GetMapping("/todo")
    fun todo(): String {
        return "todo"
    }
}
注意としては今回はAPIなので@RestControllerでアノテーションしているところです
@Controllerにすると思わぬエラーが出ますので注意しましょう
今回はAPIを以下のように使い分けます
/hello : 認証関係なく誰でもアクセスできる
/todo : ログインしたユーザーのみアクセスできる
spring-securityの設定
次にspring-securityの設定を行います
現在以下のコマンドを叩くと401エラーが発生します
$ curl localhost:8080/hello
これはspring-securityを依存関係に追加しているのでデフォルトですべてのパスはログイン認証をしていないとアクセスできないようになっているからです
まずは/helloのみログイン認証なしでアクセスできるように設定していきましょう
/helloを認証無しでアクセスする設定
/src/main/kotlin/com/example/securityにSecurityConfig.ktを作成して以下にします
ここに設定を書いていきます
package com.example.security

import org.springframework.context.annotation.Bean
import org.springframework.context.annotation.Configuration
import org.springframework.security.config.annotation.web.builders.HttpSecurity
import org.springframework.security.config.annotation.web.configuration.EnableWebSecurity
import org.springframework.security.web.SecurityFilterChain

@Configuration
@EnableWebSecurity
class SecurityConfig {
    @Bean
    fun configureHttpSecurity(httpSecurity: HttpSecurity): SecurityFilterChain {
        httpSecurity
            .authorizeHttpRequests()
            .requestMatchers("/hello", "/login").permitAll()
            .anyRequest().authenticated()
        return httpSecurity.build()
    }
}
APIを再起動してアクセスしてみます
$ curl localhost:8080/hello
するとHelloと返ってきます
簡単にそれぞれについて解説していきます
@Configuration
@EnableWebSecurity
class SecurityConfig {
    @Bean
    fun configureHttpSecurity(httpSecurity: HttpSecurity): SecurityFilterChain {
		ここに認証に関する設定をかく
    }
}
ここは雛形です。configureHttpSecurityの中にどのアクセスが認証が必要かを設定できます
以前はWebSecurityConfigAdapterを使った実装でしたが変わっています
            .authorizeHttpRequests()
            .requestMatchers("/hello", "/login").permitAll()
            .anyRequest().authenticated()
ここでは/helloと/loginのアクセスに対してpermitAll()をすることで認証なしにアクセスできるようにしました
/loginは先ほど作成していませんが、これはspring-securityがログイン用に裏で用意してくれているAPIです
そしてanyRequest().authenticated()でそれ以外のパスのアクセスは認証が必要と設定しました
ためしにcurl http://localhost:8080/todoにアクセスすると401エラーが返ってきます
$ curl -i http://localhost:8080/todo # 401エラー
/todoにアクセスする
では認証を行えるように設定を追加して、/todoにアクセスできるようにします
package com.example.security

import org.springframework.context.annotation.Bean
import org.springframework.context.annotation.Configuration
import org.springframework.security.config.annotation.web.builders.HttpSecurity
import org.springframework.security.config.annotation.web.configuration.EnableWebSecurity
import org.springframework.security.web.SecurityFilterChain
import org.springframework.security.core.userdetails.User
import org.springframework.security.core.userdetails.UserDetailsService
import org.springframework.security.crypto.bcrypt.BCryptPasswordEncoder
import org.springframework.security.crypto.password.PasswordEncoder
import org.springframework.security.provisioning.InMemoryUserDetailsManager

@Configuration
@EnableWebSecurity
class SecurityConfig {
    @Bean
    fun configureHttpSecurity(httpSecurity: HttpSecurity): SecurityFilterChain {
        httpSecurity
            .authorizeHttpRequests()
            .requestMatchers("/hello", "/login").permitAll()
            .anyRequest().authenticated()
            .and()
            .csrf().disable()
            .formLogin()
            .loginProcessingUrl("/login")
            .usernameParameter("email")
            .passwordParameter("password")
        return httpSecurity.build()
    }

    @Bean
    fun users(): UserDetailsService {
        val user = User.builder()
            .username("user")
            .password(passwordEncoder()?.encode("password"))
            .roles("USER")
            .build()
        return InMemoryUserDetailsManager(user)
    }

    @Bean
    fun passwordEncoder(): PasswordEncoder? {
        return BCryptPasswordEncoder()
    }
}
追加した箇所を説明します
            .csrf().disable()
            .formLogin()
            .loginProcessingUrl("/login")
            .usernameParameter("email")
            .passwordParameter("password")
まずcsrf().disable()でCSRFトークンによる証明を無効にしています
そして、loginProcessingUrlでログインフォームを有効化して、ユーザーのパラメータはemail、パスワードのパラメータはpasswordで受け付けるように設定しました
POSTリクエストでemailとpasswordの2つを送り、それらを用いてログイン認証を行うことになります
    @Bean
    fun users(): UserDetailsService {
		# 認証設定を書く
    }
ここで認証の具体的な内容を設定します
ここも昔であればconfigureとして実装していたので変わった箇所になります
        val user = User.builder()
            .username("user")
            .password(passwordEncoder()?.encode("password"))
            .roles("USER")
            .build()
ここでは認証ユーザーを作成しています
ユーザー名: user
パスワード: password
というログイン認証があった場合にUSERというロールを付与してログインできるようにしています
このように事前にログインできるアカウントを定義しておくのをインメモリ認証とよびます
    @Bean
    fun passwordEncoder(): PasswordEncoder? {
        return BCryptPasswordEncoder()
    }
APIに渡されたパスワードは自動的に暗号化されるため、比較するパスワードも暗号化しておく必要があるのでこの関数を用意しました
では、実際に認証して/todoにアクセスできるか確かめます
$ curl -i -c cookie.txt -H 'Content-Type:application/x-www-form-urlencoded' -X POST -d 'email=user' -d 'password=password' http://localhost:8080/login
このコマンドでまず/loginで認証を行い、認証情報をcookie.txtとしてファイルに保存しています
$ cat cookie.txt
# Netscape HTTP Cookie File
# https://curl.haxx.se/docs/http-cookies.html
# This file was generated by libcurl! Edit at your own risk.

#HttpOnly_localhost	FALSE	/	FALSE	0	JSESSIONID	BF71008CD281961A6463394AA8422306
このように情報が乗っています
次にこのファイルを利用して/todoにアクセスします
$ curl -b cookie.txt http://localhost:8080/todo
するとtodoというレスポンスが返ってきて認証してアクセスできるようになったことが確認できました
おわりに
私自身KotlinもSpringBootも利用したことがなかったのでここまでやるのにもかなり苦戦しました
このようなハンズオンがあればいいなと思っていろいろ情報を集めていましたが、体系的なものが見つからなかったので作成してみました
Discussion