Windows11 / Ubuntu22.04 デュアルブートと環境構築メモ
Windows11 / Ubuntu22.04 のデュアルブートとUbuntu PCの環境構築を、PC新調に伴い行ったメモになります。
各必要な箇所を適宜ご参照ください。
デュアルブート
基本は【上級者向け】Ubuntuをデュアルブートする《その1:既にWindowsが入っているSSD・HDDにUbuntuを入れる》に沿って行う
Win11(Bitlocker)+Ubuntu22.04だとDual Boot大変らしい
- Partitionを分割し、高速スタートアップを無効化(下記参考)
[Windows 11] 高速スタートアップを無効にする方法を教えてください。
- Ubuntu焼いたUSBを刺して、BIOS(F2キーで入る)からUbuntuを起動
Administer Secure Boot > Secure Boot Status = Disabledへ変更
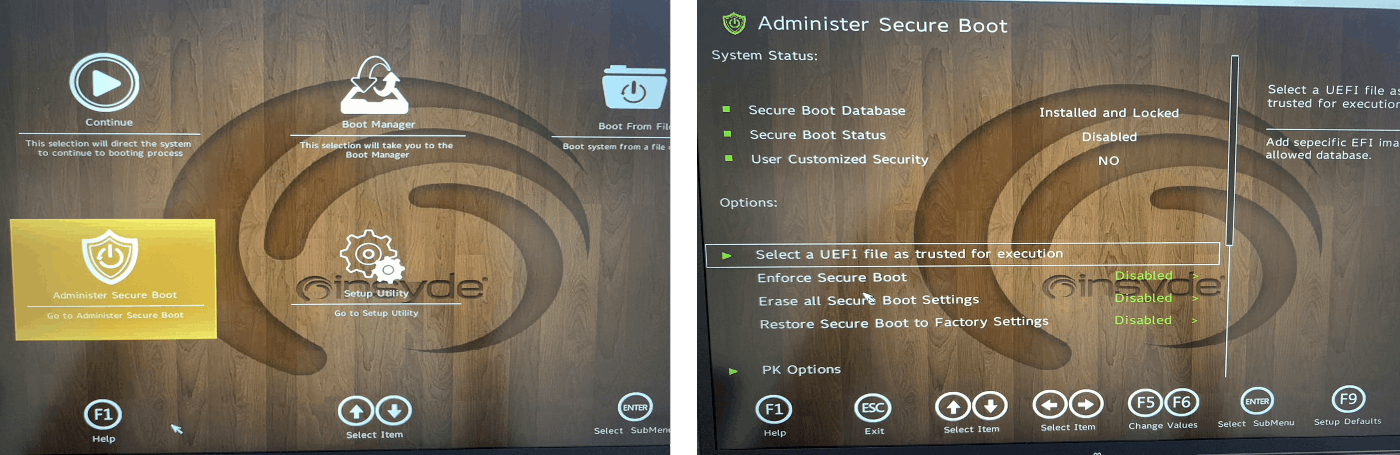
USBからUbuntuを起動(ELECOMとかUSBの名前が出る)
UbuntuのGUI起動後、以下を設定していく
- Ubuntuの設定
-
Welcome: English / Insall Ubuntu
-
Keyboard layout : Japanese
-
Updates and other software:
☑ Normal installation
☑ Download updates while installing Ubuntu,
☑ Install third-party software for graphics and Wi-Fi hardware and additional media formats -
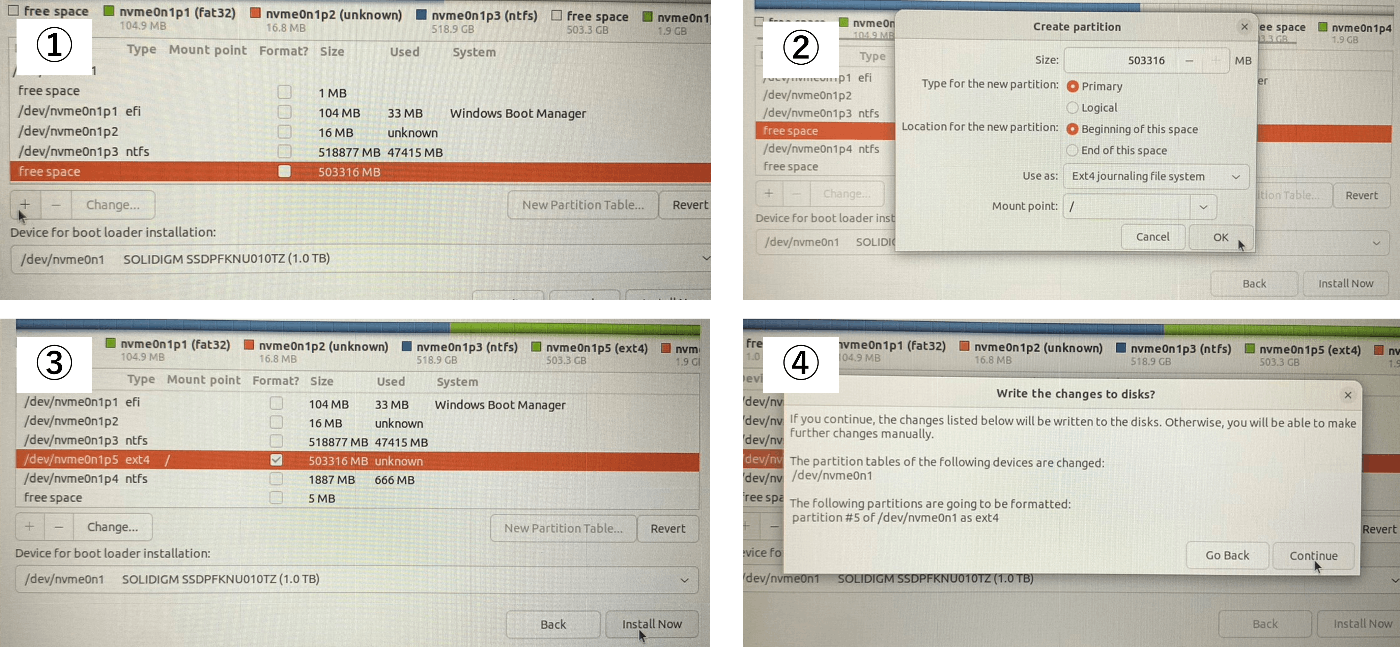
Installatin type:
Install Ubuntu alongside Windows Boot Managerとあるが、something elseを選択
free spaceにExt4 journaling file systemとMount Point: /を設定
Device for boot loader installationを/dev/nvme0n1 と使用しているHDDを選択する(1TBなら1TBとなっているデバイスを選択すること
- Reference
初心者向けLinux入門:デュアルブートでubuntuをインストール
研究室のPC(Dell Precision M3800)でWindowsとUbuntuをデュアルブートする
Terminal 系
Terminator
sudo add-apt-repository ppa:mattrose/terminator
sudo apt update
sudo apt install terminator
Settings / Keyboard からView and Customize Shortcutsを選択し、ctrl alt tへTerminatorを設定しておく
- Reference
sudo権限
sudo権限時のpasswardについて。
開発時は毎度入力が面倒なので、設定。
セキュリティの側面、一般ユーザー、rootユーザー等を考慮し、任意で設定する場合がある。
To run a command as administrator (user "root"), use "sudo <command>".
See "man sudo_root" for details.
Terminalを開くと上記のようなエラーが出る場合、一旦スルーし
sudo visudo

# Allow members of group sudo to execute any command
%sudo   ALL=(ALL:ALL)NOPASSWD:ALL
とすれば、エラーとpass入力は省くことができる。
インストール系
- VS Code
インストール後、以下実行
cd ~/Downloads
sudo dpkg -i code_1.83.1-1696982868_amd64.deb
- VS Code Extension
作業する上で、インストールしておきたいVS Code Extensionをいかに記載します。
Ctrl + Shift + P > Setting (JSON)で設定追記 または左下歯車から設定を開きプラグインごとに設定することも可能。
| プラグイン名 | 機能 |
|---|---|
| vscode-icons | アイコンが見やすくなる |
| Prettier - Code formatter | コード自動整形 |
| Bracket Lens |
{ } ブラケットのヘッダーや閉じ部分をコメントで表示 |
| Better Comments |
TODO / ! Warning / ? Question / * Strong の色分け |
| indent-rainbow | インデントのカラー付け |
| Auto Rename Tag |
<body></body> タグなどの名前を自動変更 |
| Git Graph | Gitツリーの表示 |
| Trailing Spaces | 末尾のスペースを強調 |
| language-proto-webots | PROTO構文のハイライト |
| PlantUML | JSONやYAMLをUMLに可視化 |
| Draw.io Integration |
drawio.png などでUMLを編集 |
| Markdown All in One | Markdownの目次(TOC)を作成 |
| Material Icon Theme | フォルダやファイルのアイコン変更 |
| AsciiDoc | Asciidocのライブプレビューやシンタックスハイライト |
| Excel Viewer | ExcelやCSVファイルの表示 |
| Edit csv | CSVファイルの編集 |
| Marp for VS Code | スライド作成 |
| LaTeX Workshop (James Yu) | LaTeXのビルド |
| Hex Editor | バイナリ編集 |
| Markdown Preview Mermaid Support | Mermaidのプレビュー |
| ES7+ React/Redux/React-Native/JS snippets | React用スニペットを呼び出し |
- Arduino IDE 2.x.x
Youtube(Chayan Mistry): Install Arduino IDE 2.x.x on Linux (Ubuntu)を見ながら進めると、簡単にArduino IDE 2.x.xの使用ができる
How to install Arduino IDE 2.0 on Ubuntu 20.04の記事と同様の内容。
- Google Chome
Get Chrome for Linux から、Get Chrome for Linux > 64bit.deb (For Debian/Ubuntu) > Accept and installよりインストール
cd ~/Downloads
sudo apt install ./google-chrome-stable_current_amd64.deb
- Zoom
Zoom: Linux への Zoom のインストールまたは更新のターミナルの使用よりzoom_amd64.debをインストール後、以下を実行
sudo apt install ./zoom_amd64.deb
- Unity
Install the Unity Hub on Linuxを参考にする
wget -qO - https://hub.unity3d.com/linux/keys/public | gpg --dearmor | sudo tee /usr/share/keyrings/Unity_Technologies_ApS.gpg > /dev/null

sudo sh -c 'echo "deb [signed-by=/usr/share/keyrings/Unity_Technologies_ApS.gpg] https://hub.unity3d.com/linux/repos/deb stable main" > /etc/apt/sources.list.d/unityhub.list'

sudo apt update
sudo apt-get install unityhub
Unity Hub へログイン後、Install Ubuntu Editorよりインストール
Add new license から Get a free personal licenseなどライセンスの種類を選択
- 日本語文字
mozcをインストール後、再起動で英字/日本語入力が可能
sudo apt install ibus-mozc
- SimpleScreenRecorder
- ffmpeg
sudo apt install ffmpeg
- ssh
sudo apt install net-tools
- gnuplot
sudo apt install gnuplot
- git
sudo apt install git
-
docker
Ubuntu Docker Docs -
MeshLab
sudo apt install meshlab
- LaTeX
sudo apt-get update
sudo apt-get install texlive-latex-extra -y
sudo apt-get install latexmk
latex --version
設定系
- サーバ接続
フォルダからOther Locationsを選択し、Connect to Serverより以下を入力し接続する。
smb://192.168.xx.xx
ROS 関連
Humble
基本は公式通りだが、sudo apt upgradeを忘れずに実行する
sudo apt install -y python3-pip
PKG作成は以下コマンド
ros2 pkg create --build-type ament_cmake <pkg_name>
ros2 pkg create --build-type ament_python <pkg_name>
Gazebo 11
Install Gazebo using Ubuntu packagesよりインストール
curl -sSL http://get.gazebosim.org | sh
以下で起動する。
gazebo
Ignition Gazebo 6: Fortress
Github: ros_gzよりIgnition Gazeboをインストール
sudo sh -c 'echo "deb [arch=$(dpkg --print-architecture)] http://packages.ros.org/ros2/ubuntu $(lsb_release -cs) main" > /etc/apt/sources.list.d/ros2-latest.list'
curl -s https://raw.githubusercontent.com/ros/rosdistro/master/ros.asc | sudo apt-key add -
sudo apt-get update
sudo apt install ros-humble-ros-gz
以下で起動する。
ign gazebo
その他
- mkv ⇔ mp4の変換
ffmpeg -i video1.mkv -q:v 1 video1.mp4
- Ubuntu GUIが使えなくなり、CUIのみになった場合
sudo apt install --reinstall gdm3
- ファイルシステムが壊れたら
外付けHDDが認識しなくなったとき、内部のシステムが破損している可能性があった
sudo apt install ntfs-3g
- NVIDIA Driverのインストール
nvidia-smi
NVIDIA-SMI has failed because it couldn't communicate with the NVIDIA driver. Make sure that the latest NVIDIA driver is installed and running.
HDMIに反応しない / Setting > GraphicsがNVIDIA 対応になってないときは以下でも改善可能
セキュアブートはDisableであることを確認する
mokutil --sb-state
# SecureBoot disabled
sudo apt -y purge 'nvidia-*'
sudo apt -y autoremove
sudo apt -y update
sudo apt -y install nvidia-driver-580

sudo reboot
nvidia-smi
Ubuntu 22.04でcudaインストールしPyTorchとTensorFlowをGPUで動かす方法
- Bluetooth from Ubuntu PC
SONY WH-1003などはBluetooh接続初回はペアリングモードにする
- Hugo
gohugoio/hugoより、Linux OSの場合amd64.debをインストールする
cd ~/Downloads/ && wget https://github.com/gohugoio/hugo/releases/download/v0.120.3/hugo_0.120.3_linux-amd64.deb
sudo dpkg -i hugo_0.120.3_linux-amd64.deb

## or
sudo apt-get install hugo

hugo version
##  hugo v0.120.3-a4892a07b41b7b3f1f143140ee4ec0a9a5cf3970 linux/amd64 BuildDate=2023-11-01T17:57:00Z VendorInfo=gohugoio