雑なメモ
CMake
winにboost入れる
ubuntu ver
demashita
macからでもXQuartz入れてssh -Y xxxで見れた
これ発生した
以下でbuild成功
M1 MBA
Unity Editor 2021.3.24f1 silicon
NRSDK 1.7.0
※Unity Editor 2022はまだビルドできてない
AR Foundation simulator
M1 MBA
Unity Editor 2022.3.4f1 silicon
ARDK 2.5.2
niantic lightship、
のtutorialやると、以下でひっかかる。
空のgameobjectに Standalone Input Module入れると解決。
なお、Main CameraのClear FlagsをSolid Colorにするのを忘れずに。
カメラ
回転について
Application.logMessageReceivedでログ表示できる
後で読みたい
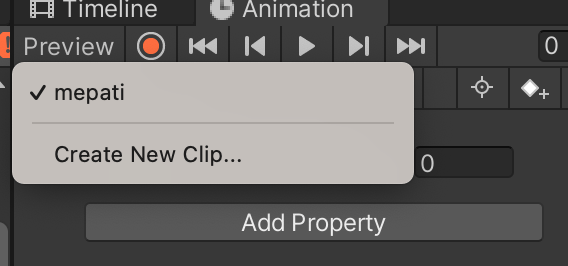
unity Animationのpreview、Timelineのpreviewと排他なので操作できないように見えた場合は注意
unityでAnimationの追加を行うUI
unity objインポート
unity カメラワーク
cinemachineのvirtual cameraはinspectorの"solo"指定でpreviewを切り替えられる
unityのpost process
unity視線制御
アンチエイリアス
エディタバージョンで設定方法変わりそう
シャドウ解像度
2022.3.10だと、Project Settings -> Quality -> Shadow -> Shadow Distanceが効いた
ソフトパーティクル
jetson nx用python image
URPサンプルでRecorder使ったらエディタが落ちた
M1 MBA
Unity Editor 2022.3.4f1 silicon
Recorder 4.0.1
-> RecorderClipのInputのOutput Resolutionを"Match WIndows Size"からFHDに変更したら回避できた
unity editorでホイール操作が遅い場合
「Hierarchy」の中から注視点にするオブジェクトを左ダブルクリックする。
freemocap、M1 MACだとPyQtのインストールでこける
Downloading PyQt6-6.6.0-cp37-abi3-macosx_10_14_universal2.whl (11.8 MB)
   ━━━━━━━━━━━━━━━━━━━━━╺━━━━━━━━━━━━━━━━━━ 6.3/11.8 MB 11.6 MB/s eta 0:00:01
ERROR: Exception:
VP-Estimation-with-Prior-Gravityのnotebook -> Pythonスクリプト
import os
import numpy as np
import cv2
import sys
import random

from vp_estimation_with_prior_gravity.features.line_detector import LineDetector
sys.path.append(os.path.join(os.path.dirname(os.path.abspath("")), "build/vp_estimation_with_prior_gravity"))
from vp_estimation_with_prior_gravity.solvers import run_hybrid_uncalibrated
from vp_estimation_with_prior_gravity.evaluation import project_vp_to_image, get_labels_from_vp
from vp_estimation_with_prior_gravity.visualization import plot_images, plot_vp, plot_lines, save_plot

img_path = "{your_path}"
out_path = "{your_path}"

SOLVER_FLAGS = [True, True, True, True, True]
th_pixels = 3  # RANSAC inlier threshold
ls_refinement = 2  # 3 uses the gravity in the LS refinement, 2 does not. Here we use a prior on the gravity, so use 2
nms = 1  # change to 3 to add a Ceres optimization after the non minimal solver (slower)
magsac_scoring = True
img = cv2.imread(img_path, 0)

vertical = np.array([0., 1, 0.])

# Intrinsics matrix obtained from the Yor Urban dataset
K = np.array([[674.91797516, 0., 306.55130528],
              [0., 674.91797516, 250.45424496],
              [0., 0., 1.]])


line_type = 'lsd'  # 'lsd' or 'deeplsd'  # 依存してないんかい!
line_detector = LineDetector(line_detector=line_type)
lines = line_detector.detect_lines(img)[:, :, [1, 0]]

principle_point = np.array([img.shape[1] / 2.0, img.shape[0] / 2.0])
f, vp = run_hybrid_uncalibrated(
    lines - principle_point[None, None, :],
    vertical, th_pixels=th_pixels, ls_refinement=ls_refinement,
    nms=nms, magsac_scoring=magsac_scoring, sprt=True, solver_flags=SOLVER_FLAGS)
vp[:, 1] *= -1

# Get the line-VP assignment
vp_labels = get_labels_from_vp(lines[:, :, [1, 0]], project_vp_to_image(vp, K), threshold=th_pixels)[0]

# Plot the results
plot_images([img, img])
plot_lines([lines, np.empty((0, 2, 2))])
plot_vp([np.empty((0, 2, 2)), lines], [[], vp_labels])
save_plot(out_path)
databricks pythonイメージのpythonパス、
/databricks/python3/bin/python3
fspyのblenderアドオンで回転行列を適用している箇所
# Set camera transform
        camera.matrix_world = mathutils.Matrix(camera_parameters.camera_transfrom)
blenderのtransformの定義
ceres-solver on m1mac
brew install ceres-solver
brew install cmake
cmake
cmake_minimum_required(VERSION 3.6)
set(CMAKE_CXX_STANDARD 20)
set(CMAKE_CXX_STANDARD_REQUIRED ON)
set(CMAKE_CXX_FLAGS "${CMAKE_CXX_FLAGS} -std=c++20")
project(Main)
add_executable(Main hello.cpp)

# https://qiita.com/mitsuruk9999/items/b8a4094f558a9c36e208
# sudo ln -s /opt/homebrew/include/eigen3/Eigen /opt/homebrew/include/Eigen
set(BREW_DIR "/opt/homebrew")
target_include_directories(${PROJECT_NAME} PRIVATE ${BREW_DIR}/include)
target_link_directories(${PROJECT_NAME} PRIVATE ${BREW_DIR}/lib)
exampleのソース
M1 Macでcolmap
brew install colmap
colmap gui
Dense reconstruction is only implemented on the GPU using CUDA.
とのこと。plyは出力されないっぽい。
kaggleデータダウンロード
!zip hoge.zip hoge
して右のペインからダウンロード
ファイルによってはmarkdownにして
<a href="./foo.zip"> Download File </a>
で取れる。
ubuntu colmap
To compile with CUDA support, also install Ubuntu’s default CUDA package:
sudo apt-get install -y \
    nvidia-cuda-toolkit \
    nvidia-cuda-toolkit-gcc
nvccのエラー
nvcc fatal : Unsupported gpu architecture 'compute_35'
おそらくここ
gemma2 cpu推論 1.2t/s
./llama-cli -m models/gemma-2-27b-it-Q4_K_M.gguf -p "ハルシネーションしないで[INST]ナスの美味しい食べ方[/INST]" -n 100 -c 10000
 -ngl 0
llama_print_timings:        load time =    4188.98 ms
llama_print_timings:      sample time =      12.99 ms /   100 runs   (    0.13 ms per token,  7700.60 tokens per second)
llama_print_timings: prompt eval time =   11835.79 ms /    17 tokens (  696.22 ms per token,     1.44 tokens per second)
llama_print_timings:        eval time =   82639.98 ms /    99 runs   (  834.75 ms per token,     1.20 tokens per second)
llama_print_timings:       total time =   94517.35 ms /   116 tokens
Log end
python3.12のminicondaイメージ上げた
whisper用のイメージ上げた