[React+TypeScript+VSCode]React公式チュートリアルをTypeScriptで作ってみた。
Abstract
React公式チュートリアル、いいって言うからやってやろうと初めたら、JavaScriptやんか!!
TypeScriptがくるって言うから、手を出したのに orz.
という訳で、勉強かねて、TypeScriptで作ってみた。
前提
- Ubuntuだよ。
- Chromeはインストールしててね。
- 開発環境は設定しててね。 Ubuntu22.04+VSCode+React+TypeScriptの開発環境を構築してみた。
- クラスオブジェクトは古臭いらしいから、関数コンポーネントで。
- React.FCは非推奨らしいから、使わない。
- フック(React Hook)よく分かんないので、厚めに説明する。
準備
1. まずプロジェクト生成
$ cd ~ && mkdir react-tutorial-l && cd react-tutorial-l # プロジェクトフォルダ作成
$ npx create-react-app ./ --template typescript         # Reactプロジェクト雛形生成
$ npm start # 一旦確認 -> ctrl+cで止める。
$ npm init -y                                           # EsLintの準備
$ npx eslint --init                                     # EsLintを設定
You can also run this command directly using 'npm init @eslint/config'.
✔ How would you like to use ESLint? · problems         # To check syntax and find problemsを選択
✔ What type of modules does your project use? · esm    # JavaScript modules(import/export)を選択
✔ Which framework does your project use? · react       # reactを選択
✔ Does your project use TypeScript? · No / Yes         # Yesを選択
✔ Where does your code run? · browser                  # browserを選択
✔ What format do you want your config file to be in? · JavaScript # JavaScriptを選択
✔ Would you like to install them now? · No / Yes       # Yesを選択
✔ Which package manager do you want to use? · npm      # npmを選択
$ npm install --save-dev --save-exact prettier          # prettierを設定
$ npm install --save-dev eslint-config-prettier         # eslint-config-prettier設定
2. eslint-config-prettier の設定ファイルを修正
    "extends": [
        "eslint:recommended",
        "plugin:react/recommended",
        "plugin:@typescript-eslint/recommended",
+       "prettier"
    ],
3. prettierの設定ファイル".prettierrc"を手で作成
$ vi .prettierrc
+{
+  semi : true,
+}
4. VSCodeで開く->設定
構成ファイルの新規作成
~/test-reactのフォルダをVSCodeで開く。

↓
実行 → 構成の追加
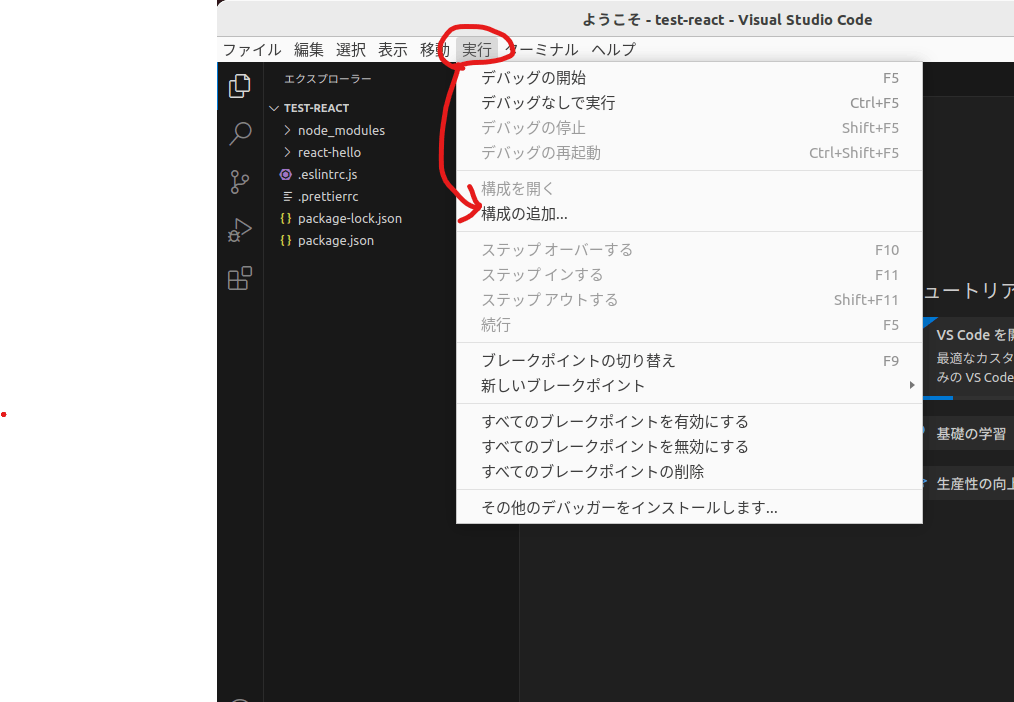
↓
Chromeを選択。
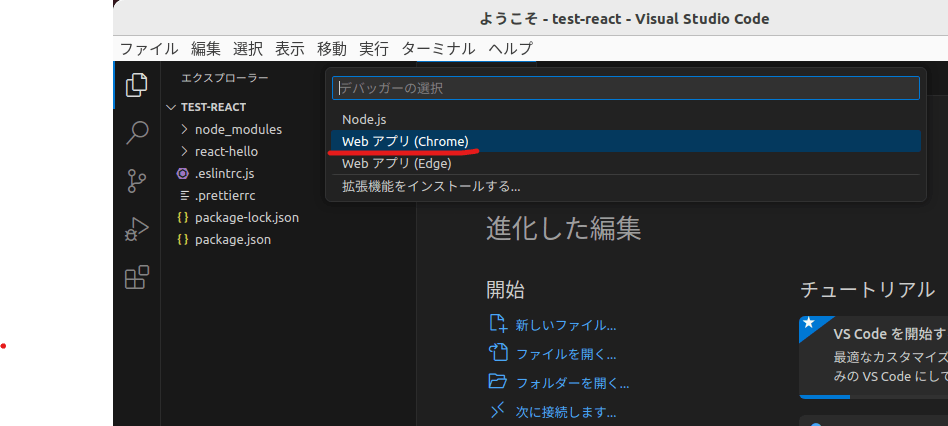
↓
launch.jsonが開く。

launch.jsonを修正
{
-   // IntelliSense を使用して利用可能な属性を学べます。
-   // 既存の属性の説明をホバーして表示します。
-   // 詳細情報は次を確認してください: https://go.microsoft.com/fwlink/?linkid=830387
    "version": "0.2.0",
    "configurations": [
        {
            "type": "chrome",
            "request": "launch",
            "name": "localhost に対して Chrome を起動する",
-           "url": "http://localhost:8080",
+           "url": "http://localhost:3000",
-           "webRoot": "${workspaceFolder}"
+           "webRoot": "${workspaceFolder}",
+           "sourceMaps": true,
+           "sourceMapPathOverrides": {
+               "webpack:///./*": "${webRoot}/src/*"
+           },
        }
    ]
}
5.prop-typesをインストール
TypeScriptでコーディングするとかなり早い段階で、パラメータチェックエラーに悩むと思われ。その時、インストールが必要になるので、もうこの段階でインストールしとく。
$ cd ~/react-tutorial-l
$ npm install --save-dev prop-types
6.ソースコードを削除しまくって、初期状態にする。
CreateReactAppの中身できるだけ消したい。
↑を参考に

7. App.tsxの不要コードを削除
import React from 'react';
- import logo from './logo.svg';
import './App.css';

function App() {
  return (
    <div className="App">
-     <header className="App-header">
-       <img src={logo} className="App-logo" alt="logo" />
-       <p>
-         Edit <code>src/App.tsx</code> and save to reload.
-       </p>
-       <a
-         className="App-link"
-         href="https://reactjs.org"
-         target="_blank"
-         rel="noopener noreferrer"
-       >
-         Learn React
-       </a>
-     </header>
+    Hello World!!
    </div>
  );
}
準備完了!!
さー、バリバリ作るぞー。
手順
さてと、React公式チュートリアルのソースコードを作成していくぞ。
1. まずはエントリポイントを探す。
勘違いしてたけど、App.tsxじゃなくて、どうもindex.tsxがエントリポイントらしい。
index.tsxは、変更する必要ないね。そのままで。(コメントは消すけど)
import React from 'react';
import ReactDOM from 'react-dom/client';
import './index.css';
import App from './App';
import reportWebVitals from './reportWebVitals';

const root = ReactDOM.createRoot(
  document.getElementById('root') as HTMLElement
);
root.render(
  <React.StrictMode>
    <App />
  </React.StrictMode>
);

- // If you want to start measuring performance in your app, pass a function
- // to log results (for example: reportWebVitals(console.log))
- // or send to an analytics endpoint. Learn more: https://bit.ly/CRA-vitals
reportWebVitals();
"<App />"ってところで、App.tsxを呼び出しているのか~。なるほど。
つまり、お作法として、"import App from './App';"でインポートして、"<App />"の形で使うのか。
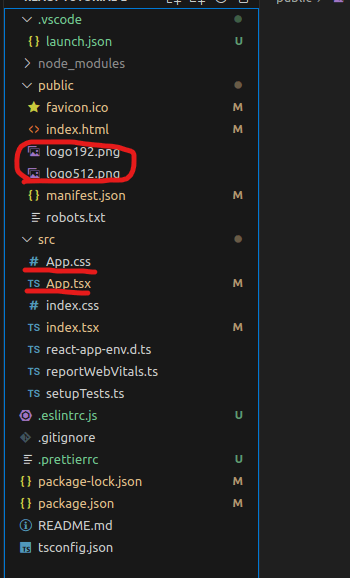
2. App.tsxと関連のコードを消す。
App.tsxがエントリポイントと勘違いしてて、要らないって分かったら消すわー。
ついでに、logo192.pngとlogo512.pngも消したる。
{
  "short_name": "React App",
  "name": "Create React App Sample",
  "icons": [
    {
      "src": "favicon.ico",
      "sizes": "64x64 32x32 24x24 16x16",
      "type": "image/x-icon"
+   }
-   },
-  {
-     "src": "logo192.png",
-     "type": "image/png",
-     "sizes": "192x192"
-   },
-   {
-     "src": "logo512.png",
-     "type": "image/png",
-     "sizes": "512x512"
-   }
  ],
  "start_url": ".",
  "display": "standalone",
  "theme_color": "#000000",
  "background_color": "#ffffff"
}
import React from 'react';
import ReactDOM from 'react-dom/client';
import './index.css';
-import App from './App';
import reportWebVitals from './reportWebVitals';

const root = ReactDOM.createRoot(
  document.getElementById('root') as HTMLElement
);
root.render(
  <React.StrictMode>
+    Hello World!!
-    <App />
  </React.StrictMode>
);

reportWebVitals();
ここで、npm start。ちゃんと動くのを確認する。
うん、ちゃんと動いてる。
3. Game.tsxを作る。
Game.tsxは、React公式チュートリアル(3目並べ)のトップコンポーネントらしい。
cd ~/react-tutorial-l && touch src/Game.tsx
const Game = () => {
    return (
        <div className="App">
            Hello World!!!
        </div>
    );
}

export default Game;
Game.tsxの呼び元、index.tsx。
import React from 'react';
import ReactDOM from 'react-dom/client';
import './index.css';
import Game from './Game';
import reportWebVitals from './reportWebVitals';

const root = ReactDOM.createRoot(
  document.getElementById('root') as HTMLElement
);
root.render(
  <React.StrictMode>
-   Hello World!!!
+   <Game />
  </React.StrictMode>
);

reportWebVitals();
で、npm start。Hello World!!!が表示される。
4. 型エイリアスを定義する。
type SquareState = 'O' | 'X' | null
↑これで、別名定義ができる。SquareStateは、"O","X",nullしか設定できない。便利~!
"型エイリアスをリテラル型として定義した。"と表現する。
憶えとこ。
import React from 'react';
+ type SquareState = 'O' | 'X' | null

const Game = () => {
+   const aaa: SquareState = 'O'

    return (
        <div className="App">
            Hello World!!!
+           <br/> { aaa }
        </div>
    );
}

export default Game;
5. Buttonコンポーネントを追加する。
ReactってデフォルトでButtonってないんだな。不便~。
なので、追加。
$ cd ~/react-tutorial-l
$ npm install react-bootstrap bootstrap
ソースに追加
import React from 'react';
+ import 'bootstrap/dist/css/bootstrap.min.css'
+ import Button from 'react-bootstrap/Button'

type SquareState = 'O' | 'X' | null

const Game = () => {
  const aaa: SquareState = 'O'

    return (
        <div className="App">
            Hello World!!!
-           <br/> { aaa }
+           <br/> { aaa } <br/>
+           <Button variant="primary">Primary</Button>{'aaaa'}
+           <Button variant="secondary">Secondary</Button>{'bbb'}
+           <Button variant="success">Success</Button>{'ccc'}
+           <Button variant="warning">Warning</Button>{'ddd'}
+           <Button variant="danger">Danger</Button>{'eee'}
+           <Button variant="info">Info</Button>{'fff'}
+           <Button variant="light">Light</Button>{'ggg'}
+           <Button variant="dark">Dark</Button>
+           <Button variant="link">Link</Button>
	</div>
    );
}

export default Game;
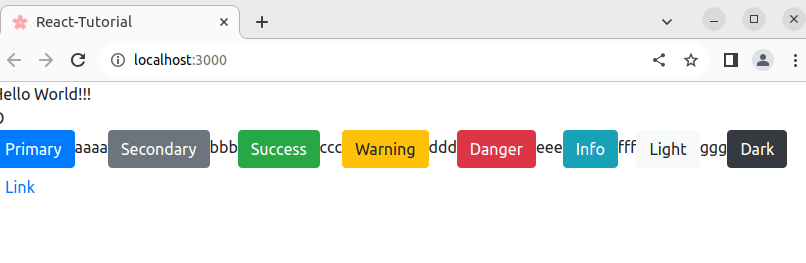
できた!!
6. React Hook(useState)を追加する。
ちょっとフックがよく分かんない。
どうも関数コンポーネントだと必要になる状態保持の仕組みらしい。
c/c++のstatic変数な感じ。確かにないと不便だな...
使い方は、ざっくりこんな感じ。
### 1.importする
import React, { useState } from 'react';
### 2.準備する。<number>を省略すると推論が働く。
const [count, setCount] = useState<number>(0);
### 3.使う
<h2>カウント: { count }</h2>
### 4.更新する。勝手に表示も更新される
<button onClick={() => setCount(count + 1)}>+</button>
2行目の
"const [count, setCount] = useState<number>(0);"
↑これが分かりにくかったんやけど、
どうもuseState()を呼ぶと、初期値とsetter関数を返してくれるらしい。
setter関数って自動で作ってくれるわけね~。なるほど~。理解した。
だから、4行目で、setCount()を使える訳ね。なるほど~。
"<button onClick={() => setCount(count + 1)}>+</button>"
理解した。完璧!!
理解したので、Game.tsxを修正する。
- import React from 'react';
+ import React, { useState } from 'react';
import Button from 'react-bootstrap/Button'
import 'bootstrap/dist/css/bootstrap.min.css'

type SquareState = 'O' | 'X' | null
+ type GameState = {
+     readonly stepNumber: number
+ }

const Game = () => {
    const aaa: SquareState = 'O'
+   const [state, setState] = useState<GameState>({
+       stepNumber: 0,
+   })

    return (
        <div className="App">
            Hello World!!!
            <br/> { aaa } <br/>
-           <Button variant="primary">Primary</Button>{ 'aaa' }
+           <Button variant="primary" onClick={ () => { setState( { stepNumber: state.stepNumber+1, }); alert('hello')} }>Primary</Button>{ state.stepNumber }
            <Button variant="secondary">Secondary</Button>{'bbb'}
            <Button variant="success">Success</Button>{'ccc'}
            <Button variant="warning">Warning</Button>{'ddd'}
            <Button variant="danger">Danger</Button>{'eee'}
            <Button variant="info">Info</Button>{'fff'}
            <Button variant="light">Light</Button>{'ggg'}
            <Button variant="dark">Dark</Button>
            <Button variant="link">Link</Button>
        </div>
    );
}

export default Game;
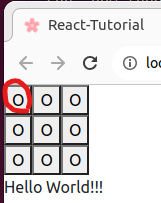
7. 3目並べの碁盤を表示。
表示させるだけ。
import React, { useState } from 'react';
import Button from 'react-bootstrap/Button'
import 'bootstrap/dist/css/bootstrap.min.css'

type SquareState = 'O' | 'X' | null
type GameState = {
    readonly stepNumber: number
}
+ type SquareProps = {
+     value: SquareState
+ }

+ const Square = (props: SquareProps) => (
+     <button className='square'>
+         {props.value}
+     </button>
+ )

+const Board = () => {
+   const renderSquare = (i: number) => (
+       <Square value={'O'} />
+   )

+   return (
+       <div>
+           <div className='board-row'>
+               {renderSquare(0)}
+               {renderSquare(1)}
+               {renderSquare(2)}
+           </div>
+           <div className='board-row'>
+               {renderSquare(3)}
+               {renderSquare(4)}
+               {renderSquare(5)}
+           </div>
+           <div className='board-row'>
+               {renderSquare(6)}
+               {renderSquare(7)}
+               {renderSquare(8)}
+           </div>
+       </div>
+   )
+}

const Game = () => {
    const aaa: SquareState = 'O'
    const [state, setState] = useState<GameState>({
        stepNumber: 0,
    })

    return (
        <div className="App">
+           <div className='game-board'>
+               <Board />
+           </div>
	    Hello World!!!
            <br/> { aaa } <br/>
            <Button variant="primary" onClick={ () => { setState( { stepNumber: state.stepNumber+1, }); alert('hello')} }>Primary</Button>{ state.stepNumber }
            <Button variant="secondary">Secondary</Button>{'bbb'}
            <Button variant="success">Success</Button>{'ccc'}
            <Button variant="warning">Warning</Button>{'ddd'}
            <Button variant="danger">Danger</Button>{'eee'}
            <Button variant="info">Info</Button>{'fff'}
            <Button variant="light">Light</Button>{'ggg'}
            <Button variant="dark">Dark</Button>
            <Button variant="link">Link</Button>
        </div>
    );
}

export default Game;
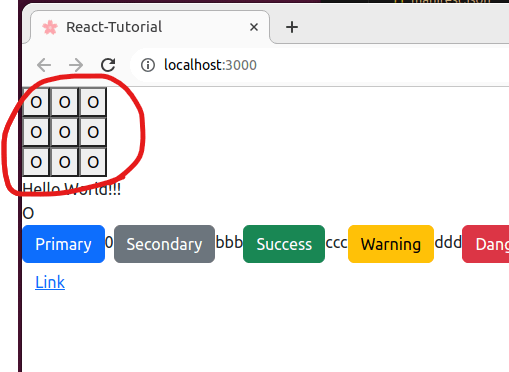
表示できた。
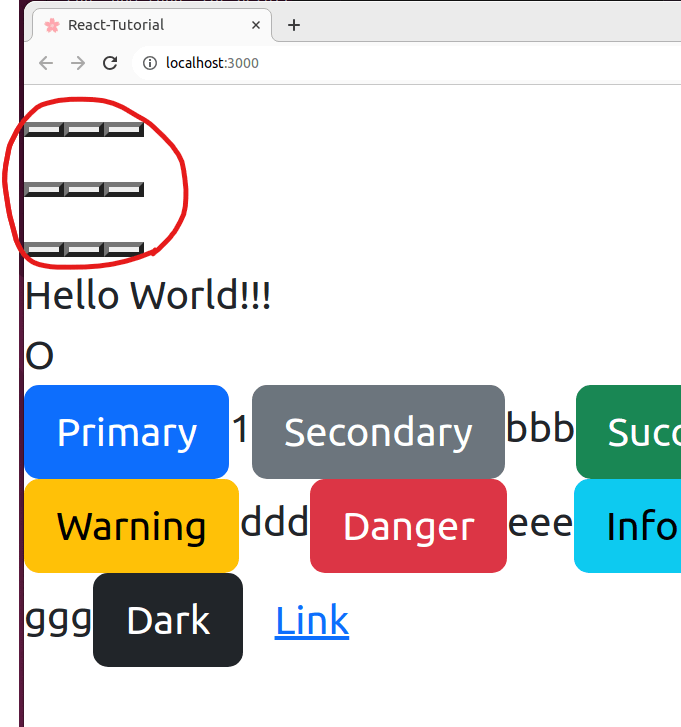
8. 碁盤の状態を保持する配列を追加。
各マス目の状態を一括で管理する配列を追加する。
$ cd ~/react-tutorial-l
$ npm install --save typescript-tuple
import React, { useState } from 'react';
import Button from 'react-bootstrap/Button'
import 'bootstrap/dist/css/bootstrap.min.css'
+ import { Repeat } from 'typescript-tuple'

type SquareState = 'O' | 'X' | null
type GameState = {
    readonly stepNumber: number
}
type SquareProps = {
    value: SquareState
}
+ type BoardState = Repeat<SquareState, 9>

~ 中略 ~

const Board = () => {
+   const aaa: BoardState = [null, null, null, null, null, null, null, null, null]
+   console.log(aaa)

~ 略 ~

}
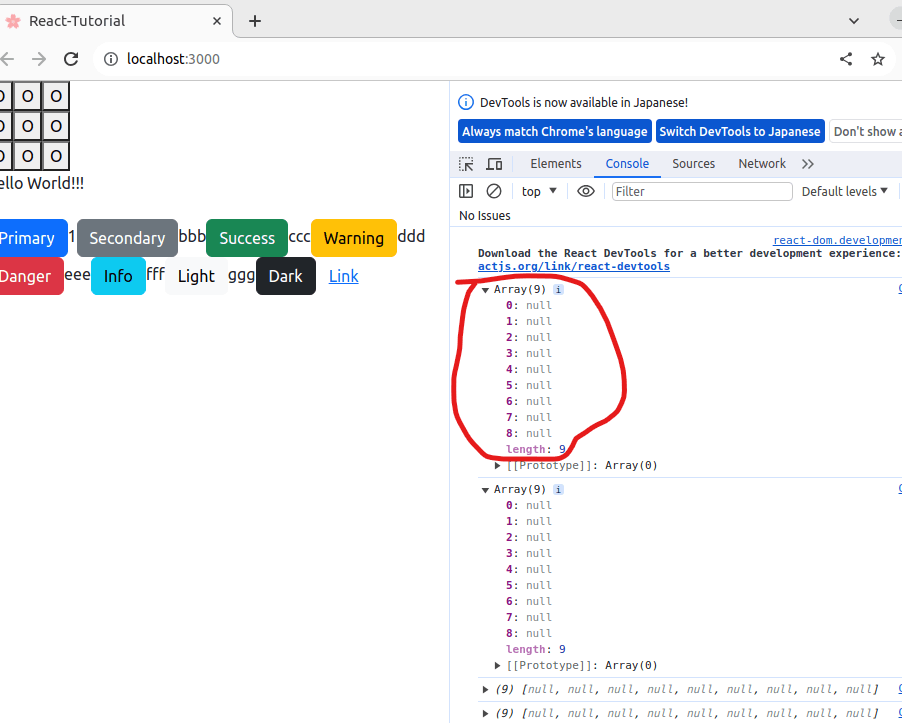
出来た!!
画面右のデバッグ用画面はF12を押せば出るから。
9. Board関数コンポーネントの引数に、碁盤の状態を保持する配列を追加。
"<Board squares={[null, null, null, null, null, null, null, null, null]} onClick={() => {console.log('aaa')} } />"
↑Board()に引数増やしたけん、呼び側でも、引数追加が必要なのは理解できるけど、バラして渡すのが気持ち悪い。
この渡し方で、受け側Board()では、{squares, onClick}として渡るらしい。なんだかなぁ。
~ 略 ~
type BoardState = Repeat<SquareState, 9>
+ type BoardProps = {
+     squares: BoardState
+     onClick: (i: number) => void
+ }

~ 略 ~

-const Board = () => {
+const Board = (props: BoardProps) => {
-  const aaa: BoardState = [null, null, null, null, null, null, null, null, null]
-  console.log(aaa)
~ 略 ~
}
const Game = () => {
~ 略 ~

    return (
        <div className="App">
            <div className='game-board'>
-               <Board />
+               <Board squares={[null, null, null, null, null, null, null, null, null]} onClick={() => {console.log('aaa')} } />
            </div>
~ 略 ~
        </div>
    );
}
10. 各マスの状態を保持する様に修正。
各マスって、赤丸ね。今は固定値で〇を表示してるだけだから。
~ 略 ~
type SquareProps = {
    value: SquareState
+   onClick: () => void
}
~ 略 ~
const Square = (props: SquareProps) => (
-   <button className='square'>
+   <button className='square' onClick={props.onClick}>
        {props.value}
    </button>
)

const Board = (props: BoardProps) => {
    const renderSquare = (i: number) => (
-       <Square value={'O'} />
+       <Square value={props.squares[i]} onClick={() => props.onClick(i)} />
    )
~ 略 ~
からっぼになちゃった。ひとまずこれでOK。
11. コード整理
- GameState型の宣言位置を移動したり...
- Square型の宣言位置を移動したり...
- 不要コード削除したり...
~ 略 ~
-type GameState = {
-   readonly stepNumber: number
-}
~ 略 ~
+type GameState = {
+   readonly stepNumber: number
+}
const Game = () => {
~ 略 ~
type SquareState = 'O' | 'X' | null
type SquareProps = {
    value: SquareState
    onClick: () => void
}
+const Square = (props: SquareProps) => (
+   <button className='square' onClick={props.onClick}>
+       {props.value}
+   </button>
+)
~ 略 ~
-const Square = (props: SquareProps) => (
-   <button className='square' onClick={props.onClick}>
-       {props.value}
-   </button>
-)
~ 略 ~
const Game = () => {
-   const aaa: SquareState = 'O'
~ 略 ~
-       <br/> { aaa } <br/>
~ 略 ~
12. 挿し順履歴機能を追加
下記の通り。
~ 略 ~
+type Step = {
+   readonly squares: BoardState
+   readonly xIsNext: boolean
+}
type GameState = {
+   readonly history: readonly Step[]
    readonly stepNumber: number
}
const Game = () => {
    const [state, setState] = useState<GameState>({
+       history: [{ squares: [null, null, null, null, null, null, null, null, null],
+               xIsNext: true,},],
        stepNumber: 0,
    })

+   const current = state.history[state.stepNumber]
+   const handleClick = (i: number) => {
+       if (current.squares[i]) {
+           return
+       }
+
+       const next: Step = (({ squares, xIsNext }) => {
+           const nextSquares = squares.slice() as BoardState
+           nextSquares[i] = xIsNext ? 'X' : 'O'
+           return {
+               squares: nextSquares,
+               xIsNext: !xIsNext,
+           }
+       })(current)
+
+       setState(({ history, stepNumber }) => {
+           const newHistory = history.slice(0, stepNumber + 1).concat(next)
+
+           return {
+               history: newHistory,
+               stepNumber: newHistory.length - 1,
+           }
+       })
+   }
~ 略 ~
    return (
        <div className="App">
            <div className='game-board'>
-               <Board squares={[null, null, null, null, null, null, null, null, null]} onClick={() => {console.log('aaa')} } />
+               <Board squares={current.squares} onClick={handleClick} />
            </div>
            Hello World!!!
-           <Button variant="primary" onClick={ () => { setState( { stepNumber: state.stepNumber+1, }); alert('hello')} }>Primary</Button>{ state.stepNumber }
            <Button variant="primary">Primary</Button>{ state.stepNumber }

できた。
この時点で、どこか押せば何かしら動くのが確認できる。
いろいろ歪んでるけど。
12. 勝ち負け判定処理を追加
下記の通り。
    const current = state.history[state.stepNumber]
+   const winner = calculateWinner(current.squares)
+   let status: string
+   if (winner) {
+       status = `Winner: ${winner}`
+   }
+   else {
+       status = `Next player: ${current.xIsNext ? 'X' : 'O'}`
+   }
    const handleClick = (i: number) => {
-       if (current.squares[i]) {
+       if (winner || current.squares[i]) {
~ 略 ~
    return (
        <div className="App">
            <div className='game-board'>
                <Board squares={current.squares} onClick={handleClick} />
            </div>
+           <div className='game-info'>
+               <div>{status}</div>
+           </div>
~ 略 ~
    );
}

+const calculateWinner = (squares: BoardState) => {
+   const lines = [
+       [0, 1, 2],
+       [3, 4, 5],
+       [6, 7, 8],
+       [0, 3, 6],
+       [1, 4, 7],
+       [2, 5, 8],
+       [0, 4, 8],
+       [2, 4, 6],
+   ]
+   for (let i = 0; i < lines.length; i++) {
+       const [a, b, c] = lines[i]
+       if (squares[a] &&
+           squares[a] === squares[b] &&
+           squares[a] === squares[c]) {
+           return squares[a]
+       }
+   }
+   return null
+}
Winnerが表示されるようになった!!

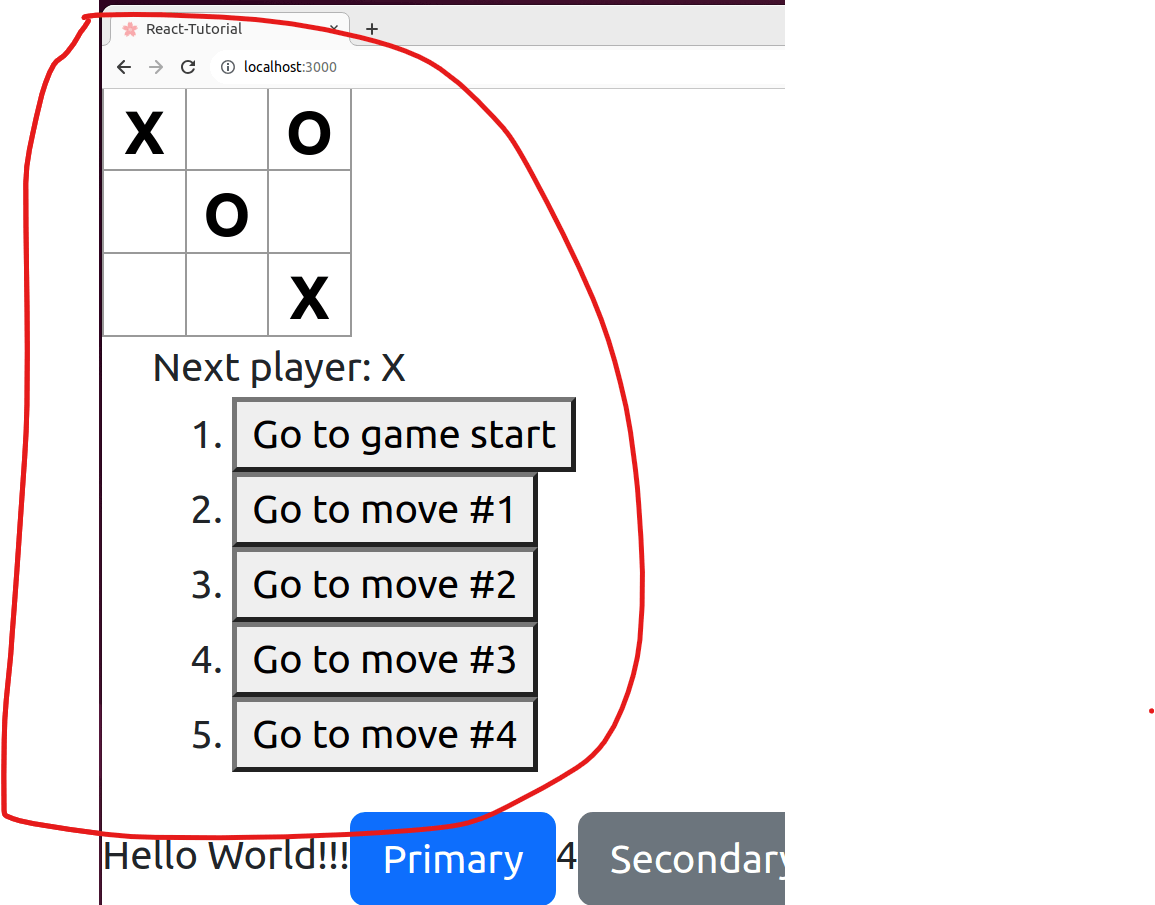
13. 挿し順履歴を表示する。
下記の通り。
~ 略 ~
    const handleClick = (i: number) => {
~ 略 ~
    }

+   const jumpTo = (move: number) => {
+       setState(prev => ({
+           ...prev,
+           stepNumber: move,
+       }))
+   }
+
+   const moves = state.history.map((step, move) => {
+       const desc = move > 0 ? `Go to move #${move}` : 'Go to game start'
+       return (
+           <li key={move}>
+               <button onClick={() => jumpTo(move)}>{desc}</button>
+           </li>
+       )
+   })
~ 略 ~
    return (
        <div className="App">
            <div className='game-board'>
                <Board squares={current.squares} onClick={handleClick} />
            </div>
            <div className='game-info'>
                <div>{status}</div>
+               <ol>{moves}</ol>
            </div>
~ 略 ~
    );
}

+const calculateWinner = (squares: BoardState) => {
+   const lines = [
+       [0, 1, 2],
+       [3, 4, 5],
+       [6, 7, 8],
+       [0, 3, 6],
+       [1, 4, 7],
+       [2, 5, 8],
+       [0, 4, 8],
+       [2, 4, 6],
+   ]
+   for (let i = 0; i < lines.length; i++) {
+       const [a, b, c] = lines[i]
+       if (squares[a] &&
+           squares[a] === squares[b] &&
+           squares[a] === squares[c]) {
+           return squares[a]
+       }
+   }
+   return null
+}
出来た!!
見栄えが残念だから、最後にそれを修正する。
14. index.cssを修正。
body {
  font: 14px 'Century Gothic', Futura, sans-serif;
  margin: 20px;
}

ol,
ul {
  padding-left: 30px;
}

.board-row:after {
  clear: both;
  content: '';
  display: table;
}

.status {
  margin-bottom: 10px;
}

.square {
  background: #fff;
  border: 1px solid #999;
  float: left;
  font-size: 24px;
  font-weight: bold;
  line-height: 34px;
  height: 34px;
  margin-right: -1px;
  margin-top: -1px;
  padding: 0;
  text-align: center;
  width: 34px;
}

.square:focus {
  outline: none;
}

.kbd-navigation .square:focus {
  background: #ddd;
}

.game {
  display: flex;
  flex-direction: row;
}

.game-info {
  margin-left: 20px;
}
出来た!!
画面下のHelloworld!!!とか消すのは、適当に。
下記コードを参考にしてます。
Discussion