市街地画像の超解像度化モデルベースライン


概要
こちらはSolafuneで開催されている 「市街地画像の超解像化 #MScup」 というコンペティションのベースラインです。本記事で紹介するものはPublic Score 0.790程のベースラインとなります。コンテストの詳細についてはウェブページを参照ください。

超解像度化イメージ図

⚠️
cf. @solafune(https://solafune.com)
コンテストの参加以外を目的とした利用及び商用利用は禁止されています。
商用利用・その他当コンテスト以外で利用したい場合はお問い合わせください。(https://solafune.com)
アルゴリズムについて
今回使用するアルゴリズムはESPCNというアルゴリズムです。このアルゴリズムを説明するために、まず始めに単一画像超解像における深層学習の利用について簡単に説明します。
SRCNN
このアルゴリズムは名前の通り、超解像タスクにCNNを適用したアルゴリズムになります。これは低解像度の画像を高解像度の画像と同じサイズまでリサイズし、3~5層のCNNを通すことで解像度を上げるアルゴリズムです。
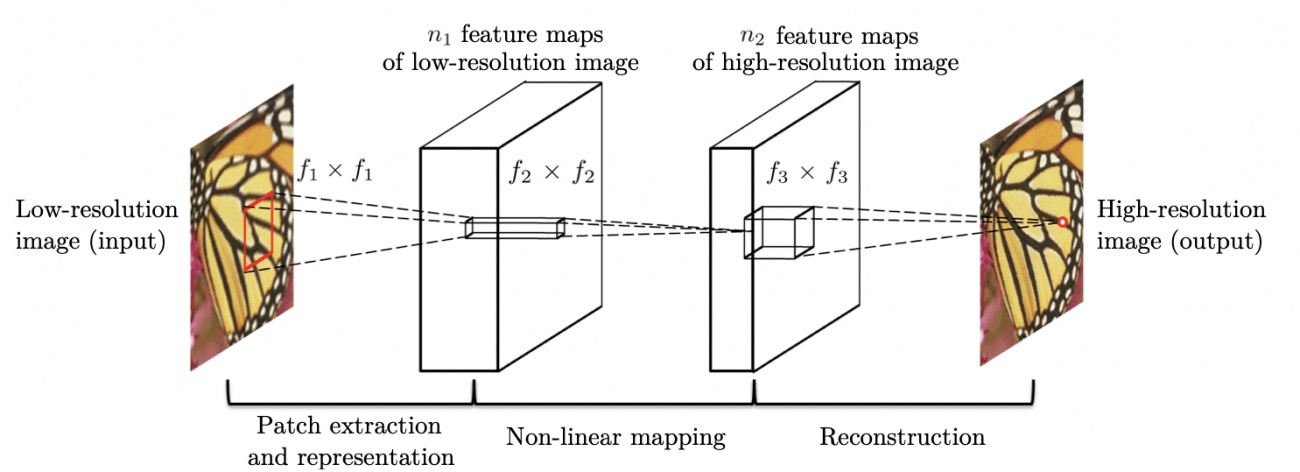
source:https://arxiv.org/pdf/1501.00092.pdf
FSRCNN
このアルゴリズムは前述のSRCNNの開発者が考案したものであり、SRCNNを高速化する目的で開発されました。SRCNNでは事前に低解像度の画像をリサイズしていましたが、この部分が速度のネックになっていました。そのためFSRCNNでは最初にリサイズする代わりに、ネットワークの最後の層にDeconvolutionすることで解像度を上げています。
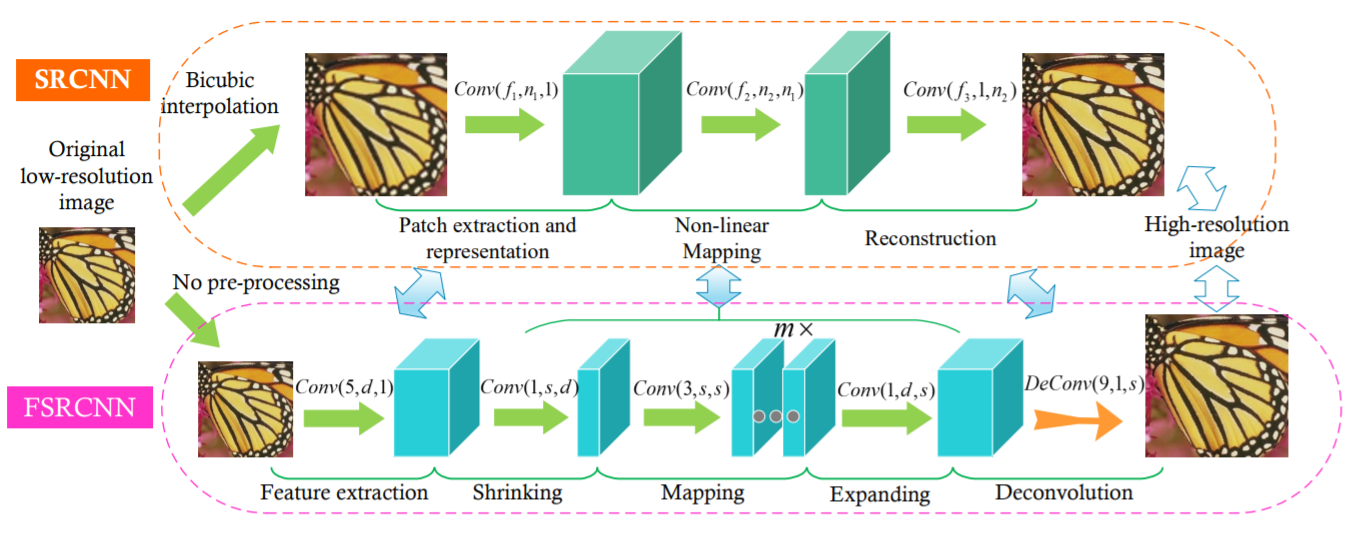
source:https://arxiv.org/pdf/1608.00367.pdf
ESPCN
前述のFSRCNNでは解像度を上げる際にDeconvolutionを利用していましたが、生成された画像を見ると斑点状の模様が出てきてしまいます。これを改善するためにESPCNではDeconvolutionの代わりにSub-Pixel Convolution(Pixel Shuffle)というアルゴリズムを利用しています。
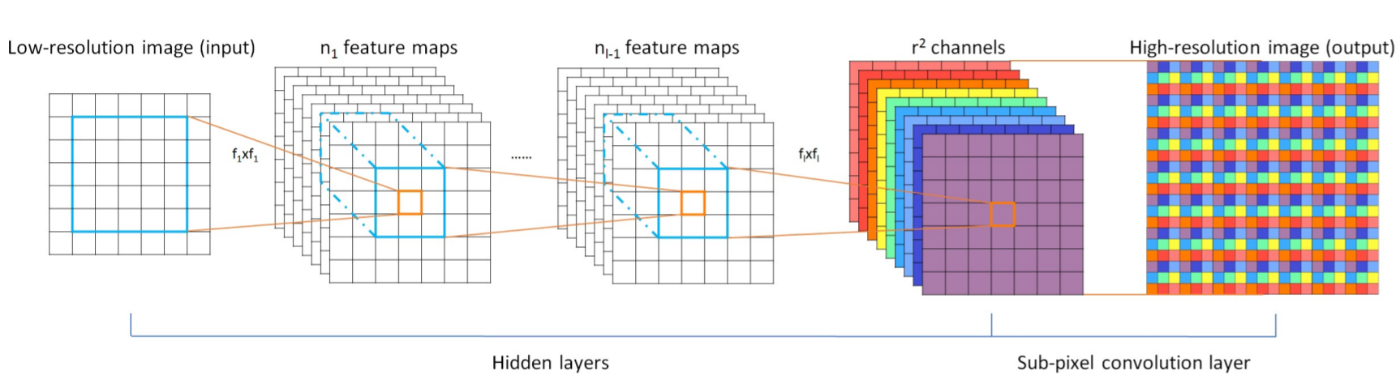
source:https://arxiv.org/pdf/1609.05158.pdf
このSub-Pixel Convolutionですが、後に開発されるSRResnetなどのアルゴリズムに採用されるなど、後のアルゴリズム開発に大きな影響を及ぼしています。
ベースライン
ライセンス
掲載したプログラムはApache License 2.0です。
参考にしたESPCNも Apache License 2.0で公開されています。
Copyright 2021 @Solafune

Licensed under the Apache License, Version 2.0 (the "License");
you may not use this file except in compliance with the License.
You may obtain a copy of the License at

http://www.apache.org/licenses/LICENSE-2.0

Unless required by applicable law or agreed to in writing, software
distributed under the License is distributed on an "AS IS" BASIS,
WITHOUT WARRANTIES OR CONDITIONS OF ANY KIND, either express or implied.
See the License for the specific language governing permissions and
limitations under the License.
ディレクトリ構成
┣━ train
┃  ┗━ train_*.tif
┣━ evaluation
┃  ┗━ evaluation_*.tif
┣━ output
┃  ┗━ test_*.tif
┗━ ESPCN_sample.py
開発環境
- PCスペック
- CPU: Intel Core i5-6500
- RAM: 8GB
- GPU: Geforce GTX 1070
- 開発環境
- Dockerによって環境構築を行いました。Dockerfileは以下の通りです。
FROM tensorflow/tensorflow:latest-gpu
RUN pip install Pillow
- Google Colabratryでも動作確認しています。この場合は、ファイルのパスやGoogle Driveのマウントなどのコードを変更・追加する必要があります。
コード説明
libraries
必要なライブラリ群をImportします。
import os

os.environ["TF_FORCE_GPU_ALLOW_GROWTH"]= "true"

import tensorflow as tf
import tensorflow.keras.layers as kl
from tensorflow.python.keras import backend as K
import numpy as np
from PIL import Image
model
今回使用するESPCNのモデルを定義します。
ESPCNではPixel Shuffleを用いてアップサンプリングを行いますが、Tensorflowには標準で搭載されていないため、自前で実装する必要があります。
# ESPCN
class ESPCN(tf.keras.Model):
    def __init__(self, input_shapes):
        super().__init__()

        self.input_shape_lm = ( None, input_shapes[0], input_shapes[1], 3)
        self.upsampling_scale = 4

        self.conv_0 = kl.Conv2D(64, 5, padding="same", activation="relu", input_shape=self.input_shape_lm)
        self.conv_1 = kl.Conv2D(32, 3, padding="same", activation="relu")
        self.pixel_shuffle = Pixel_shuffler(self.upsampling_scale, input_shapes)

    def call(self, x):
        conv2d_0 = self.conv_0(x)
        conv2d_1 = self.conv_1(conv2d_0)
        model = self.pixel_shuffle(conv2d_1)
        return model


# Pixel Shuffle
class Pixel_shuffler(tf.keras.Model):
    def __init__(self, upscale, input_shape):
        super().__init__()

				self.upscale = upscale
        self.conv = kl.Conv2D(self.upscale**2 * 3, kernel_size=3, padding="same")
        self.act = kl.Activation(tf.nn.relu)

    # forward proc
    def call(self, x):

        d1 = self.conv(x)
        d2 = self.act(tf.nn.depth_to_space(d1, self.upscale))

        return d2
学習
学習を行う部分です。
OptimizerにはAdamを使用し、損失関数にはMSEを使用しています。
# 学習
class trainer(object):
    def __init__(self, lr_shape, trained_model=""):
        self.model = ESPCN  ( lr_shape)
        self.model.compile(optimizer=tf.keras.optimizers.Adam(),
                  loss=tf.keras.losses.MeanSquaredError(),
                  metrics=[self.ssim])

        if trained_model != "":
          self.model.load_weights(trained_model)

    def train(self, lr_imgs, hr_imgs, out_path, batch_size, epochs):

        cp_callback = tf.keras.callbacks.ModelCheckpoint(out_path,
                                                 save_weights_only=True,
                                                 verbose=10)
        # 学習
        his = self.model.fit(lr_imgs, hr_imgs, batch_size=batch_size, epochs=epochs, callbacks=[cp_callback])

        print("___Training finished\n\n")

        # パラメータ保存
        print("___Saving parameter...")
        self.model.save_weights(out_path)
        print("___Successfully completed\n\n")

        return his, self.model

    # SSIM
    def ssim(self, h3, hr_imgs):
        return tf.image.ssim( h3, hr_imgs, max_val=1.0)
データ読み込み
画像データを読み込みます。
読み込んだデータは学習のため、正規化しています。
またデータのかさ増しのため、上下左右を反転した画像も生成し教師データとします。
# Dataset creation
def create_dataset():

    print("\n___Creating a dataset...")
    prc = ['/', '-', '\\', '|']
    cnt = 0
    training_data =[]

    for i in range(60):
        d = "./train/"

        # High-resolution image
        img = Image.open(d+"train_{}_high.tif".format(i))
        flip_img = np.array(ImageOps.flip(img))
        mirror_img = np.array(ImageOps.mirror(img))
        img = np.array(img)
        img = (tf.convert_to_tensor(img, np.float32)) / 255.0
        flip_img = (tf.convert_to_tensor(flip_img, np.float32)) / 255.0
        mirror_img = (tf.convert_to_tensor( mirror_img, np.float32)) / 255.0

        # Low-resolution image
        low_img = Image.open(d+"train_{}_low.tif".format(i))
        low_flip_img = np.array(ImageOps.flip(low_img))
        low_mirror_img = np.array(ImageOps.mirror(low_img))
        low_img = np.array( low_img)
        low_img = (tf.convert_to_tensor( low_img, np.float32)) / 255.0
        low_flip_img = (tf.convert_to_tensor(   low_flip_img, np.float32)) / 255.0
        low_mirror_img = (tf.convert_to_tensor( low_mirror_img, np.float32)) / 255.0

        training_data.append([img,low_img])
        training_data.append([flip_img,low_flip_img])
        training_data.append([mirror_img,low_mirror_img])

        cnt += 1

        print("\rLoading a LR-images and HR-images...{}    ({} / {})".format(prc[cnt%4], cnt, 60), end='')

    print("\rLoading a LR-images and HR-images...Done    ({} / {})".format(cnt, 60), end='')
    print("\n___Successfully completed\n")

    random.shuffle(training_data)
    lr_imgs = []
    hr_imgs = []

    for hr, lr in training_data:
      lr_imgs.append(lr)
      hr_imgs.append(hr)

    return np.array(lr_imgs), np.array(hr_imgs)
実行
以上で定義した関数・クラスを使い,実際に学習を行います.
今回はバッチ数を15、Epoc数を1400回としています。バッチ数に関しては、環境によっては変更する必要があります。
# データセットの読み込み
lr_imgs, hr_imgs = create_dataset()

print("___Start training...")
Trainer = trainer(lr_imgs[0].shape)
his, model = Trainer.train(lr_imgs, hr_imgs, out_path="espcn_model_weight" , batch_size=15, epochs=1400)
推論
上記で学習したモデルを使って推論を行います。
推論に使う画像はデータ読み込み時と同様に正規化しています。
同様に推論結果の画像も正規化されているので、元画像と同じフォーマットになるように調整しています。
for i in range(40):
    d = "./evaluation/"

    # Low-resolution image
    img = np.array(Image.open(d+"test_{}_low.tif".format(i)))
    img = (tf.convert_to_tensor( img, np.float32)) / 255.0
    img = img[np.newaxis, :, :, :]

    re = model.predict(img)
    re = np.reshape(re, (1200, 1500, 3))
    re = re * 255.0
    re = np.clip(re, 0.0, 255.0)
    sr_img = Image.fromarray(np.uint8(re))

    sr_img.save("./output/test_{}_answer.tif".format(i))
    print("Saved ./output/test_{}_answer.tif".format(i))
まとめ
今回のベースラインではESPCNというアルゴリズムを用いて超解像技術を試しました。
環境によって、学習には数時間~1日ほどかかりました。
本コンテストで使用される高解像度の画像サイズが大きめなこともあり、ネットワークを構築するのに大きなメモリが必要で試せていないアルゴリズムも多数あります。
また、損失関数・最適化手法・学習係数などの部分は変更することで改善の余地があるかもしれません。
是非こちらのベースラインを参考にコンテストに参加してみてください。
参加はこちらから→ 「市街地画像の超解像化 #MScup」
Discussion