

はじめに
請求や見積管理を簡単にシステム化できるツールを探していて、BillVektorに辿り着きました。
請求書や見積書をwordpressの「投稿」単位で管理できて、PDF化もできるので
現在チームの契約管理ツールとして利用しています。
デフォルトの機能では請求書と見積書の作成は可能ですが、
発注書の機能がなかったので、それを今回追加してみます。
BillVektorとは
請求書管理をWordPressのテーマとして実装したオープンソースの請求書管理システムです。
請求データをMFクラウド会計やfreeeに一括インポートも可能です。
「発注機能」追加
仕様
今回は見積書と全く同じテンプレート(カスタムフィールド)で発注書を作成します。
ベースの親テーマは「Release 1.11.3」を利用します。
子テーマをDL
公式から子テーマを取得してきます。
以下から直接取得も可能です。
取得したらzipファイルを解凍します。
オーバライドのために親テーマからファイルを流用するので親テーマも
同じようにダウンロードして解凍しておきましょう
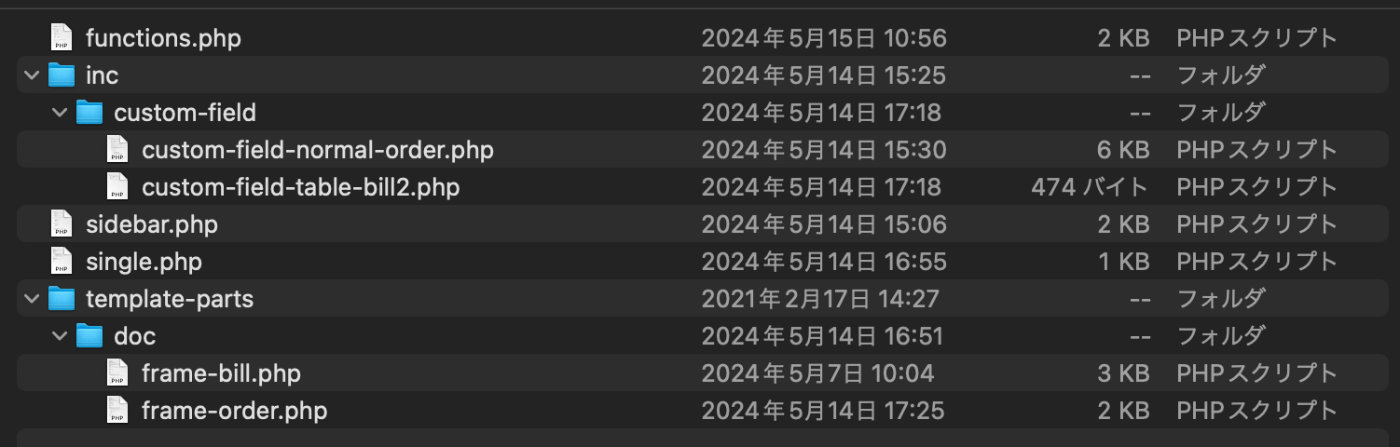
ディレクトリ構成
子テーマの改修後は以下のような構成になります。
ソースコード修正(root階層)
function.php(子テーマ内ファイル修正)
メインのfunctionファイルに発注書を管理するためのwordpress「投稿」枠を追加します。
また、新規作成するファイルのrequireを指定します。
<?php

add_filter( 'item_price_print_digits', 'item_price_print_digits_change' );
function item_price_print_digits_change( $digits ) {
	// 小数点以下の桁数
	$digits = 0;
	return $digits;
}

/*
-------------------------------------------
  Add Post Type Order
  -------------------------------------------
  */
add_action( 'init', 'bill_add_post_type_order', 0 );
function bill_add_post_type_order() {
	register_post_type(
	'order',
	array(
	'labels'             => array(
	'name'         => '発注書',
	'edit_item'    => '発注書の編集',
	'add_new_item' => '発注書の作成',
	),
	'public'             => true,
	'publicly_queryable' => true,
	'show_ui'            => true,
	'show_in_menu'       => true,
	'has_archive'        => true,
	'supports'           => array( 'title' ),
	'menu_icon'          => 'dashicons-media-spreadsheet',
	'menu_position'      => 5,
	)
	);
	register_taxonomy(
	'order-cat',
	'order',
	array(
	'hierarchical'          => true,
	'update_count_callback' => '_update_post_term_count',
	'label'                 => '発注書カテゴリー',
	'singular_label'        => '発注書カテゴリー',
	'public'                => true,
	'show_ui'               => true,
	)
	);
}

require_once dirname( __FILE__ ) . '/inc/custom-field/custom-field-normal-order.php';
require_once dirname( __FILE__ ) . '/inc/custom-field/custom-field-table-bill2.php';
sidebar.php(親テーマのファイルをコピーして修正)
wordpressの管理画面のサイドバーに発注書の「投稿」枠が表示されるように追加します。
※見積書と請求書も記載していますがもとのままオーバライドしているだけなので気にしなくてOKです。
<!-- [ #sub ] -->
<div id="sub" class="col-md-3">

  <nav class="sub-section section">
	<h3 class="sub-section-title"><a href="<?php echo get_post_type_archive_link( 'order' ); ?>">発注書</a></h3>

	<?php
	$args         = array(
	'title_li'         => '',
	'taxonomy'         => 'order-cat',
	'echo'             => 0,
	'show_option_none' => '',
	);
	$estimate_cat = wp_list_categories( $args );
	if ( $estimate_cat ) {
		echo '<ul>';
		echo $order_cat;
		echo '</ul>';
	}
	?>

  <h3 class="sub-section-title"><a href="<?php echo get_post_type_archive_link( 'estimate' ); ?>">見積書</a></h3>

	<?php
	$args         = array(
		'title_li'         => '',
		'taxonomy'         => 'estimate-cat',
		'echo'             => 0,
		'show_option_none' => '',
	);
	$estimate_cat = wp_list_categories( $args );
	if ( $estimate_cat ) {
		echo '<ul>';
		echo $estimate_cat;
		echo '</ul>';
	}
	?>

  <h3 class="sub-section-title"><a href="<?php echo home_url( '/?post_type=post' ); ?>">請求書<i class="fa fa-angle-right" aria-hidden="true"></i></a></h3>

	<?php
	$args     = array(
		'title_li'         => '',
		'echo'             => 0,
		'show_option_none' => '',
	);
	$category = wp_list_categories( $args );
	if ( $category ) {
		echo '<ul>';
		echo $category;
		echo '</ul>';
	}
	?>

  </nav>

<?php
// ウィジェットエリアid 'sidebar-widget-area' にウィジェットアイテムが何かセットされていた時
if ( is_active_sidebar( 'sidebar-widget-area' ) ) {
	// sidebar-widget-area に入っているウィジェットアイテムを表示する
	dynamic_sidebar( 'sidebar-widget-area' );
}
?>
</div>
<!-- [ /#sub ] -->
single.php(親テーマのファイルをコピーして修正)
PDF表示用のディスパッチケースに「get_template_part( 'template-parts/doc/frame-order' );」を追加して、発注書のPDFテンプレートを出力可能にします。
<!DOCTYPE html>
<html lang="ja">
<head>
  <meta charset="utf-8">
  <meta http-equiv="X-UA-Compatible" content="IE=edge">
  <meta name="viewport" content="width=device-width, initial-scale=1">
  <?php wp_head(); ?>
</head>
<body <?php body_class(); ?>>
<?php if ( have_posts() ) { ?>
<?php
while ( have_posts() ) :
	the_post();
?>
<?php
$doc_change = false;
add_filter( 'bill-vektor-doc-change', $doc_change );
if ( ! $doc_change ) {
	if ( get_post_type() == 'post' ) {
		get_template_part( 'template-parts/doc/frame-bill' );
	} elseif ( get_post_type() == 'estimate' ) {
		get_template_part( 'template-parts/doc/frame-estimate' );
	} elseif ( get_post_type() == 'client' ) {
		get_template_part( 'template-parts/doc/frame-client' );
	} elseif ( get_post_type() == 'order' ) {
		get_template_part( 'template-parts/doc/frame-order' );
	}
}
do_action( 'bill-vektor-doc-frame' );
?>
<?php endwhile; ?>
<?php } ?>

<div class="bill-no-print">
<div class="container">
<p>このエリアは印刷されません。</p>
<div class="row">
<?php get_template_part( 'template-parts/breadcrumb' ); ?>
</div>
</div>
</div>

<?php wp_footer(); ?>
</body>
</html>
ソースコード修正(template-parts/doc階層)
PDF表示用のテンプレートファイルです。
frame-order.php(新規作成)
発注書の表示テンプレートを作成します。
<div class="bill-wrap">
<div class="container">
<div class="row">
<div class="col-xs-6">
<h1 class="bill-title">発注書</h1>
<h2 class="bill-destination">
<span class="bill-destination-client">
<?php echo esc_html( bill_get_client_name( $post ) ); ?>
</span>
<span class="bill-destination-honorific">
<?php echo esc_html( bill_get_client_honorific( $post ) ); ?>
</span>
</h2>

<p class="bill-message">
下記のとおり、発注致します。<br>
何卒よろしくお願い申し上げます。</p>

<dl class="bill-estimate-title">
<dt class="text-nowrap">件名</dt>
<dd><?php the_title(); ?></dd>
</dl>
</div><!-- [ /.col-xs-6 ] -->

<div class="col-xs-5 col-xs-offset-1">
<table class="bill-info-table">
<tr>
<th>発行日</th>
<td><?php the_date(); ?></td>
</tr>
</table>

<div class="bill-address-own">
<?php $options = get_option( 'bill-setting', Bill_Admin::options_default() ); ?>
<h4><?php echo nl2br( esc_textarea( $options['own-name'] ) ); ?></h4>
<div class="bill-address"><?php echo nl2br( esc_textarea( $options['own-address'] ) ); ?></div>
<?php
if ( isset( $options['own-seal'] ) && $options['own-seal'] ) {
	$attr = array(
		'id'    => 'bill-seal',
		'class' => 'bill-seal',
		'alt'   => trim( strip_tags( get_post_meta( $options['own-seal'], '_wp_attachment_image_alt', true ) ) ),
	);
	echo wp_get_attachment_image( $options['own-seal'], 'medium', false, $attr );
}
if ( ! empty( $options['invoice-number'] ) ){
	echo '登録番号:' . nl2br( esc_textarea( $options['invoice-number'] ) );
}
?>
</div><!-- [ /.address-own ] -->
</div><!-- [ /.col-xs-5 col-xs-offset-1 ] -->
</div><!-- [ /.row ] -->
</div><!-- [ /.container ] -->


<div class="container">

<?php get_template_part( 'template-parts/doc/table-price' ); ?>

<dl class="bill-remarks">
<dt>備考</dt>
<dd>
<?php
if ( $post->bill_remarks ) {
	// 請求書個別の備考
	echo apply_filters( 'the_content', $post->bill_remarks );
} else {
	// 共通の備考
	if ( isset( $options['remarks-estimate'] ) ) {
		echo apply_filters( 'the_content', $options['remarks-estimate'] );
	}
}
?>
</dd>
</dl>
</div><!-- [ /.container ] -->
</div><!-- [ /.bill-wrap ] -->
ソースコード修正(inc/custom-field階層)
発注書入力欄のカスタムフィールド定義です。
custom-field-normal-order.php (新規作成)
「品目」以外のカスタムフィールドを定義・作成します。
今回は見積書のテンプレートと同じカスタムフィールド内容で発注書を作成していますが、
変更したい場合はこのファイルで定義します。
<?php
/*
* 発注書のカスタムフィールド(品目以外)
*/

class Order_Normal_Custom_Fields {
	public static function init() {
		add_action( 'admin_menu', array( __CLASS__, 'add_metabox' ), 10, 2 );
		add_action( 'save_post', array( __CLASS__, 'save_custom_fields' ), 10, 2 );
	}

	// add meta_box
	public static function add_metabox() {

		$id            = 'meta_box_bill_normal';
		$title         = __( '発注書項目', '' );
		$callback      = array( __CLASS__, 'fields_form' );
		$screen        = 'order';
		$context       = 'advanced';
		$priority      = 'high';
		$callback_args = '';

		add_meta_box( $id, $title, $callback, $screen, $context, $priority, $callback_args );

	}

	public static function fields_form() {
		global $post;

		$custom_fields_array = Order_Normal_Custom_Fields::custom_fields_array();
		$befor_custom_fields = '';
		VK_Custom_Field_Builder::form_table( $custom_fields_array, $befor_custom_fields );
	}

	public static function save_custom_fields() {
		$custom_fields_array = Order_Normal_Custom_Fields::custom_fields_array();
		// $custom_fields_array_no_cf_builder = arra();
		// $custom_fields_all_array = array_merge(  $custom_fields_array, $custom_fields_array_no_cf_builder );
		VK_Custom_Field_Builder::save_cf_value( $custom_fields_array );
	}

	public static function custom_fields_array() {

		$args = array(
			'post_type'      => 'client',
			'posts_per_page' => -1,
			'order'          => 'ASC',
			'orderby'        => 'title',
		);

		$client_posts = get_posts( $args );
		if ( $client_posts ) {
			$client = array( '' => '選択してください' );
			foreach ( $client_posts as $key => $post ) {
				// プルダウンに表示するかしないかの情報を取得
				$client_hidden = get_post_meta( $post->ID, 'client_hidden', true );
				// プルダウン非表示にチェックが入っていない項目だけ出力
				if ( ! $client_hidden ) {
						$client[ $post->ID ] = $post->post_title;
				}
			}
		} else {
			$client = array( '0' => '請求先が登録されていません' );
		}

		$custom_fields_array = array(
			'bill_client_name_manual'     => array(
				'label'       => __( '取引先(イレギュラー)', 'bill-vektor' ),
				'type'        => 'text',
				'description' => '複数回依頼の見込みのない取引先の場合はこちらに入力してください。<br>取引の多い取引先の場合は<a href="' . admin_url( '/post-new.php?post_type=client' ) . '" target="_blank">予め登録</a>すると便利です。',
				'required'    => false,
			),
			'bill_client'     => array(
				'label'       => __( '取引先(登録済)', 'bill-vektor' ),
				'type'        => 'select',
				'description' => '取引先は<a href="' . admin_url( '/post-new.php?post_type=client' ) . '" target="_blank">こちら</a>から登録してください。',
				'required'    => '',
				'options'     => $client,
			),
			'bill_tax_fraction' => array(
				'label'       => __( '消費税の端数処理', 'bill-vektor' ),
				'type'        => 'radio',
				'description' => '',
				'required'    => false,
				'options'     => array(
					'round' => __( '四捨五入', 'bill-vektor' ),
					'ceil'  => __( '切り上げ', 'bill-vektor' ),
					'floor' => __( '切り捨て', 'bill-vektor' ),
				),
			),
			'bill_total_price_display' => array(
				'label'       => __( '合計の表示', 'bill-vektor' ),
				'type'        => 'checkbox',
				'description' => '価格の目安リストなど、金額の合計を表示しない場合はチェックを入れてください。',
				'required'    => false,
				'options'     => array(
					'hidden' => '合計金額を表示しない',
				),
			),
			'bill_remarks'             => array(
				'label'       => __( '備考', 'bill-vektor' ),
				'type'        => 'textarea',
				'description' => '共通の備考は<a href="' . menu_page_url( 'bill-setting-page', false ) . '" target="_blank">' . '請求設定画面</a>から設定してください。<br>こちらの備考が記入されている場合は共通の備考は表示されません。',
				'required'    => false,
			),
			'bill_memo'                => array(
				'label'       => __( 'メモ', 'bill-vektor' ),
				'type'        => 'textarea',
				'description' => 'この項目は発注書には印刷されません。',
				'required'    => false,
			),
			'bill_send_pdf'            => array(
				'label'       => __( '送付済PDF', 'bill-vektor' ),
				'type'        => 'file',
				'description' => '客先に送付したPDFファイルを保存しておく場合に登録してください。',
				'hidden'      => true,
			),
		);
		return $custom_fields_array;
	}

}
Order_Normal_Custom_Fields::init();
custom-field-table-bill2.php (新規作成)
「品目」のカスタムフィールドを定義・作成します。
custom-field-table-bill.phpはオーバライド不可だったので、
custom-field-table-bill2.phpとして別ファイルで定義しています。
<?php

add_action( 'admin_menu', 'bill_add_metabox_item_table2', 10, 2 );

// add meta_box
function bill_add_metabox_item_table2() {

	$id            = 'meta_box_bill_items';
	$title         = '発注品目';
	$callback      = array( 'Bill_Item_Custom_Fields', 'fields_form' );
	$screen        = 'order';
	$context       = 'advanced';
	$priority      = 'high';
	$callback_args = '';

	add_meta_box( $id, $title, $callback, $screen, $context, $priority, $callback_args );
}
子テーマをzip化して適用
改修が完了したら子テーマのフォルダを再度zip化します。
あとはwordpressにテーマアップロードして適用すれば反映されます。
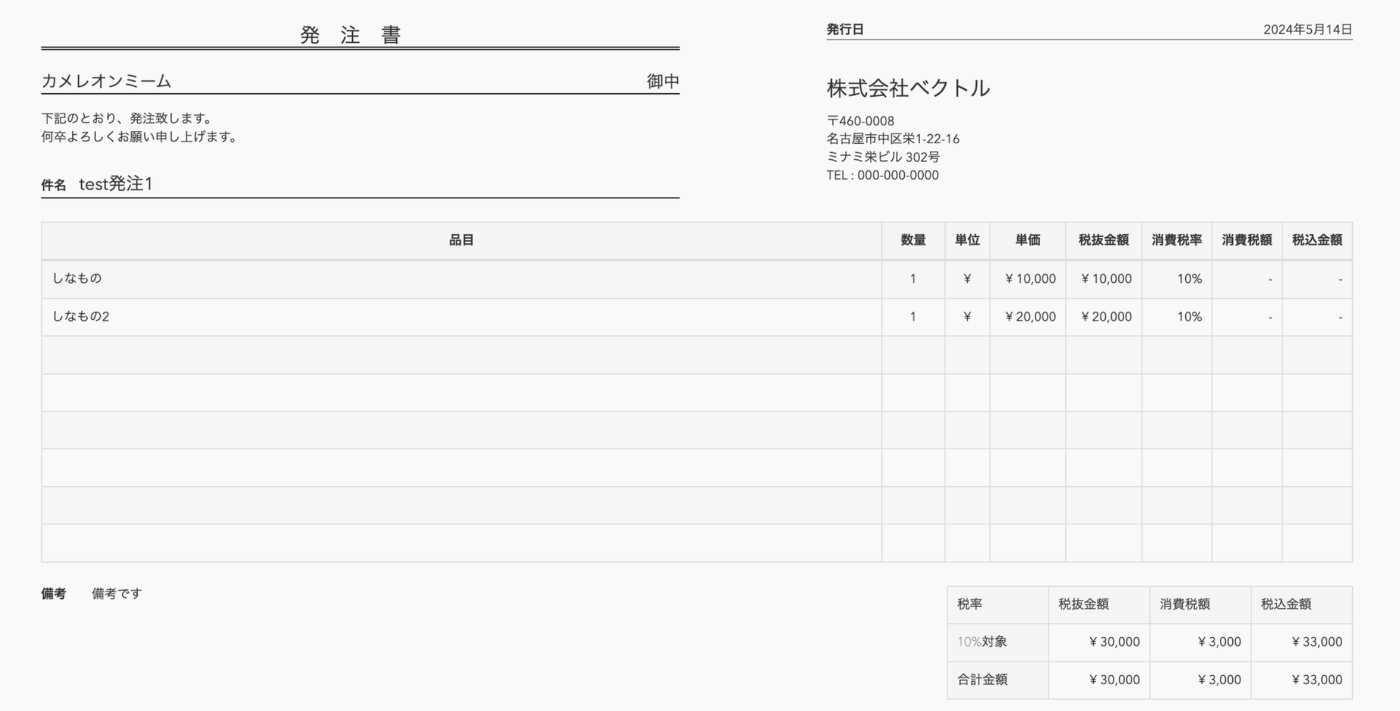
表示
発注書のPDFを出力すると以下のように表示されるようになります。
さいごに
テーマのphp処理でエラーが発生した場合は
wordpressが動作不正を起こし復旧することが困難になることがあります。
※テーマを有効化するとGUIが一切操作できなくなり、mysqlのデータを手動で削除するなどの対応が必要になるケースがあります。
子テーマの修正と動作確認は、まずは必ずローカル環境やテスト環境で実施してください。
いきなり本番に適用するのはやめましょう。
ローカルのdocker環境でwordpressを構築しておけば、
volumeを削除して起動しなおせば簡単にやり直すこともできます。
ローカル環境にwordpressをdockerで立ち上げる方法は以下にまとめていますので
よかったら参考にしてみてください。

Discussion