Headless UI の Menu を Next.js で利用する
import Link from 'next/link'
import { Menu } from '@headlessui/react'

function MyLink(props) {
  let { href, children, ...rest } = props
  return (
    <Link href={href}>
      <a {...rest}>{children}</a>
    </Link>
  )
}

function Example() {
  return (
    <Menu>
      <Menu.Button>More</Menu.Button>
      <Menu.Items>
        <Menu.Item>
          <MyLink href="/profile">Profile</MyLink>
        </Menu.Item>
      </Menu.Items>
    </Menu>
  )
}
これだけ
「これだけ」では芸がないので。
個人開発では自分用のコンポーネントライブラリを作成してそれを使っている。
その UI ライブラリは React と Headless UI にのみ依存し、Next.js には依存させたくない。
UI ライブラリに Item の Link を寄せるなら Next.js を UI ライブラリにインストールせねばならず、本体でそれをやろうとするとこのためだけに Headless UI を Next.js アプリケーションに導入しないといけない。
どちらも避けたい。さてどうしたものか。
一計を案じたが、あまりいい解決策とは思えない。もっといい方法があるはず。render props パターンなのか HOC なのか、どちらなのだろうか。よくわからないものができたときは大抵筋が悪い。適切な名前をつけられないということは、思考のショートカットができないから、他の人が都度理解する必要が出てくるためだ。
使い方だけさっと書く。気が向いたら全文書く。
通常の a タグでの使い方。
<Notification.Item key={i} item={item} href="#" />
Link コンポーネントでラップする書き方。
<Notification.Item key={i} item={item} href="/login" customWrapper={nextLinkWrapper} />
Notification.Item は以下の通り。親コンポーネントの Notification はここでは省略。
export const getMenuItemLinkCn = (active: boolean) =>
  tcn(active ? 'bg-primary-100 text-gray-900' : 'text-gray-700', 'block px-4 py-2 text-sm')

interface NotificationItemProps {
  item: NotificationItemType
  href: string
  customWrapper?: (active: boolean, href: string, children: React.ReactNode) => React.ReactNode
}

const Item = ({ item, href, customWrapper }: NotificationItemProps) => {
  return (
    <Menu.Item>
      {({ active }) => {
        return customWrapper ? (
          customWrapper(active, href, <SomeComponent item={item} />)
        ) : (
          <a href={href} className={getMenuItemLinkCn(active)}>
            <SomeComponent item={item} />
          </a>
        )
      }}
    </Menu.Item>
  )
}
Item.displayName = 'NotificationItem'
customWrapper という props を設けている。 SomeComponent は、適宜自分のコンポーネントに変えて欲しい。
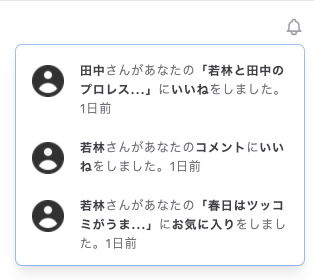
自分はこのような通知を表示するコンポーネントをはめ込んでいる。
これは UI コンポーネント側。Next.js は無関係
次は Next.js 側。
type NextLinkProps = {
  className: string
  href: string
  children: React.ReactNode
}

const NextLink: React.FC<NextLinkProps> = ({ href, children, ...rest }) => (
  <Link href={href}>
    <a {...rest}>{children}</a>
  </Link>
)

export const nextLinkWrapper = (active: boolean, href: string, children: React.ReactNode) => (
  <NextLink href={href} className={getMenuItemLinkCn(active)}>
    {children}
  </NextLink>
)
で、これを先程のように利用
<Notification.Item key={i} item={item} href="/login" customWrapper={nextLinkWrapper} />
これで Next.js の Link コンポーネントでラップできた。もちろん nextLinkWrapperを書き換えれば、どんなコンポーネントでもラップできる
また、Item 内は SomeComponent で表示するコンポーネントを UI ライブラリ側に持っているが、Menu.Item として表示したいコンポーネントを本体側で決める場合は、以下のようにすればいい。
export const nextLinkWrapper = (children: React.ReactNode) =>  (active: boolean, href: string) => (
  <NextLink href={href} className={getMenuItemLinkCn(active)}>
    {children}
  </NextLink>
)
<Notification.Item key={i} item={item} href="/login" customWrapper={nextLinkWrapper(<div>I'am a child component</div>)} />
試してないけど多分いけるんじゃないかな。
まあこれを汎用的なものにしなくても、ドロップダウンのメニューでトンマナ揃えたい & メニューアイテムを何種類もあるわけではないだろうから、別のコンポーネントを作ればいいとは思う
ファイルにまとめた
import { getMenuItemLinkCn, Notification, NotificationItemType } from '@panda-program/ui'

type NextLinkProps = {
  className: string
  href: string
  children: React.ReactNode
}

const NextLink: React.FC<NextLinkProps> = ({ href, children, ...rest }) => (
  <Link href={href}>
    <a {...rest}>{children}</a>
  </Link>
)

const nextLinkWrapper = (active: boolean, href: string, children: React.ReactNode) => (
  <NextLink href={href} className={getMenuItemLinkCn(active)}>
    {children}
  </NextLink>
)

type Props = {
  item: NotificationItemType
  href: string
}

const NextNotificationItem: React.FC<Props> = ({ item, href }) => {
  return <Notification.Item item={item} href={href} customWrapper={nextLinkWrapper} />
}

export default NextNotificationItem
使う側
// import
import { Notificatio } from '@panda-program/ui'
import NextNotificationItem from '@/components/NextNotificationItem'

const items = [...]

const Foo = () =>
  <Notification>
    <Notification.List>
      {items.map((item, i) => (
        <NextNotificationItem key={i} item={item} href="#" />
      ))}
    </Notification.List>
  </Notification>