Next.js App Router & Auth.js (next-auth v5) に入門する
Next.js Pages Router & Next Auth の時代から諸々変わっていそうなので、再入門する。
Next.js setup
create-next-app する。
npx create-next-app@latest
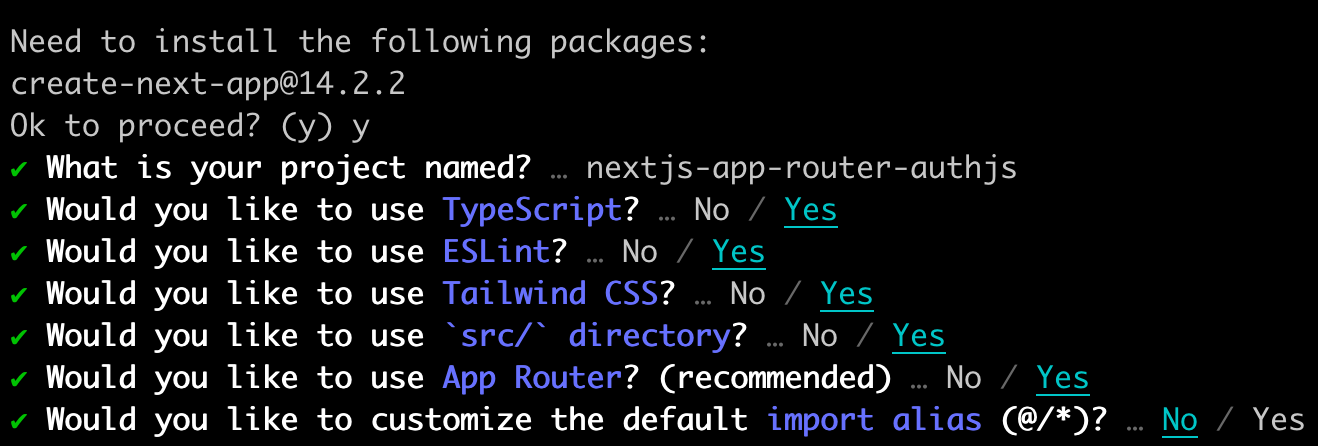
準備完了 (Next.js v14.2.2)
Auth.js setup
公式 Doc に従って Auth.js setup する。
install
npm install next-auth@beta
Auth.js になったけど、Next.js 向けの package は依然として next-auth なのか。
他の framework 向けの Auth.js の package は @auth/* みたい。
- SvelteKit:
@auth/sveltkit - express:
@auth/express
Setup Environment
AUTH_SECRET env var を設定する。
token encryption や hash で使う値らしい。なんでも OK だが、Auth.js がこの値を生成するためのコマンドを用意してくれているので利用する。
npx auth secret
こんな感じの ouput が出力されるので、そのまま .env.local に貼り付ける。
Secret generated. Copy it to your .env/.env.local file (depending on your framework):

AUTH_SECRET=GENERATETD_RANDOM_VALUE
AUTH_SECRET=GENERATETD_RANDOM_VALUE
(2024/12/25 追記)
npx auth secret 最新のものだと、.env.local への貼り付けまで自動でやってくれるようになってた。
Configure
NextAuthConfig 用意
Auth.js 用の config を管理する file を用意する。file 名はなんでもOKとのことだが、公式 Doc に従って auth.ts とする。
import NextAuth from "next-auth"

export const { handlers, signIn, signOut, auth } = NextAuth({
  providers: [],
})
Route Handler setup
/app/api/auth/[...nextauth]/route.ts に NextAuth 用の route handler 用意。
import { handlers } from "@/auth" // Referring to the auth.ts we just created
export const { GET, POST } = handlers
(optional) middleware
任意で、session の有効期限を延長させる middleware を設定する。
export { auth as middleware } from "@/auth"
Setup Authentication Methods
ここまでで基本的な設定は完了!簡単!
あとは認証 provider の設定を NextAuthConfig の providers に渡してあげれば良い。
Google OAuth を設定してみる
Google OAuth application 用意
OAuth Client ID 作成
GCP Console > APIs & Services > Credentials から新規 OAuth Client ID 作成。
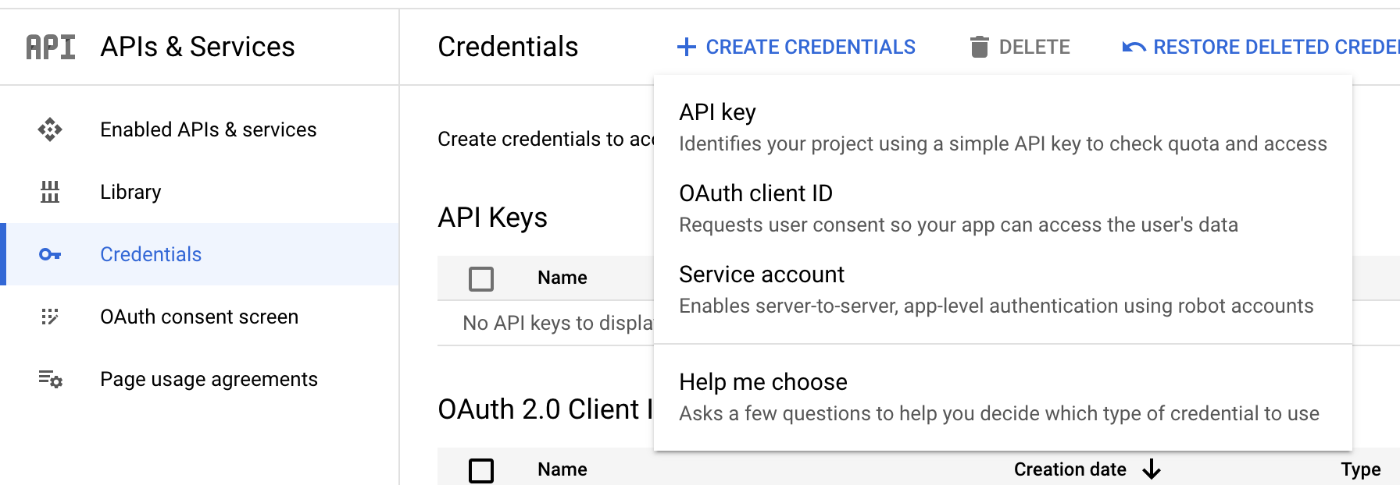
作成したら、Client ID と Client secret を控えておく。
redirect uri 設定
とりあえず local で動けばいいので http://localhost:3000/api/auth/callback/google 設定

Setup Environment Variables
Google OAuth application の Client ID と Client secret を環境変数にセット。
AUTH_GOOGLE_ID={CLIENT_ID}
AUTH_GOOGLE_SECRET={CLIENT_SECRET}
Setup Provider
NextAuthConfig.providers に Google 用の設定を行う。
やることは next-auth/providers/google を providers に渡すだけ。簡単!
import NextAuth from "next-auth"
import Google from "next-auth/providers/google"

export const { signIn, signOut, auth } = NextAuth({
  providers: [Google],
})
Add Signin Button
SignIn の導線を乗っける。
import { signIn } from '@/auth';

function SignIn() {
  return (
    <form
      action={async () => {
        'use server';
        await signIn('google');
      }}
    >
      <button
        type='submit'
        className='bg-blue-500 hover:bg-blue-700 text-white font-bold py-2 px-4 rounded'
      >
        Sign in with Google
      </button>
    </form>
  );
}

動作確認
問題なく Google SignIn できてる!
所感
Pages Router & NextAuth の時代より遥かに簡単になっていて導入するのはかなり楽。
Server Component で session を利用する
NextAuth() の戻り値の auth を使う。
import NextAuth from 'next-auth';
import Google from 'next-auth/providers/google';

export const { handlers, signIn, signOut, auth } = NextAuth({
  providers: [Google],
});
Server component 内で auth() を呼び出せば session を取得できる。
const session = await auth()
sample code
import { auth, signIn, signOut } from '@/auth';

function SignIn() {
  return (
    <form
      action={async () => {
        'use server';
        await signIn('google');
      }}
    >
      <button
        type='submit'
        className='bg-blue-500 hover:bg-blue-700 text-white font-bold py-2 px-4 rounded'
      >
        Sign in with Google
      </button>
    </form>
  );
}

function SignOut() {
  return (
    <form
      action={async () => {
        'use server';
        await signOut();
      }}
    >
      <button
        type='submit'
        className='bg-red-500 hover:bg-red-700 text-white font-bold py-2 px-4 rounded'
      >
        Sign Out
      </button>
    </form>
  );
}

export default async function Home() {
  const session = await auth();

  return (
    <div>
      <div>
        {session ? (
          <div>
            <p>Signed in as {session.user?.email}</p>
            <pre>{JSON.stringify(session, null, 2)}</pre>
          </div>
        ) : (
          <p>Not signed in</p>
        )}
      </div>
      <SignIn />
      <SignOut />
    </div>
  );
}
Auth.js では session の利用は server side 前提なのかしら...?
Next Auth v4 の useSession 相当のものはないのか...?
Client component では next-auth/react を使う
現状、Auth.js の公式 Docs での記載は上記 API reference しかなくわかりにくい...
型定義見た方がわかりやすいかも
next-auth/react 型定義
/**
 *
 * NextAuth.js methods and components that work in [Client components](https://nextjs.org/docs/app/building-your-application/rendering/client-components) and the [Pages Router](https://nextjs.org/docs/pages).
 *
 * For use in [Server Actions](https://nextjs.org/docs/app/api-reference/functions/server-actions), check out [these methods](https://authjs.dev/guides/upgrade-to-v5#methods)
 *
 * @module react
 */
import type { BuiltInProviderType, RedirectableProviderType } from "@auth/core/providers";
import type { Session } from "@auth/core/types";
import * as React from "react";
import type { AuthClientConfig, ClientSafeProvider, LiteralUnion, SessionProviderProps, SignInAuthorizationParams, SignInOptions, SignInResponse, SignOutParams, SignOutResponse, UseSessionOptions } from "./lib/client.js";
export { SessionProviderProps };
export type { LiteralUnion, SignInAuthorizationParams, SignInOptions, SignInResponse, SignOutParams };
export declare const __NEXTAUTH: AuthClientConfig;
/** @todo Document */
export type UpdateSession = (data?: any) => Promise<Session | null>;
/**
 * useSession() returns an object containing three things: a method called {@link UpdateSession|update}, `data` and `status`.
 */
export type SessionContextValue<R extends boolean = false> = R extends true ? {
    update: UpdateSession;
    data: Session;
    status: "authenticated";
} | {
    update: UpdateSession;
    data: null;
    status: "loading";
} : {
    update: UpdateSession;
    data: Session;
    status: "authenticated";
} | {
    update: UpdateSession;
    data: null;
    status: "unauthenticated" | "loading";
};
export declare const SessionContext: React.Context<{
    update: UpdateSession;
    data: Session;
    status: "authenticated";
} | {
    update: UpdateSession;
    data: null;
    status: "unauthenticated" | "loading";
} | undefined>;
/**
 * React Hook that gives you access to the logged in user's session data and lets you modify it.
 *
 * :::info
 * You will likely not need `useSession` if you are using the [Next.js App Router (`app/`)](https://nextjs.org/blog/next-13-4#nextjs-app-router).
 * :::
 */
export declare function useSession<R extends boolean>(options?: UseSessionOptions<R>): SessionContextValue<R>;
export interface GetSessionParams {
    event?: "storage" | "timer" | "hidden" | string;
    triggerEvent?: boolean;
    broadcast?: boolean;
}
export declare function getSession(params?: GetSessionParams): Promise<Session | null>;
/**
 * Returns the current Cross-Site Request Forgery Token (CSRF Token)
 * required to make requests that changes state. (e.g. signing in or out, or updating the session).
 *
 * [CSRF Prevention: Double Submit Cookie](https://cheatsheetseries.owasp.org/cheatsheets/Cross-Site_Request_Forgery_Prevention_Cheat_Sheet.html#double-submit-cookie)
 */
export declare function getCsrfToken(): Promise<string>;
type ProvidersType = Record<LiteralUnion<BuiltInProviderType>, ClientSafeProvider>;
/**
 * Returns a client-safe configuration object of the currently
 * available providers.
 */
export declare function getProviders(): Promise<ProvidersType | null>;
/**
 * Initiate a signin flow or send the user to the signin page listing all possible providers.
 * Handles CSRF protection.
 */
export declare function signIn<P extends RedirectableProviderType | undefined = undefined>(provider?: LiteralUnion<P extends RedirectableProviderType ? P | BuiltInProviderType : BuiltInProviderType>, options?: SignInOptions, authorizationParams?: SignInAuthorizationParams): Promise<P extends RedirectableProviderType ? SignInResponse | undefined : undefined>;
/**
 * Initiate a signout, by destroying the current session.
 * Handles CSRF protection.
 */
export declare function signOut<R extends boolean = true>(options?: SignOutParams<R>): Promise<R extends true ? undefined : SignOutResponse>;
/**
 * [React Context](https://react.dev/learn/passing-data-deeply-with-context) provider to wrap the app (`pages/`) to make session data available anywhere.
 *
 * When used, the session state is automatically synchronized across all open tabs/windows and they are all updated whenever they gain or lose focus
 * or the state changes (e.g. a user signs in or out) when {@link SessionProviderProps.refetchOnWindowFocus} is `true`.
 *
 * :::info
 * You will likely not need `SessionProvider` if you are using the [Next.js App Router (`app/`)](https://nextjs.org/blog/next-13-4#nextjs-app-router).
 * :::
 */
export declare function SessionProvider(props: SessionProviderProps): JSX.Element;
//# sourceMappingURL=react.d.ts.map
ざっとみた感じ v4 の Client API 変わってないか...?
Middleware で session を利用する
これまた NextAuth() の戻り値の auth を使う。
import NextAuth from 'next-auth';
import Google from 'next-auth/providers/google';

export const { handlers, signIn, signOut, auth } = NextAuth({
  providers: [Google],
});
シンプルに session の有効期限を延長するだけの middleware が欲しいのなら auth をそのまま middleware として export すればOK。
export { auth as middleware } from "@/auth"
自前の middleware に噛ませたい場合は、auth() で wrap してあげると、req.auth が生えて session が取得可能になる。
import { auth } from "./auth"

export default auth((req) => {
  if (!req.auth) {
    return NextResponse.redirect("/login")
  }
})
req.auth は、Session | null 。
export interface DefaultSession {
  user?: User
  expires: ISODateString
}

/** The active session of the logged in user. */
export interface Session extends DefaultSession {}
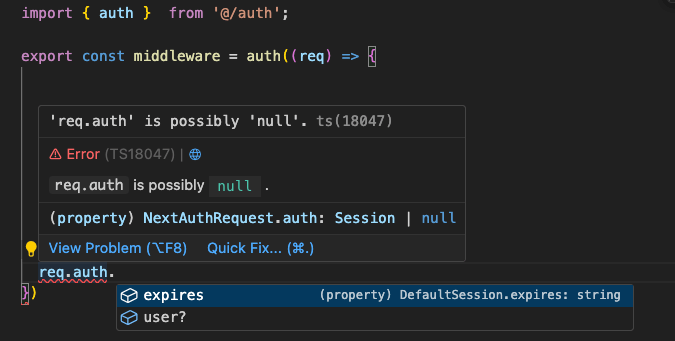
なぜ req.auth という命名にしたんだろ... req.session の方がわかりやすくないか...
API Routes で session を取得する
これまた NextAuth() の戻り値の auth を使う。
import NextAuth from 'next-auth';
import Google from 'next-auth/providers/google';

export const { handlers, signIn, signOut, auth } = NextAuth({
  providers: [Google],
});
route handler を auth() で wrap してあげると req.auth が生えて session が取得可能になる。middleware と全く同じ。
import { auth } from "@/auth"
import { NextResponse } from "next/server"

export const GET = auth(function GET(req) {
  if (req.auth) return NextResponse.json(req.auth)
  return NextResponse.json({ message: "Not authenticated" }, { status: 401 })
})
auth() について雑感
- session の取得
- NextRequest handler の NextRequest に session を付与
この2つの役割を同じ auth() という api が担っているわけだけど、これ分けた方がわかりやすくないか...?
"session を使いたい" 点においては共通してるけど、session そのものの取得と session を request object に付与するのでは役割若干違う気もする...
migration guide の対応表がわかりやすいな。
Client Component 以外全部 auth()

裏側で何が起こっているのかざっくりメモ
- provider ごとの認証処理
- 認証情報を encrypt
- jwt: jwt を encrypt
- db: db に保存された session の Id を encrypt
- encrypted な認証情報を cookie に set
- cookie から encrypted な認証情報取得
- 認証情報 decrypt しユーザ情報管理
- jwt: jwt の情報そのまま利用
- db: sessionId に紐づく session データを db から取得
Session の拡張
Auth.js libraries only expose a subset of the user’s information by default in a session to not accidentally expose sensitive user information. This is name, email, and image.
Auth.js は余計なデータを session に漏洩せないために、デフォで name, email, image のみを session に含ませる。
他の情報を session に載せたい場合のやり方をメモしていく。公式 Doc はこちら↓
JWT を利用している場合
session データを JWT に載せている (= DB に保存していない) ケース。
以下は、userId を session に載せる例。
やっていることとしては、
- jwt callback で Provider から受け取った user 情報から userId を token に載せる
- session callback で token に載せた userId を session に載せる
  providers,
  callbacks: {
    jwt({ token, user }) {
      if (user) { // User is available during sign-in
        token.id = user.id
      }
      return token
    },
    session({ session, token }) {
      session.user.id = token.id
      return session
    },
  },
}
おそらく jwt callback は cookie にセットされる jwt を作成する際に、生成される jwt をカスタマイズするための callback だと思われるが、詳細な説明が同ページにはない...
Callbacks とは...?
API reference 見る。
Callbacks are asynchronous functions you can use to control what happens when an action is performed. Callbacks are extremely powerful, especially in scenarios involving JSON Web Tokens as they allow you to implement access controls without a database and to integrate with external databases or APIs.
便利だよ〜としか書いてないな...
具体的に under the hood で何が起きているのか知りたい...
jwt callback とは...?
API reference 見る。
This callback is called whenever a JSON Web Token is created (i.e. at sign in) or updated (i.e whenever a session is accessed in the client). Anything you return here will be saved in the JWT and forwarded to the session callback. There you can control what should be returned to the client. Anything else will be kept from your frontend. The JWT is encrypted by default via your AUTH_SECRET environment variable.
jwt callback で return された値が JWT payload に保存される、とのこと。あってた。
実際の cookie を見てみる
試しに、foo: 'bar' を jwt callback で追加してみる。
    jwt: ({ user, token, account }) => {
      return {
        ...token,
+        foo: 'bar',
      };
    },
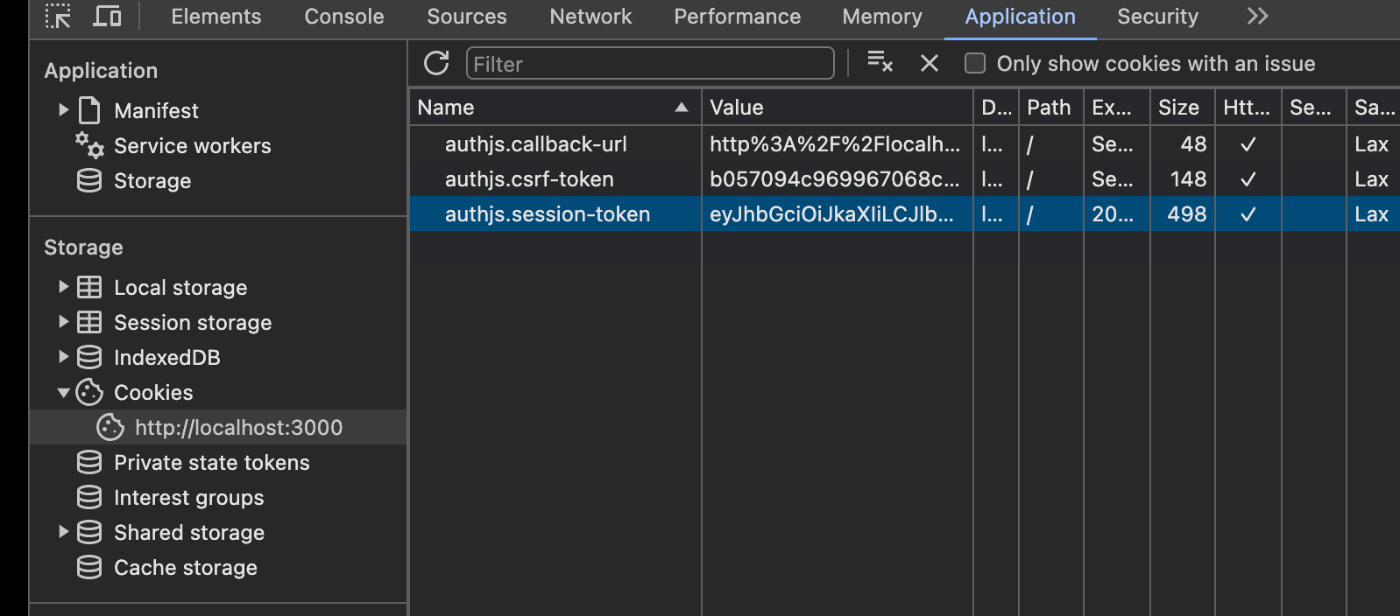
cookie の値取得
chorme dev tool から cookie 取得する。対象の cookie は "authjs.session-token"
decode (decrypt)
Auth.js の JWT は encrypted されてるので decrypt する方法を調べる。
この↓decode を内部で利用しているのでこいつを引っ張ってくれば良さそう。
"next-auth/jwt" から import できる。
import { decode } from 'next-auth/jwt';
decode の引数
export interface JWTDecodeParams {
  /** Used in combination with `secret`, to derive the encryption secret for JWTs. */
  salt: string
  /**
   * Used in combination with `salt`, to derive the encryption secret for JWTs.
   *
   * @note
   * You can also pass an array of secrets, in which case the first secret that successfully
   * decrypts the JWT will be used. This is useful for rotating secrets without invalidating existing sessions.
   * The newer secret should be added to the start of the array, which will be used for all new sessions.
   */
  secret: string | string[]
  /** The Auth.js issued JWT to be decoded */
  token?: string
}
secret は AUTH_SECRET。
salt は何を使ってるのかわからん...コード見るか
decode に渡す salt は何...?
options.cookies.sessionToken.name を使ってるみたい↓
options.cookies.sessionToken.name は authjs.session-token。session token をセットする cookie の name か。
decode するコード
import { decode } from 'next-auth/jwt';

const SESSION_NAME = 'authjs.session-token';

const TOKEN = 'eyJ......';

const decoded = await decode({
  salt: SESSION_NAME,
  secret: process.env.AUTH_SECRET!,
  token: TOKEN,
});

console.log('decoded', decoded);
実行する。
bun run scripts/main.mts
ちゃんと `foo: "bar" が追加されてる↓
decoded {
  sub: "xxxxxxxxxxxxxx",
  uid: "xxxxxxxxxxxxxx",
  iat: 1715269183,
  exp: 1717861183,
  jti: "ec4e8678-6e12-4f62-9487-5a55aee6b4a4",
  foo: "bar"
}
jwt callback の pararms.user とは...?
Either the result of the OAuthConfig.profile or the CredentialsConfig.authorize callback.
OAuth provider の場合、OAuthConfig.profile callback で return したものが入る。
CredentialsProvider の場合、 authorize callback で return したものが入る。
session callback とは...?
API reference 見る。
This callback is called whenever a session is checked. (i.e. when invoking the /api/session endpoint, using useSession or getSession). The return value will be exposed to the client, so be careful what you return here! If you want to make anything available to the client which you’ve added to the token through the JWT callback, you have to explicitly return it here as well.
session として保存している値のうち、何を client に公開するかの責務を担う。
以下は JWT に乗っけた accessToken を client に公開する例↓
callbacks: {
  async session({ session, token, user }) {
    // Send properties to the client, like an access_token from a provider.
    session.accessToken = token.accessToken

    return session
  }
}
Database session strategy の場合
session callback だけでOK。
sesseion callback の params.user に DB に保存された user データが入る。
  providers,
  callbacks: {
    session({ session, user }) {
      session.user.id = user.id
      return session
    },
  }
}
Session 拡張時の型について
Session 拡張時の型は、Module Augmentation で設定する。
以下は、session に address を追加する例↓
import NextAuth, { type DefaultSession } from "next-auth"

declare module "next-auth" {
  /**
   * Returned by `auth`, `useSession`, `getSession` and received as a prop on the `SessionProvider` React Context
   */
  interface Session {
    user: {
      /** The user's postal address. */
      address: string
      /**
       * By default, TypeScript merges new interface properties and overwrites existing ones.
       * In this case, the default session user properties will be overwritten,
       * with the new ones defined above. To keep the default session user properties,
       * you need to add them back into the newly declared interface.
       */
    } & DefaultSession["user"]
  }
}
拡張可能な型
- User
- Account
- Session
- JWT
declare module "next-auth" {
  /**
   * The shape of the user object returned in the OAuth providers' `profile` callback,
   * or the second parameter of the `session` callback, when using a database.
   */
  interface User {}
  /**
   * The shape of the account object returned in the OAuth providers' `account` callback,
   * Usually contains information about the provider being used, like OAuth tokens (`access_token`, etc).
   */
  interface Account {}

  /**
   * Returned by `useSession`, `auth`, contains information about the active session.
   */
  interface Session {}
}

// The `JWT` interface can be found in the `next-auth/jwt` submodule
import { JWT } from "next-auth/jwt"

declare module "next-auth/jwt" {
  /** Returned by the `jwt` callback and `auth`, when using JWT sessions */
  interface JWT {
    /** OpenID ID Token */
    idToken?: string
  }
}
CredentialsProvider の authorize で return する object を拡張するケース
'next-auth' module の User interface を拡張すればOK。
import NextAuth from "next-auth"

declare module 'next-auth' {
  /**
   * The shape of the user object returned in the OAuth providers' `profile` callback,
   * or the second parameter of the `session` callback, when using a database.
   */
  interface User {
    foo: string;
  }
}

export const { handlers, signIn, signOut, auth } = NextAuth({
  //...
  providers: [
    //...
    Credentials({
      credentials: {},
      authorize: async () => {
        return {
          foo: 'bar',
        };
      },
    }),
  ],
  callbacks: {
    jwt({ token, user }) {
      const value = user.foo;

      //...
    },
    //...
  },
})
authorize の型↓ User を return していることがわかる。
  authorize: (
    /**
     * The available keys are determined by {@link CredentialInput}.
     *
     * @note The existence/correctness of a field cannot be guaranteed at compile time,
     * so you should always validate the input before using it.
     *
     * You can add basic validation depending on your use case,
     * or you can use a popular library like [Zod](https://zod.dev) for example.
     */
    credentials: Partial<Record<keyof CredentialsInputs, unknown>>,
    /** The original request. */
    request: Request
  ) => Awaitable<User | null>