wasm-image-optimization で一括画像最適化
TL;DR
以下のコードをデプロイし、Workers の管理画面から Routes を設定します。
workers のコード
import { Hono } from "hono";
import { createMiddleware } from "hono/factory";
import { optimizeImage } from "wasm-image-optimization";
import { cache } from "hono/cache";

const app = new Hono();

const via = createMiddleware((c, next) => {
  if (c.req.header("via")) {
    console.log("pass through", c.req.raw.url);
    return fetch(c.req.raw);
  }

  return next();
});

app.get("*", via, cache({ cacheName: "images" }), async (c) => {
  try {
    const res = await fetch(c.req.url);
    if (!res.ok) {
      return c.body(null, 404);
    }
    const buffer = await res.arrayBuffer();
    const image = await optimizeImage({
      image: buffer,
      width: 300,
      quality: 75,
    });

    return c.body(image, 200, {
      "Content-Type": "image/webp",
      "cache-control": "public, max-age=31536000, immutable",
    });
  } catch (e) {
    console.error(e);
    return c.body(null, 500);
  }
});
はじめに
Free プランでも一括画像最適化が可能です!この記事では、cloudflare の Speed Optimization 機能である Image Optimization 相当の処理を実現する方法を紹介します。この方法を使えば、画像を配信している URL を変更せずに画像の圧縮が行えます。
今回利用するもの
Hono
cloudfalre workers 使うならこれ!というライブラリです。今回は domain cache と routes による自分自身へのリクエストを検出する middleware の作成に使いました。
wasm-image-optimization
buffer で受け取った画像を wasm で最適化するライブラリです。出力は webp のみ対応しているようです。
詳しくは作者様の記事があるのでそちらを参照してください。
Routes
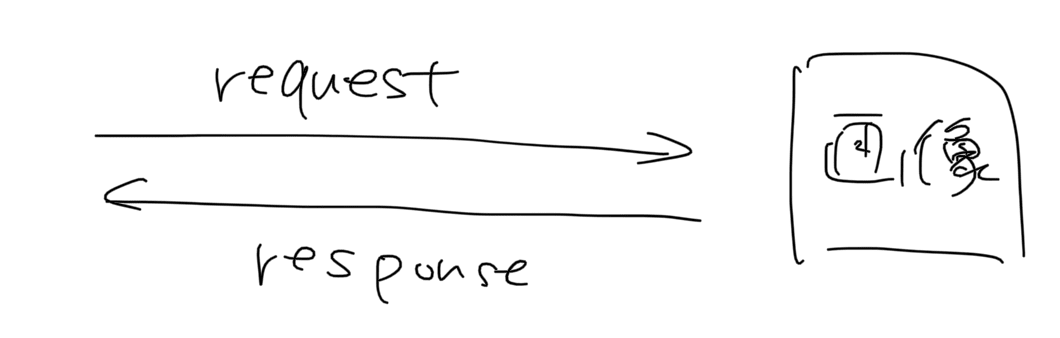
画像にアクセスするとして通常ならば以下のような流れになります。
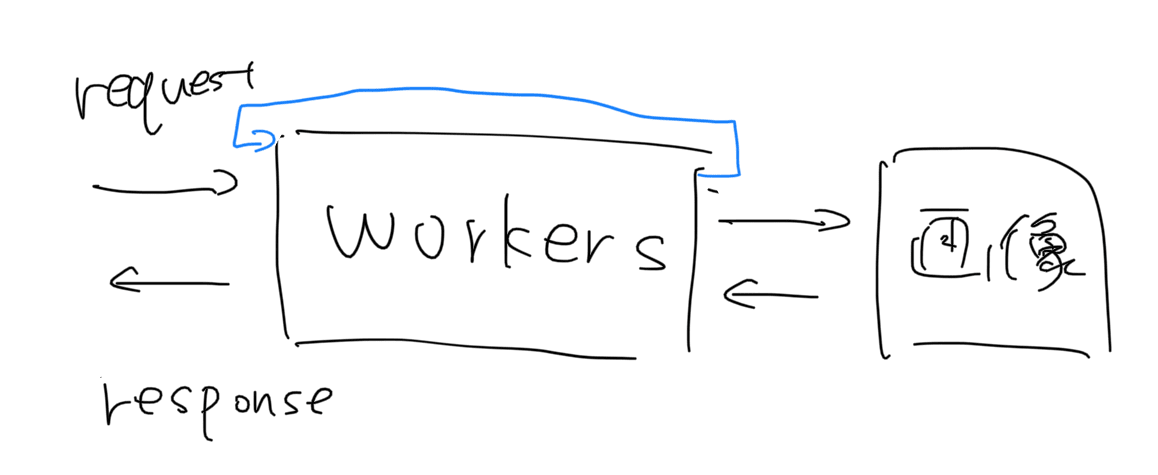
Routes を使うと画像にリクエストが行く前に前段に workers を挟むことができます。今回はここに wasm-image-optimization を使って画像を最適化する処理を挟みます。
Route を利用する上での注意
workers 上で origin へ proxy をするなら via という header をチェックする必要があります。origin へリクエストをしたつもりでも Route の機能でまた workers に戻ってくるので(上の画像の青線) via header をチェックして pass through する必要があります。
export default {
  async fetch(request, env, ctx) {
    // これがないと無限ループする
    if (request.headers.get("via")) {
      console.log("via");
      return fetch(request);
    }

    return handleRequest(request);
  },
};

async function handleRequest(request) {
  try {
    return fetch(request.url);
  } catch (e) {
    console.error(e);
    return new Response(null, 500);
  }
}
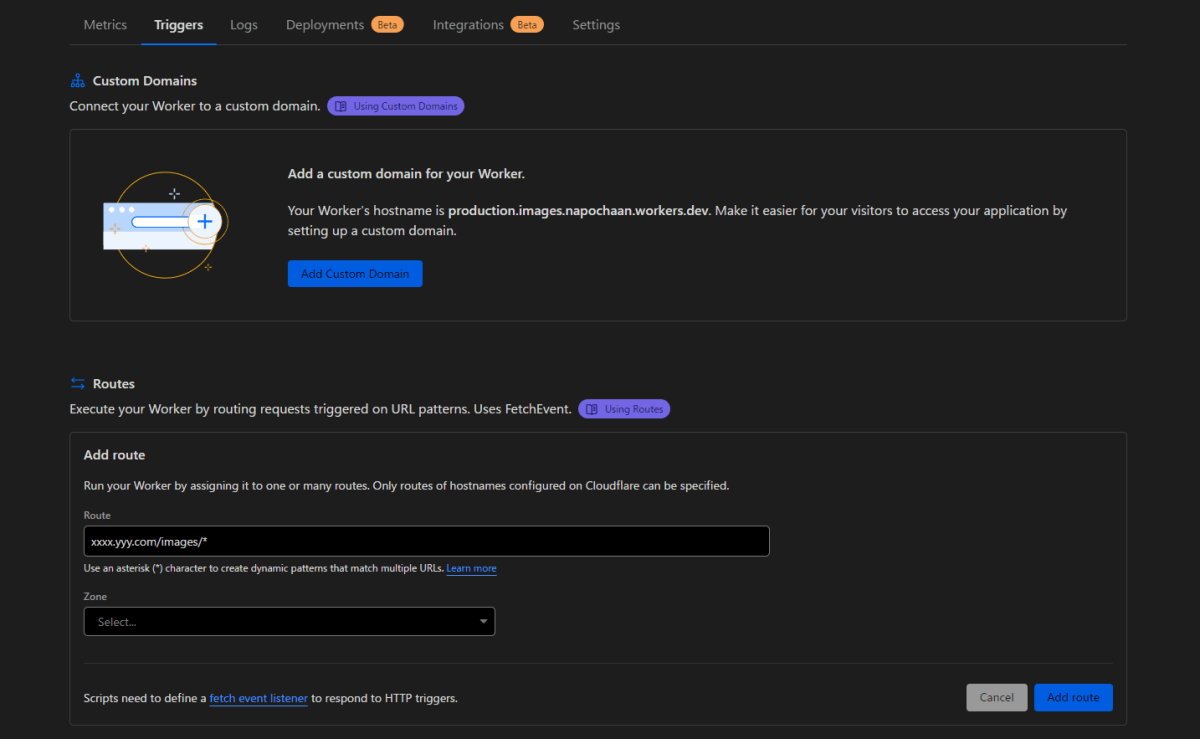
設定方法
ダッシュボードから設定するか、wrangler.toml に以下を追記します。
routes = [
  { pattern = "subdomain.example.com/*", zone_name = "example.com" }
  # or
  { pattern = "subdomain.example.com/*", zone_id = "<YOUR_ZONE_ID>" }
]
画像の最適化を行う workers を作る
- hono の
createMiddlewareで via があるときは pass through する middleware を作る。 - hono の cache middleware を雑に入れる
- fetch で画像を取得して wasm-image-optimization で最適化する
終わり。
import { Hono } from "hono";
import { createMiddleware } from "hono/factory";
import { optimizeImage } from "wasm-image-optimization";
import { cache } from "hono/cache";

const app = new Hono();

const via = createMiddleware((c, next) => {
  if (c.req.header("via")) {
    console.log("pass through", c.req.raw.url);
    return fetch(c.req.raw);
  }

  return next();
});

app.get("*", via, cache({ cacheName: "images" }), async (c) => {
  try {
    const res = await fetch(c.req.url);
    if (!res.ok) {
      return c.body(null, 404);
    }
    const buffer = await res.arrayBuffer();
    const image = await optimizeImage({
      image: buffer,
      width: 300, // ここはお好みで
      quality: 75, // ここはお好みで
    });

    return c.body(image, 200, {
      "Content-Type": "image/webp",
      "cache-control": "public, max-age=31536000, immutable",
    });
  } catch (e) {
    console.error(e);
    return c.body(null, 500);
  }
});

export default app;
画像の最適化前後の比較
僕は R2 に画像を置いていて public domain を割り当てていたので、そこに対して Route を設定しました。
縮小するサイズにもよると思いますが 2~3Mb あった画像が 5~20Kb くらいになりました。

最適化前

最適化後
まとめ
- Free プランでも Pro プラン相当の Image Optimization を実現できた
- Routes を利用することによって URL を変更せずに画像の最適化ができた
- wasm-image-optimization はめちゃくちゃ便利
だが webp しか対応してないので注意が必要- 2023-12-28 png, jpg 対応がされました。
一応ほかの format 対応可能なのかを issue で聞いてみています。僕は現状 C++ と wasm がよくわからないので今自分でも何かできないか調べているところです。
伸びてびっくりしちゃった。ありがとうございます。
2023-12-28 追記
wasm-image-optimization の output format に jpg, png が追加されました。
この変更によって accept header をみてクライアントが対応している format で返却することができるようになりました。
この挙動は Cloudflare Images の Adaptive optimized format delivery を目指したものになります。
Adaptive optimized format delivery
以下のような挙動をします。accept header をみて format が変わるようになっています。
❯ curl https://imagedelivery.net/xxxxxx -H "accept: image/png" -I

HTTP/2 200
content-type: image/png
❯ curl https://imagedelivery.net/xxxxxx -H "accept: image/webp" -I

HTTP/2 200
content-type: image/webp
Adaptive optimized format delivery を実現する
accept header をみて wasm-image-optimization の format を変更することで実現します。
import { Hono } from "hono";
import { createMiddleware } from "hono/factory";
import { optimizeImage } from "wasm-image-optimization";
import { cache } from "hono/cache";

const app = new Hono();

const via = createMiddleware((c, next) => {
  if (c.req.header("via")) {
    console.log("pass through", c.req.raw.url);
    return fetch(c.req.raw);
  }

  return next();
});

// accept header から端末で利用できる format を返す
const imageType = (accept: string): "png" | "webp" => {
  if (accept.includes("image/webp")) {
    return "webp";
  }

  return "png";
};

app.get("*", via, cache({ cacheName: "images" }), async (c) => {
  try {
    const res = await fetch(c.req.url);
    if (!res.ok) {
      return c.body(null, 404);
    }
    const format = imageType(c.req.header("accept"));
    const buffer = await res.arrayBuffer();
    const image = await optimizeImage({
      image: buffer,
      width: 300,
      quality: 75,
      // ここを追加
      format,
    });

    return c.body(image, 200, {
      "Content-Type": `image/${format}`,
      "cache-control": "public, max-age=31536000, immutable",
    });
  } catch (e) {
    console.error(e);
    return c.body(null, 500);
  }
});

export default app;
Discussion