【Docker】コンテナの勉強会まとめ #2 -Dockerの基礎からコンテナのデプロイまで-
前回の記事
コンテナの勉強会まとめ #1 -環境構築編-(For Windows Users)
本記事でのゴール:コンテナでアプリケーションを実行する
「Docker/Kubernetes 実践コンテナ入門」をベースに、Dockerコンテナのデプロイをするまでの一連の流れを紹介する。
対応ページ:p.8~9
コンテナ実行の手順
Dockerコンテナを実行するときは、以下の手順を踏む必要がある。
- Dockerfileを作成する。
- Dockerfileをビルドし、Dockerイメージを作る。
- Dockerイメージを実行(run)する。

上記の手順を以下の章より実施する。
※コンテナを実行するにあたって、「今このコマンドはどの階層で実行されているのか?」という部分が不明瞭になったため、各工程でコマンドの実行階層をイメージできるように画像にして貼り付けているので、私のように混乱した方はぜひ見ていただきたい。
実際にやってみる
事前準備
コンテナをrunした後実際に実行されるアプリケーションとして、以下の「helloworld」というファイル名を付けたシェルスクリプトを用意する。
#!/bin/sh

echo "Hello, world!"
ファイルが作成される階層

Dockerfileを作成する
Dockerfileを作成する。
FROM ubuntu:16.04

COPY helloworld /usr/local/bin
RUN chmod +x /usr/local/bin/helloworld

CMD ["helloworld"]
failed to solve with frontend dockerfile.v0: failed to read dockerfile: open /var/lib/docker/tmp/buildkit-mount3246733569/Dockerfile: no such file or directory
Dockerfileを作成する階層

Dockerfileをビルドし、Dockerイメージを作る
以下のコマンドを実行する。
docker image build -t helloworld:latest .
補足
-tオプションについて
docker image buildを行う時は、必ず何かしらのオプションをつける必要がある。
-tオプションの役割は以下。Dockerイメージに、名前とタグ(イメージのバージョン)をつけている。
-t [イメージに付与する名前]:[タグ名] Dockerfile配置ディレクトリのパス
ちなみに以下のように [イメージに付与する名前] のみを指定すると、 [タグ名] は自動的にlatest(最新のバージョン)が使用されるようになっている。
docker image build -t helloworld .
他にもdocker image build --helpコマンドを打つと、以下のように使用できるオプションの一覧が表示される。
docker image build --help

Options:
      --add-host list           Add a custom host-to-IP mapping (host:ip)
      --build-arg list          Set build-time variables
      --cache-from strings      Images to consider as cache sources
      --disable-content-trust   Skip image verification (default true)
  -f, --file string             Name of the Dockerfile (Default is 'PATH/Dockerfile')
      --iidfile string          Write the image ID to the file
      --isolation string        Container isolation technology
      --label list              Set metadata for an image
      --network string          Set the networking mode for the RUN instructions during build (default "default")
      --no-cache                Do not use cache when building the image
  -o, --output stringArray      Output destination (format: type=local,dest=path)
      --platform string         Set platform if server is multi-platform capable
      --progress string         Set type of progress output (auto, plain, tty). Use plain to show container
                                output (default "auto")
      --pull                    Always attempt to pull a newer version of the image
  -q, --quiet                   Suppress the build output and print image ID on success
      --secret stringArray      Secret file to expose to the build (only if BuildKit enabled):
                                id=mysecret,src=/local/secret
      --ssh stringArray         SSH agent socket or keys to expose to the build (only if BuildKit enabled)
                                (format: default|<id>[=<socket>|<key>[,<key>]])
  -t, --tag list                Name and optionally a tag in the 'name:tag' format
      --target string           Set the target build stage to build.
コマンドの最後の「 .」について
Dockerfileの場所(ディレクトリ)を相対パスで指定している。
今回の場合、Dockerfileはdocker image buildをするディレクトリと同じ場所にあるため、ピリオドは「この場所」を指定する1つのみ。
ビルド後、docker image lsコマンドを実行し、イメージビルドが済んでいることを確認する。
docker image ls

REPOSITORY                TAG          IMAGE ID       CREATED             SIZE
helloworld                latest       87b496c40905   About an hour ago   135MB
コマンドの実行階層

※補足
- docker image buildを実行しているのはWSL上のLinuxOS
- コマンドの指示を受け取るのは常駐プロセスであるDocker
- その結果が返ってくるのはWSL上のLinuxOS
Dockerイメージを実行(run)する
以下のコマンドを実行し、作成したアプリケーション(シェルスクリプト)が実行されることを確認する。
※ここで「Hello, world!」と表示されるのは、以下のような手順を踏んでいるため。
- DockerfileのCMDが実行される。
- ファイル名としての「helloworld」ファイルが実行される。
- 最終的にそのファイルの中にある「echo "Hello, world!"」が実行された。
docker container run helloworld:latest
Hello, world!
コマンドの実行階層

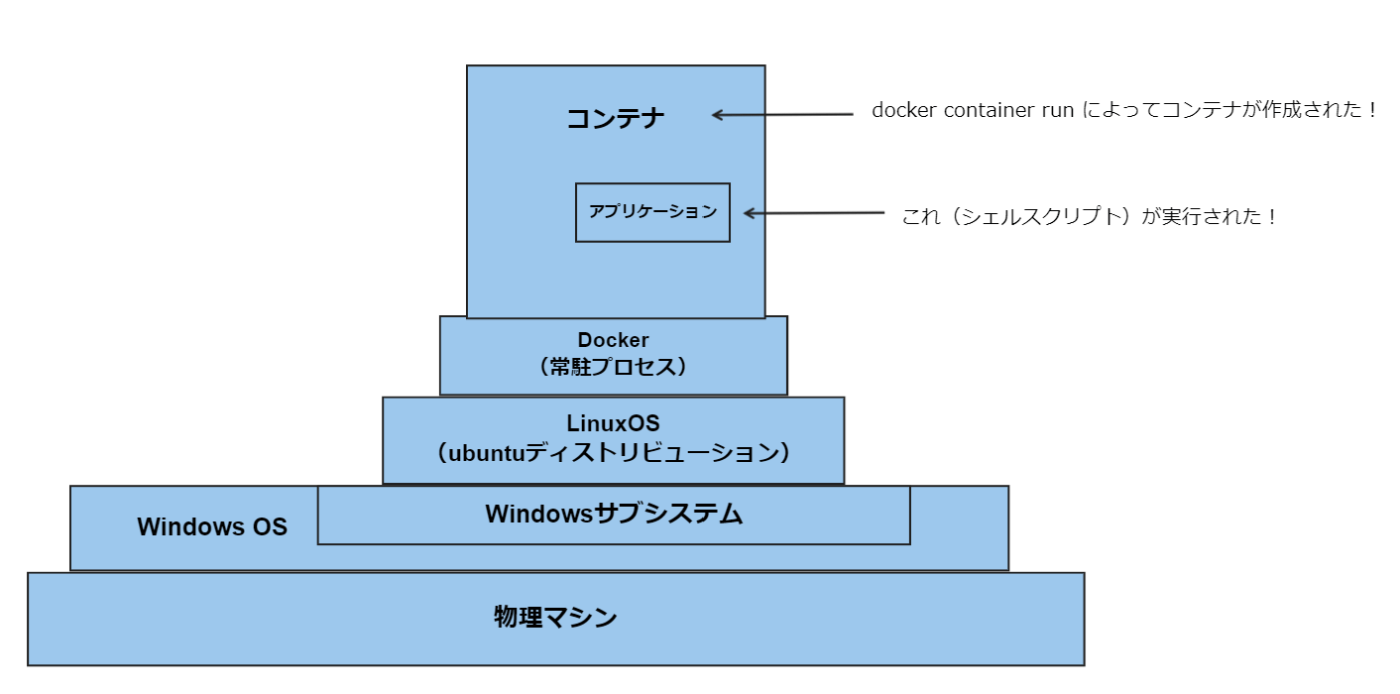
そして実行されたコンテナを図にすると以下のようになる。
コンテナは、docker container runをして初めて生まれるものなので、ここに来てやっと登場する。
所感
頭で想像するより、図に書いて「今はどの階層で作業をしているのか」を明確にすると理解が早くなった。また「Dockerfileを作成する」セクションで記載した警告のように、たった一文字違うだけでエラーが起きるので、どんな風にコマンドを打つとエラーが出るのかを探るのも勉強になるし、楽しさも感じるので引き続き行っていこうと思う。
Discussion