Core Bluetoothで相互通信(iOSとFlutter)
日常生活でよく使うがその仕組みをあまりわかっていないBluetooth。
今回は少しでもBluetooth接続を学習しようということでCore Bluetoothを使ってデバイス間の相互通信を実装してみます。
最終的にはデバイス2台で簡易なチャットアプリを作成していきます。
相互通信には L2CAP (Logical Link Control and Adaptation Protocol)を利用し、Streamでのデータ送受信を行います。
Core Bluetoothを利用するため、iOSアプリです。UI部分はFlutterで実装しますが本記事ではSwiftでの実装紹介のみです。UI周りは最後に添付するGitHubを確認いただければと思います。
Core Bluetooth
Core BluetoothはAppleのフレームワークで「Bluetooth Low Energy(BLE)」を利用して通信するためのクラスを提供してくれます。
BLE用語
BLEを利用するにあたり、いくつか用語が登場しますので簡単ではありますがご紹介します。
専門ではないので、説明が間違っていましたらご指摘いただけると助かります。
Central(セントラル)とPeripheral(ペリフェラル)
Central(セントラル) と Peripheral(ペリフェラル) という言葉が最初にでてきます。
一般的にはCentralは親機と言われスマートフォン等のデバイスと接続する側、
Peripheralは子機と言われイヤホン等のBluetoothデバイス(センサーデバイス)を指します。
シリアル通信でいうCenterは「マスター」、Peripheralは「スレーブ」に相当します。
※ 今回はチャットアプリを実装するため、Central、Peripheral共にスマートフォンとなります。
Service(サービス)
PeripheralはいくつかのServiceを持つことができます。各サービスが機能のようなものです。
CentralはこのPeripheralのServiceを指定して接続を行います。
Characteristic(キャラクタリスティック)
1つのServiceには1つ以上のCharacteristicが存在し、Service内でデータをやり取りする際に利用されます。
データはRead, Write, Notifyでやり取りすることが可能です。
| アクセス方法 | 詳細 |
|---|---|
| Read | CentralがPeripheralからデータを読み取る |
| Write | CentralからPeripheralにデータを書き込む |
| Notify | Peripheralから継続的にCentralへデータ送信する |
PeripheralがServiceやCharacrteristicを提供し、アクセスする手法に関するルールを GATT(Generic Attribute Profile)と呼びます。
BLE接続手順
接続手順の詳細は実装の中で記載しますが、Peripheral側でアドバタイズ(接続待ち状態)にし、Central側で接続するだけです。
- [Peripheral] アドバタイズ開始
- [Peripheral] L2CAPチャネルオープン
- [Central] スキャン
- [Central] 接続
- [Central] 接続したPeripheralのL2CAPオープン
接続処理でServiceやCharacrteristicを選択する等の処理はありますが、大きくはこの手順です。
実装
事前の説明が少し長くなってしまいましたが、ここから実装していきます。
プロジェクトはflutter create appで作成しています。
処理の流れ
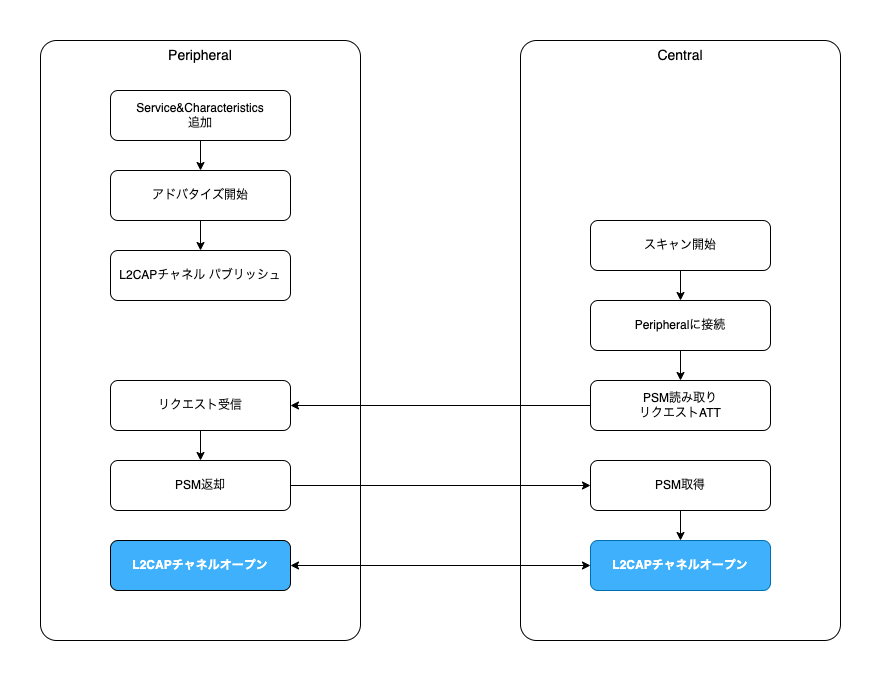
今回実装する大まかな流れと関連図です。
Xcodeプロジェクト設定
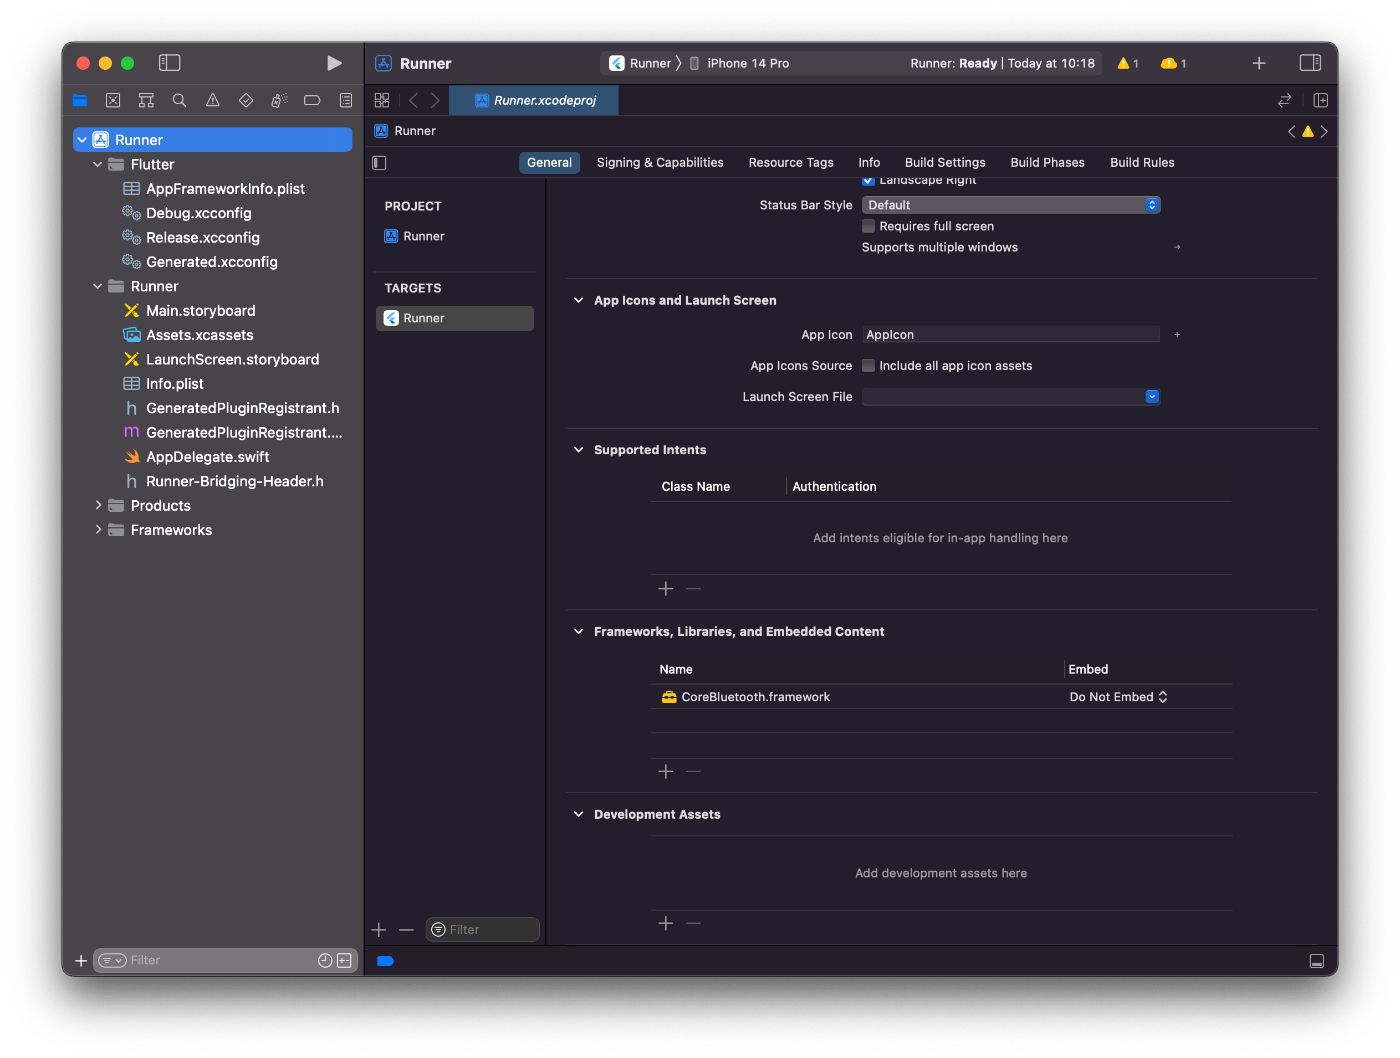
まずはCore Bluetoothを利用するためにXcodeのプロジェクトにフレームワークを追加します。
General の 「Frameworks, Libraries, and Embedded Content」から追加ボタンを押し、 CoreBluetooth.framework を選択します。
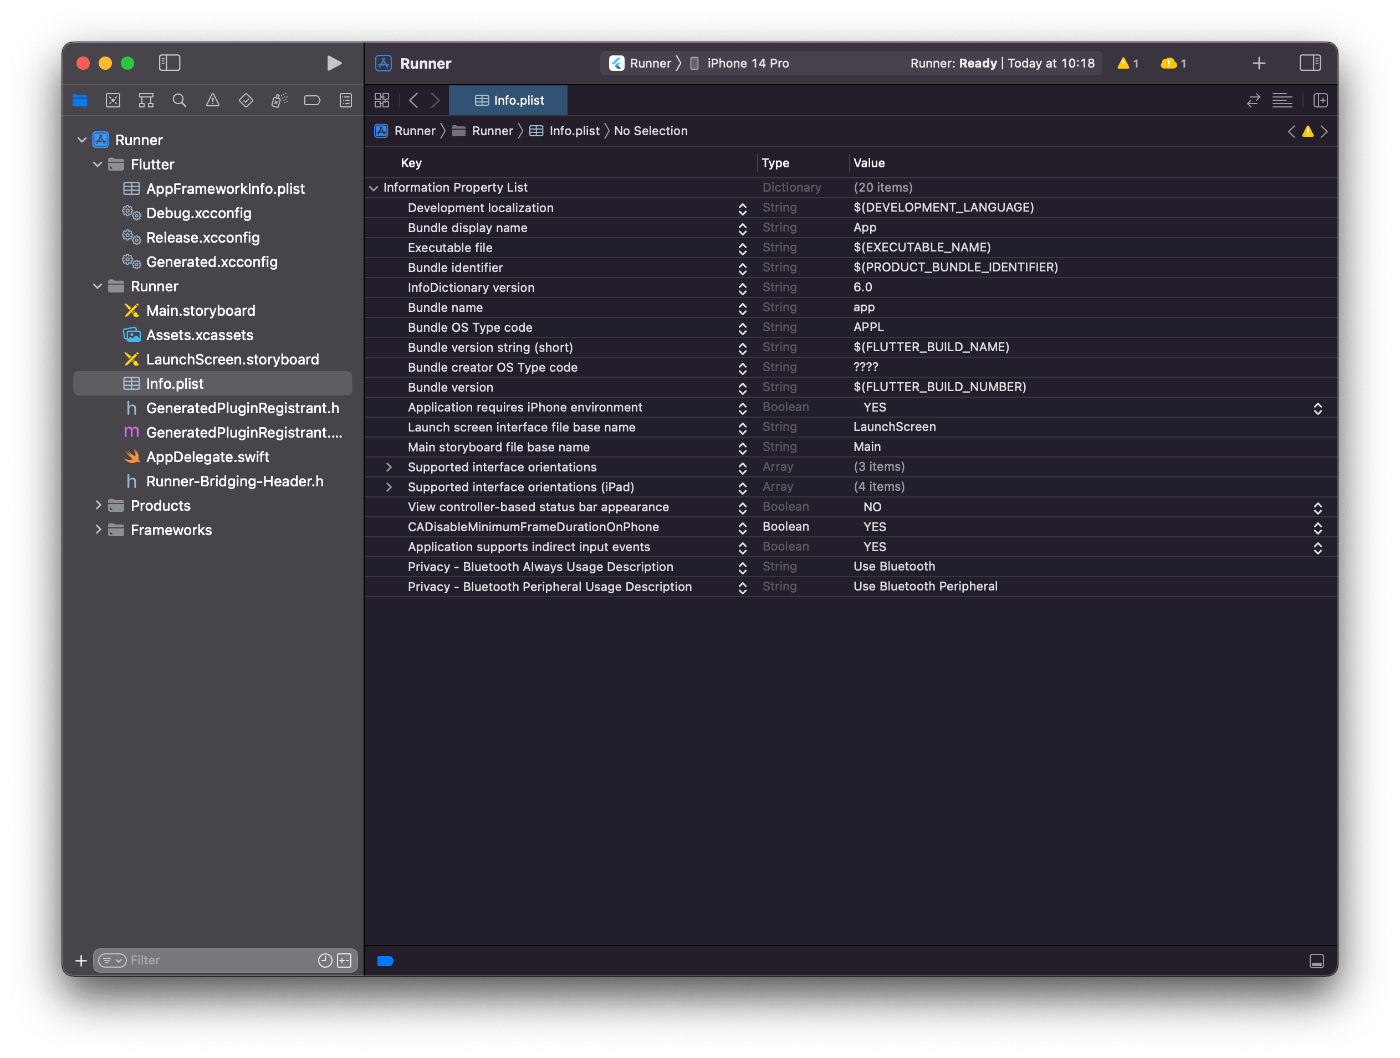
次に、Bluetoothアクセスを行うためInfo.plistに下記2つの項目を追加します。
| Key | Value |
|---|---|
| NSBluetoothAlwaysUsageDescription | Use Bluetooth |
| NSBluetoothPeripheralUsageDescription | Use Bluetooth Peripheral |
ソースコードで表示した場合(追加部分のみ抜粋)
<?xml version="1.0" encoding="UTF-8"?>
<!DOCTYPE plist PUBLIC "-//Apple//DTD PLIST 1.0//EN" "http://www.apple.com/DTDs/PropertyList-1.0.dtd">
<plist version="1.0">
<dict>
	<key>NSBluetoothAlwaysUsageDescription</key>
	<string>Use Bluetooth</string>
	<key>NSBluetoothPeripheralUsageDescription</key>
	<string>Use Bluetooth Peripheral</string>
</dict>
</plist>
ここまででプロジェクトの設定はできましたので、次からiOSネイティブの実装を行っていきます。
Peripheralコントローラ
Peripheral側の実装を行うためのコントローラPeripheralController.swiftを作成します。
import Foundation
import CoreBluetooth

class PeripheralController: NSObject, CBPeripheralManagerDelegate {

    static let shared: PeripheralController = PeripheralController()
    /// BLEのペリフェラルマネージャー
    private var manager : CBPeripheralManager?
}
アドバタイズ(接続待ち状態)は1回のみである必要があるため、コントローラはシングルトンで定義します。
次にアドバタイズを開始します。
func start() {
    self.manager = CBPeripheralManager(delegate: self, queue: nil)
}
インスタンスを生成すると、CBPeripheralManagerDelegateのperipheralManagerDidUpdateStateが呼ばれます。ここでBluetoothの状態(ON/OFF)を確認し、問題ない場合はServiceを追加します。
func peripheralManagerDidUpdateState(_ peripheral: CBPeripheralManager) {
    // BluetoothがONでない場合は後続処理は行わない
    if peripheral.state != .poweredOn {
        print("[peripheral error] bluetooth powered not on")
        return
    }

    // サービス生成
    let service = CBMutableService(type: CBUUID(string: "4BBA6CAA-BFC8-46A6-AB3D-CFCA5C96D39E"), primary: true)
    // Characteristicsを設定
    service.characteristics = [
        CBMutableCharacteristic(
            type: CBUUID(string: "0001"),
            properties: [.read],
            value: nil,
            permissions: [.readable]
        )
    ]

    // サービス追加
    self.manager?.add(service)
}
サービス生成時に指定しているCBUUID(string: "4BBA6CAA-BFC8-46A6-AB3D-CFCA5C96D39E")のUUID文字列は 今回は 何でも問題ありません。私がuuidgenコマンドで生成した値を設定しています。
characteristicsに設定しているのは、上の図でも書いた通り、L2CAPチャネルオープン時に利用するPSM値をやり取りするためのCBMutableCharacteristicです。読み取りのみできれば良いので、.readのみを設定しています。
サービスをマネージャーに追加するとperipheralManager(_ peripheral: CBPeripheralManager, didAdd service: CBService, error: Error?)が呼ばれます。
func peripheralManager(_ peripheral: CBPeripheralManager, didAdd service: CBService, error: Error?) {
    if let err = error {
        print("[peripheral error] \(err)")
        return
    }
    // 正常にサービス追加できたため、アドバタイズを開始する
    let data: [String: Any] = [
        CBAdvertisementDataLocalNameKey: "com.example.corebluetooth",
        CBAdvertisementDataServiceUUIDsKey: [service.uuid],
    ]
    peripheral.startAdvertising(data)
    // ストリーム送受信用のL2CAPチャネルをパブリッシュ
    peripheral.publishL2CAPChannel(withEncryption: true)
    print("success! start advertising: \(service.uuid.uuidString)")
}
正常にサービスが追加できた場合はstartAdvertisingでアドバタイズの開始とpublishL2CAPChannelでL2CAPチャネルをパブリッシュします。アドバタイズ開始時にCBAdvertisementDataLocalNameKeyに固有の名称を設定することでCentral側で見つけやすくします。
アドバタイズを完了するとperipheralManagerDidStartAdvertisingが呼ばれます。画面等へ完了の通知を行う場合はここで実施するのが良いかと思います。今回は特に何もせず、メッセージだけ出力しています。
func peripheralManagerDidStartAdvertising(_ peripheral: CBPeripheralManager, error: Error?) {
    if let err = error {
        print("[peripheral error] failed start advertising: \(err)")
        return
    }
    print("success! started advertising")
}
L2CAPチャネルのパブリッシュを行うとperipheralManager(_ peripheral: CBPeripheralManager, didPublishL2CAPChannel PSM: CBL2CAPPSM, error: Error?)が呼ばれます。PSMは後にCentral側への通知で利用するため、クラス変数として保持しておきます。
func peripheralManager(_ peripheral: CBPeripheralManager, didPublishL2CAPChannel PSM: CBL2CAPPSM, error: Error?) {
    if let err = error {
        print("[peripheral error] publishing channel: \(err.localizedDescription)")
        return
    }
    self.psm = PSM
    print("published channel psm: \(PSM)")
}
ここまでで、アドバタイズとL2CAPチャネルのパブリッシュが完了したため、Central側からスキャンして見つけることができるようになりました。この後は接続後に必要となるL2CAPチャネルのオープン時のコールバック、ATTリクエストに対する処理を実装していきます。
まずはL2CAPチャネルのオープン時のコールバックです。こちらは、パブリッシュしたL2CAPチャネルに対してCentral側からオープンされた場合に呼ばれます。CBL2CAPChannel内にInputStreamとOutputStreaamがありますので、そちらをオープンします。BLEStreamは独自定義のクラスで、Stream周りを共通的に扱うクラスになります。
func peripheralManager(_ peripheral: CBPeripheralManager, didOpen channel: CBL2CAPChannel?, error: Error?) {
    if let err = error {
        print("[peripheral error] opening channel: \(err.localizedDescription)")
        return
    }
    guard let channel = channel else { return }
    self.streams = BLEStream(channel: channel)
    self.streams?.delegate = self
}
class BLEStream: NSObject, StreamDelegate {

    private var channel: CBL2CAPChannel

    init(channel: CBL2CAPChannel) {
        self.channel = channel
        super.init()

        /// ストリームオープン
        self.channel.outputStream?.delegate = self
        self.channel.outputStream?.schedule(in: .current, forMode: .default)
        self.channel.outputStream?.open()

        /// ストリームオープン
        self.channel.inputStream?.delegate = self
        self.channel.inputStream?.schedule(in: .current, forMode: .default)
        self.channel.inputStream?.open()
    }

    /// ストリーム切断
    func disconnect() {
        self.channel.inputStream?.close()
        self.channel.outputStream?.close()
    }

    func stream(_ aStream: Stream, handle eventCode: Stream.Event) {

        var streamType: String = "input"
        if aStream == self.channel.outputStream {
            streamType = "output"
        }

        switch eventCode {
        case .openCompleted:
            // ストリームオープン
            print("[stream - \(streamType)] open completed")
            if streamType == "output" {
                self.delegate?.bleStream(stream: self.channel.outputStream!)
            }
            break
        case .hasBytesAvailable:
            // データ受信
            print("[stream - \(streamType)] has bytes available")
            if let inputStream = self.channel.inputStream {
                self.onStream(stream: inputStream)
            }
            break
        case .hasSpaceAvailable:
            // データ送信可能
            print("[stream - \(streamType)] has space available")
            break
        case .errorOccurred:
            print("[stream - \(streamType)] errorOccurred: \(String(describing: aStream.streamError?.localizedDescription))")
            break
        case .endEncountered:
            // ストリーム切断
            print("[stream - \(streamType)] end encountered")
            self.disconnect()
            break
        default:
            break
        }
    }
}
ストリーム受信時の処理についてはSwiftの通常のStreamであるためここでは割愛します。
最後にATTリクエストに対する処理です。今回はReadのみの利用となるためRead用のメソッドのみ実装します。
func peripheralManager(_ peripheral: CBPeripheralManager, didReceiveRead request: CBATTRequest) {
    let uuid = request.characteristic.uuid.uuidString
    switch uuid {
    case BLEConst.kCharacteristicsPSM:
        // PSM要求
        let psmValue = Int("\(self.psm!)")!
        let data = try! JSONEncoder().encode(BLEPSMIF(psm: psmValue))
        // リクエストに設定してレスポンス返却
        request.value = data
        peripheral.respond(to: request, withResult: .success)
        break
    default:
        break
    }
}
Central側からPSMの値を読み取るリクエストが来た場合、L2CAPチャネルパブリッシュ時に取得した自分自身のPSM値を返却するようにしています。BLEPSMIFはCodableクラスになっていて、Int型のpsmという変数を持つのみとなります。
requestのvalueにJSON変換したデータを設定し、peripheral.respond(to: request, withResult: .success)でCentral側に返します。
接続を行うためのPeripheral側の実装は以上になります。
Centralコントローラ
Central側の実装を行うためのコントローラCentralController.swiftを作成します。
import Foundation
import CoreBluetooth

class CentralController: NSObject, CBCentralManagerDelegate, CBPeripheralDelegate {

    static let shared: CentralController = CentralController()
    /// BLEセントラルマネージャー
    private var manager: CBCentralManager?
}
こちらもスキャンは1回のみである必要があるため、コントローラはシングルトンで定義します。
func start() {
    self.manager = CBCentralManager(delegate : self, queue : nil)
}
こちらもPeripheral同様、インスタンスを生成するとCBCentralManagerDelegateのcentralManagerDidUpdateStateが呼ばれます。ここでBluetoothの状態(ON/OFF)を確認し、問題ない場合はスキャンを開始します。
func centralManagerDidUpdateState(_ central: CBCentralManager) {
    // BluetoothがONでない場合は後続処理は行わない
    if central.state != .poweredOn {
        print("[error] bluetooth powered not on")
        return
    }

    // スキャンを開始
    let options: [String: Any] = [
        CBCentralManagerScanOptionAllowDuplicatesKey: NSNumber(value: false)
    ]
    self.manager?.scanForPeripherals(withServices: nil, options: options)
}
スキャンした結果は随時centralManager(_ central: CBCentralManager, didDiscover peripheral: CBPeripheral, advertisementData: [String : Any], rssi RSSI: NSNumber)が呼び出されます。
func centralManager(
    _ central: CBCentralManager,
    didDiscover peripheral: CBPeripheral,
    advertisementData: [String : Any],
    rssi RSSI: NSNumber
) {
    guard let name = advertisementData["kCBAdvDataLocalName"] as? String,
            name == "com.example.corebluetooth",
            let ids = advertisementData["kCBAdvDataServiceUUIDs"] as? [CBUUID]
    else {
        return
    }

    // 接続状態を保存
    self.connectedUUIDs = ids
    self.peripheral = peripheral
    self.peripheral?.delegate = self

    // スキャンを停止して接続する
    self.manager?.stopScan()
    self.manager?.connect(peripheral, options: nil)
}
Peripheral側でサービス追加時に指定したCBAdvertisementDataLocalNameKeyの名称と一致するPeripheralのみを対象とし、見つかった場合はスキャンを停止します。ここで、接続するPeripheralはクラス変数に保持しておかないと、connectを行なった際に上手く接続できません。idsはサービスのUUIDのリストとなっています。後続処理で利用するため、こちらもクラス変数として保持しておきます。
connectを行うと接続完了のコールバックcentralManager(_ central: CBCentralManager, didConnect peripheral: CBPeripheral)が呼ばれます。先程保持しておいたサービスのUUIDリストを設定します。今回はサービスを1つしか設定していませんので、そのまま設定しています。
func centralManager(_ central: CBCentralManager, didConnect peripheral: CBPeripheral) {
    // Peripheralが提供しているサービスをUUID指定で検索する
    peripheral.discoverServices(self.connectedUUIDs)
}
discoverServicesを行うとCBPeripheralDelegateのperipheral(_ peripheral: CBPeripheral, didDiscoverServices error: Error?)が呼ばれます。
func peripheral(_ peripheral: CBPeripheral, didDiscoverServices error: Error?) {
    if (error != nil) {
        print("[error central] discover services \(error!.localizedDescription)")
        return
    }

    guard let services = peripheral.services else { return }

    // 見つかったサービスを取得
    for service in services {
        if self.connectedUUIDs.contains(service.uuid) {
            peripheral.discoverCharacteristics(nil, for: service)
        }
    }
}
見つかったサービスの中で指定したサービスのUUIDと一致するもの取得し、discoverCharacteristicsを行います。
discoverCharacteristicsで指定したサービス内で有効なcharacteristicsが見つかるとperipheral(_ peripheral: CBPeripheral, didDiscoverCharacteristicsFor service: CBService, error: Error?)が呼ばれます。
func peripheral(_ peripheral: CBPeripheral, didDiscoverCharacteristicsFor service: CBService, error: Error?) {
    if (error != nil) {
        print("[error central] discover characterostics \(error!.localizedDescription)")
        return
    }
    // 見つかったCharacteristicsを取得
    guard let characteristics = service.characteristics else {
        print("no data characteristics")
        return
    }
    // 必要なCharacteristicsが存在するか確認
    guard let c = characteristics.filter({ d in d.uuid.uuidString == BLEConst.kCharacteristicsPSM}).first else {
        print("[error cantral] no psm characteristcs")
        return
    }
    // チャネルオープンするために必要なPSM値を取得するためのリクエスト
    peripheral.readValue(for: c)
}
PeripheralのPSMを取得するため、characteristicを取得してreadValueを呼び出します。これでATTリクエストを実行したため、Peripheral側でperipheralManager(_ peripheral: CBPeripheralManager, didReceiveRead request: CBATTRequest)が呼び出されます。
Peripheral側からリクエストに対するレスポンスが返されると下記のメソッドが呼び出されます。これで相手側のPSMを取得します。
func peripheral(_ peripheral: CBPeripheral, didUpdateValueFor characteristic: CBCharacteristic, error: Error?) {
    let uuid = characteristic.uuid.uuidString
    switch uuid {
    case BLEConst.kCharacteristicsPSM:
        // 構造体に変換
        guard let data = try? JSONDecoder().decode(BLEPSMIF.self, from: characteristic.value!) else {
            return
        }
        self.psm = CBL2CAPPSM(data.psm)
        // チャネルオープン
        peripheral.openL2CAPChannel(self.psm!)
        break
    default:
        break
    }
}
PSMを取得したら、その値を利用してopenL2CAPChannelでL2CAPチャネルをオープンします。
無事にオープンできればPeripheralと同様、didOpenが呼ばれます。その後のStreamの扱いはPeripheralと同じとなります。
func peripheral(_ peripheral: CBPeripheral, didOpen channel: CBL2CAPChannel?, error: Error?) {
    if let err = error {
        print("[central error] opening channel: \(err.localizedDescription)")
        return
    }
    guard let channel = channel else { return }
    self.streams = BLEStream(channel: channel)
    self.streams?.delegate = self
}
ここまでで、PeripheralとCentralの接続が完了し、L2CAPチャネルを利用して相互通信が可能となりました。
動作確認
相互通信が可能となりましたので、L2CAPチャネルのストリームを利用してテキストのやり取りを行ってみます。
メッセージの送信はストリームのwriteメソッドで行います。引数はUnsafePointer<UInt8>型なので、Stringを変換して送信します。
channel.outputStream?.write(ptr, maxLength: length)
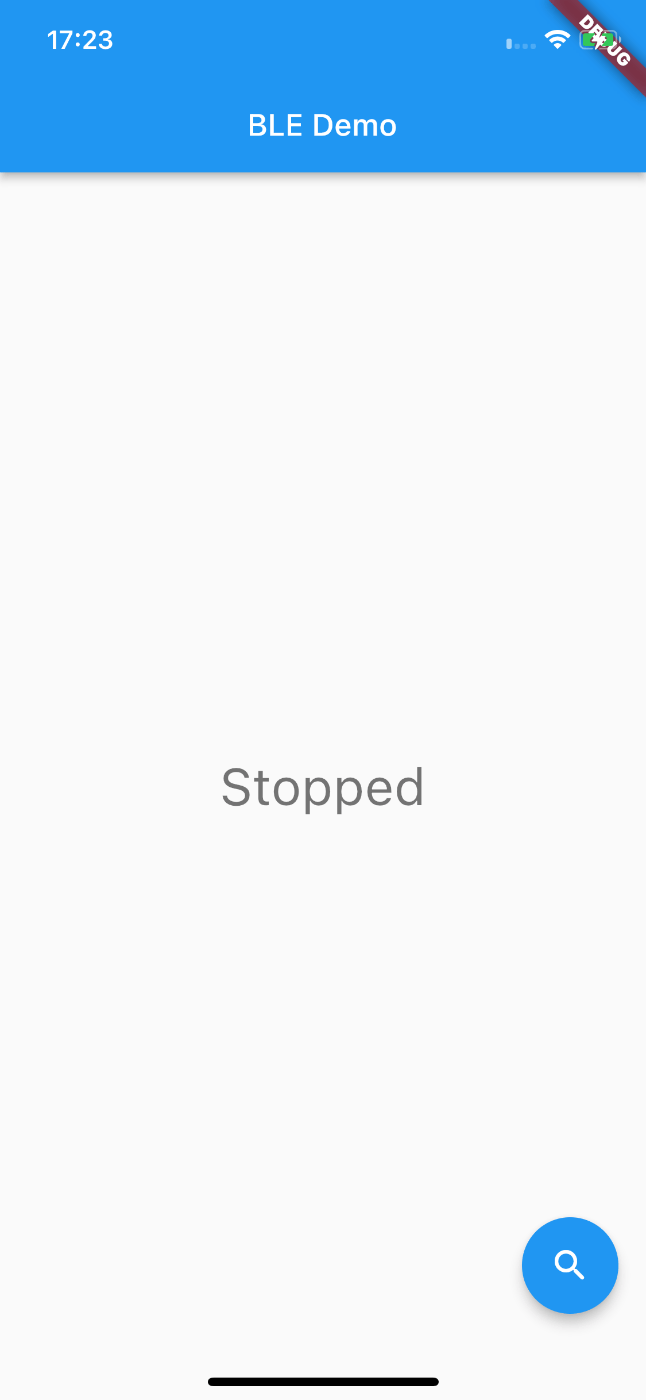
動作確認には実機のiOSが2台必要となります。下記のスクリーンショットは1台分ですが、2台とも同じアプリを実行しています。
どうやらiOS SimulatorではBluetooth通信ができないみたいです。。昔できていたような気がしますが、なくなったみたいです。。
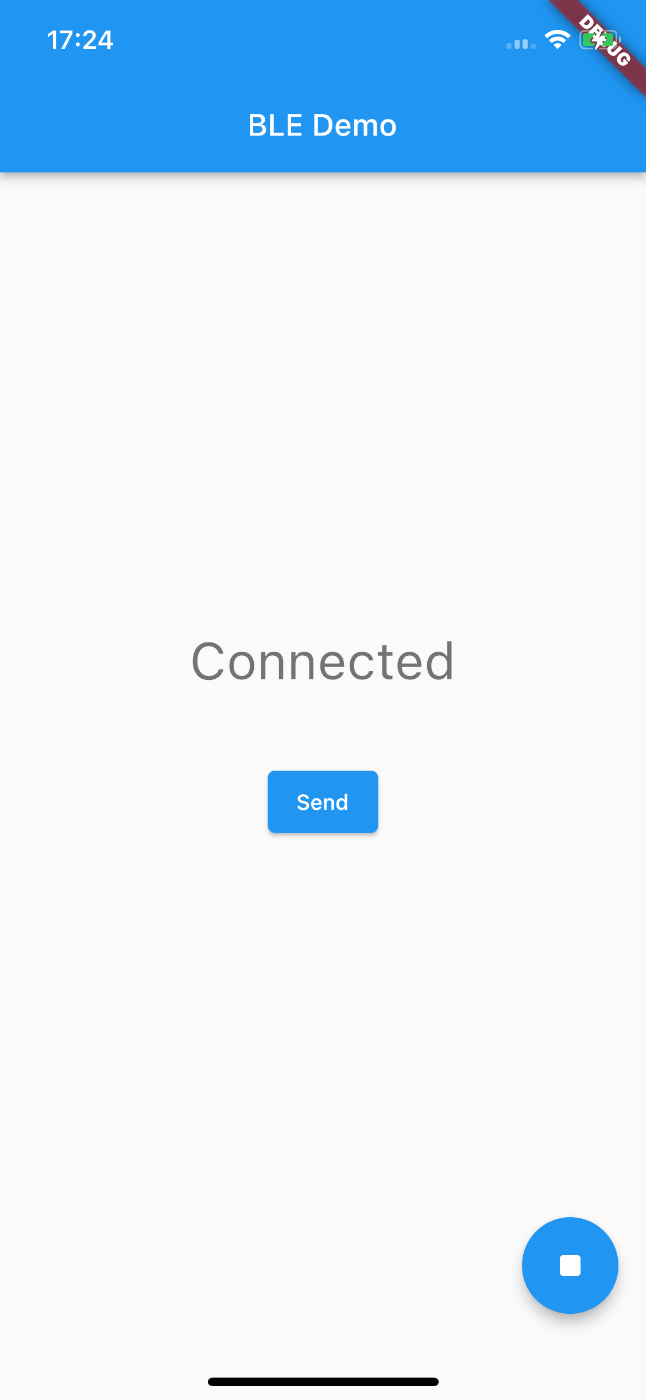
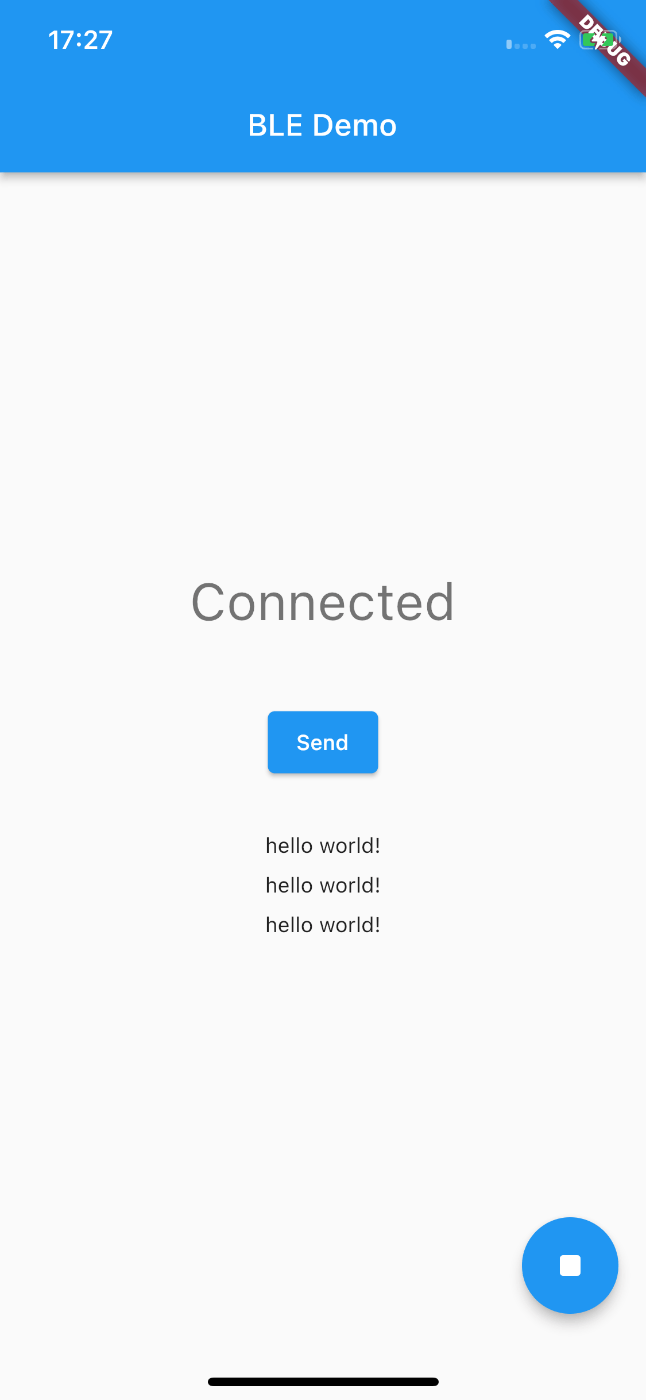
| 接続前 | 接続後 | メッセージ送信 |
|---|---|---|
 |
 |
 |
- 接続前画面で右下の検索ボタンを押すともう一方の端末に接続します。
アプリ起動時にアドバタイズを実行するようにしているため、どちらの端末もPeripheralとして動作するようになっていて、
検索ボタンを押した方が Central として動作します。
(同時に押すとか、どちらもCentralとかの制御は今回はデモなのでありません..) - 接続後画面はL2CAPチャネルがオープンされたコールバックを受け、
Connectedとメッセージ送信ボタンを表示します。 - 「Send」ボタンを押下することで相手に
hello world!が送信されます。受信した側はその文字列を表示するようにしています。
【参考】UnsafePointer<UInt8>への変換
UnsafePointer<UInt8>への変換は少し手間取ったので参考程度にソースを載せておきます。
class Sample {
    func sendData(text: String) {
        var textData = text
        textData.append("EOF")
        var data = textData.data(using: .utf8)
        data?.shapeForBle { (ptr, length) in
            self.openedStream?.write(ptr, maxLength: length)
        }
    }
}

extension Data {
    mutating func shapeForBle(sendTo: @escaping ((UnsafePointer<UInt8>, Int) -> Void)) {
        // データサイズ
        let totalSize = self.count
        self.withUnsafeMutableBytes { (raw: UnsafeMutableRawBufferPointer) in
            /// ポインター形式変換
            guard let ptr = raw.baseAddress?.assumingMemoryBound(to: UInt8.self) else {
                return
            }
            // 1度に送信できるサイズは1KBまでのため、1024を上限としてチャンク分割を行う
            let uploadChunkSize = BLEConst.kStreamMaxSize
            // オフセット
            var offset = 0
            // オフセットがサイズを超えるまで繰り返し
            while offset < totalSize {
                // チャックのサイズを算出
                let chunkSize = offset + uploadChunkSize > totalSize ? totalSize - offset : uploadChunkSize
                // 送信するチャンクデータを取得
                var chunk = Data(bytesNoCopy: ptr + offset, count: chunkSize, deallocator: .none)

                let diff = uploadChunkSize - chunkSize;
                var data = ""
                for _ in 0..<diff {
                    data.append(" ")
                }
                chunk.append(data.data(using: .utf8)!)

                // 送信するための形式に変換
                chunk.withUnsafeBytes { chunkRaw in
                    guard let chunkPtr = chunkRaw.baseAddress?.assumingMemoryBound(to: UInt8.self) else {
                        return
                    }
                    sendTo(chunkPtr, chunk.count)
                }
                offset += chunkSize
            }
        }
    }
}
ストリーム受信時のUnsafeMutablePointer<UInt8>からString型への変換についてはGitHubを参照ください。
実装終わり
想定より非常に長くなりましたが、やっっっとBluetoothで相互通信ができるようになりました。
調べながらでまとまりのない実装ですので参考程度にしていただければと思います。
ここまでの実装をベースに1対1のシンプルなメッセージチャットを作ってみましたので
興味のある方、是非覗いてみてください。
最後に
今回はBluetooth通信について理解するために実装してみました。
Core Bluetoothを利用してPeripheralへ接続するというサイトはいくつかあったのですが、iOS側がPeripheralとなる実装やL2CAPチャネルを利用したサンプルがあまりなかったので、少しでも参考になればと思います。
実装してみて感じたこととしては、、BLEには色々とライブラリがありますし、iOSではMultipeer Connectivity、AndroidではNearby Connections API等のサービスがあり、P2P通信を行うにはこれらのライブラリやフレームワークを利用するのが良いかなと思いました。。
あまり更新頻度は高くないですが、GitHubにいくつかコードをあげているのでお時間ある方は少し覗いていただけると有り難いです。
Discussion