AppBarをコンポーネント化して全画面に同じデザインを反映させる
今回は、FlutterでAppBarをコンポーネント化する方法を紹介します。
AppBarは多くのアプリでよく使われているWidgetです。
普段利用しているアプリ、ほぼ全ての画面にはAppBarが存在します。
AppBarはほとんど同じデザインで全画面に反映されることが多いですが、
今回はそのAppBarを実際にコンポーネント化する方法について解説します。
✅今回の内容
- 今回使用するプログラム
- AppBarをコンポーネント化する
- 実際に動かしてみる
✅メイン内容
🛠 今回使用するプログラム
1. 元となるプログラム
今回は、AppBarをコンポーネント化します。
AppBarをコンポーネント化するケースは様々ですが、
全てのページのAppBarを同じデザインにするときによくコンポーネント化されます。
なので、今回は画面を2枚用意して、AppBarをコンポーネント化し、
同じデザインのAppBarを設置していきたいと思います。
コピペで使えるプログラム
import 'package:flutter/material.dart';
void main() {
runApp(const MyApp());
}
class MyApp extends StatelessWidget {
const MyApp({super.key});
// This widget is the root of your application.
Widget build(BuildContext context) {
return MaterialApp(
title: 'Flutter Demo',
theme: ThemeData(),
home: const MyHomePage(title: 'Flutter Demo Home Page'),
);
}
}
class MyHomePage extends StatefulWidget {
const MyHomePage({super.key, required this.title});
final String title;
State<MyHomePage> createState() => _MyHomePageState();
}
class _MyHomePageState extends State<MyHomePage> {
int _counter = 0;
void _incrementCounter() {
setState(() {
_counter++;
});
}
Widget build(BuildContext context) {
return Scaffold(
appBar: AppBar(
title: Text(widget.title),
),
body: Center(
child: Column(
mainAxisAlignment: MainAxisAlignment.center,
children: <Widget>[
const Text(
"遷移前ページ",
),
],
),
),
floatingActionButton: FloatingActionButton(
onPressed: () {
Navigator.of(context).push(
MaterialPageRoute(builder: (context) => TransitionWidget()));
},
tooltip: 'Increment',
child: const Icon(Icons.add),
),
);
}
}
class TransitionWidget extends StatelessWidget {
const TransitionWidget({super.key});
Widget build(BuildContext context) {
return Scaffold(
appBar: AppBar(
title: Text(
"画面遷移",
style: TextStyle(
fontWeight: FontWeight.bold,
color: Colors.white,
fontSize: 23,
),
),
),
body: Center(child: Text("遷移先ページ")),
);
}
}
🛠 AppBarをコンポーネント化する
1. AppBarを作成
まず、AppBarだけのWidgetを作成します。
class AppBarComponentWidget extends StatelessWidget {
  AppBarComponentWidget({required this.title, super.key});
  String title;
Widget build(BuildContext context) {
return AppBar(
title: Text(
title,
style: const TextStyle(
fontWeight: FontWeight.bold,
color: Colors.white,
fontSize: 23,
),
),
flexibleSpace: Container(
decoration: const BoxDecoration(
gradient: LinearGradient(colors: [
Colors.blue,
Colors.red,
]),
),
),
);
}
}
このクラスはコンストラクタが呼ばれた時にAppBarを返却します。
引数にタイトルを設定している理由は、今回AppBarをコンポーネント化するので表示するページによってタイトルを変えようと思ったからです。
AppBarComponentWidget({required this.title, super.key});
String title;
2. 埋め込んでみる
元となるプログラムのAppBarに上記で作成したAppBarComponentWidgetを当てはめる。
      appBar: AppBar(
        title: Text(widget.title),
      ),

      //↓変更後

      appBar: AppBarComponentWidget(
        title: "遷移前ページ",
      ),
すると、以下のようなエラーが出ます。
The named parameter 'title' is required, but there's no corresponding argument.
Try adding the required argument.dartmissing_required_argument
The argument type 'AppBarComponentWidget' can't be assigned to the parameter type 'PreferredSizeWidget?'.dartargument_type_not_assignable
このエラーが発生する理由ですが、
ScaffoldのappbarパラメータはPreferredSizeWidget型です。
実は、よく使うAppBarはPreferredSizeWidgetを実装したクラスです。
なので、AppBarをコンポーネント化しよう思ったら、そのコンポーネント化したクラスでPreferredSizeWidgetクラスを実装する必要があります。
実装しちゃいましょう。
class AppBarComponentWidget extends StatelessWidget
    implements PreferredSizeWidget {
すると、今度はAppBarComponentWidgetにエラーが出ます。
今実装したPreferredSizeWidgetクラスは抽象クラスです。なので、実装したサブクラスでPreferredSizeWidgetクラスの内容をオーバーライドする必要があります。
オーバーライドする内容は下記。
class PreferredSize extends StatelessWidget implements PreferredSizeWidget {
/// Creates a widget that has a preferred size that the parent can query.
const PreferredSize({
super.key,
required this.child,
required this.preferredSize,
});
/// The widget below this widget in the tree.
///
/// {@macro flutter.widgets.ProxyWidget.child}
final Widget child;
//ここ!!
final Size preferredSize;
Widget build(BuildContext context) => child;
}
buildメソッド等はすでにオーバーライドされているので、
今回はpreferredSizeをオーバーライドすれば良いです。
Size get preferredSize {
return Size(double.infinity, 60.0);
}
preferredSizeでは、AppBarのサイズを指定してあげる必要があります。
通常、AppBarでは高さ:56.0が設定されています。
今回は、キリよく60に設定しました。
これで、buildしてみると
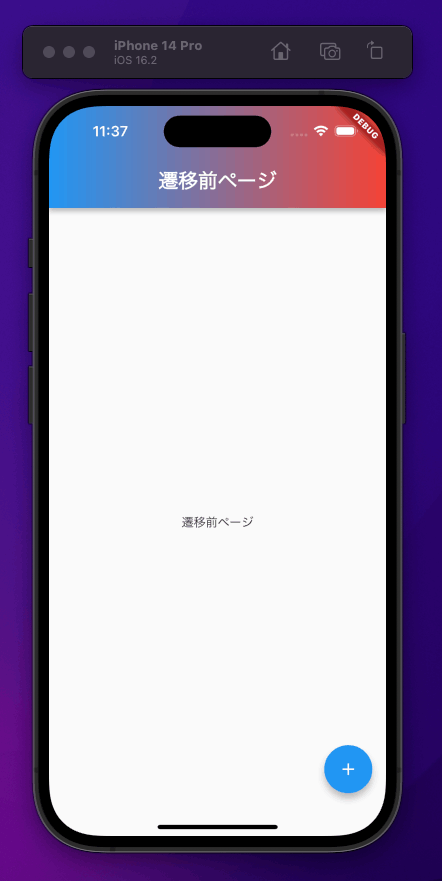
と、AppBarがMyHomePageクラスに反映されています。
遷移先のTransitionWidgetクラスにもコンポーネント化したAppBarComponentWidgetクラスを入れましょう。
class TransitionWidget extends StatelessWidget {
const TransitionWidget({super.key});
Widget build(BuildContext context) {
return Scaffold(
appBar: AppBarComponentWidget(
title: "遷移先ページ",
),
body: Center(child: Text("遷移先ページ")),
);
}
}
🛠 実際に動かしてみる
1. 完成版

これでAppBarのコンポーネント化が完成です。🍎
✅まとめ
今回は、AppBarのコンポーネント化について解説しました。
AppBarをコンポーネント化しようとした時、エラーが出て焦ってしまう時があると思います。
上記の方法で改善できますので、ぜひご参考にしてみてください。
iOSアプリのTestFlightの登録方法については以下の記事で解説しています。
今回はここまで
Discussion