Git_GitHub再入門
今更ながらGit,GitHubに再入門(再学習)してみました。
1. Gitとは?
バージョン管理システムの一つで以下を管理する
- 誰が
- いつ
- なにを
変更したかを管理します。
さらには特定のバージョンとの差分を確認したり、状態を戻すことができます。
2. なぜバージョン管理が必要なのか?
バージョン管理を行うことで得られるメリット
- 変更履歴を辿れる
- 差分を確認できる
- 最新のファイルがわかる
- 前のバージョンに簡単に戻せる
- 他人の作業箇所がわかる
- 他人の作業を簡単に結合できる
3. Gitの用語解説
リポジトリ:プロジェクトの全てのファイル(変更履歴や設定ファイルをもすべて)を管理している
コミット:ファイルの状態をセーブすること。ある程度機能を纏めてコミットすることが望ましい。
ブランチ:複数の機能を平行して開発を行う場合に有効。その他複数人と同時に開発を行う場合にも有効である。
4. SSHでGitHubへアクセスする
ローカルPCからGitHubへアクセスする際にパスワード認証がサポートされなくなったので、SSHによるアクセス方法を試します。
4.1 SSHキーの作成
PS C:\Users\******\node_modules\Zenn>
PS C:\Users\******\node_modules\Zenn>
PS C:\Users\******\node_modules\Zenn> ssh-keygen.exe -t ed25519 -C "*****@example.com"
Generating public/private ed25519 key pair.
Enter file in which to save the key (C:\Users\******/.ssh/id_ed25519):
Enter passphrase (empty for no passphrase):
Enter same passphrase again:
Your identification has been saved in C:\Users\******/.ssh/id_ed25519.
Your public key has been saved in C:\Users\******/.ssh/id_ed25519.pub.
The key fingerprint is:
SHA256:/1LFrd00KZTzJRmV6TcBB0Q***** *****@example.com
The key's randomart image is:
+--[ED25519 256]--+
|   .o.+..oo===*=+|
|     o .  . +*++.|
|      .     .++o+|
|     .       .+*+|
| .  .   S    ..+=|
|  o ..   .  . . o|
|   o o.   ..     |
|  o ....  ..     |
|   Eo.o.   ..    |
+----[SHA256]-----+
PS C:\Users\******\node_modules\Zenn>
SSHキーが作成されたことを確認する。
PS C:\Users\******\node_modules\Zenn> ls -l ..\..\.ssh\


    ディレクトリ: C:\Users\******\.ssh


Mode                 LastWriteTime         Length Name
----                 -------------         ------ ----
-a----        2023/01/01     22:12            411 id_ed25519
-a----        2023/01/01     22:12            102 id_ed25519.pub
-a----        2022/12/16     16:56            707 known_hosts
4.2 ~/.ssh/configファイルの作成
Host *
 AddKeysToAgent yes
 IdentityFile ~/.ssh/id_ed25519
4.3 SSHキーをssh-agentに登録する
4.3.1 Windowsのssh-agentが起動していない場合
PSを管理者で実行し、以下コマンドを実行する。
PS C:\WINDOWS\system32> Set-Service -StartupType Automatic ssh-agent
PS C:\WINDOWS\system32> Start-Service ssh-agent
4.3.2 SSHキーをssh-agentに登録
PS C:\Users\******\node_modules\Zenn> ssh-add.exe C:\Users\******\.ssh\id_ed25519
Identity added: C:\Users\******\.ssh\id_ed25519 (*****@example.com)
PS C:\Users\******\node_modules\Zenn>
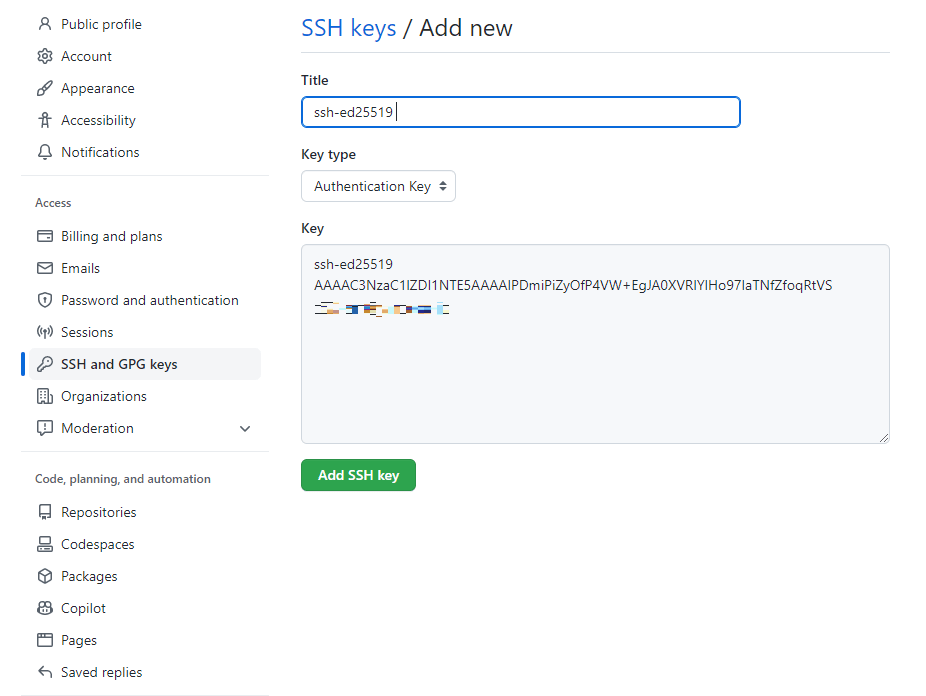
4.3.3 公開鍵のコピー
id_ed25519.pubの中身をコピーする
4.4.4 GitHub上にコピーした中身を張り付ける
GitHub -> アカウントのSettings -> SSH and GPG keys -> New SSH key をクリックする
5. リポジトリをローカルにコピー(Clone)
GitHub上にあるsample-repoを使って以下のような開発の流れを想定し実施してみます。
5.1 事前準備
GitHubのアカウント情報を**~/.gitconfig**に記述します。
--globalを付けないと、リポジトリ配下の.git/configに記述されます。
$ git config --global user.name "hogehoge"
$ git config --global user.email "hoge@example.com"
設定の確認
git config --global --list
PS C:\Users\******\node_modules\Zenn> git config --global --list
user.name=hogehoge
user.email=example@hoge.com
PS C:\Users\******\node_modules\Zenn>
5.2 リポジトリをコピー(クローン)
GitHubにアクセスし、<>Codeボタンをクリックし、SSHのURLをコピーします。
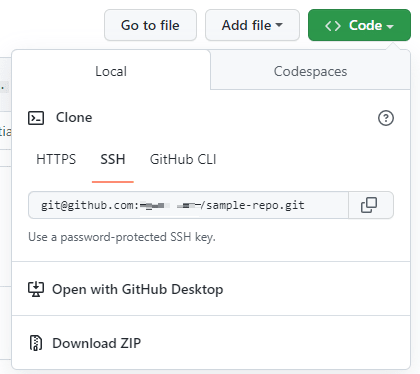
C:\Users\******>git clone git@github.com:******/sample-repo.git
Cloning into 'sample-repo'...
remote: Enumerating objects: 3, done.
remote: Counting objects: 100% (3/3), done.
remote: Total 3 (delta 0), reused 0 (delta 0), pack-reused 0
Receiving objects: 100% (3/3), done.

C:\Users\******>
※使い慣れたUNIXコマンドを使いたいのでPSからWSL2で作業を行います。
クローンしたのでsample-repoのREADME.mdを確認できます。
sample-repo# ls -a
.  ..  .git  README.md
sample-repo#
リモートリポジトリとの紐づけを確認する。
git remote -vコマンドでローカルリポに紐づいているリモートURLを確認できます。
sample-repo# git remote -v
origin  git@github.com:******/sample-repo.git (fetch)
origin  git@github.com:******/sample-repo.git (push)
sample-repo#
5.3 ブランチ(update-readmne)を作成
ブランチ作成の例として、README.mdを更新するためにブランチを切ります。
※基本的にmainブランチで作業することはあり得ない。
万が一ブランチで開発環境を壊してもmainブランチに影響が出ないための措置である。
作業用ブランチを作成
現在のブランチを確認する。
mainブランチしか無いことを確認する。
「*」が付いているブランチ名がメインつまりアクティブなブランチです。
sample-repo# git branch
* main
sample-repo#
新しいブランチを作成する。
ブランチ名は「update-readme」とします。
sample-repo# git branch update-readme
ブランチ一覧を確認する
ブランチの確認
sample-repo# git branch
* main
  update-readme
sample-repo#
作業するブランチを切り替える
update-readmeブランチに切り替えます。
sample-repo# git checkout update-readme
M       README.md
Switched to branch 'update-readme'
update-readmeがメインブランチに切り替わっていることを確認する。
sample-repo# git branch
  main
* update-readme
sample-repo#
5.4 README.mdを更新しコミットする
コミットの流れ
README.mdを更新する -> 更新分をStaging areaにaddする -> リモートリポにcommitする
README.mdを変更する
まずgit statusコマンドで作業状態を確認する。
状態としては更新内容はありません。
sample-repo# git status
On branch update-readme
nothing to commit, working tree clean
sample-repo#
それではREADME.mdを更新していきます。
README.md内の末尾に「更新」の文言を追記し、保存します。
sample-repo# cat README.md
# sample-repo
Git練習用
更新
sample-repo#
作業状態を確認する。
README.mdファイルに更新(modified)があると表示されています。
sample-repo# git status
On branch update-readme
Changes not staged for commit:
  (use "git add <file>..." to update what will be committed)
  (use "git restore <file>..." to discard changes in working directory)
        modified:   README.md

no changes added to commit (use "git add" and/or "git commit -a")
sample-repo#
作業内容をStaging areaに上げる
git add <対象のファイル名> コマンドでStaging areaに上げます。
sample-repo# git add README.md
作業状態を確認します。
Changes to be commitedとあるように、コミットできる状態にあります。つまりStaging areaにあることが分かります。
sample-repo# git status
On branch update-readme
Changes to be committed:
  (use "git restore --staged <file>..." to unstage)
        modified:   README.md

sample-repo#
5.5 ローカルリポをリモートリポに反映する(push)
Staging areaの内容をコミットする
- コミット時は必ずコメントをつける
- 基本的には一文でコメントする
sample-repo# git commit -m "update readme"
[update-readme af46759] update readme

 1 file changed, 3 insertions(+), 2 deletions(-)
sample-repo#
作業状態を確認する
作業する前の表示と同じです。つまり作業内容(変更内容)はありません。
sample-repo# git status
On branch update-readme
nothing to commit, working tree clean
sample-repo#
閑話休題
コミット履歴を見る
コミット履歴 = バージョンみたいなもの
コミット履歴はgit logコマンドで確認できます。
git logコマンドをでは以下のようなことが分かる。
- コミット履歴の一覧を表示できる
- 前回コミットした内容が履歴にあることを確認できる
- リモートリポより1コミット進んでいることを確認できる
以下実行結果を確認すると2つの履歴が表示されています。上にある履歴が新しいものです。
コミットコメントも表示されているので、できるだけコメントのみでどのような更新をしたのかが分かると良いです。
※Initial commitは最初にリポジトリを作成したときに発生しています。
また各ブランチの最新の状態を確認できる。
af46759b397697fa1139f4a7439599bb4128bcf7 (HEAD -> update-readme)
より、update-readmeのブランチではID:af46759b397697fa1139f4a7439599bb4128bcf7の内容が最新であり、
2a4cb0d8aa51a86c8693a76584a7c4a162d259da (origin/main, origin/HEAD, main)
では、origin/main, origin/HEAD, mainブランチがID:2a4cb0d8aa51a86c8693a76584a7c4a162d259daの内容が最新であることが分かります。
- ※origin/main,origin/HEADのoriginはリモートリポのこと。
- ※HEADは今いるブランチを指している。
root@localhost:/mnt/c/Users/******/sample-repo# git log
commit af46759b397697fa1139f4a7439599bb4128bcf7 (HEAD -> update-readme)
Author: root <root@******.localdomain>
Date:   Mon Jan 2 18:15:15 2023 +0900

    update readme

commit 2a4cb0d8aa51a86c8693a76584a7c4a162d259da (origin/main, origin/HEAD, main)
Author: ****** <93906423+******@users.noreply.github.com>
Date:   Sun Jan 1 22:04:27 2023 +0900

    Initial commit
root@localhost:/mnt/c/Users/******/sample-repo#
5.6 pushする前にpullをする
改めてpushとpullの動きをおさらいします。
git push : ローカルリポをリモートリポに反映させる
git pull : リモートリポをローカルリポに反映させる
何故push前にpullをするのか?
チームで開発を行っている場合、自分がリモートリポで作業している間に他のメンバーがリモートリポを更新していた場合、pullせずpushすると他のメンバーがpushした内容が消えてしまうためです。
※pullしていないと自分のローカルリポに他のメンバーの更新内容を持っていないため発生してしまうトラブルです。
pullコマンド
git pull <remote_ref><branchname> コマンドでpullします。
pullする前に
pullコマンドのオプションであるremote_ref,branchnameを確認します。
remote_refはgit remote -vコマンド出力されるoriginです。
sample-repo# git remote -v
origin  git@github.com:*******/sample-repo.git (fetch)
origin  git@github.com:*******/sample-repo.git (push)
sample-repo#
branchnameはmainブランチのデータを取得するためmainを指定します。
pullする
sample-repo# git pull origin main
From github.com:*******/sample-repo
 * branch            main       -> FETCH_HEAD
Already up to date.
pushする(ローカルリポコンテンツをリモートリポにアップロードする)
root@localhost:/mnt/c/Users/*******/sample-repo# git push origin update-readme
Enumerating objects: 5, done.
Counting objects: 100% (5/5), done.
Writing objects: 100% (3/3), 281 bytes | 3.00 KiB/s, done.
Total 3 (delta 0), reused 0 (delta 0), pack-reused 0
remote:
remote: Create a pull request for 'update-readme' on GitHub by visiting:
remote:      https://github.com/*******/sample-repo/pull/new/update-readme
remote:
To github.com:*******/sample-repo.git
 * [new branch]      update-readme -> update-readme
root@localhost:/mnt/c/Users/*******/sample-repo#
5.7 update-readmeブランチをmainブランチにマージ(反映)する
pull requestとは、リモートリポでマージする場合に出すリクエストのこと。
基本的にGitでの開発は複数人のメンバー(チーム)で行うため自由に自分の更新分をマージしてはいけない(することはできない)。
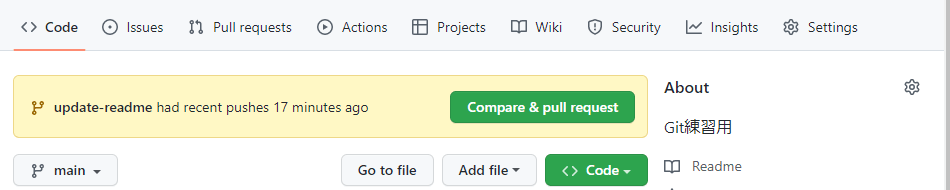
pull requestを作成する
GitGubのmainブランチにて以下画像にある「Pull requests」をクリックする。
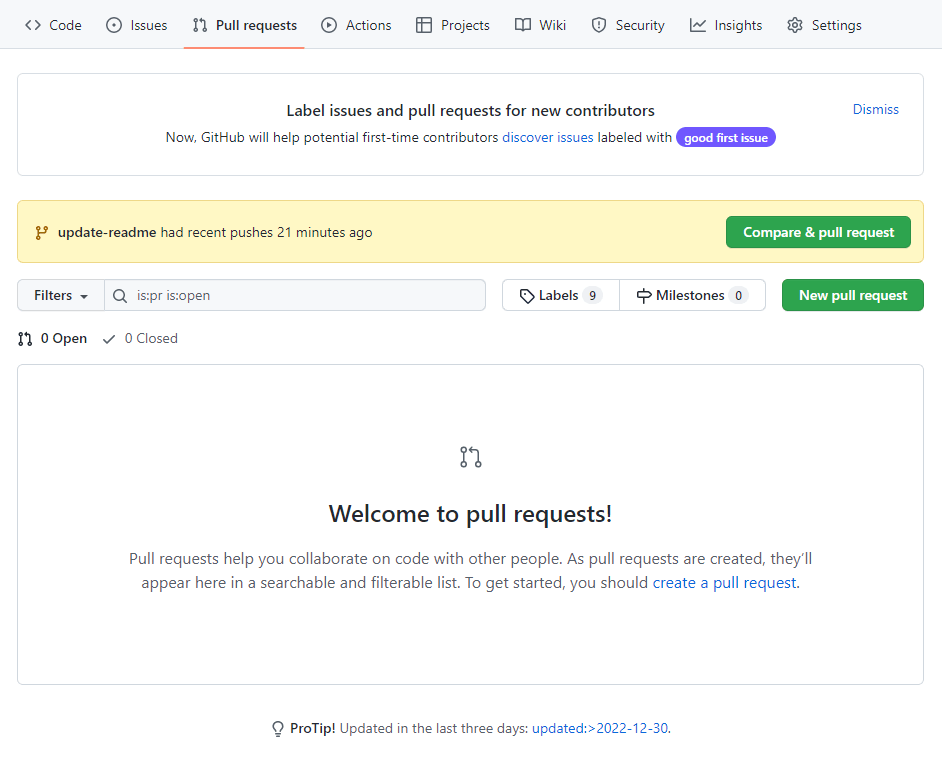
画面遷移後、「New pull request」をクリックする
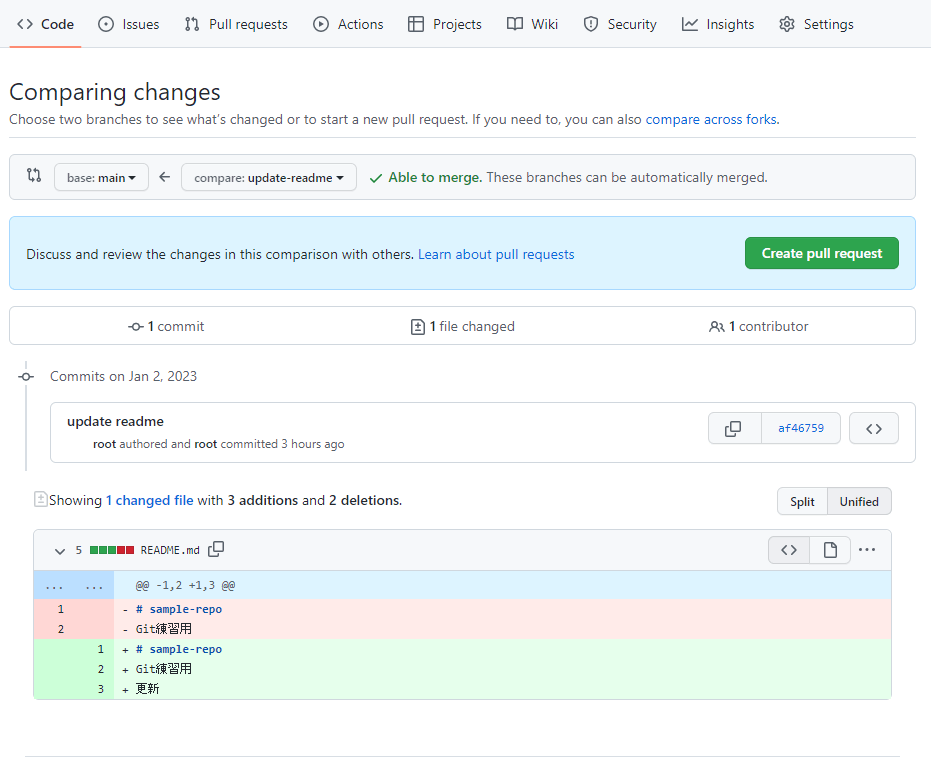
画面遷移後、pull request作成画面が表示されるので、どのブランチからどのブランチにマージするか以下画像のとおり update-readme から main となるよう設定します。
すると、変更箇所の差分が表示されます。
更新内容(差分)に問題なければ画面右横の「Create pull request」をクリックする。
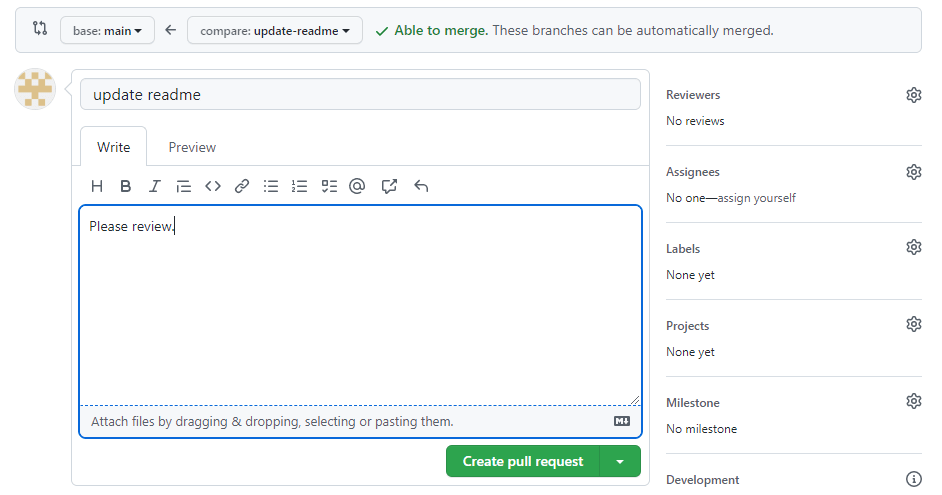
さらに画面遷移後、リクエストのコメントを書くことができるので適当に「Please review.」を書いて「Create pull request」をクリックする。
pull requestを確認する
pull requestが作成されると以下画面のように表示されます。
※あくまで例です。
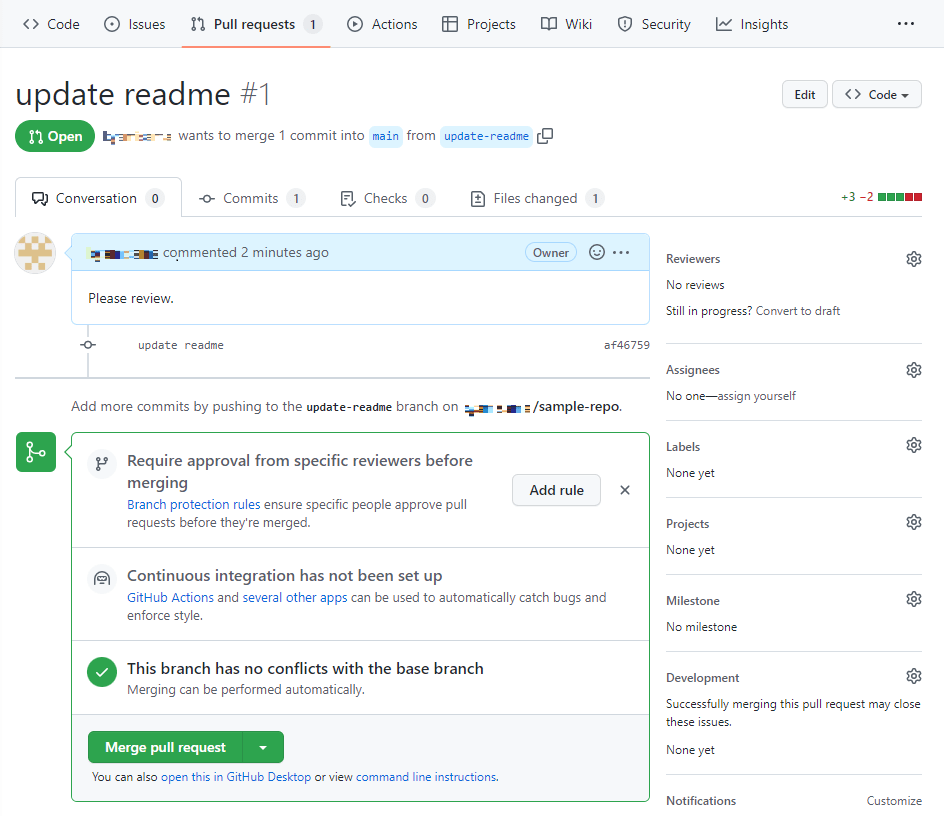
さらに、「File changed」をクリックするとデータの差分を確認できます。
pull requestをマージする
今回は練習ということなので、自分でプルリクして、自分でマージします。
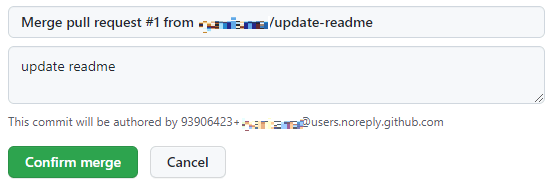
マージは以下画像の「Merge pull request」をクリックします。
クリックすると以下画像のとおりプルリクに対してコメントできますが今回はそのままで「Confirm merge」をクリックします。
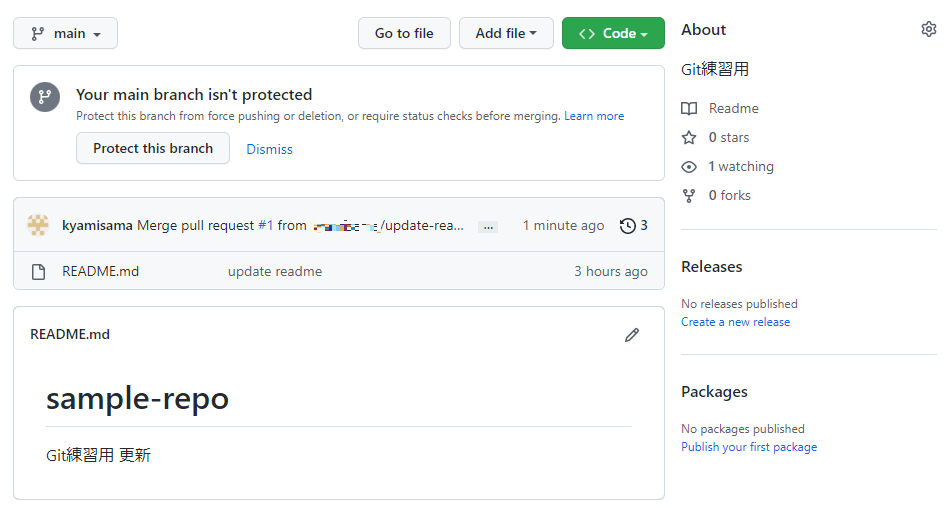
mainブランチにてREADME.mdが更新されていることを確認する
以下画像のとおりmainブランチのREADME.mdが更新されていることが確認できます。
5.8 リモートリポをローカルリポに反映する(pull)
ここまででリモートリポのmainブランチにマージすることができたので、mainブランチのREADME.mdは更新されています。
しかし、ローカルリポのmainブランチは更新前の状態なので、git pullを実行してローカルリポに最新の状態を反映させます。
※注意点
- pull コマンドは、アクティブブランチにマージするコマンドなので、mainブランチに切り替えること
mainブランチに切り替える
sample-repo# git checkout main
Switched to branch 'main'
Your branch is up to date with 'origin/main'.
sample-repo# git branch
* main
  update-readme
sample-repo#
ちなみにmainブランチのREADME.mdを確認してみる。
「更新」の文言が追記されていないので、最新のの状態ではないです。
sample-repo# cat README.md
# sample-repo
Git練習用
sample-repo#
pullしてmainブランチを最新の状態にする
sample-repo# git pull origin main
remote: Enumerating objects: 1, done.
remote: Counting objects: 100% (1/1), done.
remote: Total 1 (delta 0), reused 0 (delta 0), pack-reused 0
Unpacking objects: 100% (1/1), 624 bytes | 44.00 KiB/s, done.
From github.com:*******/sample-repo
 * branch            main       -> FETCH_HEAD
   2a4cb0d..aefb368  main       -> origin/main
Updating 2a4cb0d..aefb368
Fast-forward
 README.md | 5 +++--
 1 file changed, 3 insertions(+), 2 deletions(-)
sample-repo# cat README.md
# sample-repo
Git練習用
更新
sample-repo#
5.8 不要なブランチを削除する
特定のブランチを削除するコマンド
git branch -d <branch-name>
- mainブランチにマージしていないブランチは削除できない
- 強制削除する場合は、-dではなく-Dを用いる
ローカルリポにてupdate-readmeブランチを削除
sample-repo# git branch -d update-readme
Deleted branch update-readme (was af46759).
sample-repo# git branch
* main
sample-repo#
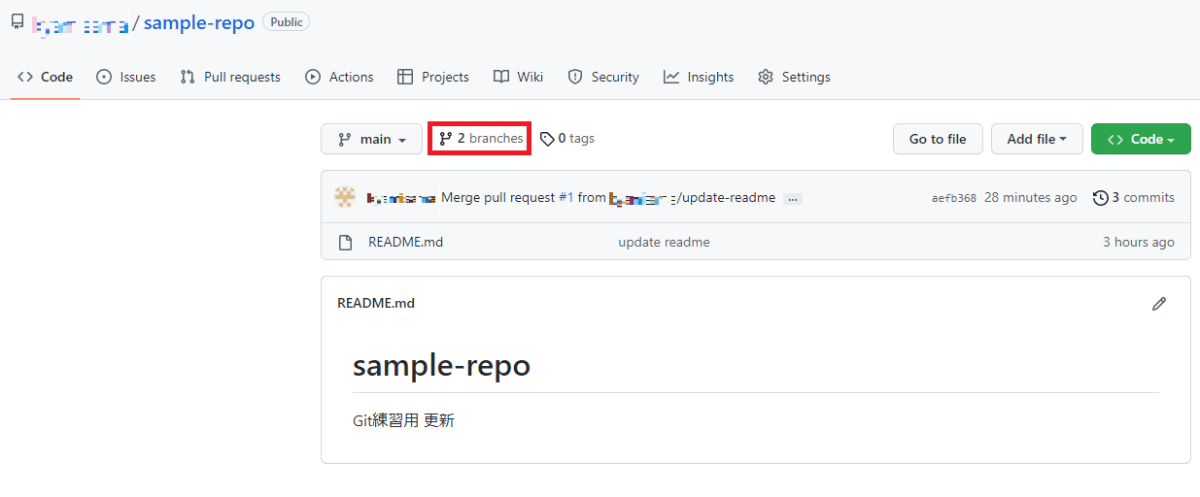
リモートリポにてupdate-readmeブランチを削除
GitGubにて以下画像赤枠の「branches」をクリックします。
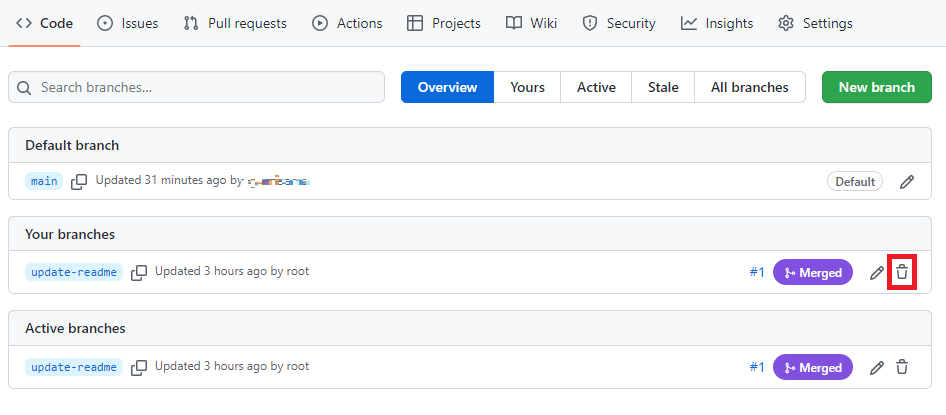
対象のブランチ(update-readme)のゴミ箱マークをクリックし、削除します。
6. Gitの基本操作
6.1 スクラッチからgitリポジトリを作成する
git init <project-name>
git initを実行することでカレントディレクトリに.gitフォルダが入った<project-name>フォルダが作成される。
またinitの後にフォルダ名を指定しなければ、カレントディレクトリがgitリポになる。
実際にスクラッチで作成してみる
% git init project-from-scratch
Initialized empty Git repository in /Users/******/project-from-scratch/.git/
% ls -a project-from-scratch
.	..	.git
6.2 作成したgitリポにファイルを作成してコミットしてみる
ファイルの作成
% cd project-from-scratch
% touch newfile.txt
% echo 'newfile' > newfile.txt
% cat newfile.txt
newfile
git statusコマンドで状態を確認する
No commits yetからまだコミットしていないことがわかります。
% git status
On branch master

No commits yet

Untracked files:
  (use "git add <file>..." to include in what will be committed)

        newfile.txt

nothing added to commit but untracked files present (use "git add" to track)
git addでnewfile.txtをステージングに追加する
% git add newfile.txt
git commitで内容をコミットする
% git commit -m "add newfile.txt"
[master (root-commit) 8131ab2] add newfile.txt
 1 file changed, 1 insertion(+)
 create mode 100644 newfile.txt
6.3 既存のディレクトリをgitリポにする
これまで作業していたディレクトリをgitリポにしたい場合git initコマンでgitリポ化できます。
試しに上で作成したproject-from-scratchの.gitを削除して、再度git initコマンドを実行してみます。
rm .gitで.gitの削除
% sudo rm -r .git
% ls -a
.               ..              newfile.txt
git initでgitリポ化する
% git init
Initialized empty Git repository in /Users/*****/project-from-scratch/.git/
% ls -a
.               ..              .git            newfile.txt
.gitフォルダができています。
それではリポジトリ化したproject-from-scratchディレクトリをリモートリポ化してみます。
事前にGithubでリモートリポを作成しておきます。
git remote コマンドのoriginの後のURLは事前に作成したリモートリポのURLです。
% git remote add origin https://github.com/*****/newfile.git
fatal: remote origin already exists.
% git remote rm origin
% git push -u origin master
Enumerating objects: 3, done.
Counting objects: 100% (3/3), done.
Writing objects: 100% (3/3), 218 bytes | 218.00 KiB/s, done.
Total 3 (delta 0), reused 0 (delta 0)
To https://github.com/******/newfile.git
 * [new branch]      master -> master
Branch 'master' set up to track remote branch 'master' from 'origin'.
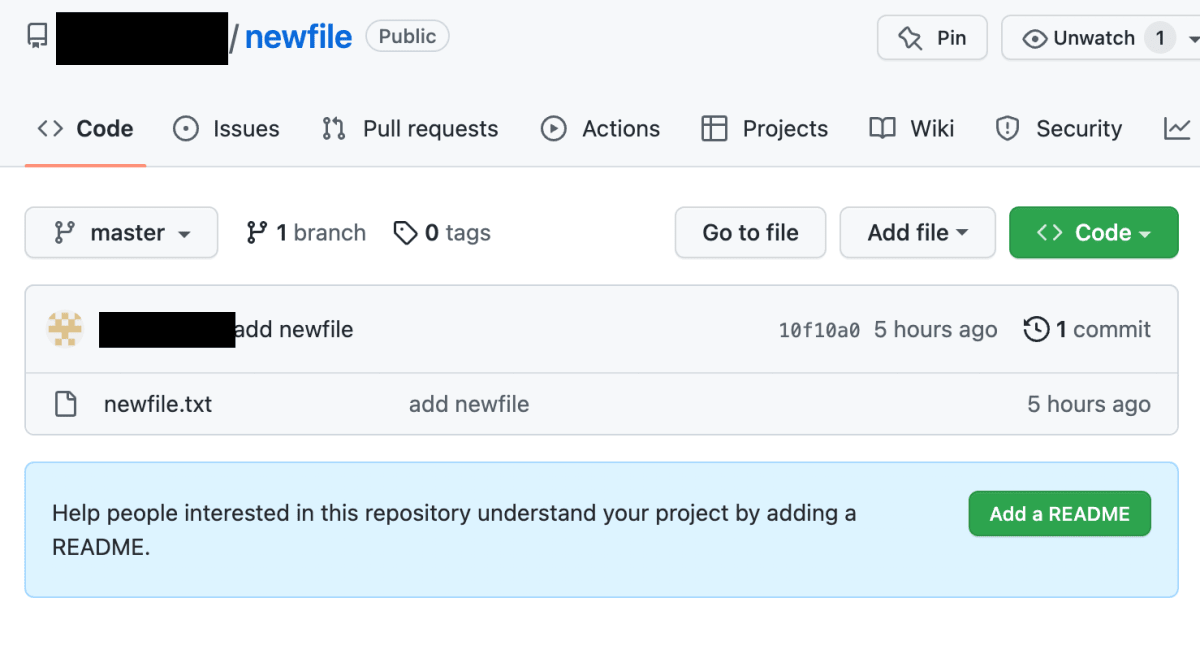
GitHubを確認してみるとリモートリポジトリ化されています。
6.4 fork
forkとは、他人やオープンソースのリポジトリを自分のリポジトリにコピーすること。
そうすることで、本家のリポジトリに影響を与えず作業することができる。
実際にforkしてみる
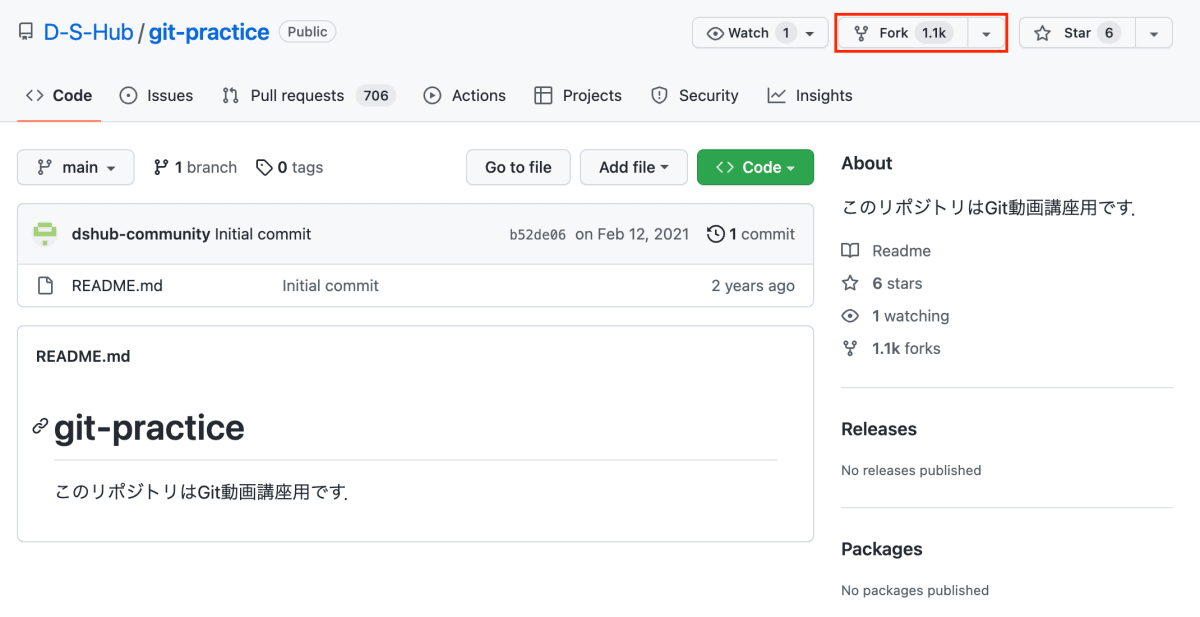
forkするリポジトリは https://github.com/D-S-Hub/git-practice とする。
流れ
- D-S-Hub/git-practice をforkする
- 自分のGitHubにリポジトリとして追加する
- 追加したリモートリポジトリをローカルリポジトリにする
D-S-Hub/git-practiceにアクセスし、以下画像の赤枠にあるforkをクリックします。
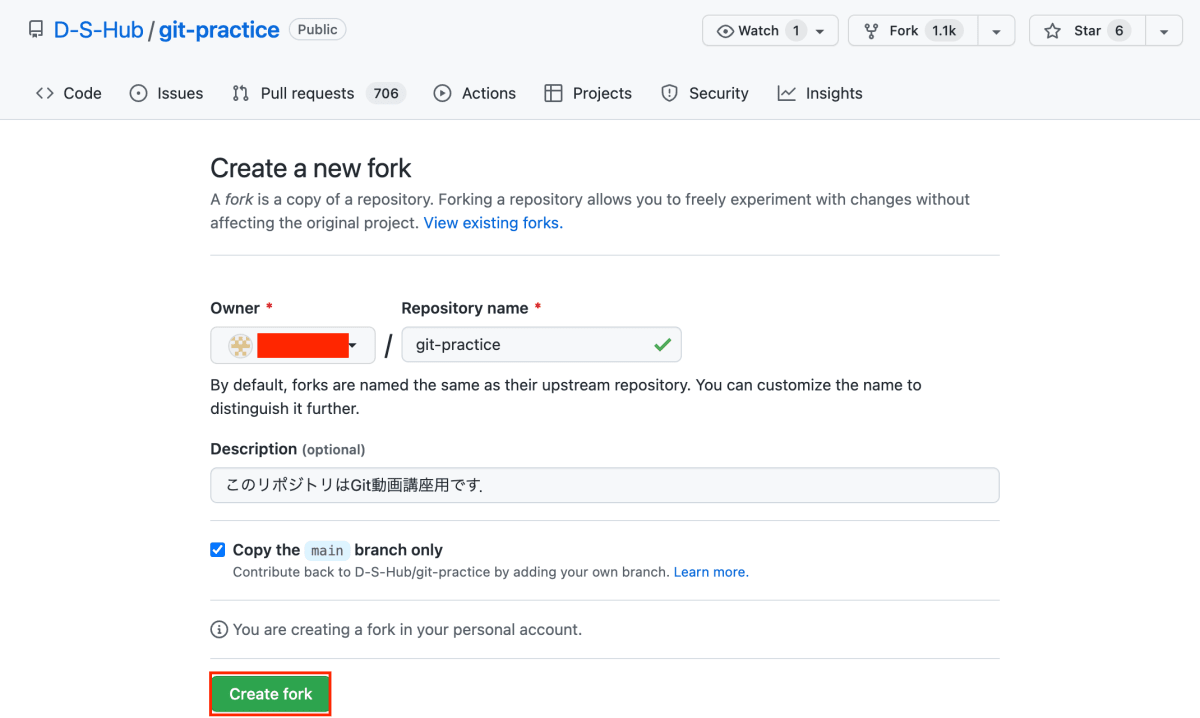
すると自分のリポジトリに作成する画面が表示されます。
以下画像の赤塗り潰し部分が自分のGitHubアカウント名です。
そのままCreate forkをクリックします。
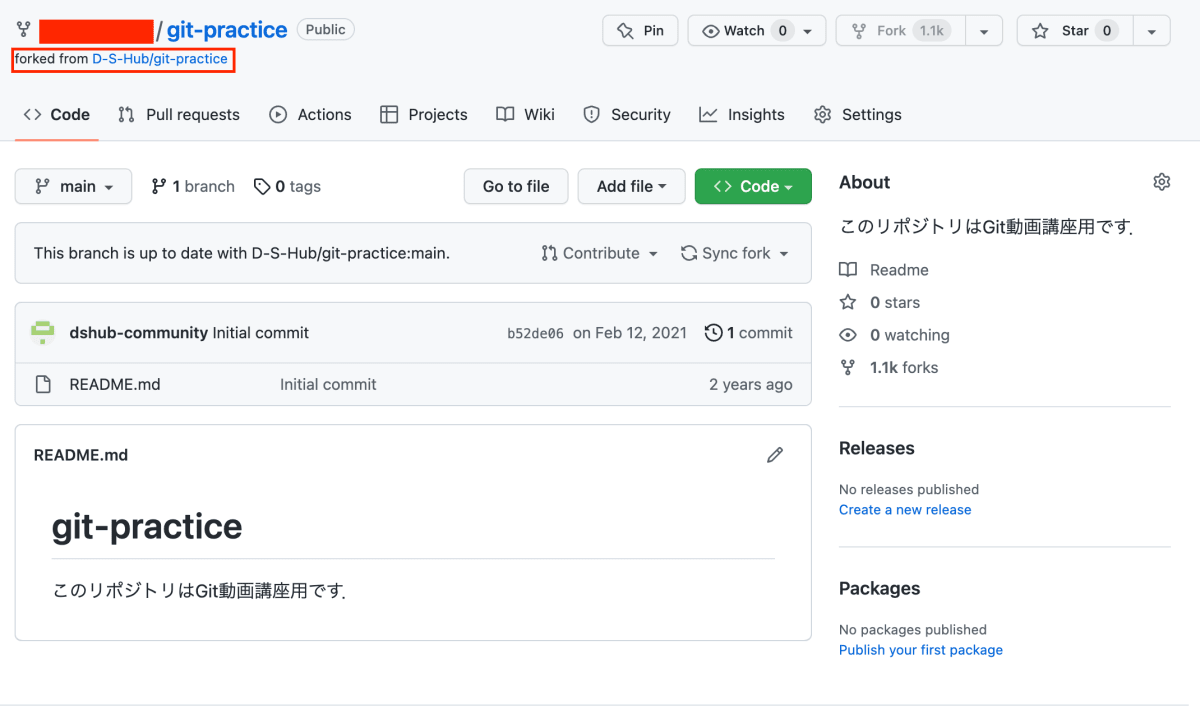
画面が切り替えわり、自分のGitHubアカウントに紐づきます。
forked from D-S-Hub/git-practiceと記載があるように、D-S-Hub/git-practiceからforkされています。
git-practiceをcloneする
% git clone https://github.com/******/git-practice.git
Cloning into 'git-practice'...
remote: Enumerating objects: 3, done.
remote: Total 3 (delta 0), reused 0 (delta 0), pack-reused 3
Unpacking objects: 100% (3/3), done.
確認してみる。
% cd git-practice
% ls
README.md
% cat README.md
# git-practice
このリポジトリはGit動画講座用です.
6.5 ちょっと一息TIPS
gitがtrackしているファイルの一覧を表示するコマンド
git ls-files
※trackとは、git addやgit commitしたファイルのこと。
反対にワーキングディレクトリで作業しているファイルのことはuntrackと呼ばれる。
% git ls-files
README.md
README.mdが表示されました。
これは既にcommitされているのでtrackファイルです。
なので表示されます。
それでは新しいファイルを作成してみます。
% touch newfile.txt
% ls
README.md       newfile.txt
% echo "create newfile" > newfile.txt
% cat newfile.txt
create newfile
git statusコマンドで状態を確認する。
Untracked filesとしてnewfile.txtがあることがわかります。
% git status
On branch main
Your branch is up to date with 'origin/main'.

Untracked files:
  (use "git add <file>..." to include in what will be committed)

        newfile.txt

nothing added to commit but untracked files present (use "git add" to track)
git ls-filesコマンドを実行してみます。
newfile.txtはまだgit add も git commitもしていないので表示されません。
% git ls-files
README.md
それではgit addを実行後、git ls-filesを実行してみます。
git addしたことでnewfile.txtが表示されました。
% git add newfile.txt
% git ls-files
README.md
newfile.txt
6.6 git操作のキャンセル操作について
git addしたけど作業をキャンセルしたい場合の方法を学習いきます。
作業をキャンセルするコマンド
git reset HEAD <filename>
流れ
- newfile.txtをgit addする
- git resetでキャンセルする
- git statusで状態確認する
git addでステージング領域に追加する
% git add newfile.txt
% git status
On branch main
Your branch is up to date with 'origin/main'.

Changes to be committed:
  (use "git reset HEAD <file>..." to unstage)

        new file:   newfile.txt
git resetでキャンセルする
% git reset HEAD newfile.txt
git statusで状態確認する
git addがキャンセルされたのでnewfile.txtがuntrackファイルに戻りました。
% git status
On branch main
Your branch is up to date with 'origin/main'.

Untracked files:
  (use "git add <file>..." to include in what will be committed)

        newfile.txt

nothing added to commit but untracked files present (use "git add" to track)
6.7 Working Directoryでの作業をキャンセルしたい
Working Directoryでの編集、更新作業をやっぱりキャンセルする方法
作業をキャンセルするコマンド
git checkout -- <filename>
※このコマンドが使えるのはtrack済みのファイルのみです。
newfile.txtに適当に更新する
% echo "create newfile2" >> newfile.txt
% cat newfile.txt
create newfile
create newfile2
% git status
On branch main
Your branch is ahead of 'origin/main' by 1 commit.
  (use "git push" to publish your local commits)

Changes not staged for commit:
  (use "git add <file>..." to update what will be committed)
  (use "git checkout -- <file>..." to discard changes in working directory)

        modified:   newfile.txt

no changes added to commit (use "git add" and/or "git commit -a")
追記した「create newfile2」作業をキャンセルする
% git checkout -- newfile.txt
% cat newfile.txt
create newfile
% git status
On branch main
Your branch is ahead of 'origin/main' by 1 commit.
  (use "git push" to publish your local commits)

nothing to commit, working tree clean
6.8 ファイル名の変更をgitで管理する
ファイル名を管理するgitコマンド
git mv <filename1><filename2>
<filename1>を<filename2>に変更し、それをGitで管理する。
newfile.txtをnamechanged.txtに変更する
% git mv newfile.txt namechanged.txt
% ls
README.md       namechanged.txt
% git status
On branch main
Your branch is ahead of 'origin/main' by 1 commit.
  (use "git push" to publish your local commits)

Changes to be committed:
  (use "git reset HEAD <file>..." to unstage)

        renamed:    newfile.txt -> namechanged.txt
renamed: newfile.txt -> namechanged.txtよりファイル名の変更前と変更後が表示されています。
さらに Changes to be committed: よりステージング領域に追加されていることがわかります。
git commit してみます。
% git commit -m "change name"
[main 13d0712] change name
 1 file changed, 0 insertions(+), 0 deletions(-)
 rename newfile.txt => namechanged.txt (100%)
〜実験〜Unixコマンドのmvコマンドだとどうなる?
% mv namechanged.txt namechanged2.txt
% ls
README.md               namechanged2.txt
% git status
On branch main
Your branch is ahead of 'origin/main' by 2 commits.
  (use "git push" to publish your local commits)

Changes not staged for commit:
  (use "git add/rm <file>..." to update what will be committed)
  (use "git checkout -- <file>..." to discard changes in working directory)

        deleted:    namechanged.txt

Untracked files:
  (use "git add <file>..." to include in what will be committed)

        namechanged2.txt

no changes added to commit (use "git add" and/or "git commit -a")
git mvコマンドとの違いはuntrackファイルかtrackファイル化の違いです。
git mvだとtrackファイルに、mvコマンドだとuntrackファイルになります。
より詳しく見ると、namechanged.txtが削除され、namechanged2.txtが新規作成されたということです。
次にgit addします。
% git add -A
% git status
On branch main
Your branch is ahead of 'origin/main' by 2 commits.
  (use "git push" to publish your local commits)

Changes to be committed:
  (use "git reset HEAD <file>..." to unstage)

        renamed:    namechanged.txt -> namechanged2.txt
なぜ-Aオプションをつけるのか?
git add .コマンドでも同じ結果になり疑問を持った方もいると思います。
どうやら
Gitのバージョンによりますが,
v1.xでは,$git add .は削除したファイルはstageされません。
v2.xでは$git add .でも削除したファイルはstageされるため,
$git add -Aと同じ結果となります。
とのことです。
それでは最後にcommitします。
% git commit -m "change name again"
[main a1d8f04] change name again
 1 file changed, 0 insertions(+), 0 deletions(-)
 rename namechanged.txt => namechanged2.txt (100%)
6.9 ファイルの削除をGitで管理する
ファイルを削除するコマンド
git rm <filename>
※trackされていないファイルは削除できない
Staging areaに作業内容があるファイルは削除できない
Working Directory内でファイルを削除するとどうなるか?
touch delete_soon.txtというファイルを作成して、削除してみる。
% touch delete_soon.txt
% ls
README.md               delete_soon.txt         namechanged2.txt
ファイルの状態としてはuntrackファイルです。
% git status
On branch main
Your branch is ahead of 'origin/main' by 3 commits.
  (use "git push" to publish your local commits)

Untracked files:
  (use "git add <file>..." to include in what will be committed)

        delete_soon.txt

nothing added to commit but untracked files present (use "git add" to track)
git rmコマンドを説明したようにtrackしていないファイルは削除できません。
なのでgit rm delete_soon.txtを実行してもエラーとなるはずです。
% git rm delete_soon.txt
fatal: pathspec 'delete_soon.txt' did not match any files
はい。fatalエラーとなり想定通りです。
untrackファイルの削除は rm コマンドを利用します。
% rm delete_soon.txt
% git status
On branch main
Your branch is ahead of 'origin/main' by 3 commits.
  (use "git push" to publish your local commits)

nothing to commit, working tree clean
Staging area内でファイルを削除するとどうなるか?
% touch delete_soon.txt
% git add delete_soon.txt
% git status
On branch main
Your branch is ahead of 'origin/main' by 3 commits.
  (use "git push" to publish your local commits)

Changes to be committed:
  (use "git reset HEAD <file>..." to unstage)

        new file:   delete_soon.txt
% git rm delete_soon.txt
error: the following file has changes staged in the index:
    delete_soon.txt
(use --cached to keep the file, or -f to force removal)
この削除エラーも想定通りです。
git rmコマンドを説明したようにStagin area内での削除はできません。
なので今回もrmコマンドで削除します。
% rm delete_soon.txt
% git status
On branch main
Your branch is ahead of 'origin/main' by 3 commits.
  (use "git push" to publish your local commits)

Changes to be committed:
  (use "git reset HEAD <file>..." to unstage)

        new file:   delete_soon.txt

Changes not staged for commit:
  (use "git add/rm <file>..." to update what will be committed)
  (use "git checkout -- <file>..." to discard changes in working directory)

        deleted:    delete_soon.txt
git statusの結果より、最初にtouchコマンドで作成した状態のnew fileがあり、次にrmコマンドで削除したdeleteの状態が存在します。
それではここでgit addコマンドを実行するとどうなるか?
状態としては、物理的なファイルは存在しないが、git status上にはnew file とdelete fileが状態として存在しています。
% git add delete_soon.txt
git statusコマンドで状態を確認してみるとnothing to commitと表示されました。
% git status
On branch main
Your branch is ahead of 'origin/main' by 3 commits.
  (use "git push" to publish your local commits)

nothing to commit, working tree clean
ファイルを作成しコミットして削除するとどうなるか?
ファイルの作成からcommitまで実施する。
% touch delete_soon.txt
% git add delete_soon.txt
% git commit -m "make new file"
[main a19ebf4] make new file
 1 file changed, 0 insertions(+), 0 deletions(-)
 create mode 100644 delete_soon.txt
% git status
On branch main
Your branch is ahead of 'origin/main' by 4 commits.
  (use "git push" to publish your local commits)

nothing to commit, working tree clean
git rmコマンドを実行し、状態を確認する。
% git rm delete_soon.txt
rm 'delete_soon.txt'
% git status
On branch main
Your branch is ahead of 'origin/main' by 4 commits.
  (use "git push" to publish your local commits)

Changes to be committed:
  (use "git reset HEAD <file>..." to unstage)

        deleted:    delete_soon.txt
git rm実行後の状態としては、delete状態に遷移しています。
実際のファイルも削除されています。
% ls
README.md               namechanged2.txt
最後にgit commitを実行します。
% git commit -m "delete file"
[main 6ea421c] delete file
 1 file changed, 0 insertions(+), 0 deletions(-)
 delete mode 100644 delete_soon.txt
% git status
On branch main
Your branch is ahead of 'origin/main' by 5 commits.
  (use "git push" to publish your local commits)

nothing to commit, working tree clean
削除作業を取り消してみる
少し複雑な流れなので以下に記載します。
流れ
- delete_soon.txtを新規作成する
- git add でStaging areaに追加し、git commitする
- git rmでdelete_soon.txtを削除する
- git reset HEADで削除作業をunstageする
- git checkoutで削除作業をWorking Directoryから破棄する
流れ1〜3を実施する。
% touch delete_soon.txt
% git add delete_soon.txt
% git commit -m "new file"
[main 4344e40] new file
 1 file changed, 0 insertions(+), 0 deletions(-)
 create mode 100644 delete_soon.txt
% git rm delete_soon.txt
rm 'delete_soon.txt'
ここから、git rmした作業をやっぱり止めたいとします。
% git reset HEAD delete_soon.txt
Unstaged changes after reset:
D       delete_soon.txt
% ls
README.md               namechanged2.txt
lsでdelete_soon.txtが表示されないのは、以下の状態確認の通りdelete_soon.txtが削除された状態にあるためです。
つまり、git commmitの前に戻ったという意味です。
% git status
On branch main
Your branch is ahead of 'origin/main' by 6 commits.
  (use "git push" to publish your local commits)

Changes not staged for commit:
  (use "git add/rm <file>..." to update what will be committed)
  (use "git checkout -- <file>..." to discard changes in working directory)

        deleted:    delete_soon.txt

no changes added to commit (use "git add" and/or "git commit -a")
ここからgit checkoutコマンでdelete_soon.txtが削除されたことを無かったことにします。
% git checkout -- delete_soon.txt
% ls
README.md               delete_soon.txt         namechanged2.txt
6.10 git logの使い方
コミット履歴を一覧表示する
$ git log
- --oneline: 各コミットを1行で表示する
- --graph: 核コミットを線で結ぶ
- -- <filename>: 特定のファイルの情報を表示する
- --follow <filename>: ファイル名の変更も考慮して履歴を表示する
--oneline
% git log --oneline
4344e40 (HEAD -> main) new file
6ea421c delete file
a19ebf4 make new file
a1d8f04 change name again
13d0712 change name
d7a9f3e add newfile
b52de06 (origin/main, origin/HEAD) Initial commit
--graph
% git log --graph
* commit 4344e40143fba7b867979557bf29a2d1c41e2d8c (HEAD -> main)
| Author: ******* <hogehoge@example.com>
| Date:   Sun Jan 15 11:52:53 2023 +0900
|
|     new file
|
* commit 6ea421c459d2d41708d9d9cab5d1fbfbdbae1780
| Author: ******* <hogehoge@example.com>
| Date:   Sun Jan 15 11:46:54 2023 +0900
|
|     delete file
|
* commit a19ebf4b9ded6fc1df327a9aaa24b85defdc45f7
| Author: ******* <hogehoge@example.com>
| Date:   Sun Jan 15 11:25:16 2023 +0900
|
|     make new file
|
* commit a1d8f04c4cb1b73dc5f220c031071ce1fe560435
| Author: ******* <hogehoge@example.com>
| Date:   Sat Jan 14 23:31:09 2023 +0900
|
|     change name again
|
* commit 13d0712399e6863261f103f9d825c90f6724addf
-- <filename>
% git log -- delete_soon.txt
commit 4344e40143fba7b867979557bf29a2d1c41e2d8c (HEAD -> main)
Author: ******* <hogehoge@example.com>
Date:   Sun Jan 15 11:52:53 2023 +0900

    new file

commit 6ea421c459d2d41708d9d9cab5d1fbfbdbae1780
Author: ******* <hogehoge@example.com>
Date:   Sun Jan 15 11:46:54 2023 +0900

    delete file

commit a19ebf4b9ded6fc1df327a9aaa24b85defdc45f7
Author: ******* <hogehoge@example.com>
Date:   Sun Jan 15 11:25:16 2023 +0900

    make new file
特定のコミット情報を表示する
$ git show <commitID>
% git show 6ea421c459d2d41708d9d9cab5d1fbfbdbae1780
commit 6ea421c459d2d41708d9d9cab5d1fbfbdbae1780
Author: ******* <hogehoge@example.com>
Date:   Sun Jan 15 11:46:54 2023 +0900

    delete file

diff --git a/delete_soon.txt b/delete_soon.txt
deleted file mode 100644
index e69de29..0000000
6.11 .gitigonreについて
.gitigonreを使うことで指定したファイルやフォルダをGitの管理から外すことができます。
例えば、以下のようなファイル/フォルダは.gitignoreに追加する
- サイズが大きいファイルやフォルダ(ログファイル、モデルファイルなど)
- バイナリファイル
- 中間ファイル
- パスワードなどの機密情報ファイル
- システムが生成するファイル(.DS_Storeなど)やキャッシュファイルなど
.gitignoreの置き場所
~/<project>/.gitignore
.gitignoreを使ってみる
output.logというファイルを指定しGit管理から外してみます。
.gitignoreの作成からGit管理から外すファイル名の記述まで実施。
% touch .gitignore
% vim .gitignore
% cat .gitignore
output.log
.gitignoreファイルをcommitまで実施します。
% git add .gitignore
% git commit -m "modified .gitignore"
[main 7cea511] modified .gitignore
それではoutput.logを作成してGitの管理から外れていることを確認してみます。
% touch output.log
% git status
On branch main
Your branch is ahead of 'origin/main' by 8 commits.
  (use "git push" to publish your local commits)

nothing to commit, working tree clean
nothing to commitから管理から外れていることがわかります。
6.12 ブランチとマージ
ブランチ名について
ブランチ名を付ける際の一般的な約束。
- そのブランチで何の作業をするかを一目でわかるようにする
- ハイフンで区切る
- 長すぎないようにする
- チームのネーミングルールがあればそれに従う
- 例:add-model-module
brachコマンド操作
ブランチを作成する
git branch <branch-name>
ブランチを作成し、さらにそのブランチに切り替える
git branch -b <branch-name>
ブランチの移動
git checkout <branch-name>
ブランチの名前を変更する
git branch -m <branch-name> <new_branch-name>
ブランチの削除
git branch -d <branch-name>
マージについて
ローカルリポジトリでのマージ
自分だけが使うような環境であれば(チームでの作業ではない)ローカルリポでのマージがよくあるのでその場合は以下コマンドでマージする。
git merge <branch-name>
ブランチ同士のdiff(差分)を確認する
git diff <base> <compare>
- <base>ブランチをベースとして<compare>ブランチとの差分を表示する
- 大抵、<compare>ブランチが新しい変更などを施したブランチ
実際にローカルリポにマージしてみる
% git checkout -b new-feature
Switched to a new branch 'new-feature'
% git branch
  main
* new-feature
% echo "new-branchで変更" >> README.md
% cat README.md
# git-practice
このリポジトリはGit動画講座用です.
new-branchで変更
% git add README.md
% git commit -m "update README.md"
[new-feature e4d149f] update README.md
 1 file changed, 1 insertion(+)
git mergeコマンドはいるブランチにマージするので、マージ先に移動しておく必要があります。
今回のマージ先はmainです。
% cat README.md
# git-practice
このリポジトリはGit動画講座用です.
new-branchで変更
% git checkout main
Switched to branch 'main'
Your branch is up to date with 'origin/main'.
% cat README.md
# git-practice
このリポジトリはGit動画講座用です.
% git diff main new-feature
diff --git a/README.md b/README.md
index 9e7d037..948254c 100644
--- a/README.md
+++ b/README.md
@@ -1,2 +1,3 @@
 # git-practice
 このリポジトリはGit動画講座用です.
+new-branchで変更
% git merge main new-feature
Updating 7cea511..e4d149f
Fast-forward
 README.md | 1 +
 1 file changed, 1 insertion(+)
% git branch -d new-feature
Deleted branch new-feature (was e4d149f).
6.13 Automatic mergeについて
各コミットで異なる箇所を変更している場合に自動でマージしてくれる機能のこと
例えば、mainブランチでA.txtを編集し、別の誰かが別のブランチでB.txtを編集した場合にこの2つのファイルをマージする際にGit側が自動で変更箇所を認識して整合性が取れるようにマージしてくれます。
反対に各コミットで同じ箇所を編集している場合はMerge Conflictを起こします。
これはGit側で自動対応不可なので、自分たちで解決する必要があります。
実際にAutomatic mergeを試してみる
新規ブランチ作成とREADME.mdの編集
% git checkout -b no-fast-forward
Switched to a new branch 'no-fast-forward'
% git branch
  main
* no-fast-forward
% vim README.md
% cat README.md
# git-practice
このリポジトリはGit動画講座用です.
no-fast-branchで変更 ★ここを修正
git add からgit commitまで実行
% git add README.md
% git commit -m "update readme for automatic merge"
[no-fast-forward 1b66c68] update readme for automatic merge
 1 file changed, 1 insertion(+), 1 deletion(-)
git logで状態の確認
メインブランチがno-fast-forwardで先ほどcommitした状態が最新となっています。
% git log --oneline
1b66c68 (HEAD -> no-fast-forward) update readme for automatic merge
e4d149f (main) update README.md
7cea511 (origin/main, origin/HEAD) modified .gitignore
fa224fa add gutignore
4344e40 new file
6ea421c delete file
a19ebf4 make new file
a1d8f04 change name again
13d0712 change name
d7a9f3e add newfile
b52de06 Initial commit
mainブランチに切り替え、newfile.txtを作成する
% git checkout main
Switched to branch 'main'
Your branch is ahead of 'origin/main' by 1 commit.
  (use "git push" to publish your local commits)
  % touch newfile.txt
% echo "created newfile" > newfile.txt
% cat newfile.txt
created newfile
git addからgit commitまでを実行
% git add newfile.txt
% git commit -m "make new file for automatic merge"
[main 1819c3b] make new file for automatic merge
 1 file changed, 1 insertion(+)
 create mode 100644 newfile.txt
git logで状態の確認
メインブランチがmainで先ほどcommitした状態が最新となっています。
% git log --oneline
1819c3b (HEAD -> main) make new file for automatic merge
e4d149f update README.md
7cea511 (origin/main, origin/HEAD) modified .gitignore
fa224fa add gutignore
4344e40 new file
6ea421c delete file
a19ebf4 make new file
a1d8f04 change name again
13d0712 change name
d7a9f3e add newfile
b52de06 Initial commit
git diffで差分を確認する
README.txtの変更分とnewfile.txtの追加分が表示されているのがわかります。
% git diff main no-fast-forward
diff --git a/README.md b/README.md
index 948254c..31ec71a 100644
--- a/README.md
+++ b/README.md
@@ -1,3 +1,3 @@
 # git-practice
 このリポジトリはGit動画講座用です.
-new-branchで変更
+no-fast-branchで変更
diff --git a/newfile.txt b/newfile.txt
deleted file mode 100644
index 0ad9beb..0000000
--- a/newfile.txt
+++ /dev/null
@@ -1 +0,0 @@
-created newfile
git mergeでマージします
% git merge no-fast-forward
Merge made by the 'recursive' strategy.
 README.md | 2 +-
 1 file changed, 1 insertion(+), 1 deletion(-)
git logで状態の確認
最新のコミットポイント:b9854d9 はmainブランチのコミットポイント:1819c3b とno-fast-forwardブランチのコミットポイント:1b66c68 の両方から線が伸びており、両方のコミットポイントをマージしていることがわかります。
% git log --all --oneline --graph
*   b9854d9 (HEAD -> main) Merge branch 'no-fast-forward' into main
|\
| * 1b66c68 (no-fast-forward) update readme for automatic merge
* | 1819c3b make new file for automatic merge
|/
* e4d149f update README.md
* 7cea511 (origin/main, origin/HEAD) modified .gitignore
* fa224fa add gutignore
* 4344e40 new file
* 6ea421c delete file
* a19ebf4 make new file
* a1d8f04 change name again
* 13d0712 change name
* d7a9f3e add newfile
* b52de06 Initial commit
最後に不要なブランチの削除とマージされていることを確認する
% git branch -d no-fast-forward
Deleted branch no-fast-forward (was 1b66c68).
% cat README.md
# git-practice
このリポジトリはGit動画講座用です.
no-fast-branchで変更
6.14 merge conflictについて
コンフリクトは各コミットが同じ箇所を変更している場合に、コミットをすると発生する事象のこと。
わざとコンフリクトを発生させてみる
conflictと言うブランチを作成し、切り替える
% git checkout -b conflict
Switched to a new branch 'conflict'
% git branch
* conflict
  main
README.mdを編集する
% vi README.md
% cat README.md
# git-practice
このリポジトリはGit動画講座用です.
conflictブランチで変更 ★ここを編集
git add から git commitまで実施する
% git add README.md
% git commit -m "update readme on conflict branch for conflict"
[conflict 1c2ecf3] update readme on conflict branch for conflict
 1 file changed, 1 insertion(+), 1 deletion(-)
mainブランチに切り替えてREADME.mdを編集する
conflictブランチで編集した同じ箇所を編集し、コンフリクトを発生させてみます。
% git checkout main
Switched to branch 'main'
Your branch is ahead of 'origin/main' by 4 commits.
  (use "git push" to publish your local commits)
% vi README.md
% cat README.md
# git-practice
このリポジトリはGit動画講座用です.
mainブランチで変更 ★ここを編集
git add から git commitまで実施する
% git add README.md
% git commit -m "update readme on main for conflict"
[main f6d1dcd] update readme on main for conflict
 1 file changed, 1 insertion(+), 1 deletion(-)
現状の状態を確認してみると、b9854d9コミットポイントに対して、f6d1dcd,1c2ecf3の2つのコミットポイントが関連付いています。
それぞれmainとconflicブランチでコミットした内容です。
% git log --all --oneline --graph
* f6d1dcd (HEAD -> main) update readme on main for conflict
| * 1c2ecf3 (conflict) update readme on conflict branch for conflict
|/
*   b9854d9 Merge branch 'no-fast-forward' into main
差分を確認する
% git diff main conflict
diff --git a/README.md b/README.md
index bba860e..dc570e8 100644
--- a/README.md
+++ b/README.md
@@ -1,3 +1,3 @@
 # git-practice
 このリポジトリはGit動画講座用です.
-mainブランチで変更
+conflictブランチで変更
マージしてみる
コンフリクトが発生し、マージに失敗しました。
Merge conflict in README.mdからREADME.mdでコンフリクトが起きていることがわかります。
% git merge conflict
Auto-merging README.md
CONFLICT (content): Merge conflict in README.md
Automatic merge failed; fix conflicts and then commit the result.
ちなみにgit statusで状態を確認すると、
both modified: README.mdで両方編集されていますよと言われています。
% git status
On branch main
Your branch is ahead of 'origin/main' by 5 commits.
  (use "git push" to publish your local commits)

You have unmerged paths.
  (fix conflicts and run "git commit")
  (use "git merge --abort" to abort the merge)

Unmerged paths:
  (use "git add <file>..." to mark resolution)

        both modified:   README.md

no changes added to commit (use "git add" and/or "git commit -a")
どうやってコンフリクトを直すか
実際にREADME.mdを手修正します。
# git-practice
このリポジトリはGit動画講座用です.
<<<<<<< HEAD
mainブランチで変更
=======
conflictブランチで変更
>>>>>>> conflict
今回はmainブランチで作業を無しにしたいので以下のように修正しました。
# git-practice
このリポジトリはGit動画講座用です.
conflictブランチで変更
再度git add からcommitまで実施する
% git add README.md
% git commit -m "resolve conflict"
[main 1811bca] resolve conflict
git log でコミットの流れを再確認してみる
% git log --all --oneline --graph
*   1811bca (HEAD -> main) resolve conflict
|\
| * 1c2ecf3 (conflict) update readme on conflict branch for conflict
* | f6d1dcd update readme on main for conflict
|/
*   b9854d9 Merge branch 'no-fast-forward' into main
最後conflictブランチを削除します。
% git branch -d conflict
Deleted branch conflict (was 1c2ecf3).
6.15 fetchについて
fetchはリモートリポジトリから情報を取得すること。
ちなみに、git pull = fetch + mergeである。
fetchコマンドを体感してみる
まずはリモートリポ上でREADME.mdファイルを編集します。
その後、その編集内容をfetchして取得したいと思います。
※リモートリポでのファイル編集はベストプラクティスではないので本来はやらないほうがいい。
リモートリポでREADME.mdの編集
以下のように編集しました。
git fetchを実行してみる
% git fetch origin
remote: Enumerating objects: 5, done.
remote: Counting objects: 100% (5/5), done.
remote: Compressing objects: 100% (3/3), done.
remote: Total 3 (delta 1), reused 1 (delta 0), pack-reused 0
Unpacking objects: 100% (3/3), done.
From https://github.com/******/git-practice
   1811bca..da24b43  main       -> origin/main
ただ、fetchはmergeはしないので編集したREADME.mdは古いままです。
% cat README.md
# git-practice
このリポジトリはGit動画講座用です.
conflictブランチで変更
mergeさせるためにgit pullコマンドを実行します。
% git pull origin main
From https://github.com/*******/git-practice
 * branch            main       -> FETCH_HEAD
Updating 1811bca..da24b43
Fast-forward
 README.md | 2 +-
 1 file changed, 1 insertion(+), 1 deletion(-)
6.16 git pull時のコンフリクト対応について
コンフリクトを起こす一番多いケースとしては、誰かがリモートリポをマージした内容と自分が編集した箇所が被っている場合です。
その際に、自分もリポートリポにマージしようとgit pullを実行すると変更箇所が被っておりコンフリクトを起こします。
実際にgit pull時のコンフリクトを起こしてみます。
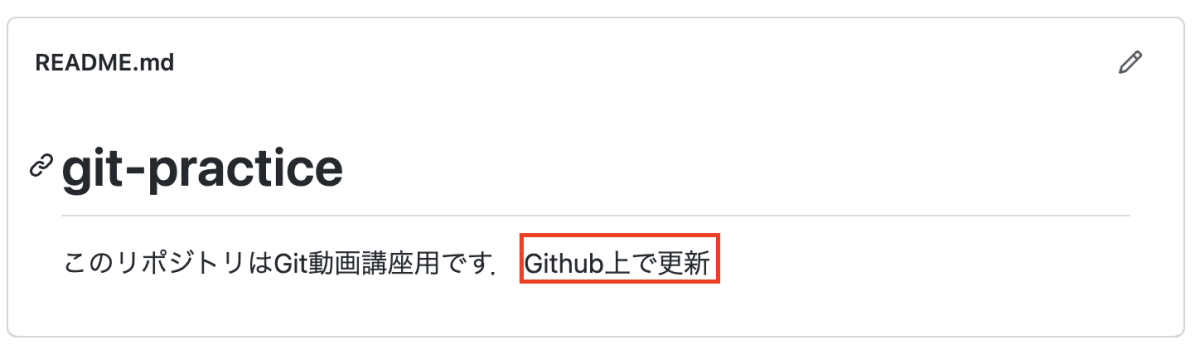
Github上でREADME.mdを編集する
以下のように編輯しました。
ブランチを作成し、切り替えます
% git checkout -b conflict-remote
Switched to a new branch 'conflict-remote'
README.mdを編輯します。
% vi README.md
% cat README.md
# git-practice
このリポジトリはGit動画講座用です.
conflict-remote上で更新
git add と git commitを実施
% git add README.md
% git commit -m "update readme on conflict-remote for conflict"
[conflict-remote e9b357b] update readme on conflict-remote for conflict
 1 file changed, 1 insertion(+), 1 deletion(-)
git pullを実施
conflict-remoteブランチで編集したREADME.mdをpushしたいので、念の為にgit pullで最新のデータを取得します。
ここで先ほどGithub上で編集したREADME.mdと編集箇所が被っているのでコンフリクトを起こします。
% git pull origin main
remote: Enumerating objects: 5, done.
remote: Counting objects: 100% (5/5), done.
remote: Compressing objects: 100% (3/3), done.
remote: Total 3 (delta 2), reused 0 (delta 0), pack-reused 0
Unpacking objects: 100% (3/3), done.
From https://github.com/******/git-practice
 * branch            main       -> FETCH_HEAD
   da24b43..78cd2f4  main       -> origin/main
Auto-merging README.md
CONFLICT (content): Merge conflict in README.md
Automatic merge failed; fix conflicts and then commit the result.
はい。CONFLICT (content): Merge conflict in README.mdよりコンフリクトを起こしたことがわかります。
手動でコンフリクトを修正する
# git-practice
このリポジトリはGit動画講座用です.
<<<<<<< HEAD
conflict-remote上で更新
=======
Github上で更新(2回目)
>>>>>>> 78cd2f4020774041ebd4382cc7df2bc8a0902029
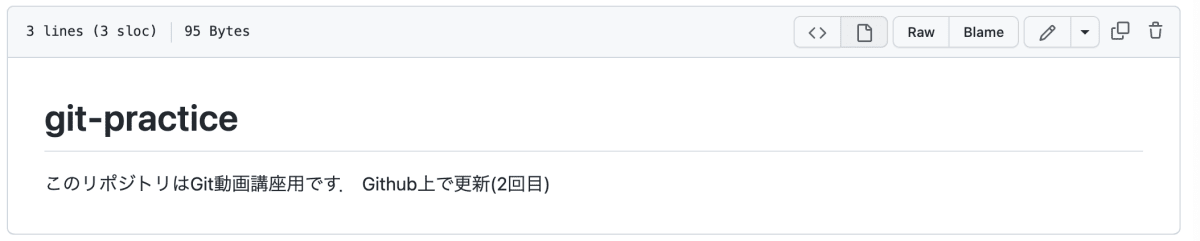
今回はGithub上で編集した方を削除します。
# git-practice
このリポジトリはGit動画講座用です.
Github上で更新(2回目)
再度 git addとgit commitを実施します
% git add README.md
% git commit -m "resolve conflict"
[conflict-remote c5e94d0] resolve conflict
Pull Requestを出してマージする
これまではgit mergeコマンドでマージしていましたが、チームの開発の場合他のメンバーにマージしてくださいと依頼を出します。それがPull Requestです。
git pushコマンドを実施する
今回はmainブランチにpushするのではなく、リモートリポ上にconflict-remoteブランチを作成します。
そのため、git pushコマンドでの<branchname>はconflict-remoteを指定しています。
% git push origin conflict-remote
Enumerating objects: 8, done.
Counting objects: 100% (8/8), done.
Delta compression using up to 6 threads
Compressing objects: 100% (4/4), done.
Writing objects: 100% (4/4), 547 bytes | 547.00 KiB/s, done.
Total 4 (delta 1), reused 0 (delta 0)
remote: Resolving deltas: 100% (1/1), completed with 1 local object.
remote:
remote: Create a pull request for 'conflict-remote' on GitHub by visiting:
remote:      https://github.com/*******/git-practice/pull/new/conflict-remote
remote:
To https://github.com/*******/git-practice.git
 * [new branch]      conflict-remote -> conflict-remote
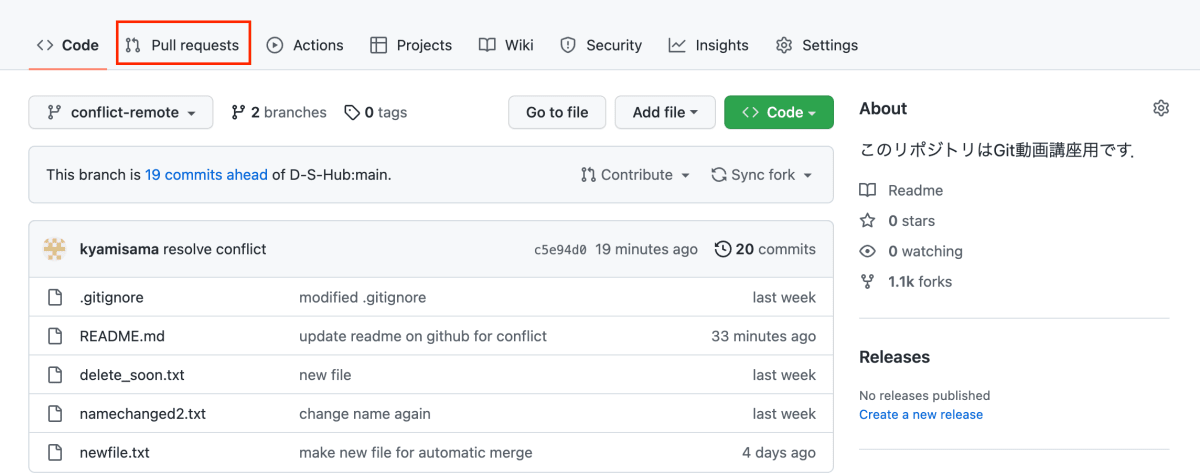
Git hub上でPull Requestを上げる
本来は先ほど実施したgit pushでGithub上の画面に「Compare & pull request」というボタンが出現するのですが、今回は何故か出現しないので以下の画像の赤枠部分の「Pull Request」をクリックします。
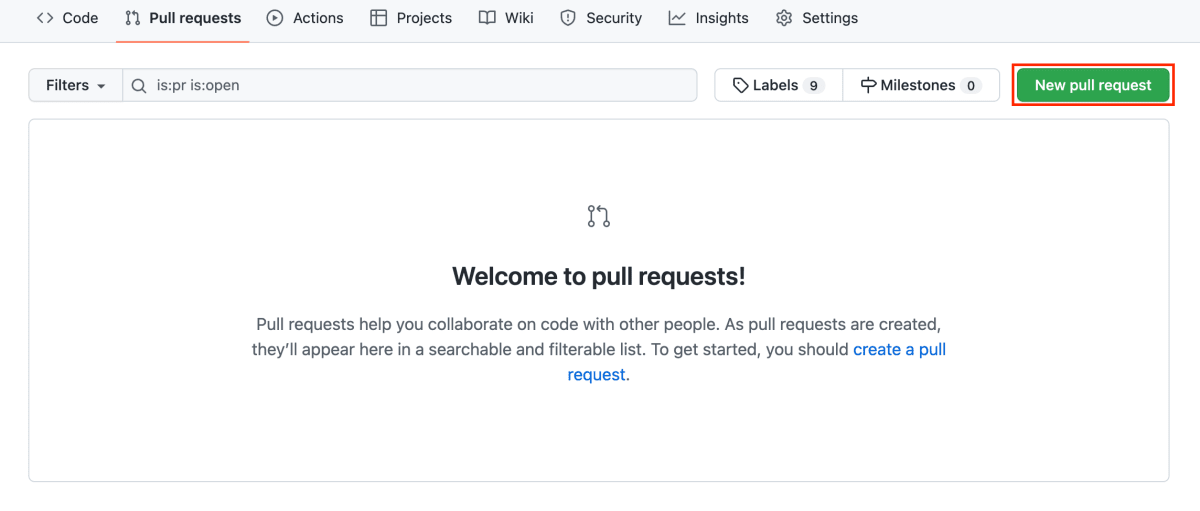
次に「New Pull Request」をクリックします。
次に「Create pull request」をクリックする前に青枠を見ると、
base repositoryがfork元のリポジトリを指しています。
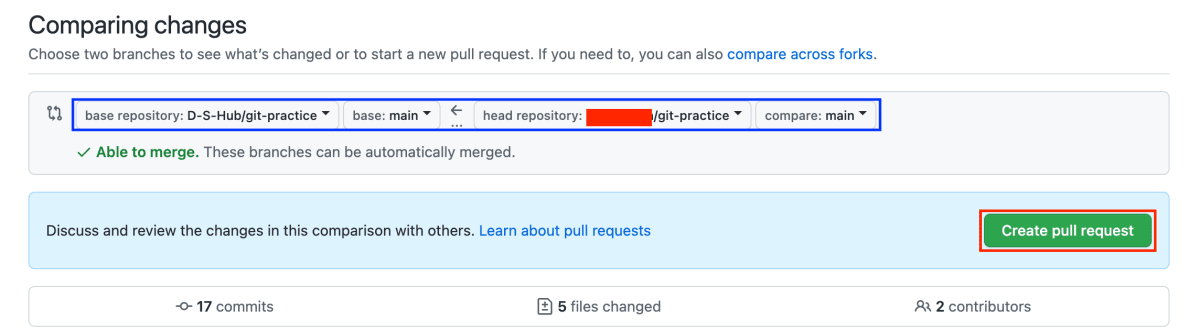
デフォルトでこうなるので、forkしてきたリポジトリに対してプルリクを上げるときは、以下のようにbase repositoryは自分のリポジトリを指すようにします。
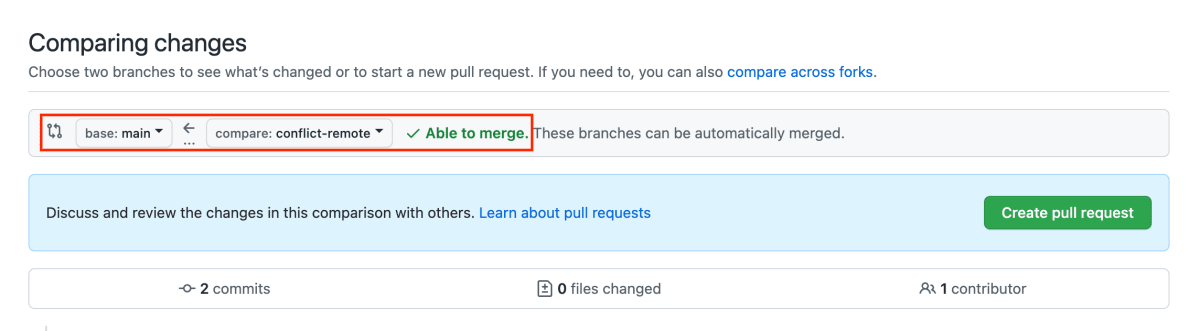
これで「Create pull request」をクリックします。
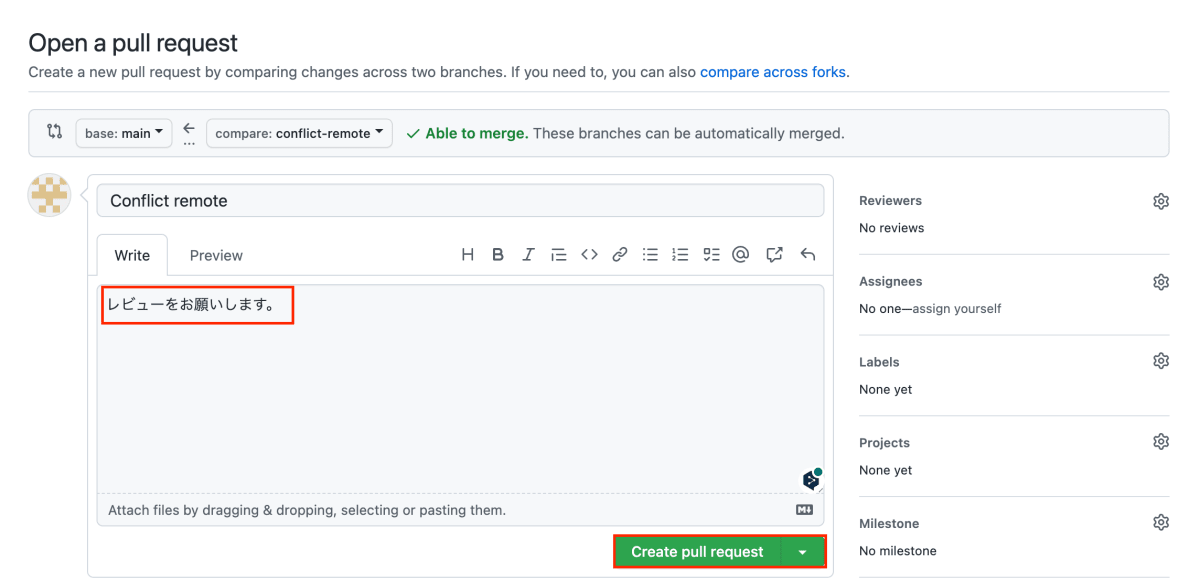
次にプルリクのコメントを記入し、もう一度「Create pull request」をクリックします。
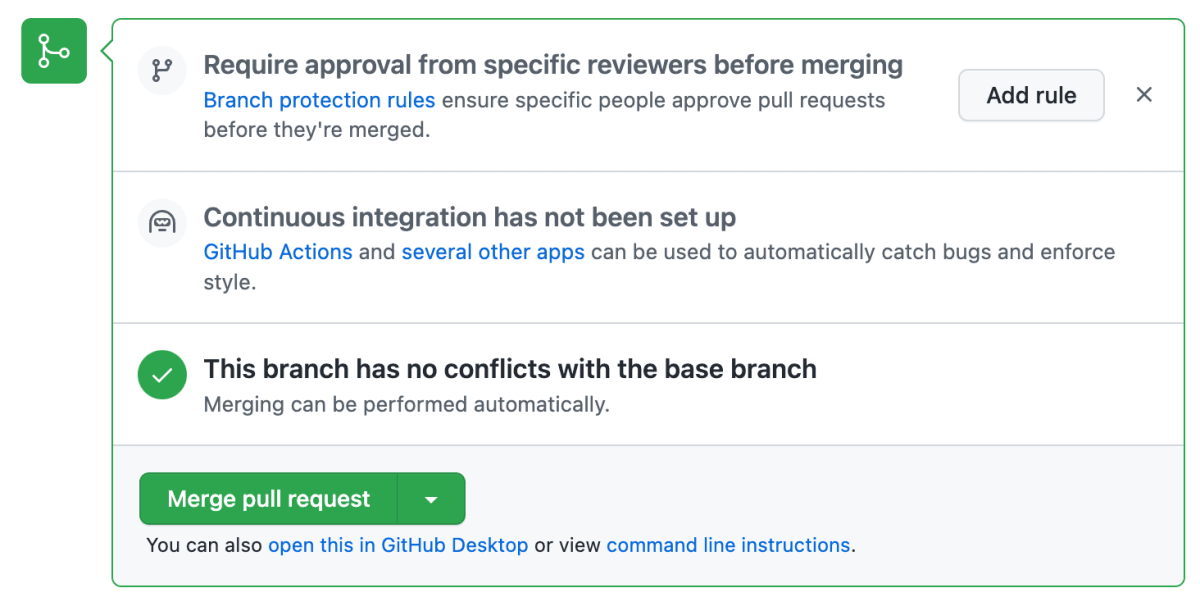
最後自分でMerge pull requestを実行する
本来は誰かにレビューしてもらって、OKであればレビューした人がマージしますが、今回は自分でマージします。
「Merge pull request」をクリックします。
6.17 ローカルリポにfork元のリポ情報をセットする
現在登録しているリポジトリ情報を確認してみる
 % git remote -v
origin  https://github.com/******/git-practice.git (fetch)
origin  https://github.com/******/git-practice.git (push)
ここにfork元のリポジトリ情報をセットしていく。
% git remote add upstream git@github.com:D-S-Hub/git-practice.git
% git remote -v
origin  https://github.com/******/git-practice.git (fetch)
origin  https://github.com/******/git-practice.git (push)
upstream        git@github.com:D-S-Hub/git-practice.git (fetch)
upstream        git@github.com:D-S-Hub/git-practice.git (push)
Discussion