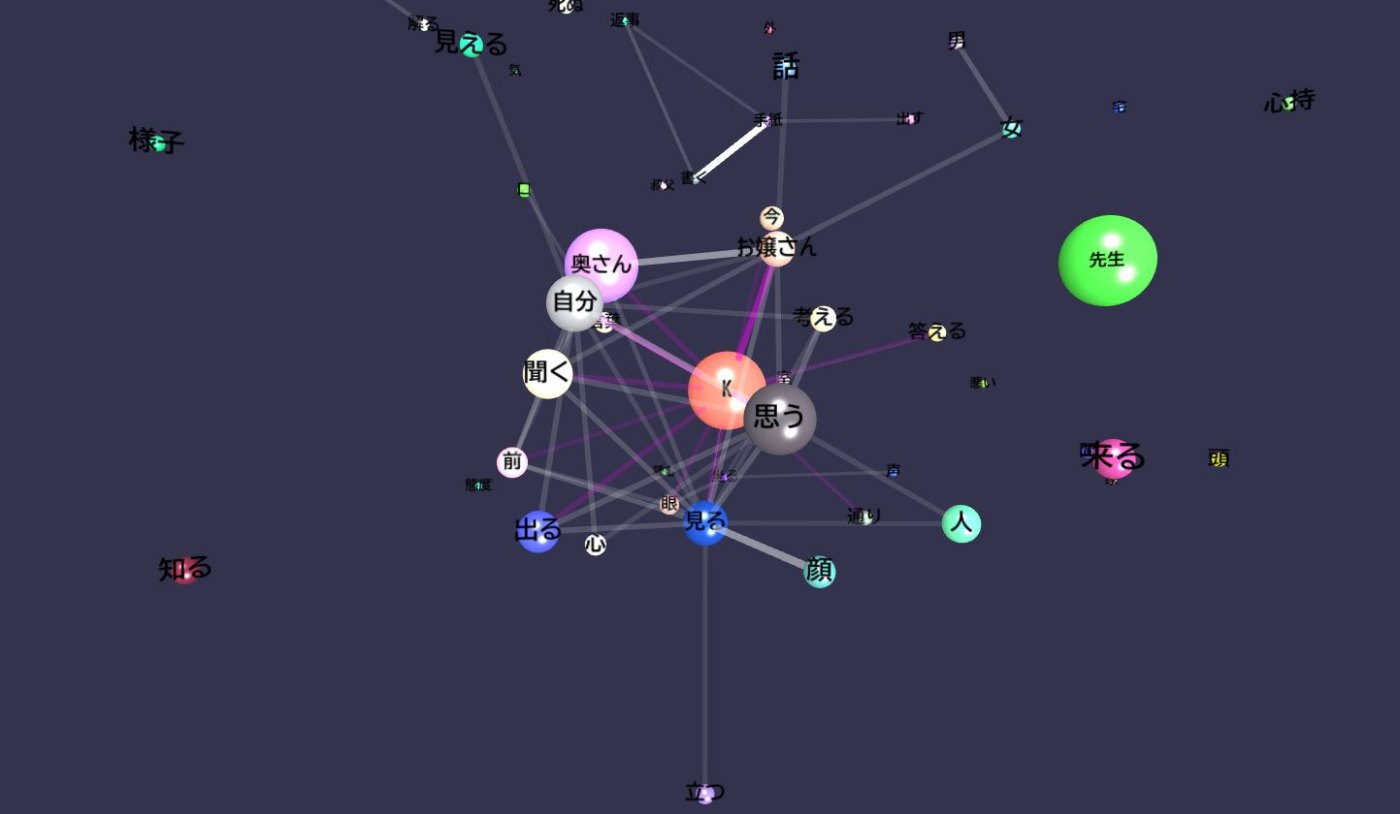
Babylon.jsで3D共起ネットワーク的なことをしたい
「Babylon.jsでの物理エンジン使えば、簡単に共起ネットワークみたいなグラフのノード自動配置できるんじゃないの?」と思ったのでやります。
ChatGPTに聞きつつ作ったものがこれ。バネと斥力を自力で実装している。
そしてこれを作ってから思ったのが、「バネって一般的な力学的な挙動だから、実装されてるんじゃないの?」と思って調べたら普通にありました。ただしlegacyなのでphysics v2では使えない。
SpringJoint作ってメッシュをつなぐだけでできる。
var createScene = function () {
    const scene = new BABYLON.Scene(engine);

    // カメラとライトを設定
    const camera = new BABYLON.ArcRotateCamera("camera1", Math.PI / 2, Math.PI / 4, 10, new BABYLON.Vector3(0, 0, 0), scene);
    camera.attachControl(canvas, true);
    const light = new BABYLON.HemisphericLight("light1", new BABYLON.Vector3(1, 1, 0), scene);

    // 物理エンジンを有効化
    scene.enablePhysics(new BABYLON.Vector3(0, 0, 0), );

    // 球体を作成
    const sphere1 = BABYLON.MeshBuilder.CreateSphere("sphere1", { diameter: 1 }, scene);
    sphere1.position = new BABYLON.Vector3(-2, 0, 0);
    sphere1.physicsImpostor = new BABYLON.PhysicsImpostor(sphere1, BABYLON.PhysicsImpostor.SphereImpostor, { mass: 1, restitution: 0.9 }, scene);

    const sphere2 = BABYLON.MeshBuilder.CreateSphere("sphere2", { diameter: 1 }, scene);
    sphere2.position = new BABYLON.Vector3(2, 0, 0);
    sphere2.physicsImpostor = new BABYLON.PhysicsImpostor(sphere2, BABYLON.PhysicsImpostor.SphereImpostor, { mass: 1, restitution: 0.9 }, scene);

    // SpringJoint を作成
    const springJoint = new BABYLON.PhysicsJoint(BABYLON.PhysicsJoint.SpringJoint, {
        length: 2,
        stiffness: 10,
        damping: 0.7
    });

    // 球体をジョイントで接続
    sphere1.physicsImpostor.addJoint(sphere2.physicsImpostor, springJoint);

    // 球体間に線を引く
    let line = BABYLON.MeshBuilder.CreateLines("line", {points: [sphere1.position, sphere2.position], updatable: true }, scene);

    // シーンを毎フレーム更新
    scene.registerBeforeRender(function () {
        line = BABYLON.MeshBuilder.CreateLines("line", {
            points: [sphere1.position, sphere2.position], instance: line
        });
    });

    const addDragBehavior = (mesh) => {
        var pointerDragBehavior = new BABYLON.PointerDragBehavior({});
        mesh.addBehavior(pointerDragBehavior);
    }
    addDragBehavior(sphere1)
    addDragBehavior(sphere2)


    return scene;
};
バネで接続できるのはわかったのであとはデータを使って実際に試してみる。
前に共起ネットワークは作ったことあるし、このあたりからデータは拾ってこれるはず...
ひとまずバネの実装をSpringJointに変えてみた。同じような挙動。
夏目漱石のこころの共起ネットワークデータを持ってきて表示させたら、球体が飛んでった。
最初にぶつかって弾かれてどっか行っちゃうので、壁作りますか。
壁つけた。球体に重み付けのサイズ指定はしてるけど、線に重みがないのでつける。
線の重みを線の透過度と長さで表現。次はクーロン力的なのつけたい。
physicsHelper.gravitationalFieldで球体ごとに負の重力場を与えて斥力として使おうと思ったら重すぎて無理だった。
反発力は手動設定した。割といい感じではないだろうか?
    scene.registerBeforeRender(function () {
        const minDistance = 10; // 反発力を適用する最小距離
        const repulsionConstant = minDistance * minDistance; // 反発力の定数

        // 球体同士の反発力
        const keys = Object.keys(spheres)
        keys.forEach((keyA, indexA) => {
            const sphereA = spheres[keyA]
            for (let indexB = indexA + 1; indexB < keys.length; indexB++) {
                const sphereB = spheres[keys[indexB]];

                const distanceVec = sphereA.position.subtract(sphereB.position);
                const distance = distanceVec.length();

                // 反発力
                if (distance < minDistance) {
                    const repulsionForce = distanceVec.normalize().scale(repulsionConstant / (distance * distance));
                    sphereA.physicsImpostor.applyForce(repulsionForce, sphereA.position);
                    sphereB.physicsImpostor.applyForce(repulsionForce.scale(-1), sphereB.position);
                }
            }
        });

        // ...

    });
文字表示で沼ってた。
dynamicTextureでできるのはわかったけど背景色なしにする方法が見つからず、ChatGPTに何回か聞いたら教えてくれた。
const text = node.name;
const font = "bold 44px monospace";
const dynamicTexture = new BABYLON.DynamicTexture("DynamicTexture", { width: 512, height: 256 }, scene, true);

// 背景透過
dynamicTexture.hasAlpha = true;

// 背景透過: "transparent"
dynamicTexture.drawText(text, null, null, font, "black", "transparent", true, true);

const material = new BABYLON.StandardMaterial("TextMaterial", scene);
material.diffuseTexture = dynamicTexture;

// 背景透過
material.useAlphaFromDiffuseTexture = true;

material.backFaceCulling = false;

const plane = BABYLON.MeshBuilder.CreatePlane("TextPlane", { width: 3, height: 1.5 }, scene);
plane.material = material;

// 正面方向が逆なので反転
plane.scaling.x = -1;
球体の位置に文字を表示するようにして、ちゃんと文字がカメラの方を見てくれるようにした。
え?めっちゃよくない?さすがChatGPT先生。
// テキストを正面に向ける
keys.forEach((key) => {
    const sphere = spheres[key].sphere;
    const plane = spheres[key].plane;

    // カメラと球体の中心とのベクトルを計算
    const direction = sphere.position.subtract(camera.position).normalize();

    // テキストを球体の表面に配置(球体の半径を考慮)
    const sphereRadius = sphere.getBoundingInfo().boundingSphere.radiusWorld;
    plane.position = sphere.position.subtract(direction.scale(sphereRadius));
    plane.lookAt(camera.position);
});
ダブルクリックするとフォーカスされるように
scene.registerBeforeRender(function () {
    // ...

    // ダブルクリックした球体にフォーカス
    if (animating) {
        camera.target = BABYLON.Vector3.Lerp(camera.target, targetPosition, 0.01);
        if (BABYLON.Vector3.DistanceSquared(camera.target, targetPosition) < 0.01) {
            animating = false; // 目標に十分近づいたらアニメーションを停止
        }
    }

});

// ダブルクリックした球体にフォーカス
let targetPosition = camera.position;
let animating = false;
window.addEventListener("dblclick", function(evt) {
    const pickResult = scene.pick(scene.pointerX, scene.pointerY);
    if (pickResult.hit) {
        targetPosition = pickResult.pickedMesh.position;
        animating = true; // アニメーション開始
    }
});
あとlineだとなんでか表示が消える時があるからtubeに変更した。
文字を手前に配置した関係上、球体のドラッグができなくなっていたので、文字をクリック対象から外す。
plane.isPickable = false;
どの球体が接続しているのかわかりやすくするために色変更処理を追加。
// 選択した球体に接続された線の色を変える
const pickedName = pickResult.pickedMesh.name
lines.forEach(line => {
    if (line.line.name.includes(pickedName)) {
        line.line.material.diffuseColor = new BABYLON.Color3(1, 0, 1);
    } else {
        line.line.material.diffuseColor = new BABYLON.Color3(1, 1, 1);
    }
})
できたよー?

初期配置がほぼ同じだと球体がはねて壁を貫通することがあったので、適度にバラけるようにした。
あと壁も分厚くした。だいぶ最初の動きが静かな感じになった。
そんなわけで?LTもしたしCloseです!