Closed11
FastAPIを始める時のメモ(ボツ)
自分用に作成。
手を動かしながらメモしていく(Windows環境)
Todoアプリの部分は以下の部分を参考にしました。
Pythonのバージョン確認
コマンドプロンプト
$ python --version
仮想環境構築
プロジェクトフォルダへ移動して以下を実行
コマンドプロンプト
$ python -m venv .venv
仮想環境に入ってPythonのバージョン確認
コマンドプロンプト
$ cd .venv\Scripts
$ activate
コマンドプロンプトが仮想環境内に切り替わる
コマンドプロンプト
(.venv) $ python --version
毎回アクティブにするのはダルいので、batファイルを用意する
以下のbatファイルを配置し、ダブルクリックで起動すれば、
仮想環境をアクティブにしつつVSCodeが起動する
vscode.bat
cd /d %~dp0
call ".\.venv\Scripts\activate.bat"
call code .
exit
※以降のコマンドはVSCode内のターミナルにて実行する
FastAPIをインストール
VSCode内ターミナル
$ pip install fastapi
Hypercornをインストール
VSCode内ターミナル
$ pip install hypercorn
$ pip install hypercorn[h3]
「requirements.txt」を出力
VSCode内ターミナル
$ pip freeze > ./requirements.txt
ディレクトリ構成

Hello World!
main.py
from fastapi import FastAPI

app = FastAPI()

@app.get("/hello")
async def hello():
    return {"message": "hello world!"}
Hypercorn 起動
VSCode内ターミナル
$ hypercorn ./api/main:app --bind 127.0.0.1:8000 --reload
VSCodeで「pycache」を非表示にする
- 「ファイル」⇒「ユーザー設定」⇒「設定」
- 「files.exclude」で検索
- 「パターンを追加」⇒
**/__pycache__を入力
「F5」キーで起動するように「launch.json」を作成する
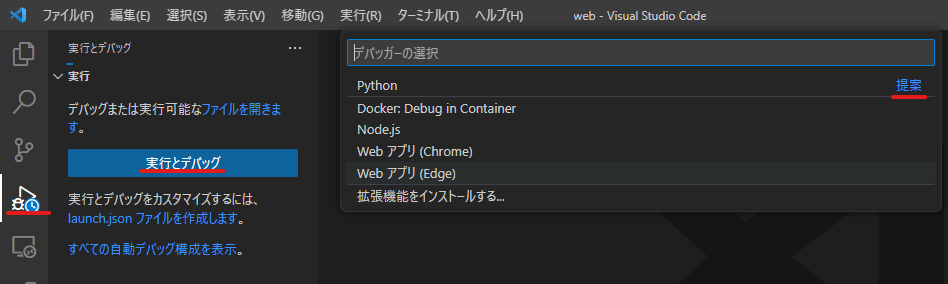
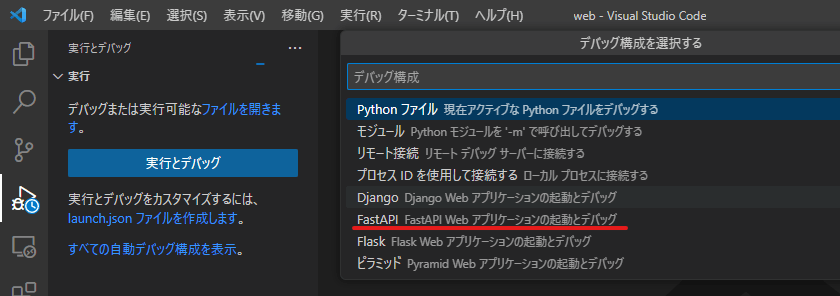
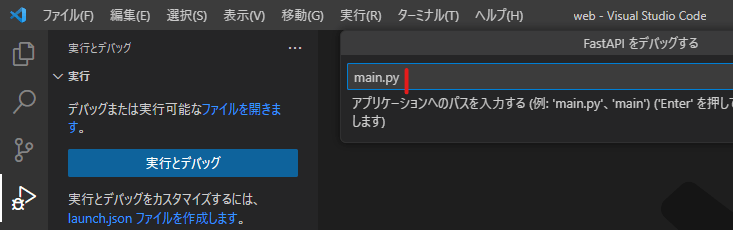
※「main.py」からフォーカスを外してEnter
「launch.json」の編集
launch.json
{
    // IntelliSense を使用して利用可能な属性を学べます。
    // 既存の属性の説明をホバーして表示します。
    // 詳細情報は次を確認してください: https://go.microsoft.com/fwlink/?linkid=830387
    "version": "0.2.0",
    "configurations": [
        {
            "name": "Python: FastAPI",
            "type": "python",
            "request": "launch",
            "module": "hypercorn",
            "console": "integratedTerminal",
            "args": [
                "./api/main:app",
                "--bind",
                "127.0.0.1:8000",
            ],
        },
    ]
}
ブレークポイントで止まるのも確認

ディレクトリ構造変更
※後でDockerでMySQLを追加する
※git用に「.gitignore」を追加しておきたい
todo
├─ database
│    └─ mysql
│           ⇒ 後でDockerでMySQLを構築する
├─ web
│    ├─ .venv
│    │      ⇒ python仮想環境
│    │
│    ├─ .vscode
│    │      ⇒ VSCodeの設定
│    │
│    └─ api
│        │  ⇒ FastAPIのソースコード
│        │
│        ├ requirements.txt
│        │
│        └ vscode.bat
└ .gitignore
.gitignore
# 仮想環境不要
/web/.venv/

# pemファイル不要
*.pem

# envファイル不要
*.env

# キャッシュファイル不要
*.pyc

# キャッシュフォルダ不要
*__pycache__/

# DS_Storeファイル不要
.DS_Store

# ログファイル不要
/web/api/log/*
/database/mysql/log/*

!.gitignore
「requirements.txt」の出力を忘れるので、ビルド時に自動出力する
- 「.vscode」内に「tasks.json」を追加
tasks.json
{
    // See https://go.microsoft.com/fwlink/?LinkId=733558
    // for the documentation about the tasks.json format
    "version": "2.0.0",
    "tasks": [
        {
            "label": "local_pre_launch_task",
            "type": "shell",
            "command": "${workspaceFolder}/local_pre_launch_task.cmd",
            "presentation": {
                "reveal": "always",
                "panel": "shared",
                "clear": true
            }
        }
    ]
}
- 呼び出すコマンドファイル「local_pre_launch_task.cmd」を作成する
※ windowsを想定して一旦、拡張子は「.cmd」
local_pre_launch_task.cmd
pip freeze > ./requirements.txt
- 「launch.json」から呼び出す(タスクのラベル名を指定)
launch.json
{
    // IntelliSense を使用して利用可能な属性を学べます。
    // 既存の属性の説明をホバーして表示します。
    // 詳細情報は次を確認してください: https://go.microsoft.com/fwlink/?linkid=830387
    "version": "0.2.0",
    "configurations": [
        {
            "name": "Python: FastAPI",
            "type": "python",
            "request": "launch",
            "module": "hypercorn",
            "console": "integratedTerminal",
            "args": [
                "./api/main:app",
                "--bind",
                "127.0.0.1:8000",
            ],
+          "preLaunchTask": "local_pre_launch_task",
        },
    ]
}
オレオレ証明書の作成
- WSL2内のUbuntuにて「openssl」コマンドを利用する
- 「/CN=local.fastapi_tod.com」適宜変更する
- ここでは「~/todo/web/ssl」フォルダに作成
WSL2内のshell
$ openssl req -x509 -sha256 -nodes -days 365 -newkey rsa:2048 -subj /CN=local.fastapi_tod.com -keyout key.pem -out cert.pem
hypercornをHTTPSで起動する
launch.json
{
    // IntelliSense を使用して利用可能な属性を学べます。
    // 既存の属性の説明をホバーして表示します。
    // 詳細情報は次を確認してください: https://go.microsoft.com/fwlink/?linkid=830387
    "version": "0.2.0",
    "configurations": [
        {
            "name": "Python: FastAPI",
            "type": "python",
            "request": "launch",
            "module": "hypercorn",
            "console": "integratedTerminal",
            "args": [
                "./api/main:app",
                "--bind",
                "127.0.0.1:8000",
+                "--keyfile",
+                "./ssl/key.pem",
+                "--certfile",
+                "./ssl/cert.pem"
            ],
            "preLaunchTask": "local_pre_launch_task",
        },
    ]
}
むむむ、HypercornでHTTP/3やろうとすると、「aioquic」が必要っぽい。
しかも、Python3.9系じゃないとまだバグありそう・・・
おとなしくUvicornで再構築するか・・・
このスクラップは2023/03/19にクローズされました