さくっとNuxt.jsとApolloでGraphQLの雰囲気を掴むハンズオン
本記事の目的
Nuxt.jsとApollo Clientを用いたハンズオンを通してGraphQLの雰囲気を掴むことを目的としています。
バックエンドにはpokemon APIを活用します。
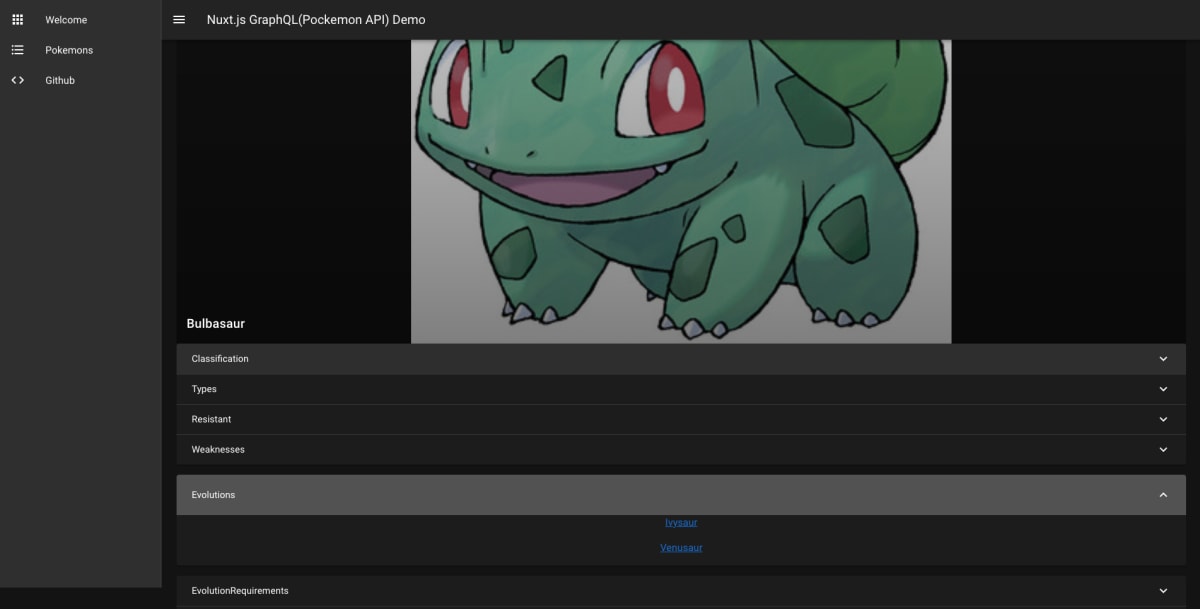
最終的には以下のようなポケモン図鑑が完成します。
(なおDeploy作業までは扱っておりません。)
https://nuxt-graphql-demo.netlify.app/
開発環境
- macOS
- node v14.15.5
GraphQLとは
- API向けのクエリ言語
- 特徴として以下の点があります。
- RESTでは複数のendipointが存在し、用途に応じてrequestを送り不必要なデータも含むresponseがあった反面、GraphQLでは単一のendpointに対して、欲しい情報を指定してrequest、responseを得ることができる。
- request時に必要なresponseを指定することでフロントエンドでの開発が行いやすくなる
開発開始
プロジェクト作成
npx create nuxt-appコマンドにてプロジェクトを作成します。
npx create-nuxt-app nuxt-graphql-example
対話形式でNuxt.jsのアプリを立ち上げることができます。
今回は以下のようにオプションを選択します。
Programming languageはTypescript(以下TSと略)を選択していますが、当アプリで型を用いるメリットはほぼないため、Javascriptで開発を進めていきます。
また、UI構築を簡単にするためVuetifyを用います。結果的に工数をかなり減らすことができました。
? Programming language: TypeScript
? Package manager: Yarn
? UI framework: Vuetify.js
? Nuxt.js modules: (Press <space> to select, <a> to toggle all, <i> to invert selection)
? Linting tools: (Press <space> to select, <a> to toggle all, <i> to invert selection)
? Testing framework: Jest
? Rendering mode: Universal (SSR / SSG)
? Deployment target: Server (Node.js hosting)
? Development tools: (Press <space> to select, <a> to toggle all, <i> to invert selection)
? Continuous integration: None
? Version control system: Git
現時点でyarn devにてローカルサーバの立ち上げを確認できます。

Apollo Clientセットアップ
GraphQLをもちいたrequestを送るためにApollo Clientを用います。
ライブラリをインストール
yarn add @nuxtjs/apollo graphql-tag
clientを読み込む設定をnuxt.config.jsに行っていきます。
// nuxt.config.js

// Modules (https://go.nuxtjs.dev/config-modules)
  modules: [
    '@nuxtjs/apollo',
  ],

  // Apollo module configuration
  apollo: {
    clientConfigs: {
      default: {
        httpEndpoint: 'https://graphql-pokemon2.vercel.app/',
      }
    }
  },
TS対応のためgql.d.tsを新規作成し、記述していきます。
// gql.d.ts

declare module '*.gql' {
  import { DocumentNode } from 'graphql'

  const content: DocumentNode
  export default content
}

declare module '*.graphql' {
  import { DocumentNode } from 'graphql'

  const content: DocumentNode
  export default content
}
実行するクエリを用意
プロジェクト配下にapollo/queriesディレクトリを新規作成し、クエリを用意します。
├── apollo
│   └── queries
│       ├── pokemon.gql
│       └── pokemons.gql
- pokemon.gql
- idを引数に該当するpokemonの情報を取得
-
$id:String!でString型で必ず引数を受け取る(Non-nullable)
# pokemon.gql

query pokemon($id: String!) {
  pokemon(id: $id) {
    name
    classification
    types
    resistant
    weaknesses
    evolutions {
      name
      id
      image
    }
    evolutionRequirements {
      name
      amount
    }
    image
  }
}
- pokemons.gql
-
$amount:Int!で取得するpokemonの種別数を必ずInt型で受け取る(Non-nullable)
-
# pokemons.gql

query pokemons($amount: Int!) {
  pokemons(first: $amount) {
    id
    name
    image
  }
}
UI構築(pages)
pages配下にページネーション用のファイルを用意します。
├── pages
│   ├── index.vue
│   ├── pokemon
│   │   └── _id.vue
│   └── pokemons.vue
- index.vue
- トップページ
- pokemons.vue
- ポケモン一覧ページ
- pokemon/_id.vue
- ポケモン詳細ページ
index.vue
サイトの説明ページです。
好みに合わせてカスタマイズしましょう。
<template>
  <v-container fill-height>
    <v-row justify="center" align-content="center" class="">
      <v-col cols="12" align-self="auto">
          <h1 class="text-center">This is the demosite by using Nuxt.js + GraphQL(Apollo)</h1>
      </v-col>
      <v-col cols="12" align-self="auto">
          <h2 class="text-center">You can play the pokemomn picture book from sidebar menu</h2>
      </v-col>
    </v-row>
  </v-container>
</template>

pokemons.gql
ポケモン一覧ページ
<script>内でapolloobjectを用いることでgraphQLのrequestを行うことができます。
respponseはapolloObject内で宣言したpokemonsを値として使うことができます。
<template>
  <v-container fluid>
    <v-row dense>
      <v-col v-for="pokemon in pokemons" :key="pokemon.id" :cols="12">
        <v-card>
          <NuxtLink :to="`pokemon/${pokemon.id}`">
            <v-img
              :src="pokemon.image"
              class="white--text align-end"
              gradient="to bottom, rgba(0,0,0,.1), rgba(0,0,0,.5)"
              contain=true
              height="800"
            >
              <v-card-title v-text="pokemon.name"></v-card-title>
            </v-img>
          </NuxtLink>

          <!-- <v-card-actions>
            <v-spacer></v-spacer>
            <v-btn icon>
              <v-icon>mdi-heart</v-icon>
            </v-btn>

            <v-btn icon>
              <v-icon>mdi-bookmark</v-icon>
            </v-btn>

            <v-btn icon>
              <v-icon>mdi-share-variant</v-icon>
            </v-btn>
          </v-card-actions> -->
        </v-card>
      </v-col>
    </v-row>
    <br>
    <v-expansion-panels accordion>
      <v-expansion-panel>
        <v-expansion-panel-header>Show Query Result</v-expansion-panel-header>
        <v-expansion-panel-content>
          {{ pokemons }}
        </v-expansion-panel-content>
      </v-expansion-panel>
    </v-expansion-panels>
  </v-container>
</template>
<script>
import "vue-apollo";
import pokemons from "~/apollo/queries/pokemons.gql";

// pokemonは最大151匹
let numGetPokemons = 151;

export default {
  data() {
    return {
      pokemons
    };
  },
  // pokemon一覧を取得
  apollo: {
    pokemons: {
      prefetch: "loading",
      query: pokemons,
      variables: {
        amount: numGetPokemons
      }
    }
  },
};
</script>

pokemon/_id.vue
ポケモン一覧ページのNuxtLinkを用いて動的にポケモン詳細ページを生成します。
レンダリング時にresponseのpokemonが取得しきれずエラーになるため、v-if="pokemon"にて取得が完了でき次第ページを表示するようにします。
prefetch: ({ route }) => ({ id: route.params.id })とvariables() {return { id: this.$route.params.id };}を用いることでpath内のポケモンidを取得して、pokemonクエリの変数として用います。
※ 使用するコンポーネントsingleExplanation,multiExplanation,evolutionExplanationについては次章にて解説していきます。
<template>
  <div v-if="pokemon">
    <v-container fluid>
      <v-img
        :src="pokemon.image"
        class="white--text align-end"
        gradient="to bottom, rgba(0,0,0,.1), rgba(0,0,0,.5)"
        contain=true
        height="800"
      >
        <v-card-title v-text="pokemon.name"></v-card-title>
      </v-img>
      <v-expansion-panels focusable>
        <!-- classification -->
        <single-explanation
          referKey="Classification"
          :referValue="pokemon.classification"
        />
        <!-- types -->
        <multi-explanation referKey="Types" :referValue="pokemon.types" />
        <!-- resistant -->
        <multi-explanation
          referKey="Resistant"
          :referValue="pokemon.resistant"
        />
        <!-- weaknesses -->
        <multi-explanation
          referKey="Weaknesses"
          :referValue="pokemon.weaknesses"
        />
        <!-- evolutions -->
        <evolution-explanation
          v-if="pokemon.evolutions"
          referKey="Evolutions"
          :referValue="pokemon.evolutions"
        />
        <!-- evolutionRequirements -->
        <multi-explanation
          v-if="pokemon.evolutionRequirements"
          referKey="EvolutionRequirements"
          :referValue="pokemon.evolutionRequirements"
        />

        <!-- レスポンス -->
        <v-expansion-panel>
          <v-expansion-panel-header>Show Query Result</v-expansion-panel-header>
          <v-expansion-panel-content class="justify-center">
            {{ pokemon }}
          </v-expansion-panel-content>
        </v-expansion-panel>
      </v-expansion-panels>
    </v-container>
  </div>
</template>

<script>
import pokemon from "~/apollo/queries/pokemon.gql";
import multiExplanation from "~/components/multiExplanation.vue";
import singleExplanation from "~/components/singleExplanation.vue";
import evolutionExplanation from "~/components/evolutionExplanation.vue";

export default {
  apollo: {
    pokemon: {
      query: pokemon,
      prefetch: ({ route }) => ({ id: route.params.id }),
      variables() {
        return { id: this.$route.params.id };
      }
    }
  },
  components: {
    multiExplanation,
    singleExplanation,
    evolutionExplanation
  }
};
</script>
UI構築(components)
responseに対応してUIを表示するcomponentsを作成します。
singleExplanation,multiExplanation,evolutionExplanationコンポーネントを作成していきます。
├── components
│   ├── evolutionExplanation.vue
│   ├── multiExplanation.vue
│   └── singleExplanation.vue
singleExplanation
<template>
    <v-expansion-panel>
      <v-expansion-panel-header>{{ referKey }}</v-expansion-panel-header>
      <v-expansion-panel-content class="text-center">
        {{ referValue }}
      </v-expansion-panel-content>
    </v-expansion-panel>
</template>
<script>
export default {
  props: ["referKey", "referValue"]
};
</script>
multiExplanation
<template>
  <v-expansion-panel>
    <v-expansion-panel-header>{{ referKey }}</v-expansion-panel-header>
    <v-expansion-panel-content v-for="(value, key) in referValue" :key="key" class="text-center">
      {{ value }}
    </v-expansion-panel-content>
  </v-expansion-panel>
</template>
<script>
export default {
  props: ["referKey", "referValue"]
};
</script>
evolutionExplanation
NuxtLinkを用いて進化するポケモンへのリンクを貼ります。
<template>
  <v-expansion-panel>
    <v-expansion-panel-header>{{referKey}}</v-expansion-panel-header>
    <v-expansion-panel-content v-for="(value, key) in referValue" :key="key" class="text-center">
      <NuxtLink :to="`${value.id}`">
      {{value.name}}
      </NuxtLink>
    </v-expansion-panel-content>
  </v-expansion-panel>
</template>
<script>
export default {
  props:[
    'referKey',
    'referValue'
    ]
};
</script>
UI構築(その他)
お好みでdefault.vueを修正してSidebarの項目やlayoutを整えます
├── layouts
│   ├── default.vue
│   └── error.vue
<template>
<v-app dark>
<v-navigation-drawer
v-model="drawer"
:mini-variant="miniVariant"
:clipped="clipped"
fixed
app
>
<v-list>
<v-list-item
v-for="(item, i) in items"
:key="i"
:to="item.to"
:href="item.href"
router
exact
>
<v-list-item-action>
<v-icon>{{ item.icon }}</v-icon>
</v-list-item-action>
<v-list-item-content>
<v-list-item-title v-text="item.title" />
</v-list-item-content>
</v-list-item>
</v-list>
</v-navigation-drawer>
<v-app-bar
:clipped-left="clipped"
fixed
app
>
<v-app-bar-nav-icon @click.stop="drawer = !drawer" />
<v-toolbar-title v-text="title" />
<v-spacer />
</v-app-bar>
<v-main>
<v-container>
<nuxt />
</v-container>
</v-main>
<v-footer
:absolute="!fixed"
app
>
<span>© {{ new Date().getFullYear() }}</span>
</v-footer>
</v-app>
</template>
<script>
export default {
data () {
return {
clipped: false,
drawer: false,
fixed: false,
items: [
{
icon: 'mdi-apps',
title: 'Welcome',
to: '/'
},
{
icon: 'mdi-format-list-bulleted',
title: 'Pokemons',
to: '/pokemons'
},
{
icon: 'mdi-code-tags',
title: ' Github',
href: 'https://github.com/kimkiyong0612/Nuxt-GraphQL-Demo'
}
],
miniVariant: false,
right: true,
rightDrawer: false,
title: 'Nuxt.js GraphQL(Pockemon API) Demo'
}
}
}
</script>
結び
以上をもってポケモン図鑑を作成することができました。
あとはherokuやNetlifyにデプロイすることで0円でサイトを公開することができます。
(VercelではSSRのDeployがうまくいかなかったため、成功した方がいたら教えてもらえるとうれしいです。)
おつかれさまでした。
Reference
Discussion