Learn to debug like a pro - Paul Hudson
Basic
assert()
使用例
func alwaysTrue() -> Bool {
	return true
}
assert(alwaysTrue() == true, "alwaysTrue is failed")
-
assert()の条件が成立されてない場合、アプリがクラッシュになります - アプリがAppStoreへ発行されている場合、
assert()は削除されなくても無効になります - プログラムのロジックが絶対に間違ってないと思う場所に、
assert()をいっぱい入れましょう。万が一ロジックが間違ってしまっても速やかに問題点を突き止められます。
precondition()
- 使い方は
assert()と同じです。しかし、assert()はAppStore発行されたら消えますが、precondition()は消えないです。エードユーザーの前でもクラッシュになります。 - Swift Stand Libraryでは
precondition()を246回使っています。例えば:- empty
removeLast() - reversed ranges
let range = 10...0 - divided by 0
let divide = 10 / 0 - reading out of array ranges
- empty
fatalError()
fatalError()のソースコード
public func fatalError(
	_ message: @autoclosure() -> String = String(),
	file: StaticString = #file, line: Unit = #line
) -> Never
fatalError()は返り値はしないです。ロジックエラーの処理に優れています。例えば:
- Dequeue cells
- Instantiate from storyboards
- Read the app bundle
Reading values
lldb (low level debugger)
lldbを使うためには、デバッグモードに入らなければならないです
つまり、Breakpointを入れてlldbを使いましょう
まずは変数を一つ追加
class ViewController: UIViewController {
+   var someInt = 100

    override func viewDidLoad() {
        super.viewDidLoad()
    }

}
次はsuper.viewDidLoad()の行にBreakpointを追加

そしてアプリをビルド。画面はすぐに停止して、デバッグモードになりました

画面の右下の(lldb)のところにp someIntを記入、Enterを打ちます
そして返り値が来ました。
(lldb) p someInt
(Int) $R0 = 100
lldbのオブジェクト
class SampleObject {
    let name: String

    init(name: String) {
        self.name = name
    }
}

class ViewController: UIViewController {
    var someInt = 100
    var someObject = SampleObject(name: "a")

    override func viewDidLoad() {
        super.viewDidLoad() // ここにBreakpointを入れる
    }

}
一般的なオブジェクトのプリントアウト
(lldb) po someObject
<SampleObject: 0x281d4fdc0>
オブジェクトのプロパティやメソッドを確認できるようなプリントアウト
(lldb) p someObject
(JustTest.SampleObject) $R1 = 0x0000000281d4fdc0 (name = "a")
pとpoは、アプリのプロセスにコンパイルするので、変数の値を変えるリスクがあります
lldbのframe variable
何も変えずにただローカル変数の値をプリントアウト
class ViewController: UIViewController {

    override func viewDidLoad() {
        super.viewDidLoad()

        for i in 1...10 {
		// ここにBreakpointを入れよう
        }
    }
}
frame variableは、こちらの変数のみプリントアウトできます

(lldb) fr v i
(Int) i = 0
lldbのexpr
変数の値を変えます
class SampleObject {
    let name: String

    init(name: String) {
        self.name = name
    }
}

class ViewController: UIViewController {
    var someInt = 100
    var someObject = SampleObject(name: "a")

    override func viewDidLoad() {
        super.viewDidLoad() // ここにBreakpointを入れる
    }

}
(lldb) p someObject.name
(String) $R0 = "a"
(lldb) expr someObject = SampleObject(name: "bb")
() $R1 = {}
(lldb) p someObject.name
(String) $R1 = "bb"
Quick look
目のアイコンをクリック

変数をプレビューすることができます

Breakpoint
Breakpointを編集
編集する仕方はBreakpointに右クリック、そして「Edit Breakpoint...」をセレクト

Ignore n times before stoppingを活用して
ループ内のデバッグ効率を向上します

Automatically continue after evaluating actionsのチェックを入れたら
ビルド中、そのBreakpointがスキップになります

BreakpointのAction
まずはBreakpointを入れます
class ViewController: UIViewController {
    override func viewDidLoad() {
        super.viewDidLoad()

        for i in 1...10 {
            print(i)  // ここにBreakpointを入れる
        }
    }

}
そしてBreakpointを編集、Actionを追加します

起動したらデバッグパネルにlldbのプリントが表れています
BreakpointのCondition
Conditionを指定したら特定状況下デバッグを起動させることができます

Conditionを活用
まずはenumから始めます
enum BreakpointManager {
    static let firstRun = 0
    static let userCreate = 0
    static let userLogin = 0
    static let subscribe = 0
}
テストのシナリオを細く分け、上のように4つのシナリオを分けます
そしてBreakpointのConditionにBreakpointManager.userLogin == 1を記入

userLoginのシナリオをテストしたい時、enumを修正して
enum BreakpointManager {
    static let firstRun = 0
    static let userCreate = 0
+   static let userLogin = 1
    static let subscribe = 0
}
そしてビルド。条件が合ってるからプログラムが止まりました
さらに、userLoginというキーワードを利用してコードを検索することもできます

Conditionのサウンド
enum BreakpointManager {
    static let firstRun = 0
    static let userCreate = 0
    static let userLogin = 0
    static let subscribe = 0
+   static let soundsEnable = 1
}

class ViewController: UIViewController {
    override func viewDidLoad() {
        super.viewDidLoad()

        for i in 1...10 {
            print(i)
        }
        //ループが終わり ここにBreakpoint
    }

}
Actionにサウンドを追加

Exception breakpoint
Crashの時にデバッグモードになれる設定です

Exception breakpointを導入する前に、このようなプログラムのデバッグは難しいです
class ViewController: UIViewController {
    override func viewDidLoad() {
        super.viewDidLoad()

        let vc = storyboard?.instantiateViewController(withIdentifier: "Detail") as? ViewController // ここにエラーが発生する
    }

}
ログ履歴を一つずつにチェック、原因を見つかるのです

Exception breakpointを導入後、アプリを起動したらすぐにデバッグモードになりました
「0 objc_exception_throw」をクリック

lldbのどころにpo $arg1を打ち、問題点が返しました

このデバッグコマンドも、Exception breakpointの内に統合されることもできます

Symbolic breakpoint
Symbolic breakpointを通して、ViewControllerがdeinitされた時に音がするようになりました。逆に音が出ない時にはretain cycleの可能性を示します。
class ViewController: UIViewController {

    override func viewDidLoad() {
        super.viewDidLoad()

        let button = UIButton(type: .system)
        button.setTitle("Show Another", for: .normal)
        button.translatesAutoresizingMaskIntoConstraints = false
        button.addTarget(self, action: #selector(buttonTapped), for: .touchUpInside)
        view.addSubview(button)

        button.centerXAnchor.constraint(equalTo: view.centerXAnchor).isActive = true
        button.centerYAnchor.constraint(equalTo: view.centerYAnchor).isActive = true

    }

    @objc func buttonTapped() {
        guard let vc = storyboard?.instantiateViewController(withIdentifier: "Another") as? AnotherViewController else { return }
        vc.beforeVC = self
        navigationController?.pushViewController(vc, animated: true)

    }

}

class AnotherViewController: UIViewController {
    var beforeVC: ViewController?

    override func viewDidLoad() {
        super.viewDidLoad()

        let button = UIButton(type: .system)
        button.setTitle("Show Last", for: .normal)
        button.translatesAutoresizingMaskIntoConstraints = false
        button.addTarget(self, action: #selector(buttonTapped), for: .touchUpInside)
        view.addSubview(button)

        button.centerXAnchor.constraint(equalTo: view.centerXAnchor).isActive = true
        button.centerYAnchor.constraint(equalTo: view.centerYAnchor).isActive = true
    }

    @objc func buttonTapped() {
        guard let vc = storyboard?.instantiateViewController(withIdentifier: "Last") as? LastViewController else { return }
        navigationController?.pushViewController(vc, animated: true)

    }

    deinit {
        print("Another view is died")
    }
}

class LastViewController: UIViewController {
    override func viewDidLoad() {
        super.viewDidLoad()
    }

    deinit {
        print("Last view is died")
    }
}
Break navigatorのパネルの左下の「+」をクリック、「Symbolic Breakpoint...」を選択

Symbolに-[UIViewController dealloc]を記入
Log Messageに--- dealloc @(id)[$arg1 description]@ @(id)[$arg1 title]@を記入

そしたら設定完了です
Watchpoints
- Breakpoints: Pause when a location is reached or when an event happens
- Watchpoints: Pause when a value is changed by any part of your code
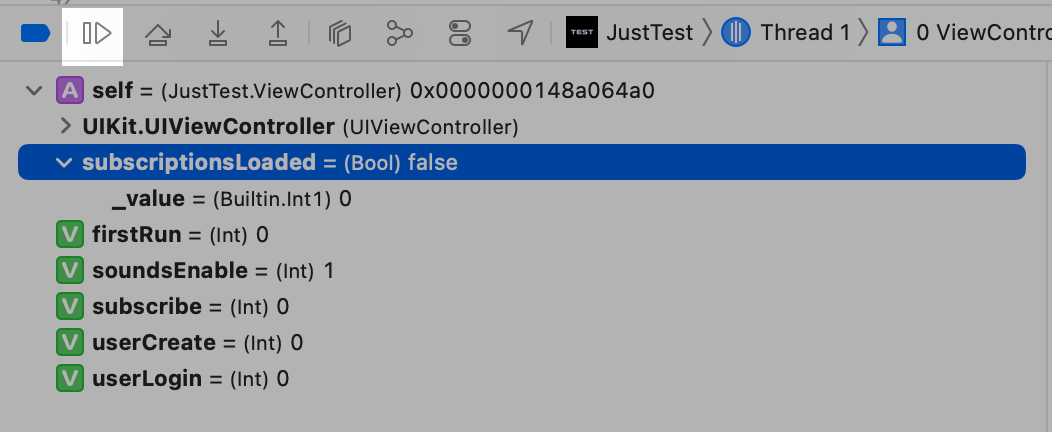
subscriptionsLoadedがいつに改変されるのかをチェックするためには
まずはすべてが始まる前の場所にBreakpointを入れます
class ViewController: UIViewController {
    var subscriptionsLoaded = false

    override func viewDidLoad() {
        super.viewDidLoad()

	print(subscriptionsLoaded) // false ここにBreakpointを入れる
        authenticateUser()
        downloadSubscriptions()
        showWelcome()
        print(subscriptionsLoaded) // true

    }

    func authenticateUser() { }

    func downloadSubscriptions() {
        subscriptionsLoaded = true
    }

    func showWelcome() { }

}
そしてアプリをビルド、デバッグモード画面に「subscriptionsLoaded」の変数に対して右クリック、「Watch subscriptionsLoaded」を選択

そしてアプリを続けます
subscriptionsLoadedが変えられた時にWatchが起動され、またデバッグモードになりました

subscriptionsLoadedがどこに変えられたかをチェック確認するには、まずは「ViewController.subscriptionsLoaded.setter」にクリック

「ViewController.downloadSubscriptions」をクリック

変数が変えられた場所に飛べました

Layout
Debug view hierarchy
アプリ起動中、このボタンをクリック

画面が3Dに見えるようになりました
さらにキーワード検索することもできます

Focus View
Viewをフォーカスするこのによって

一つのViewに専念することができました

lldbのrecursiveDescription
まずはViewControllerで簡易な画面を作ります。
画面の中央にボタン一つだけ置くのレイアウトです。
class ViewController: UIViewController {

    override func viewDidLoad() {
        super.viewDidLoad()

        let button = UIButton(type: .system)
        button.setTitle("Show Last", for: .normal)
        button.translatesAutoresizingMaskIntoConstraints = false
        view.addSubview(button)

        button.centerXAnchor.constraint(equalTo: view.centerXAnchor).isActive = true
        button.centerYAnchor.constraint(equalTo: view.centerYAnchor).isActive = true
        // ここにBreakpoint
    }

}
そしてアプリを起動、Breakpointがあるのでデバッグモードになりました
lldbのどころにpo view.value(forKey: "recursiveDescription")!を記入
(lldb) po view.value(forKey: "recursiveDescription")!
<UIView: 0x157f0bbb0; frame = (0 0; 390 844); autoresize = W+H; layer = <CALayer: 0x600001366640>>
   | <UIButton: 0x157f0b650; frame = (0 0; 0 0); opaque = NO; layer = <CALayer: 0x6000013666c0>>
画面の構成が文字になって返ってきました。
Constraintのデバッグ
まずはViewControllerを簡単に作り、今回は故意的に衝突のConstraintを加えます
class ViewController: UIViewController {

    override func viewDidLoad() {
        super.viewDidLoad()

        let button = UIButton(type: .system)
        button.setTitle("Show Last", for: .normal)
        button.translatesAutoresizingMaskIntoConstraints = false
        view.addSubview(button)

        button.centerXAnchor.constraint(equalTo: view.centerXAnchor).isActive = true
        button.centerYAnchor.constraint(equalTo: view.centerYAnchor).isActive = true

        // 故意的に衝突の二つのconstraintを加える
+       button.widthAnchor.constraint(equalToConstant: 20).isActive = true
+       button.widthAnchor.constraint(equalToConstant: 40).isActive = true

    }

}
そして起動。起動は問題なくできますが、デバッグメッセージがたくさん出ました
NSLayoutConstraintのメッセージに注目してください

identifierを追加
constraintの書き方を変えて、identifierを追加します
-button.widthAnchor.constraint(equalToConstant: 20).isActive = true
-button.widthAnchor.constraint(equalToConstant: 40).isActive = true

+let widthAnchor1 = button.widthAnchor.constraint(equalToConstant: 20)
+widthAnchor1.identifier = "Button Width Anchor 1"
+widthAnchor1.isActive = true

+let widthAnchor2 = button.widthAnchor.constraint(equalToConstant: 40)
+widthAnchor2.identifier = "Button Width Anchor 2"
+widthAnchor2.isActive = true
そしてもう一度アプリを起動
Discussion