Rustでマウスの割り込みハンドラを実装する[MikanOS/Day07]
前回
前回はマウスドライバを実装しました。
初めに
現在MikanOSをRustで挑戦しています。
ちなみに、MikanOSとは"ゼロからの OS 自作入門"という書籍上で実装するOSの名前です。
今回は前回実装したマウスドライバを割り込みに対応させました。
割り込みに対応させたマウスドライバ
...若干カーソルがちらついていますが
スクラップ
実装
実装の大まかな流れ
- IDTを作成する
- 割り込みハンドラを作成する
- IDTに割り込みハンドラを登録する
- IDTのロード
- MSIの設定
IDTの作成
IDT(Interrupt Descriptor Table)は最大256個のエントリ(Interrupt Descriptor)から構成される配列です。
エントリ1つにつき一つの割り込みハンドラが登録できますが、適当なエントリに登録していい訳ではないようで、登録したい割り込みハンドラに対応したエントリを選ぶ必要があります。
0x00から0x15までは例外を取り扱うエントリで構成されており、例えば0x00はゼロ除算の例外を処理します。
XHCIに対応したエントリは0x40です。
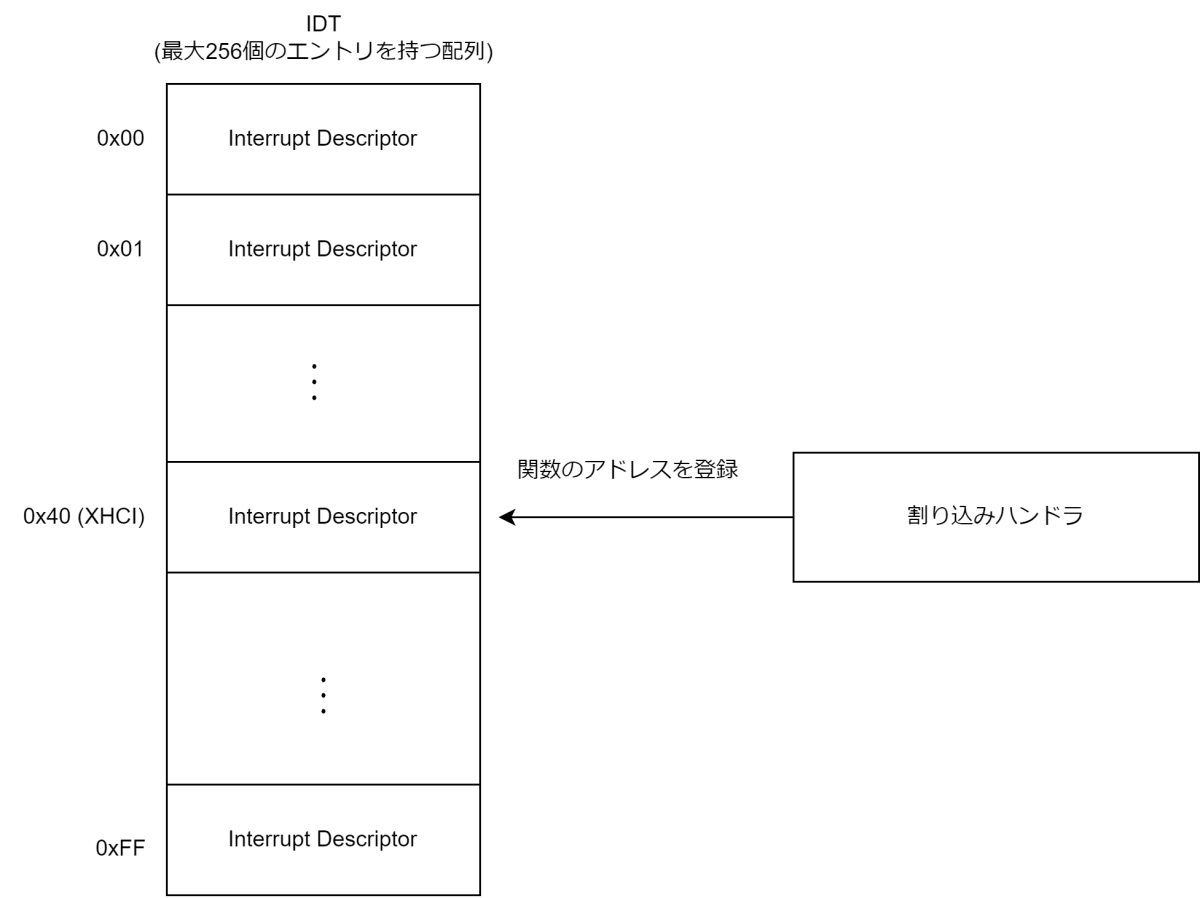
以下はInterrupt DescriptorとIDTのコードになります。
Interrupt Descriptor
pub type InterruptHandler = extern "x86-interrupt" fn(stack_frame: InterruptStackFrame);

#[bitfield(bits = 128)]
#[derive(Debug, Copy, Clone)]
pub struct InterruptDescriptor {
    pub offset_low: u16,
    pub segment_selector: u16,
    pub interrupt_stack_table_offset: B5,
    #[skip]
    __: B3,
    pub type_attributes: InterruptDescriptorAttribute,
    pub offset_middle: u16,
    pub offset_high: u32,

    #[skip]
    __: u32,
}


impl InterruptDescriptor {
    pub fn set_handler(
        &mut self,
        handler: InterruptHandler,
        type_attributes: InterruptDescriptorAttribute,
    ) -> KernelResult {
        let offset =  handler as usize;
        self.set_type_attributes(type_attributes);
        self.set_offset_low((offset & 0xffff) as u16);
        self.set_offset_middle(((offset >> 16) & 0xffff) as u16);
        self.set_offset_high((offset >> 32) as u32);
        self.set_segment_selector(read_code_segment());

        Ok(())
    }
}
IDT
const IDT_SIZE: usize = 256;

pub struct InterruptDescriptorTable([InterruptDescriptor; IDT_SIZE]);

impl InterruptDescriptorTable {
    pub const fn new() -> Self {
        Self([InterruptDescriptor::new(); IDT_SIZE])
    }

    pub fn load(&self) {
        load_idt(&self.descriptor());
    }

    fn descriptor(&self) -> IdtDescriptor {
        IdtDescriptor::new(
            ((self.0.len() - 1) * core::mem::size_of::<InterruptDescriptor>()) as u16,
            self.0.as_ptr() as u64,
        )
    }
}


impl Default for InterruptDescriptorTable {
    fn default() -> Self {
        Self::new()
    }
}


impl IndexMut<usize> for InterruptDescriptorTable {
    fn index_mut(&mut self, index: usize) -> &mut Self::Output {
        &mut self.0[index]
    }
}


impl Index<usize> for InterruptDescriptorTable {
    type Output = InterruptDescriptor;

    fn index(&self, index: usize) -> &Self::Output {
        &self.0[index]
    }
}


impl Index<InterruptVector> for InterruptDescriptorTable {
    type Output = InterruptDescriptor;

    fn index(&self, index: InterruptVector) -> &Self::Output {
        &self[index as usize]
    }
}

impl IndexMut<InterruptVector> for InterruptDescriptorTable {
    fn index_mut(&mut self, index: InterruptVector) -> &mut Self::Output {
        &mut self[index as usize]
    }
}
割り込みハンドラの作成
割り込みハンドラの中では2つの処理を行っています。
- キューにイベントを登録
- 割り込み処理の終了を通知
InterruptMouseHandler (割り込みハンドラ)
pub static mut INTERRUPT_MOUSE_QUEUE: VectorQueue<()> = VectorQueue::new();


pub extern "x86-interrupt" fn interrupt_mouse_handler(_stack_frame: InterruptStackFrame) {
    unsafe {
        INTERRUPT_MOUSE_QUEUE.enqueue(());
    }

    LocalApicRegisters::default()
        .end_of_interrupt()
        .notify();
}
キューにイベントを登録
割り込みハンドラ内ではキューにイベントを溜めるだけで実際の処理はキューの読み取り側で行います。(マウスの場合割り込みハンドラから渡すべき引数はないため、()のような適当な値をエントリーさせています。)
QueueWaiterはキューを読み取りイテレートする構造体です。
nextメソッド内では3つのアセンブリ命令(をラップしている関数)を使用しています。
sti = 割り込み有効化
cli = 割り込み無効化
hlt = CPU休止 割り込み発生時に再開
QueueWaiter
pub struct InterruptQueueWaiter<Queue, Value>
    where
        Queue: Queueing<Value> + 'static,
{
    queue: &'static mut Queue,
    _maker: PhantomData<Value>,
}


impl<Queue, Value> InterruptQueueWaiter<Queue, Value>
    where
        Queue: Queueing<Value> + 'static,
{
    pub fn new(queue: &'static mut Queue) -> InterruptQueueWaiter<Queue, Value> {
        Self {
            queue,
            _maker: PhantomData,
        }
    }
}

impl<Queue, Value> Iterator for InterruptQueueWaiter<Queue, Value>
    where
        Queue: Queueing<Value>,
{
    type Item = Value;

    fn next(&mut self) -> Option<Self::Item> {
        let mut value = self.queue.dequeue();
        while value.is_none() {
            sti_and_hlt();

            value = self.queue.dequeue();
        }
        cli();
        Some(value.unwrap())
    }
}
xHC側
pub fn start_xhci_host_controller(
    mmio_base_addr: MemoryMappedAddr,
    mouse_subscriber: impl MouseSubscribable + 'static,
) -> PciResult {
    // ...その他の処理

    let queue_waiter = unsafe { InterruptQueueWaiter::new(&mut INTERRUPT_MOUSE_QUEUE) };
    queue_waiter.for_each(|_| {
        // イベントリングに追加されたイベントを処理
        xhc_controller.process_event();
    });

    Ok(())
}
割り込み処理の終了を通知させる
end_of_interrupt().notify()の部分で割り込みの終了をCPUに伝えています。これをしないと次の割り込みが発生しません。
pub extern "x86-interrupt" fn interrupt_mouse_handler(_stack_frame: InterruptStackFrame) {
    // ...

    LocalApicRegisters::default()
        .end_of_interrupt()
        .notify();
}
通知を送るためにはEndOfInterruptレジスタになんらかの値を書き込む必要があります。
このレジスタはLocalApicレジスタ群の先頭アドレスから0xB0の位置にあります。
EndOfInterrupt
/// EOI
#[derive(VolatileBits)]
#[add_addr_bytes(0xB0)]
#[volatile_type(u32)]
pub struct EndOfInterrupt(usize);

impl EndOfInterrupt {
    pub fn new(addr: LocalApicRegistersAddr) -> Self {
        Self::new_uncheck(addr.0)
    }


    /// 割り込み処理が終了したことを通知します。
    pub fn notify(&self) {
        self.write_volatile(0);
    }
}
この構造体に使用しているVolatileBitsというのは、自作したDeriveマクロです。このマクロを付与すると以下のメソッドが自動的に実装されます。
- new_uncheck
- read_volatile
- read_flag_volatile
- write_volatile
- write_flag_volatile
add_addr_bytesという属性を使うことで、先頭アドレスからオフセット(バイト)を指定できます。EOIでは0xB0を指定しています。
今回は使用していませんが、せっかくなので他の属性や機能も紹介します。
bits
読み書きするビット数を指定します。
#[test_case]
fn it_write_with_bits() {
    #[derive(VolatileBits)]
    #[bits(2)]
    #[volatile_type(u64)]
    struct VolatileStruct(usize);

    let addr = [0b1000u64; 1].as_ptr().addr();
    let v = VolatileStruct::new_uncheck(addr);
    v.write_volatile(0b11);

    assert_eq!(v.read_volatile(), 0b11);
}
offset_bit
オフセット(ビット)を指定します。
#[test_case]
fn it_write_with_bits_and_offset() {
    #[derive(VolatileBits)]
    #[bits(2)]
    #[offset_bit(1)]
    #[volatile_type(u8)]
    struct VolatileStruct(usize);
    let buff = [0b1000u8; 1];
    let addr = buff.as_ptr().addr();
    let v = VolatileStruct::new_uncheck(addr);
    v.write_volatile(0b11);

    assert_eq!(v.read_volatile(), 0b11);
    assert_eq!(buff[0], 0b1110)
}
PhantomData
構造体の第1フィールドはアドレスになりますが、第2フィールドにPhantomDataを持たせることができます。
これは次に紹介するVolatileAccessibleというトレイトを使うときに役立ちます。
#[derive(VolatileBits)]
#[bits(1)]
#[offset_bit(11)]
pub struct ControllerNotReady(usize, PhantomData<UsbStatusRegisterOffset>);
VolatileAccessible
feature="extra-traits"を使うことでVolatileAccessibleというトレイトが使えます。
このトレイトは上で紹介したメソッドを持つトレイトで、構造体はこのトレイトを実装する形になります。
pub trait VolatileAccessible<ActualValue, Addr, Phantom>{
    fn new_uncheck(v: Addr) -> Self;

    fn read_volatile(&self) -> ActualValue;
    fn read_flag_volatile(&self) -> bool;

    fn write_flag_volatile(&self, flag: bool);
    fn write_volatile(&self, value: ActualValue);
}
Phantomの部分は第2フィールドのPhantomDataの型になります。
例えばUsbStatusRegisterのオフセットが先頭アドレスになる構造体が複数ある時に、それらに同一の実装を持たせたい場合に以下のような実装ができます。
コード
pub trait UsbStatusRegisterField<T, VolatileType, Addr>
where
    T: VolatileAccessible<VolatileType, Addr, UsbStatusRegisterOffset>,
{
    fn new(offset: UsbStatusRegisterOffset) -> Self;
    fn new_check_flag_true(offset: UsbStatusRegisterOffset) -> PciResult<T>;
    fn new_check_flag_false(offset: UsbStatusRegisterOffset) -> PciResult<T>;
}

impl<T, VolatileType> UsbStatusRegisterField<T, VolatileType, usize> for T
where
    T: VolatileAccessible<VolatileType, usize, UsbStatusRegisterOffset>,
{
    fn new(offset: UsbStatusRegisterOffset) -> T {
        T::new_uncheck(offset.offset())
    }

    fn new_check_flag_true(offset: UsbStatusRegisterOffset) -> PciResult<T> {
        let s = T::new(offset);
        if s.read_flag_volatile() {
            Ok(s)
        } else {
            Err(PciError::InvalidRegister(
                InvalidRegisterReason::IllegalBitFlag { expect: true },
            ))
        }
    }

    fn new_check_flag_false(offset: UsbStatusRegisterOffset) -> PciResult<T> {
        let s = T::new(offset);
        if s.read_flag_volatile() {
            Err(PciError::InvalidRegister(
                InvalidRegisterReason::IllegalBitFlag { expect: false },
            ))
        } else {
            Ok(s)
        }
    }
}
IDTのロード
IDTのロードにはlidtという命令を使用します。
ロードの際にはIDTの先頭アドレスとサイズを渡します。
lidt
/// Interrupt Descriptor Tableをロードします。
#[inline]
pub fn load_idt(idt_descriptor: &IdtDescriptor) {
    unsafe {
        asm!("lidt [{}]", in(reg) idt_descriptor, options(readonly, nostack, preserves_flags));
    }
}
IdtDescriptor
#[derive(Debug, Clone, Copy)]
#[repr(C, packed)]
pub struct IdtDescriptor {
    pub limit: u16,

    pub offset: u64,
}


impl IdtDescriptor {
    pub fn new(limit: u16, offset: u64) -> Self {
        Self { limit, offset }
    }
}
MSIの設定
xHCIは割り込み方法にMSI(またはMSI-X)という方式を採用しているらしく,
MSICapabilityHeaderに設定を書き込み必要があります。
このヘッダ内で書き込む必要があるのはMessageAddressとMessageDataの部分です。

MSI Capability Header
先頭ヘッダは、Pci Configuration Spaceの0x34の位置にあるCapabilities Pointerからアドレスを取得し、IoMemoryAccessibleを使ってアクセスします。
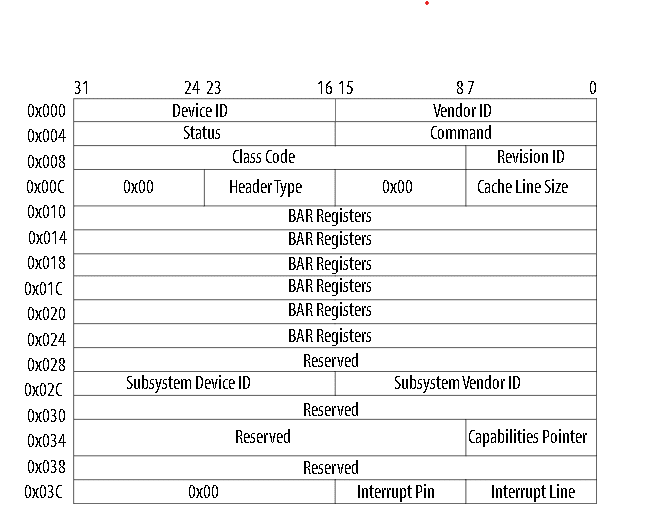
Pci Configuration Space
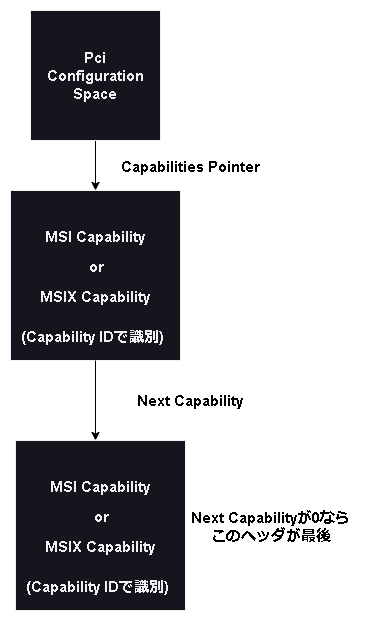
MSI(-x)のヘッダ群の構成
IoMemoryAccessible
const CONFIG_DATA_REGISTER_ADDR: u16 = 0x0CFC;


/// このトレイトはI/O空間への入出力を提供します。
pub trait IoMemoryAccessible {
    /// 指定のポートアドレスから値を読み込みます。
    fn io_in(&self, port: u16) -> u32;


    /// 指定のポートアドレスに値を書き込みます。
    fn io_out(&mut self, port: u16, value: u32);


    /// Config Address Registerへの値の書き込みと、
    /// Config Data Registerから値の読み込みを行います。
    fn read_config_data_with_set_addr(&mut self, config_addr_register: ConfigAddrRegister) -> u32 {
        self.write_config_addr(config_addr_register);
        self.read_config_data()
    }

    /// Config Address Registerへの値の書き込みと、
    /// Config Data Registerへの値の書き込みを行います。
    fn write_config_data_with_set_addr(
        &mut self,
        config_addr_register: ConfigAddrRegister,
        value: u32,
    ) {
        self.write_config_addr(config_addr_register);
        self.write_config_data(value);
    }


    fn write_config_addr(&mut self, config_addr_register: ConfigAddrRegister) {
        const CONFIG_ADDR_REGISTER_ADDR: u16 = 0x0CF8;

        self.io_out(CONFIG_ADDR_REGISTER_ADDR, config_addr_register.as_data())
    }


    fn write_config_data(&mut self, value: u32) {
        self.io_out(CONFIG_DATA_REGISTER_ADDR, value);
    }


    fn read_config_data(&self) -> u32 {
        self.io_in(CONFIG_DATA_REGISTER_ADDR)
    }
}
MsiCapabilityRegister
#[derive(Clone)]
pub struct MsiCapabilityRegister<Io>
where
    Io: IoMemoryAccessible,
{
    control: ControlAccessor,
    message_address: MessageAddressAccessor,
    message_data: MessageDataAccessor,
    msi_cap_addr: u8,
    configuration_space: ConfigurationSpace,
    io: Io,
}

impl<Io> Debug for MsiCapabilityRegister<Io>
where
    Io: IoMemoryAccessible + Clone,
{
    fn fmt(&self, f: &mut Formatter<'_>) -> core::fmt::Result {
        f.debug_struct("MsiCapabilityRegister")
            .field(
                "Control",
                &self
                    .clone()
                    .read_control_register()
                    .unwrap(),
            )
            .field(
                "MessageAddress",
                &self
                    .clone()
                    .read_message_address_register()
                    .unwrap(),
            )
            .field(
                "MessageData",
                &self
                    .clone()
                    .read_message_data_register()
                    .unwrap(),
            )
            .finish()
    }
}

impl<Io> MsiCapabilityRegister<Io>
where
    Io: IoMemoryAccessible,
{
    pub fn new(
        msi_cap_addr: u8,
        configuration_space: ConfigurationSpace,
        mut io: Io,
    ) -> PciResult<MsiCapabilityRegister<Io>> {
        let control = ControlAccessor::new();
        let message_address = MessageAddressAccessor::new(
            control
                .read(&mut io, &configuration_space, msi_cap_addr)?
                .is_64bit_addr_capable(),
        );

        Ok(Self {
            control,
            message_address,
            message_data: MessageDataAccessor::new(),
            msi_cap_addr,
            configuration_space,
            io,
        })
    }


    pub fn read_control_register(&mut self) -> PciResult<Control> {
        self.control
            .read(&mut self.io, &self.configuration_space, self.msi_cap_addr)
    }


    pub fn read_message_address_register(&mut self) -> PciResult<MessageAddress> {
        self.message_address
            .read(&mut self.io, &self.configuration_space, self.msi_cap_addr)
    }


    pub fn read_message_data_register(&mut self) -> PciResult<MessageData> {
        self.message_data
            .read(&mut self.io, &self.configuration_space, self.msi_cap_addr)
    }

    pub fn enable(
        &mut self,
        apic_id: u8,
        trigger_mode: TriggerMode,
        vector: InterruptVector,
        delivery_mode: DeliveryMode,
        multiple_msg_enable: u8,
    ) -> PciResult {
        self.control.update(
            &mut self.io,
            &self.configuration_space,
            self.msi_cap_addr,
            |control| {
                control.set_msi_enable();

                let capable = control.multiple_msg_capable();
                control.set_multiple_msg_enable(min(capable, multiple_msg_enable));
            },
        )?;
        self.message_address.update(
            &mut self.io,
            &self.configuration_space,
            self.msi_cap_addr,
            |message_addr| {
                message_addr.set_message_addr(0xfee00000 | ((apic_id as usize) << 12));
            },
        )?;

        self.message_data.update(
            &mut self.io,
            &self.configuration_space,
            self.msi_cap_addr,
            |message_data| {
                message_data.set_vector(vector);
                message_data.set_delivery_mode(delivery_mode);
                if trigger_mode.is_level() {
                    message_data.set_trigger_mode(TriggerMode::Level);
                    message_data.set_level_for_trigger_mode(LevelForTriggerMode::Assert);
                }
            },
        )?;
        Ok(())
    }
}
TODOなど
- InterruptInエンドポイントを使った割り込みができていないため、修正予定です。 (詳細はスクラップを参照)
- MSI-Xの設定ができていないので後々実装したいです。
次回
次回はメモリ管理の実装を行います。
OSがどのようにメモリ管理しているのか、かなり興味があるので楽しみです。
Discussion