mmsegmentationのv1系で、独自データでモデルを訓練する方法
2024/04/11
前提・課題
- mmsegmentationのv1系を使って、独自データでセマンティックセグメンテーションモデルを訓練したい
- 既存の解説記事にはmmsegmentation v0系を使ったものは多いが、v1系(mmcv>=2.0.0)のものが見つからなかった
- この記事では以下の環境を使用している
- Ubuntu 22.04 LTS
- Python-3.10.4
- CUDA Toolkit 12.3
- mmsegmentation 1.2.2
- この記事では2クラス(背景と対象物体)のセマンティックセグメンテーションを扱う
方法
インストール
PyTorchとmmsegmentationをインストールする
例えば以下のような.shファイルを作成して、
# !/bin/bash

# torch
python3 -m pip install --upgrade pip wheel setuptools
python3 -m pip install \
    torch==2.1.1 \
    torchvision==0.16.1 \
    --index-url https://download.pytorch.org/whl/cu121

# mmsegmentation
python3 -m pip install -U openmim
mim install mmengine
mim install "mmcv>=2.0.0"
python3 -m pip install "mmsegmentation>=1.0.0" ftfy regex
実行する
./setup.sh
データ作成
今回は以下のような合成データを作成する
- 入力画像: 黒(0,0,0)背景にサイズ・位置・色がランダムな矩形を描画したカラー画像
- 正解ラベル: 矩形が描画されているピクセルは255,それ以外は0の2値マスク画像
| 入力画像 | 正解ラベル |
|---|---|
 |
 |
今回生成したデータでは矩形の色には特に意味はなく、矩形すべてを同じクラスとしてセマンティックセグメンテーションを学習する。矩形が重なっていても区別しない。
import os
import random

import cv2
import numpy as np
from tqdm import tqdm

w_img = 640
h_img = 480
w_max = 200
h_max = 200
w_min = 20
h_min = 20
colors = [
    (255, 0, 0),
    (0, 255, 0),
    (0, 0, 255),
]


def draw_rect(img: np.ndarray, img_mask: np.ndarray):
    w = random.randint(w_min, w_max - 1)
    h = random.randint(h_min, h_max - 1)
    x1 = random.randint(0, w_img - w - 1)
    y1 = random.randint(0, h_img - h - 1)
    cv2.rectangle(
        img,
        (x1, y1),
        (x1 + w, y1 + h),
        color=colors[random.randint(0, len(colors) - 1)],
        thickness=-1,
    )
    cv2.rectangle(
        img_mask,
        (x1, y1),
        (x1 + w, y1 + h),
        color=255,
        thickness=-1,
    )


def main(dir_save_base: str, ns: list[int]):
    splits = ["train", "val", "test"]

    for split, n_img in zip(splits, ns):
        for i in tqdm(range(n_img)):
            img = np.zeros((h_img, w_img, 3), np.uint8)
            img_mask = np.zeros((h_img, w_img), np.uint8)
            n_draw = random.randint(0, 3)
            for j in range(n_draw):
                draw_rect(img, img_mask)

            # image
            name = str(i).zfill(3) + ".png"
            dir_save = os.path.join(dir_save_base, split, "imgs")
            os.makedirs(dir_save, exist_ok=True)
            path_save = os.path.join(dir_save, name)
            cv2.imwrite(path_save, img)

            # mask
            dir_save = os.path.join(dir_save_base, split, "mask")
            os.makedirs(dir_save, exist_ok=True)
            path_save = os.path.join(dir_save, name)
            cv2.imwrite(path_save, img_mask)


if __name__ == "__main__":
    # 生成した画像の保存先
    dir_save = "data/synth"
    os.makedirs(dir_save, exist_ok=True)
    # [train,val,test]用に何枚の画像を作成するか
    n_images = [100, 20, 20]
    main(dir_save, n_images)
実行
python make_data.py
実行すると、以下のようなディレクトリ構造が作成され、imgs, maskの中に入力画像と正解ラベル画像が生成される。
data/
└── synth/
	 ├── test/
	 │   ├── imgs/
	 │   └── mask/
	 ├── train/
	 │   ├── imgs/
	 │   └── mask/
	 └── val/
		  ├── imgs/
		  └── mask/
前処理
mmsegmentationの入力形式に合わせるため、正解ラベルをインデックスカラーに変換する
import os
import glob

from tqdm import tqdm
from PIL import Image
from PIL.Image import Image as PILImage
import numpy as np
import cv2


def convert(img: np.ndarray) -> PILImage:
    palette = [
        [0, 0, 0],
        [255, 0, 0],
    ]

    seg_img = Image.fromarray(img).convert("P")
    seg_img.putpalette(np.array(palette, dtype=np.uint8))
    return seg_img


def main(dir_in_base: str):
    splits = ["train", "val", "test"]
    for split in splits:
        dir_in = os.path.join(dir_in_base, split, "mask")
        dir_out = os.path.join(dir_in_base, split, "mask_index")
        os.makedirs(dir_out, exist_ok=True)

        paths_img = glob.glob(os.path.join(dir_in, "*.png"))
        for path in tqdm(paths_img):
            img = cv2.imread(path, 0)

            # ピクセル値を 0 or 1 に強制後、index colorに変換
            img[img != 0] = 1
            img: PILImage = convert(img)

            # save
            name = os.path.basename(path)
            path_save = os.path.join(dir_out, name)
            img.save(path_save)


if __name__ == "__main__":
    dir_in = "data/synth"
    main(dir_in)
実行
python convert_mask.py
以下のように、train,val,testの各ディレクトリにmask_indexが作成され、インデックスカラーに変換された正解ラベル画像が保存される
data/
└── synth/
	 ├── test/
	 │   ├── imgs/
	 │   ├── mask/
	 │   └── mask_index/
	 ├── train/
	 │   ├── imgs/
	 │   ├── mask/
	 │   └── mask_index/
	 └── val/
		  ├── imgs/
		  ├── mask/
		  └── mask_index/
学習
学習コードは公式のデモmmsegmentation/demo/MMSegmentation_Tutorial.ipynbを参考にした。
2値セグメンテーションを学習する際の設定方法は、公式ドキュメントのHow to handle binary segmentation taskを参考にした。
- 背景と前景の2クラスなので、
num_classes=2を設定する -
output_channelsがモデルの最終レイヤーの出力チャネル数だが、2値セグメンテーションでは以下の選択肢がある- 学習時にCross Entropy Lossを使っているなら
out_channels=2にする。この場合は推論時にF.softmax()とargmax()を使用する - 学習時にBinary Cross Entropy Lossを使っているなら
out_channels=1にする。この場合は推論時にF.sigmoid()とthresholdを使用する。thresholdのデフォルトは0.3
- 学習時にCross Entropy Lossを使っているなら
今回は2の方法を使用する。(BinaryCrossEntropyLossというlossはないので、代わりにCrossEntropyLossとuse_sigmoid=Trueを指定する)
また、挙動がよくわからなかったがreduce_zero_label=Trueになっていると背景クラス(0)が無視されるらしく、2値セグメンテーションでは望ましくないらしいのでreduce_zero_label=Falseにする。
import os

from mmseg.registry import DATASETS
from mmseg.datasets import BaseSegDataset
from mmengine.runner import Runner
from mmengine import Config


# クラスラベル名
classes = ("background", "rect")
palette = [
    [0, 0, 0],
    [255, 0, 0],
]


@DATASETS.register_module()
class CustomDataset(BaseSegDataset):
    METAINFO = dict(classes=classes, palette=palette)

    def __init__(self, **kwargs):
        super().__init__(img_suffix=".png", seg_map_suffix=".png", **kwargs)


def make_config(dir_save: str, path_config: str, path_model: str):

    # 学習データディレクトリ
    dir_root = "data/synth"
    dir_train = os.path.join(dir_root, "train")
    dir_val = os.path.join(dir_root, "val")
    img_dir = "imgs"
    ann_dir = "mask_index"

    n_iters = 200
    period_val = 200
    period_log = 10
    period_save = 200

    bs = 8
    num_classes = 2
    out_channels = 1

    cfg = Config.fromfile(path_config)
    cfg.load_from = path_model

    # Since we use only one GPU, BN is used instead of SyncBN
    cfg.norm_cfg = dict(type="BN", requires_grad=True)
    cfg.crop_size = (256, 256)

    cfg.model.data_preprocessor.size = cfg.crop_size
    cfg.model.backbone.norm_cfg = cfg.norm_cfg
    cfg.model.decode_head.norm_cfg = cfg.norm_cfg
    cfg.model.auxiliary_head.norm_cfg = cfg.norm_cfg

    # modify num classes of the model in decode/auxiliary head
    cfg.model.decode_head.num_classes = num_classes
    cfg.model.auxiliary_head.num_classes = num_classes

    cfg.model.decode_head.out_channels = out_channels
    cfg.model.auxiliary_head.out_channels = out_channels

    use_sigmoid = True
    cfg.model.decode_head.loss_decode = dict(
        type="CrossEntropyLoss",
        use_sigmoid=use_sigmoid,
        loss_weight=0.4,
    )
    cfg.model.auxiliary_head.loss_decode = dict(
        type="CrossEntropyLoss",
        use_sigmoid=use_sigmoid,
        loss_weight=1.0,
    )
    cfg.reduce_zero_label = False

    # Modify dataset type and path
    cfg.dataset_type = "CustomDataset"
    cfg.data_root = dir_root

    cfg.train_dataloader.batch_size = bs

    ratio_range = (1, 1)
    scale = (256, 256)

    cfg.train_pipeline = [
        dict(type="LoadImageFromFile"),
        dict(type="LoadAnnotations"),
        dict(
            type="RandomResize",
            scale=scale,
            ratio_range=ratio_range,
            keep_ratio=True,
        ),
        dict(type="RandomCrop", crop_size=cfg.crop_size, cat_max_ratio=0.75),
        dict(type="RandomFlip", prob=0.5),
        dict(type="PackSegInputs"),
    ]

    cfg.test_pipeline = [
        dict(type="LoadImageFromFile"),
        dict(
            type="Resize",
            scale=scale,
            keep_ratio=True,
        ),
        # add loading annotation after ``Resize`` because ground truth
        # does not need to do resize data transform
        dict(type="LoadAnnotations"),
        dict(type="PackSegInputs"),
    ]

    cfg.train_dataloader.dataset.type = cfg.dataset_type
    cfg.train_dataloader.dataset.data_root = dir_train
    cfg.train_dataloader.dataset.data_prefix = dict(
        img_path=img_dir, seg_map_path=ann_dir
    )
    cfg.train_dataloader.dataset.pipeline = cfg.train_pipeline
    # train/valのsplitを、ディレクトリを分けずにテキストファイルで指定することも可能
    # cfg.train_dataloader.dataset.ann_file = "splits/train.txt"

    cfg.val_dataloader.dataset.type = cfg.dataset_type
    cfg.val_dataloader.dataset.data_root = dir_val
    cfg.val_dataloader.dataset.data_prefix = dict(
        img_path=img_dir, seg_map_path=ann_dir
    )
    cfg.val_dataloader.dataset.pipeline = cfg.test_pipeline
    # cfg.val_dataloader.dataset.ann_file = "splits/val.txt"

    cfg.test_dataloader = cfg.val_dataloader

    # Set up working dir to save files and logs.
    cfg.work_dir = dir_save

    cfg.train_cfg.max_iters = n_iters
    cfg.train_cfg.val_interval = period_val
    cfg.default_hooks.logger.interval = period_log
    cfg.default_hooks.checkpoint.interval = period_save

    # Set seed to facilitate reproducing the result
    cfg["randomness"] = dict(seed=0)

    return cfg


def main(dir_save, path_config, path_model):
    cfg = make_config(dir_save, path_config, path_model)
    runner = Runner.from_cfg(cfg)
    # start training
    runner.train()


if __name__ == "__main__":
    dir_model = "checkpoints"
    config = "pspnet_r50-d8_4xb2-40k_cityscapes-512x1024.py"
    model = "pspnet_r50-d8_512x1024_40k_cityscapes_20200605_003338-2966598c.pth"
    path_config = os.path.join(dir_model, config)
    path_model = os.path.join(dir_model, model)

    # モデル保存先
    dir_save = "save"

    main(dir_save, path_config, path_model)
実行
# モデルと設定ファイルをダウンロード
mim download mmsegmentation --config pspnet_r50-d8_4xb2-40k_cityscapes-512x1024 --dest checkpoints

# 学習開始
python train.py
筆者の環境(GPUあり)では1分程度で完了した。
ログに以下のような評価結果が出る。
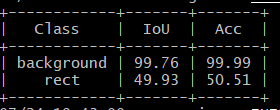
04/11 20:42:05 - mmengine - INFO - per class results:
04/11 20:42:05 - mmengine - INFO -
+------------+-------+-------+
|   Class    |  IoU  |  Acc  |
+------------+-------+-------+
| background | 99.71 | 99.84 |
|    rect    | 92.38 | 96.47 |
+------------+-------+-------+
04/11 20:42:05 - mmengine - INFO - Iter(val) [20/20]    aAcc: 99.7200  mIoU: 96.0500  mAcc: 98.1500  data_time: 0.0047  time: 0.0837
推論
import os

import matplotlib.pyplot as plt
import mmcv
from mmseg.apis import init_model, inference_model, show_result_pyplot

from train import make_config


def main(path_save, path_img, dir_save, path_config, path_model):
    cfg = make_config(dir_save, path_config, path_model)
    model = init_model(cfg, path_model, "cuda:0")

    img = mmcv.imread(path_img)
    result = inference_model(model, img)

    plt.figure(figsize=(8, 6))
    vis_result = show_result_pyplot(model, mmcv.bgr2rgb(img), result, show=False)
    plt.imshow(vis_result)
    plt.savefig(path_save)


if __name__ == "__main__":
    dir_model = "checkpoints"
    config = "pspnet_r50-d8_4xb2-40k_cityscapes-512x1024.py"
    path_config = os.path.join(dir_model, config)

    # 学習済みモデルpath
    dir_save = "save"
    model = "iter_200.pth"
    path_model = os.path.join(dir_save, model)

    # 入力画像path
    path_img = "data/synth/test/imgs/002.png"
    # 推論結果保存先
    path_save = "out.jpg"

    main(path_save, path_img, dir_save, path_config, path_model)
実行
python predict.py
推論結果の画像が保存される。
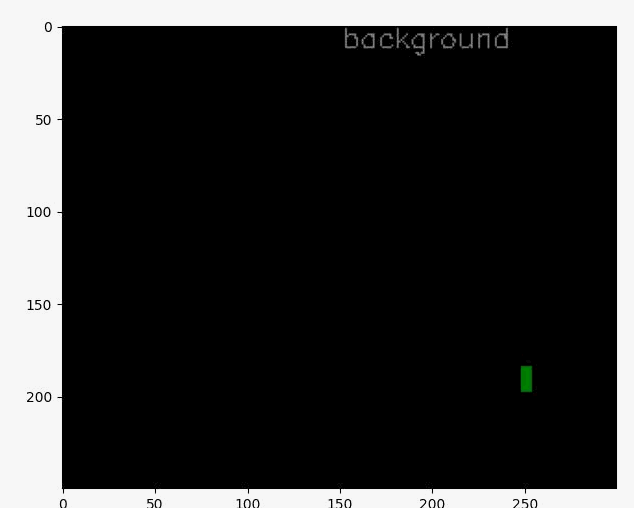
入力と比較すると以下のようになる。少しわかりにくいが、赤い部分が推論されたrectクラスの領域。
| 入力画像 | 推論結果 |
|---|---|
 |
 |
参考記事
-
mmsegmentation/demo/MMSegmentation_Tutorial.ipynb- https://github.com/open-mmlab/mmsegmentation/blob/main/demo/MMSegmentation_Tutorial.ipynb
- mmsegmentation v1系でのカスタムデータセット学習チュートリアル
-
How to handle binary segmentation task- https://github.com/open-mmlab/mmsegmentation/blob/master/docs/en/faq.md#how-to-handle-binary-segmentation-task
- 公式ドキュメントFAQの2値セグメンテーションの設定方法
-
Foreground accuracy to be 0.0 #16412022- https://github.com/open-mmlab/mmsegmentation/issues/1641#issuecomment-1148163924
- 2値セグメンテーションの設定方法に関するissue。(1) reduce_zero_label=False, (2) num_class=1, (3) use binary cross entropy loss (use_sigmoid=True)
-
Training using Bisenetv2 with custom dataset of 2 classes #14302022- https://github.com/open-mmlab/mmsegmentation/issues/1430#issuecomment-1085431167
- 2値セグメンテーションで
reduce_zero_label=TrueだとNaNが出るというissue。reduce_zero_labelの説明
-
openmimを使ったMMDetectionのconfigファイルとcheckpointsファイルのダウンロード方法2022- https://qiita.com/nyakiri_0726/items/6581e16924400ccc24bf
- mim download コマンドでmodelとconfigをダウンロードできる
Discussion
最新の情報を元にした記事助かります。


参考に、ご紹介くださっているコードを実行し、学習を進めたのですが、なぜかtrain.pyの最終アウトプットが添付画像のような結果となり、また、生成されたラベル付け結果も本記事の結果と大きく異なり、添付2枚目のように上手くいかない結果となってしまいました。
何が問題なのか見当がつかず助言いただけると助かります。