はじめに
今回はRustの画像処理ライブラリ「imageproc」を使って、
円や線、文字を描画した画像を生成してみます。
円の描画
先ずはimage::ImageBuffer::from_pixel()で画像データを生成します。
以下サンプルでは横:300px、縦:300px、色:白の背景で生成しています。
その画像にimageprocのdraw_hollow_circle_mut()で円を描き足します。
引数では、円の中心座標、半径、色を指定します。
塗りつぶしの円を描く場合は、draw_filled_circle()を利用します。
main.rs
extern crate image;
extern crate imageproc;

use image::{ImageBuffer, Rgb};
use imageproc::drawing::draw_hollow_circle_mut;

const FILE_NAME: &str = "output.png";
const IMAGE_SIZE: u32 = 300;
const BACKGROUND_COLOR: Rgb<u8> = Rgb([255, 255, 255]);

const RADIUS: i32 = 120;
const CIRCLE_COLOR: Rgb<u8> = Rgb([0, 0, 255]);

fn main() {
    let image_width = IMAGE_SIZE;
    let image_height = IMAGE_SIZE;
    let mut img = ImageBuffer::from_pixel(image_width, image_height, BACKGROUND_COLOR);

    let center_x = (image_width / 2) as i32;
    let center_y = (image_height / 2) as i32;

    draw_hollow_circle_mut(&mut img, (center_x, center_y), RADIUS, CIRCLE_COLOR);

    img.save(FILE_NAME).expect("error");
}
以下画像を生成できました。

線の描画
draw_line_segment_mut()を利用し、線が書けます。
    let line_start = ({始点のX座標}, {始点のY座標});
    let line_end = ({終点のX座標}, {終点のY座標});
    draw_line_segment_mut(&mut img, line_start, line_end, {線の色});
先程の円の真ん中に、横線を描いてみました。

文字の描画
文字を描画する場合はフォントを扱う「rusttype」というライブラリと、
imageprocのdraw_text_mut()を利用します。
    let font_data = include_bytes!("{フォントファイルのパス}");
    let font = Font::try_from_bytes(font_data).expect("error");

    let scale = Scale::uniform({文字の大きさ});
    let text_x = {文字の開始X座標};
    let text_y = {文字の開始Y座標};

    draw_text_mut(&mut img, TEXT_COLOR, text_x, text_y, scale, &font, TEXT_STR);
「image processing」という文字を円の中に書き足してみました。

おまけ
円、線、文字の描画を組み合わせて印影っぽい画像が生成できました!
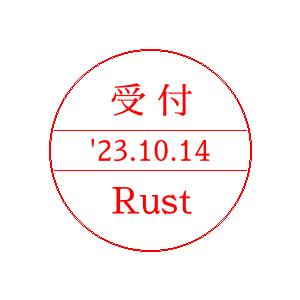
以下がサンプルコードです。
サンプルコード
Cargo.toml
[dependencies]
image = "0.24"
imageproc = "0.23"
rusttype = "0.9"
chrono = "0.4"
main.rs
extern crate image;
extern crate imageproc;
extern crate rusttype;
extern crate chrono;

use std::io::Result;
use image::{ImageBuffer, Rgba};
use imageproc::drawing::{draw_text_mut, draw_hollow_circle_mut, draw_line_segment_mut};
use rusttype::{Font, Scale};
use chrono::{Local, Datelike};

const FILE_NAME: &str = "output.png";
const IMAGE_SIZE: u32 = 300;
const COLOR_WHITE: Rgba<u8> = Rgba([255u8, 255, 255, 255]);
const COLOR_RED: Rgba<u8> = Rgba([255u8, 0, 0, 255]);
const RADIUS: i32 = 100;
const LINE_SPACING: f32 = 20.0;

struct DrawContext {
    img: ImageBuffer<Rgba<u8>, Vec<u8>>,
    center_x: i32,
    center_y: i32,
}

impl DrawContext {
    fn new(width: u32, height: u32) -> Self {
        let img = ImageBuffer::from_pixel(width, height, COLOR_WHITE);
        let center_x = width as i32 / 2;
        let center_y = height as i32 / 2;
        Self { img, center_x, center_y }
    }

    fn draw_circle(&mut self) {
        draw_hollow_circle_mut(
            &mut self.img,
            (self.center_x.try_into().unwrap(), self.center_y.try_into().unwrap()),
            RADIUS,
            COLOR_RED,
        );
    }

    fn draw_horizontal_lines(&mut self) {
        let line_x1 = self.center_x - RADIUS + (LINE_SPACING/5.0) as i32;
        let line_x2 = self.center_x + RADIUS - (LINE_SPACING/5.0) as i32;
        let line_y = self.center_y;

        draw_line_segment_mut(
            &mut self.img,
            (line_x1 as f32, line_y as f32 - LINE_SPACING),
            (line_x2 as f32, line_y as f32 - LINE_SPACING),
            COLOR_RED,
        );

        draw_line_segment_mut(
            &mut self.img,
            (line_x1 as f32, line_y as f32 + LINE_SPACING),
            (line_x2 as f32, line_y as f32 + LINE_SPACING),
            COLOR_RED,
        );
    }

    fn format_date(&self) -> String {
        let current_date = Local::now();
        let year = current_date.year() % 100;
        let month = current_date.month();
        let day = current_date.day();
        format!("'{:02}.{:02}.{:02}", year, month, day)
    }

    fn draw_text(&mut self, font: &Font, scale: Scale, text: String, x_offset: f32, y: f32) {
        let v_metrics = font.v_metrics(scale);
        let text_width = font
            .layout(&text, scale, rusttype::point(0.0, 0.0 + v_metrics.ascent))
            .map(|g| {
                if let Some(bounding_box) = g.pixel_bounding_box() {
                    bounding_box.width() as f32
                } else {
                    0.0
                }
            })
            .sum::<f32>();

        let x = self.center_x as f32 - text_width / 2.0 - x_offset;

        draw_text_mut(&mut self.img, COLOR_RED, x as i32, y as i32, scale, font, &text);
    }

    fn save_image(&self, filename: &str) -> Result<()> {
        self.img.save(filename).expect("save error.");
        Ok(())
    }
}

fn main() -> Result<()> {
    let image_width = IMAGE_SIZE;
    let image_height = IMAGE_SIZE;
    let mut context = DrawContext::new(image_width, image_height);

    context.draw_circle();
    context.draw_horizontal_lines();

    let font_data = include_bytes!("../sample.ttf");
    let font = Font::try_from_bytes(font_data as &[u8]).expect("font load error.");
    let text_scale = Scale::uniform(50.0);
    let date_scale = Scale::uniform(40.0);
    let text = context.format_date();

    context.draw_text(&font, text_scale, "受 付".to_string(), 5.0, 75.0);
    context.draw_text(&font, date_scale, text, 15.0, 130.0);
    context.draw_text(&font, text_scale, "Rust".to_string(), 0.0, 175.0);

    context.save_image(FILE_NAME)?;
    Ok(())
}
おわりに
「image」で画像の読み込み、保存、加工など基本的な画像操作がおこなえますが、
「imageproc」を組み合わせて使用することで、より多様な画像編集がおこなえます。
フィルターや画像解析など、他のモジュールもまた試してみたいと思います🧐

「ワークスタイルの未来を切り拓く」を理念に掲げ、リアルとデジタルの2つの働く場に向けた事業展開に留まらず、自社が率先して新しいワークスタイルに挑戦し、発信を行うことでワークスタイルの未来を切り拓いていきます。
Discussion
Imageの勉強をしています。
とてもわかりやすかったです!ありがとうございました。
コメントありがとうございます!
参考になったようでよかったです♪