はじめに
こんにちは!Altive 株式会社の Flutter アプリ開発者の小林遼太(@naipaka)です🦙
今回は、図形を描画したり画像などを切り抜いたりする際に用いるClipPath や CustomClipper を使って、身分証撮影ガイドのようなものを作成する際の手順をまとめました。
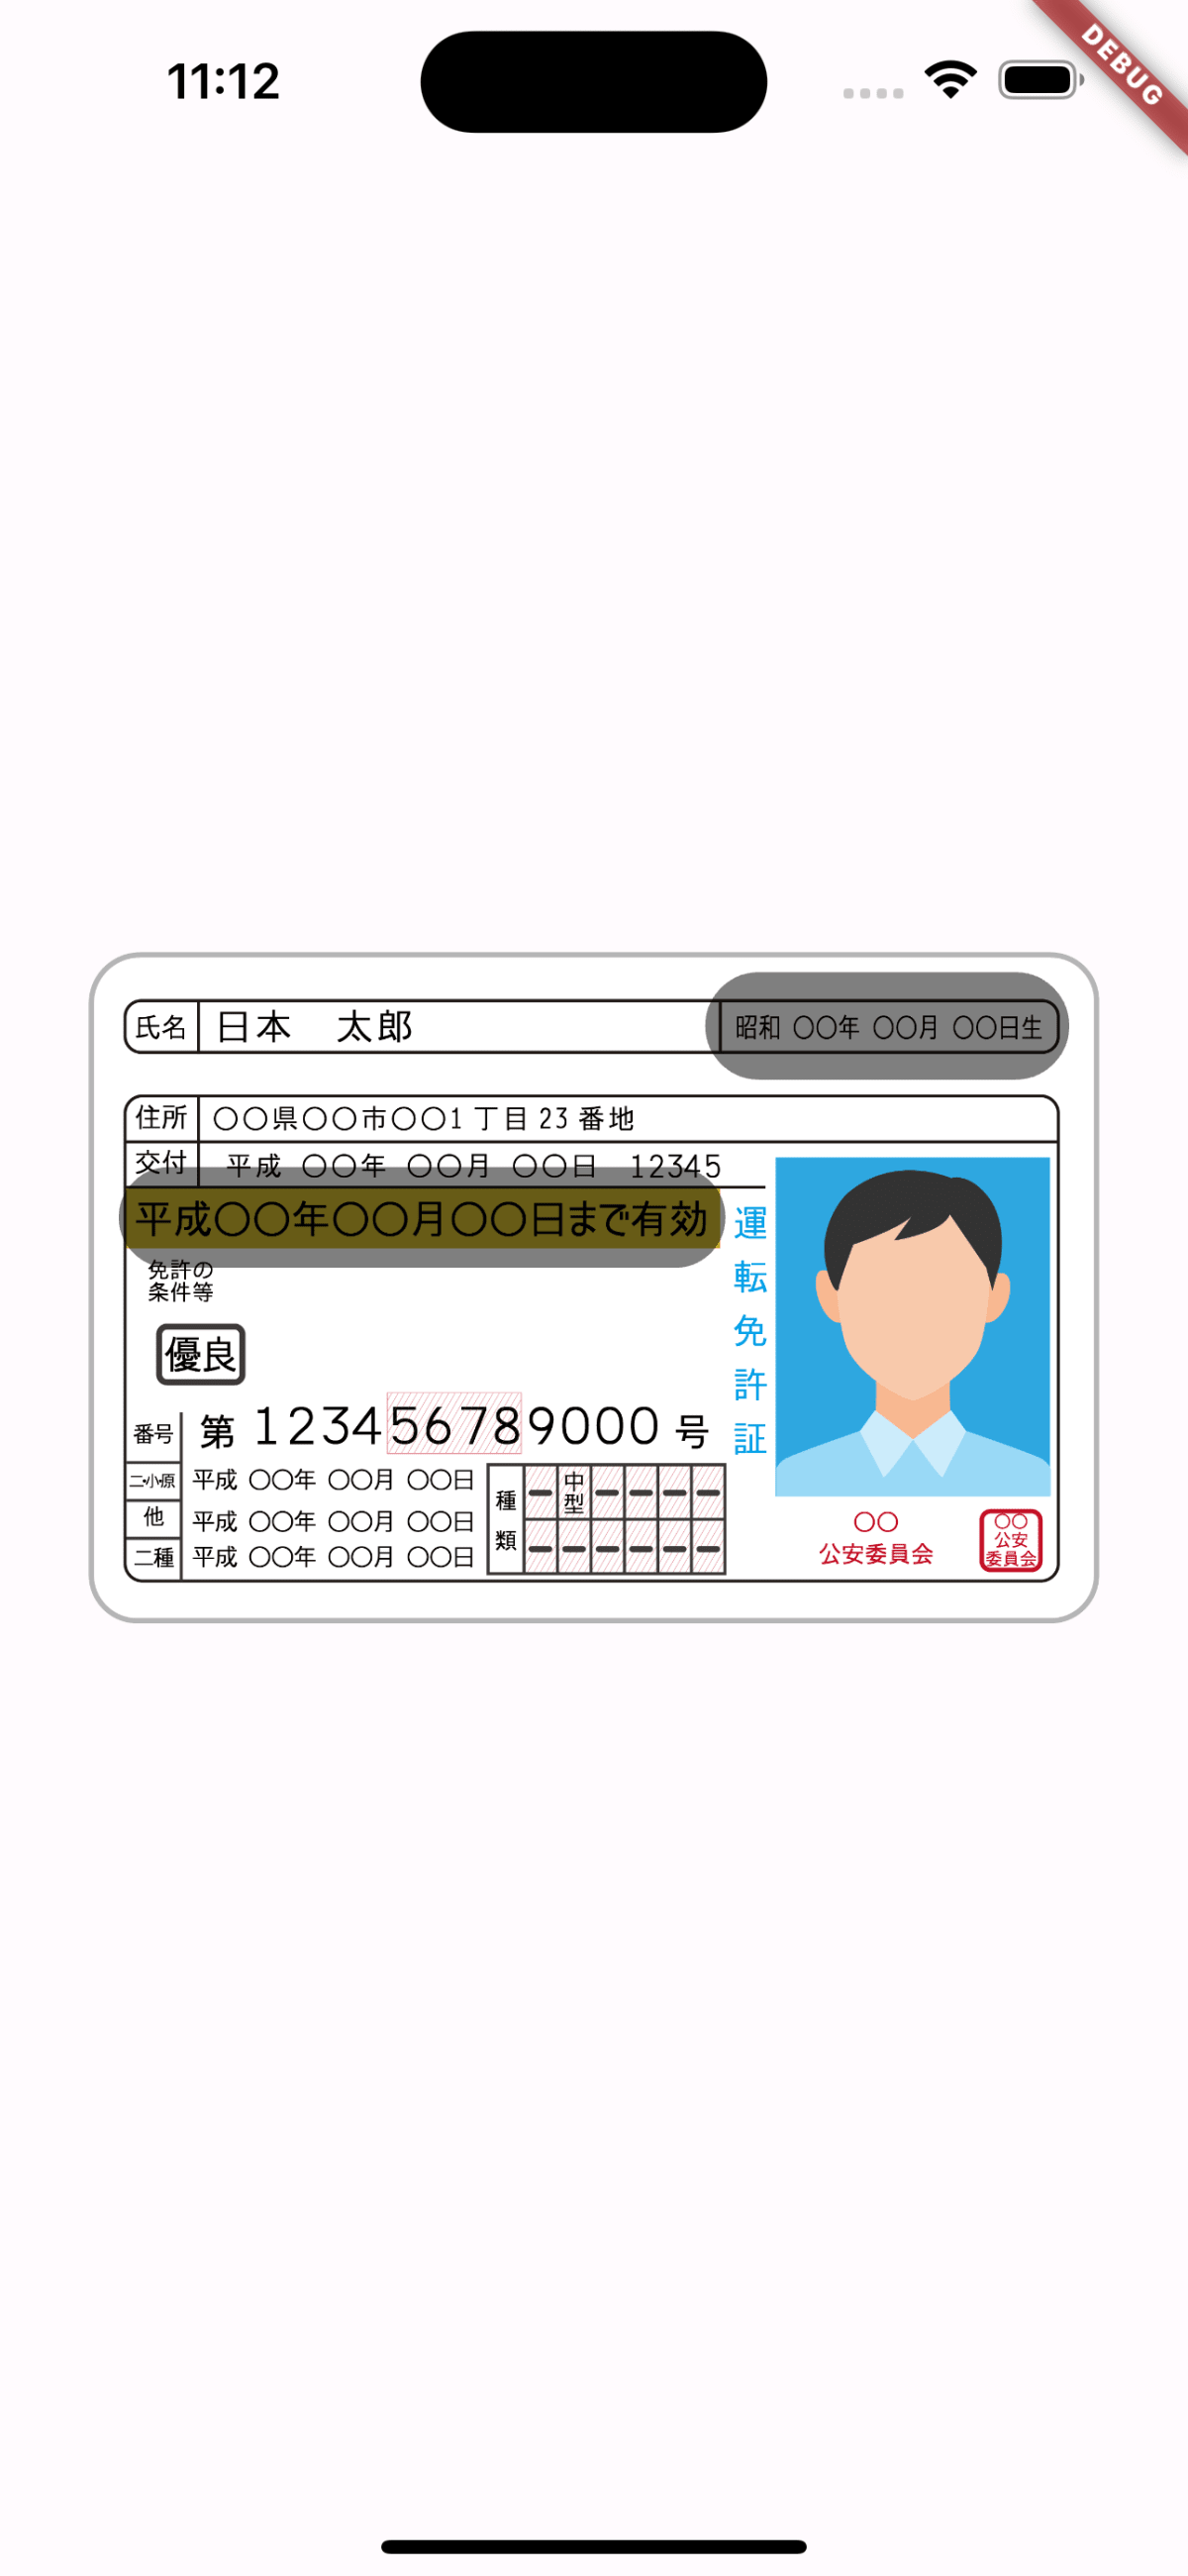
完成イメージ
完成イメージは下記のとおりです。

運転免許証の一部にガイドを当てる
これを例えば camera パッケージの CameraPreview などと組み合わせることで、カメラ撮影時にガイドを表示することができます。
実装手順
それでは、実装手順を説明していきます。
0. 事前準備
以下、今回ガイドを当てる対象の画像を表示するページです。
こちらを元に、ClipPath や CustomClipper を使ってガイドを作成していきます。
class CaptureGuidePage extends StatelessWidget {
const CaptureGuidePage({super.key});
Widget build(BuildContext context) {
return Scaffold(
body: Padding(
padding: const EdgeInsets.symmetric(horizontal: 32),
child: Center(
child: Stack(
children: [
Image.asset(
'assets/images/driver-license.png',
),
],
),
),
),
);
}
}

運転免許証画像はパブリックドメインの画像を使用しています
1. ガイドしたい図形を描画
それでは、ガイドしたい図形を描画するための CustomClipper を作成していきます。
まずは、身分証全体を半透明な黒で覆います。
          child: Stack(
            children: [
              Image.asset(
                'assets/images/driver-license.png',
              ),
+             Positioned.fill(
+               child: Container(
+                 decoration: BoxDecoration(
+                   color: Colors.black.withOpacity(0.5),
+                   borderRadius: BorderRadius.circular(20),
+                 ),
+               ),
+             ),
            ],
          ),

次に、生年月日と有効期限にガイドを当てるため、下記のように2つの図形を Pathで描画します。
              Positioned.fill(
+               child: ClipPath(
+                 clipper: DriverLicenseGuideClipper(),
                  child: Container(
                    decoration: BoxDecoration(
                      color: Colors.black.withOpacity(0.5),
                      borderRadius: BorderRadius.circular(20),
                    ),
                  ),
+               ),
              ),
class DriverLicenseGuideClipper extends CustomClipper<Path> {
Path getClip(Size size) {
final path = Path()
// 生年月日を囲む図形。
..addRRect(
RRect.fromRectAndRadius(
Rect.fromLTWH(
size.width * 0.61,
size.height * 0.03,
size.width * 0.36,
size.height * 0.16,
),
const Radius.circular(20),
),
)
// 有効年月日を囲む図形。
..addRRect(
RRect.fromRectAndRadius(
Rect.fromLTWH(
size.width * 0.03,
size.height * 0.32,
size.width * 0.6,
size.height * 0.15,
),
const Radius.circular(20),
),
);
return path;
}
bool shouldReclip(covariant CustomClipper<Path> oldClipper) => false;
}
Left, Top, Width, Height の値は、目測で調整しています。
サイズに対する比率で調整しているので、画像の大きさが変わってもガイドの位置が変わらないようになっています。
2. 図形の切り抜き
対象の位置のみを覆うことができたので、今度は逆にその部分を切り抜いていきます。
切り抜くには、 「Widget 全体を覆う図形」を追加したのち、 PathFillType.evenOdd を Path の fillType に設定します。
PathFillType.evenOdd は、ある点から無限に線を引き、その線がパスと交差する回数に基づいてその点が塗りつぶされるかどうかを決定しています。
任意の線と偶数回交差する場合は塗りつぶされず、奇数回交差する場合は塗りつぶされます。
(レイヤーの重なりをイメージするとわかりやすいかもしれません)
今回の場合、「Widget 全体を覆う図形」と、「生年月日を囲む図形」で重なっている部分は任意の線と2回交差することになるため、その領域だけが塗り潰されなくなる、というわけです。
The interior is defined by an odd number of edge crossings.
For a given point, the point is considered to be on the inside of the path if a line > > drawn from the point to infinity crosses an odd number of lines.
    final path = Path()
+     // Widget全体を囲む図形。
+     ..addRect(
+       Rect.fromLTWH(0, 0, size.width, size.height),
+     )
      // 生年月日を囲む図形。
      ..addRRect(
        RRect.fromRectAndRadius(
          Rect.fromLTWH(
            size.width * 0.61,
            size.height * 0.03,
            size.width * 0.36,
            size.height * 0.16,
          ),
          const Radius.circular(20),
        ),
      )
      // 有効年月日を囲む図形。
      ..addRRect(
        RRect.fromRectAndRadius(
          Rect.fromLTWH(
            size.width * 0.03,
            size.height * 0.32,
            size.width * 0.6,
            size.height * 0.15,
          ),
          const Radius.circular(20),
        ),
      )
+     // 図形が重なる部分を塗りつぶさない設定。
+     ..fillType = PathFillType.evenOdd;
    return path;
これで、任意の位置にガイドを当てることができました!
完成形
class CaptureGuidePage extends StatelessWidget {
const CaptureGuidePage({super.key});
Widget build(BuildContext context) {
return Scaffold(
body: Padding(
padding: const EdgeInsets.symmetric(horizontal: 32),
child: Center(
child: Stack(
children: [
Image.asset(
'assets/images/driver-license.png',
),
Positioned.fill(
child: ClipPath(
clipper: DriverLicenseGuideClipper(),
child: Container(
decoration: BoxDecoration(
color: Colors.black.withOpacity(0.5),
borderRadius: BorderRadius.circular(20),
),
),
),
),
],
),
),
),
);
}
}
class DriverLicenseGuideClipper extends CustomClipper<Path> {
Path getClip(Size size) {
final path = Path()
// Widget全体を囲む図形。
..addRect(
Rect.fromLTWH(0, 0, size.width, size.height),
)
// 生年月日を囲む図形。
..addRRect(
RRect.fromRectAndRadius(
Rect.fromLTWH(
size.width * 0.61,
size.height * 0.03,
size.width * 0.36,
size.height * 0.16,
),
const Radius.circular(20),
),
)
// 有効年月日を囲む図形。
..addRRect(
RRect.fromRectAndRadius(
Rect.fromLTWH(
size.width * 0.03,
size.height * 0.32,
size.width * 0.6,
size.height * 0.15,
),
const Radius.circular(20),
),
)
// 図形が重なる部分を塗りつぶさない設定。
..fillType = PathFillType.evenOdd;
return path;
}
bool shouldReclip(covariant CustomClipper<Path> oldClipper) => false;
}
おわりに
これまで ClipPath や CustomClipper を使う機会がなかったので実装しながら勉強になりました。
ガイドの位置を調整するのが一番時間がかかったかもしれません😂
実際のアプリでは、ここで作成した Widget を camera パッケージの CameraPreview の上に重ねて、カメラ撮影時にガイドを表示することができます。
今回のように、複数の図形でくり抜いたりしたい場合に参考にしていただけると幸いです!

Discussion