NextAuthでログイン認証(Email,Google,Github)試してみた(Next.js(AppRouter))
NextAuthの記事は過去のに書いたことはありましたがメールアドレスでの認証と登録はした事なかったため、今回は記事として書き起こしておきます。
使用スタック
・Next.js 14(AppRouter)
・Prisma
・MaterialUi
・NextAuth
・Bcrypt
・React-Hook-Form
・Zod
・Sqlite
環境構築
下記のコマンドでNext.jsの雛形を作成する
npx create-next-app next-auth
基本は最後以外すべてyesで大丈夫です(全部Enter)
Need to install the following packages:
  create-next-app@14.1.4
Ok to proceed? (y) y
√ Would you like to use TypeScript? ... No / Yes
√ Would you like to use ESLint? ... No / Yes
√ Would you like to use Tailwind CSS? ... No / Yes
√ Would you like to use `src/` directory? ... No / Yes
√ Would you like to use App Router? (recommended) ... No / Yes
√ Would you like to customize the default import alias (@/*)? ... No / Yes
作成した雛形のディレクトリに移動
cd next-auth
ライブラリのインストールを行います
npm i prisma @mui/material @emotion/react @emotion/styled @next-auth/prisma-adapter @types/bcrypt bcrypt react-hook-form @hookform/resolvers zod
デフォルトの記述を削除していきます
【対象ファイル】
・globals.css
・Page.tsx
・tsconfig.json
-globals.css-
赤い箇所のtailwind以外の記述を削除する
 @tailwind base;
 @tailwind components;
 @tailwind utilities;

-:root {
-  --foreground-rgb: 0, 0, 0;
-  --background-start-rgb: 214, 219, 220;
-  --background-end-rgb: 255, 255, 255;
-}
-
-@media (prefers-color-scheme: dark) {
-  :root {
-    --foreground-rgb: 255, 255, 255;
-    --background-start-rgb: 0, 0, 0;
-    --background-end-rgb: 0, 0, 0;
-  }
-}
-
-body {
-  color: rgb(var(--foreground-rgb));
-  background: linear-gradient(
-      to bottom,
-      transparent,
-      rgb(var(--background-end-rgb))
-    )
-    rgb(var(--background-start-rgb));
-}
-
-@layer utilities {
-  .text-balance {
-    text-wrap: balance;
-  }
-}
-Page.tsx-
Page.tsxの<main>の中身をすべて削除しreturn()の中に<></>を記載します

-tsconfig.json-
pathを変更します
{
  "compilerOptions": {
    "lib": ["dom", "dom.iterable", "esnext"],
    "allowJs": true,
    "skipLibCheck": true,
    "strict": true,
    "noEmit": true,
    "esModuleInterop": true,
    "module": "esnext",
    "moduleResolution": "bundler",
    "resolveJsonModule": true,
    "isolatedModules": true,
    "jsx": "preserve",
    "incremental": true,
    "plugins": [
      {
        "name": "next"
      }
    ],
    "paths": {
+      "@/*": ["./*"]
    }
  },
  "include": ["next-env.d.ts", "**/*.ts", "**/*.tsx", ".next/types/**/*.ts"],
  "exclude": ["node_modules"]
}
SessionProviderのラッピング
ログイン認証が完了するとsessionのデータを受け取れるようになり各ページでユーザー情報を取得する必要があります。全ページでsession取得が出来るようlayout.tsxに取得用Providerでラッピングします。※layout.tsxに記述すると同じ階層の全page.tsxに適応される
ルートディレクトリにlibフォルダを作成しその中にNextAuthProvidert.tsxを作成します
"use client";
import { SessionProvider } from "next-auth/react";

export const NextAuthProvider = ({ children }:{ children: React.ReactNode }) => {
  return (
    <SessionProvider>
      {children}
    </SessionProvider>
  )
};
続いてlayout.tsxに先ほど作成したNextAuthProviderをラッピングしていきます。
 import type { Metadata } from "next";
 import { Inter } from "next/font/google";
 import "./globals.css";
+ import { NextAuthProvider } from "@/lib/NextAuthProvider";
 const inter = Inter({ subsets: ["latin"] });

 export const metadata: Metadata = {
  title: "Create Next App",
  description: "Generated by create next app",
 };

 export default function RootLayout({
  children,
 }: Readonly<{
  children: React.ReactNode;
 }>) {
  return (
    <html lang="en">
+      <NextAuthProvider>
        <body className={inter.className}>{children}</body>
+      </NextAuthProvider>
    </html>
  );
 }
これでpage全体からsessionを取得できるよウに設定できました。
次はページの作成と受け取ったsessionデータを実際に表示するページを作成します。
メインページの作成
ログインの認証が完了した後に遷移するメインページを作成していきます。
先ほどの<main>タグ内を消したpage.tsxにレイアウトを記述していきます
 export default function Home() {
  return (
    <>
+      <div className="flex items-center flex-col">
+        <h1 className="text-3xl m-10 font-bold">Next Auth</h1>
+        <div className="flex items-center flex-col m-5">
+          <div className="m-2">ログイン中のユーザー</div>
+        </div>
+      </div>
    </>
  );
 }
下記のコマンドで画像のように表示されているか確認します。
npm run dev

次にログイン後に渡されるsessionを受け取りログイン中のユーザーを表示します。
const { data: session, status } = useSession()
useSessionでsessionを受け取りstatusでsessionを取得出来ていれば表示し取得中の場合は
読み込み中のUIをMaterialUiで実装していきます。
※statusには3つの状態が存在します
status = "authenticated" session取得後
status = "loading" session取得中
status = "unauthenticated" session取得失敗
※use clientを付けるのを忘れずに
+ "use client"
+ import { useSession, signIn, signOut } from "next-auth/react"
+ import Skeleton from '@mui/material/Skeleton';
 export default function Home() {
+  const { data: session, status } = useSession()
  return (
    <>
    <div className="flex items-center flex-col">
      <h1 className="text-3xl m-10 font-bold">Next Auth</h1>
      <div className="flex items-center flex-col m-5">
        <div className="m-2">ログイン中のユーザー</div>
+        {status === "loading" ? (
+            <Skeleton variant="text" animation="wave" width={175} height={25}/>
+          ) : (
+            <p className="font-bold">{session?.user?.email}</p>
+          )}
      </div>
    </div>
    </>
  );
 }
ログアウトボタンをnextAuthで提供されているsignOut関数を使い実装します
 "use client";
 import { useSession, signIn, signOut } from "next-auth/react";
 import Skeleton from "@mui/material/Skeleton";
 export default function Home() {
  const { data: session, status } = useSession();
  return (
    <>
      <div className="flex items-center flex-col">
        <h1 className="text-3xl m-10 font-bold">Next Auth</h1>
        <div className="flex items-center flex-col m-5">
          <div className="m-2">ログイン中のユーザー</div>
          {status === "loading" ? (
            <Skeleton variant="text" animation="wave" width={175} height={25} />
          ) : (
            <p className="font-bold">{session?.user?.email}</p>
          )}
        </div>
+        <button
+          onClick={() => signOut()}
+          className="bg-red-500 py-2 px-3 text-xs text-white rounded-lg"
+        >
+          サインアウトする
+        </button>
      </div>
    </>
  );
 }
ログインページ(SignIn)の作成
appフォルダ内にsigninフォルダを作成しpage.tsxファイルを作成します
下記のように記載します
"use client";
import React from "react";
import { useState } from "react";
import { useSession, signIn, signOut } from "next-auth/react";
import { redirect } from "next/navigation";
import Link from "next/link";
import { useForm } from "react-hook-form";
import { zodResolver } from "@hookform/resolvers/zod";
import { validationLoginSchema } from "@/src/validationSchema";

const Page = () => {
  const { data: session, status } = useSession();
  const [resError, setResError] = useState<Error>();
  const {
    register,
    handleSubmit,
    getValues,
    formState: { errors },
  } = useForm({
    mode: "onChange",
    resolver: zodResolver(validationLoginSchema),
  });

  //セッション判定
  if (session) redirect("/");

  const handleLogin = async (data: any) => {
    const email = data.email;
    const password = data.password;
    const res = await fetch("/api/signIn", {
      body: JSON.stringify(data),
      headers: {
        "Content-type": "application/json",
      },
      method: "POST",
    });
    if (res.ok) {
      signIn("credentials", { email: email, password: password });
    } else {
      const resError = await res.json();
      setResError(resError.errors);
    }
  };
  return (
    <>
      <div className="flex flex-col w-full h-screen text-sm items-center justify-center">
        <div className="flex flex-col items-center justify-center p-10 border-2 rounded-2xl">
          <p className="text-2xl font-bold mb-5">ログイン画面</p>
          <form
            onSubmit={handleSubmit(handleLogin)}
            className="flex flex-col items-center"
          >
            <div className="text-xs font-bold text-red-400 mb-4">
              {resError as React.ReactNode}
            </div>
            <label htmlFor="email">
              <p>メールアドレス</p>
              <input
                type="text"
                id="email"
                {...register("email")}
                className=" border-2 w-[300px] h-[35px] px-2 mb-2"
              />
              <div className="text-xs font-bold text-red-400 mb-2">
                {errors.email?.message as React.ReactNode}
              </div>
            </label>
            <label htmlFor="password">
              <p>パスワード</p>
              <input
                type="password"
                id="password"
                {...register("password")}
                className=" border-2 w-[300px] h-[35px] px-2 mb-2"
              />
              <div className="text-xs font-bold text-red-400 mb-2">
                {errors.password?.message as React.ReactNode}
              </div>
            </label>
            <button
              type="submit"
              className="text-white bg-gray-700 w-[300px] h-[35px] mt-2"
            >
              ログイン
            </button>
          </form>
          <hr className="my-4 border-gray-300 w-[300px]" />
          <div className="flex flex-col items-center">
            <button
              onClick={() => {
                signIn("github");
              }}
              className="bg-white text-black border-2 w-[300px] h-[35px] mb-2"
            >
              Githubでログイン
            </button>
            <button
              onClick={() => {
                signIn("google");
              }}
              className="bg-white text-black border-2 w-[300px] h-[35px] mb-2"
            >
              Googleでログイン
            </button>
            <Link href="/signup" className="mt-2">
              新規登録はこちら
            </Link>
          </div>
        </div>
      </div>
    </>
  );
};

export default Page;
上から少し解説していきます。
先ほども登場したuseSessionでsessionを取得しておりifでsession状態がある時(ログイン済み)はメインページに飛ばします
const { data: session, status } = useSession();
if (session) redirect("/");
クライアント側のvalidationはreact-hook-formでエラーを受け取りerrrosに格納されますが、サーバー側のvalidationが起きたときにはuseStateでエラーを管理します。
const [resError, setResError] = useState<Error>();
react-hook-formを使う際の定番の書き方です
const {
    register,
    handleSubmit,
    getValues,
    formState: { errors }, //エラーが格納される
  } = useForm({
    mode: "onChange",
    resolver: zodResolver(validationLoginSchema),
  });
modeをonChangeにする事で入力するごとにvalidationのチェックが行われるようになります。zodresolverはzodで定義した型をuserFormに適応することが出来使用するためにはvalidationLoginSchemaを作成しておく必要があります。srcフォルダの中にvalidationSchema.tsを作成し、後に使用するvalidationRegistSchemaも記述していきます
import { z } from "zod"

export const validationRegistSchema = z.object({
    email: z
        .string()
        .nonempty("メールアドレスを入力してください")
        .email("無効なメールアドレス形式です"),
    password: z
        .string()
        .nonempty("パスワードを入力してください")
        .min(8, "パスワードは8文字以上です"),
    passwordConfirm: z
        .string()
        .nonempty("再確認パスワードを入力してください")
})
.superRefine(({ password, passwordConfirm }, ctx) =>  {
    if (password !== passwordConfirm) {
        ctx.addIssue({
            code: "custom",
            message: "パスワードが一致しません",
            path: ["passwordConfirm"],
        })
    }
})

export const validationLoginSchema = z.object({
    email: z
        .string()
        .nonempty("メールアドレスを入力してください"),
    password: z
        .string()
        .nonempty("パスワードを入力してください")
})
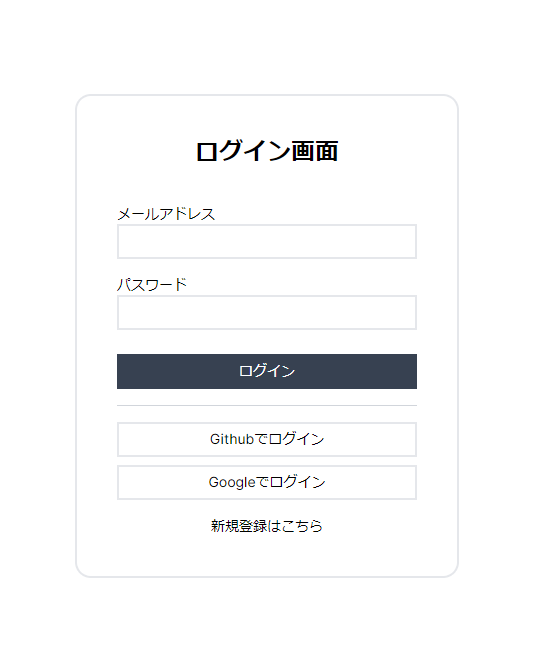
下記のようなログインフォームになっていれば大丈夫です。

新規登録ページの作成(SignUp)
こちらもappフォルダにsignupディレクトリを作成しpage.tsxにログインページと似た構成で記述していきます
"use client";
import React, { useState } from "react";
import { useSession, signIn, signOut } from "next-auth/react";
import { redirect } from "next/navigation";
import Link from "next/link";
import { useForm } from "react-hook-form";
import { zodResolver } from "@hookform/resolvers/zod";
import { validationRegistSchema } from "@/src/validationSchema";

interface Error {
  email: [];
  password: [];
  passwordConfirm: [];
}

const Page = () => {
  const { data: session, status } = useSession();
  const [resError, setResError] = useState<Error>();

  const {
    register,
    handleSubmit,
    getValues,
    formState: { errors },
  } = useForm({
    mode: "onChange",
    resolver: zodResolver(validationRegistSchema),
  });

  //セッション判定
  if (session) redirect("/");

  //登録処理
  const handleRegist = async (data: any) => {
    //フォーム取得
    const email = data.email;
    const password = data.password;
    const res = await fetch("/api/signUp", {
      body: JSON.stringify(data),
      headers: {
        "Content-type": "application/json",
      },
      method: "POST",
    });
    if (res.ok) {
      signIn("credentials", { email: email, password: password });
    } else {
      const resError = await res.json();
      setResError(resError.errors);
    }
  };
  return (
    <>
      <div className="flex flex-col w-full h-screen text-sm items-center justify-center">
        <div className="flex flex-col items-center justify-center p-10 border-2 rounded-2xl">
          <p className="text-2xl font-bold mb-5">アカウント登録</p>
          <form
            onSubmit={handleSubmit(handleRegist)}
            className="flex flex-col items-center"
          >
            <label htmlFor="email">
              <p>メールアドレス</p>
              <input
                type="text"
                id="email"
                {...register("email")}
                className=" border-2 w-[300px] h-[35px] px-2 mb-2"
              />
              <div className="text-xs font-bold text-red-400 mb-2">
                {errors.email?.message as React.ReactNode}
                {resError?.email?.map((error, index) => (
                  <p key={index}>{error}</p>
                ))}
              </div>
            </label>
            <label htmlFor="password">
              <p>パスワード</p>
              <input
                type="password"
                id="password"
                {...register("password")}
                className=" border-2 w-[300px] h-[35px] px-2 mb-2"
              />
              <div className="text-xs font-bold text-red-400 mb-2">
                {errors.password?.message as React.ReactNode}
                {resError?.password?.map((error, index) => (
                  <p key={index}>{error}</p>
                ))}
              </div>
            </label>
            <label htmlFor="passwordConfirm">
              <p>再確認パスワード</p>
              <input
                type="password"
                id="passwordConfirm"
                {...register("passwordConfirm")}
                className=" border-2 w-[300px] h-[35px] px-2 mb-2"
              />
              <div className="text-xs font-bold text-red-400 mb-2">
                {errors.passwordConfirm?.message as React.ReactNode}
                {resError?.passwordConfirm?.map((error, index) => (
                  <p key={index}>{error}</p>
                ))}
              </div>
            </label>
            <button
              type="submit"
              className="text-white bg-gray-700 w-[300px] h-[35px] my-2"
            >
              登録
            </button>
          </form>
          <Link href="/signin" className="mt-2">
            ログインはこちら
          </Link>
        </div>
      </div>
    </>
  );
};

export default Page;
Prisma設定
先ほど作成したNextAuthProviderのディレクトリのlibファイルにPrisma.tsを作成します
import { PrismaClient } from "@prisma/client";

const prisma = new PrismaClient();
export default prisma
次にPrismaの初期化を行います
npx prisma init
実行後ルートディレクトリにprismaディレクトリが作成されていることを確認します。
shema.prismaに今回使用する公式のデフォルトスキーマを記述し、nextauth.dbファイルをshema.prismaと同階層に作成します(空ファイルのまま)
datasource db {
  provider = "sqlite"
  url      = env("DATABASE_URL")
}

generator client {
  provider        = "prisma-client-js"
}

model Account {
  id                 String  @id @default(cuid())
  userId             String
  type               String
  provider           String
  providerAccountId  String
  refresh_token      String?
  access_token       String?
  expires_at         Int?
  token_type         String?
  scope              String?
  id_token           String?
  session_state      String?

  user User @relation(fields: [userId], references: [id], onDelete: Cascade)

  @@unique([provider, providerAccountId])
}

model Session {
  id           String   @id @default(cuid())
  sessionToken String   @unique
  userId       String
  expires      DateTime
  user         User     @relation(fields: [userId], references: [id], onDelete: Cascade)
}

model User {
  id            String    @id @default(cuid())
  password      String?
  name          String?
  email         String?   @unique
  emailVerified DateTime?
  image         String?
  accounts      Account[]
  sessions      Session[]
}

model VerificationToken {
  identifier String
  token      String   @unique
  expires    DateTime

  @@unique([identifier, token])
}
スキーマ内で使用するシークレットキーををenvファイルに記載します。
googleとgithubのシークレットキーの取得方法は過去の記事にも上げているので見てみてください
NEXTAUTH_URL='http://localhost:3000/'
NEXTAUTH_SECRET=86dd6d06c37ef7271aec846263a21b99

DATABASE_URL="file:./nextauth.db"

GITHUB_CLIENT_ID=""
GITHUB_CLIENT_SECRET=""

GOOGLE_CLIENT_ID=""
GOOGLE_CLIENT_SECRET=""
下記コマンドでdbにスキーマを登録していきます
npx prisma generate
npx prisma db push
APIの作成
signup/signin/nextauth用apiを3つ作成していきます。next.jsではappディレクトリにapiディレクトリを作成しその中にapiを記述してきます。
例) app/api/signup/route.ts
signUp
apiディレクトリの中にsignUpディレクトリを作成しroute.tsファイルを作成し下記のように記述します。これはサーバー側のvalidationとアカウントを作成しDBに保存するapiです。
import { NextRequest, NextResponse } from "next/server";
import prisma from "@/lib/Prisma";
import bcrypt from "bcrypt";
import { validationRegistSchema } from "@/src/validationSchema";

export async function POST(req: NextRequest) {
  const data = await req.json();
  const { email, password } = data;

  // メールアドレス重複確認とバリデーションを同時に行う
  const [user, validationResult] = await Promise.all([
    prisma.user.findFirst({ where: { email } }),
    validationRegistSchema.safeParseAsync(data)
  ]);

  let errors = validationResult.success ? {} : validationResult.error.flatten().fieldErrors;
  //スプレッド構文で広げてから代入
  if (user) {
    errors.email = [...(errors.email || []), "このメールアドレスは既に使用されています"];
  }

  if (Object.keys(errors).length > 0) {
    return new NextResponse(JSON.stringify({ errors }), { status: 400 });
  }

  // パスワードをハッシュ化してユーザーを作成
  const hashedPassword = await bcrypt.hash(password, 10);
  await prisma.user.create({
    data: {
      email: email,
      password: hashedPassword,
    },
  });

  return new NextResponse(JSON.stringify({ message: "Success" }), { status: 201 });
}
signIn
signUp同様にsignIn apiを作成していきます。apiディレクトリにsignInディレクトリを作成しroute.tsを再度作成し処理を記述します。ログイン時のサーバーのvalidation用apiです
import { NextRequest, NextResponse } from "next/server";
import prisma from "@/lib/Prisma";
import bcrypt from "bcrypt";

export async function POST(req: NextRequest) {
  const data = await req.json();
  const { email, password } = data;

  try {
    const user = await prisma.user.findUnique({
      where: { email: email },
    });
    if (!user || !password) throw new Error("User not found");
    if (user?.password) {
      const isCorrectPassword = await bcrypt.compare(password, user.password);
      if (!isCorrectPassword) {
        throw new Error("Incorrect password");
      }
    }
  } catch {
    return new NextResponse(
      JSON.stringify({ errors: "メールアドレスかパスワードが違います" }),
      { status: 400 }
    );
  }
  return new NextResponse(JSON.stringify({ message: "Success" }), {
    status: 201,
  });
}
nextauth用api
nextAuthで用意されているapiでディレクトリ構造が少し特殊になります。下記のようにディレクトリとファイルを作成してみてください。
1.apiディレクトリにauthディレクトリ作成
2.authディレクトリに[...nextauth]ディレクトリを作成
※...の個数間違えないように...
3.[...nextauth]ディレクトリにroute.tsファイルを作成
以下の攻勢になっていれば大丈夫です
app/api/auth/[...nextauth]/route.ts
import NextAuth from "next-auth";
import GithubProvider from "next-auth/providers/github";
import GoogleProvider from "next-auth/providers/google";
import CredentialsProvider from "next-auth/providers/credentials";
import { PrismaAdapter } from "@next-auth/prisma-adapter";
import prisma from "@/lib/Prisma";

const handler = NextAuth({
  secret: process.env.NEXTAUTH_SECRET,
  adapter: PrismaAdapter(prisma),
  providers: [
    CredentialsProvider({
      name: "Credentials",
      credentials: {
        email: { label: "Username", type: "text" },
        password: { label: "Password", type: "password" },
      },
      async authorize(credentials) {
        let user = null; // `try`ブロックの外で`user`を宣言
        try {
          // メールアドレス存在チェック
          user = await prisma.user.findUnique({
            where: { email: credentials?.email },
          });
        } catch (error) {
          return null; // エラーが発生した場合はnullを返す
        }
        return user;
      },
    }),
    GithubProvider({
      clientId: process.env.GITHUB_CLIENT_ID ?? "",
      clientSecret: process.env.GITHUB_CLIENT_SECRET ?? "",
    }),
    GoogleProvider({
      clientId: process.env.GOOGLE_CLIENT_ID ?? "",
      clientSecret: process.env.GOOGLE_CLIENT_SECRET ?? "",
    }),
  ],
  pages: {
    signIn: "/signIn",
  },
  session: {
    strategy: "jwt",
  },
  callbacks: {
    async redirect({ url, baseUrl }) {
      return "/";
    },
  },
});

export { handler as GET, handler as POST };
最後にmiddlewareを設定します
srcディレクトリにmiddleware.tsを作成します。nextAuthで用意されているwithAuth関数を使いjwtの取得状況によってログインページのリダイレクトするようなっています
import { withAuth } from "next-auth/middleware"

export default withAuth({
  // Matches the pages config in `[...nextauth]`
  pages: {
    signIn: '/signin',
  }
})

export const config = { matcher: ["/"] }
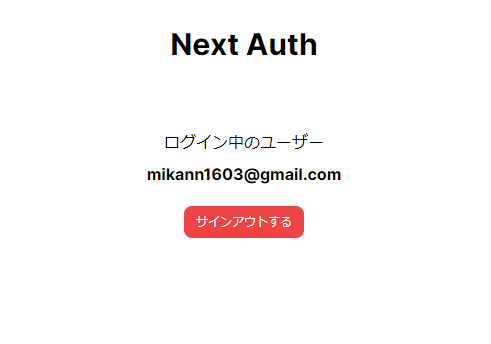
ログインに成功した場合下記のようにsessionデータから名前が取得出来ていれば成功です


Discussion