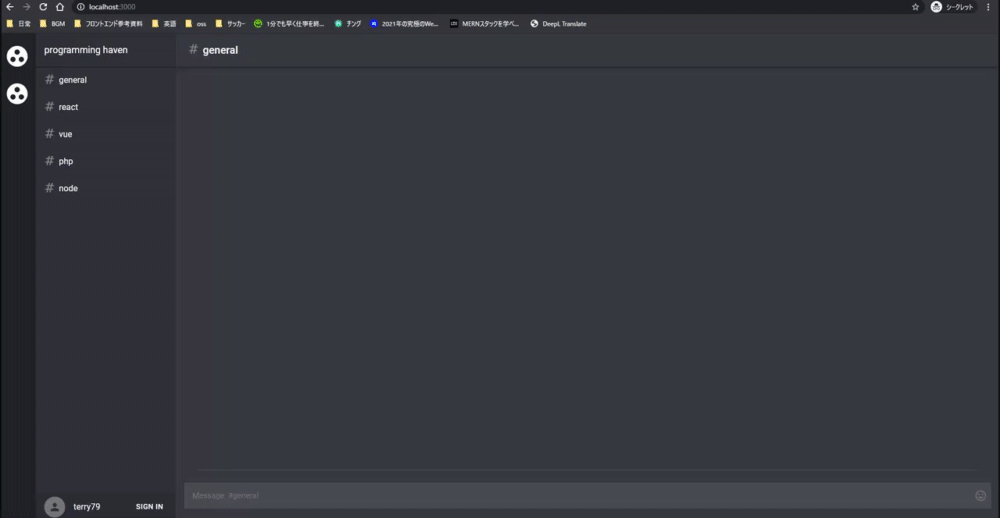
React+Node.jsでdiscord-cloneを作るメモ
1日目
参考プロジェクト
やり方の方針
とりあえずcommitログを過去から遡って、変更を写経していく。
ログをzennに残す
CRA
create react appした
プロジェクトファイルをクリーン
いらないやつら消した。
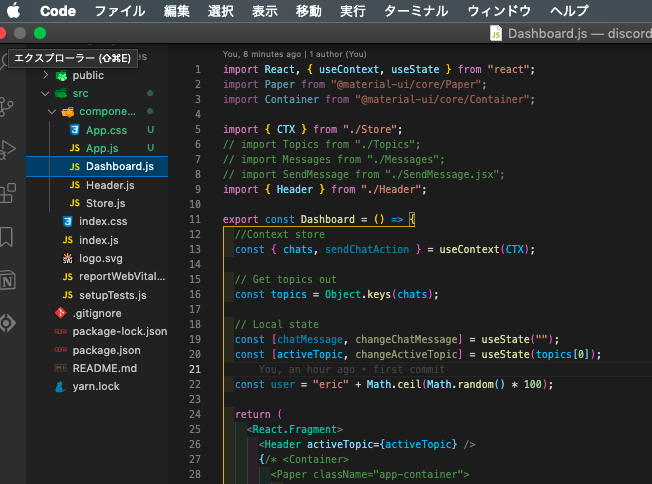
DashBoard.js
usecontext
useContextのしくみ - Qiita
import React, { useContext, useState } from "react";
import Paper from "@material-ui/core/Paper";
import Container from "@material-ui/core/Container";

import { CTX } from "./Store";
// import Topics from "./Topics";
// import Messages from "./Messages";
// import SendMessage from "./SendMessage.jsx";
import { Header } from "./Header";

export const Dashboard = () => {
  //Context store
  const { chats, sendChatAction } = useContext(CTX);

  // Get topics out
  const topics = Object.keys(chats);

  // Local state
  const [chatMessage, changeChatMessage] = useState("");
  const [activeTopic, changeActiveTopic] = useState(topics[0]);

  const user = "eric" + Math.ceil(Math.random() * 100);

  return (
    <React.Fragment>
      <Header activeTopic={activeTopic} />
      {/* <Container>
        <Paper className="app-container">
          <Topics topics={topics} changeActiveTopic={changeActiveTopic} />
          <Messages chats={chats} activeTopic={activeTopic} />
          <SendMessage
            chatMessage={chatMessage}
            changeChatMessage={changeChatMessage}
            user={user}
            activeTopic={activeTopic}
            sendChatAction={sendChatAction}
          />
        </Paper>
      </Container> */}
    </React.Fragment>
  );
};
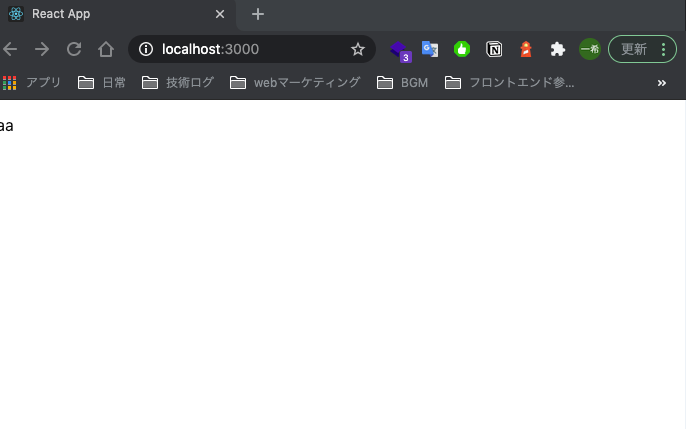
Header.jsの作成
とりあえず作成して表示。
ログ
header作るところまで
明日は他のコンポーネント作る。
2日目
各コンポーネントの実装
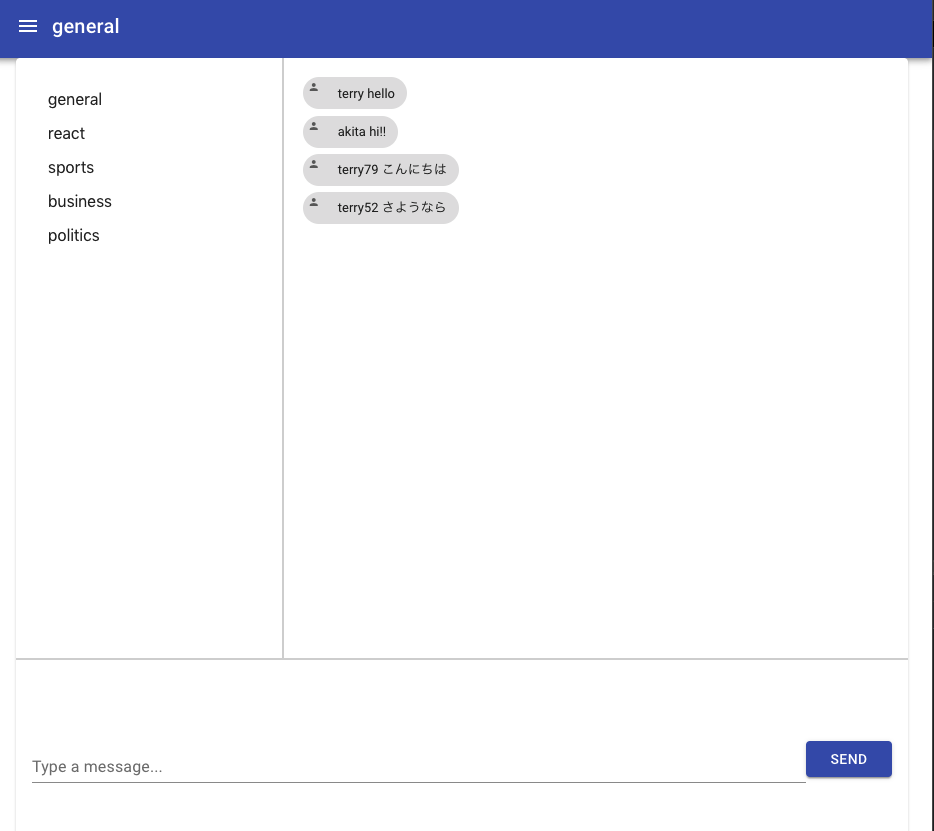
Messages.jsx
メッセージ一覧を表示するコンポーネント。
chatsのデータをmapで表示している。
import React from "react";

import { Chip, Icon } from "@material-ui/core";

export const Messages = ({ chats, activeTopic }) => {
  return (
    <div className="messages-container">
      {chats[activeTopic].map((message, i) => (
        <div className="messages" key={i}>
          <Chip
            avatar={<Icon>person</Icon>}
            label={message.from + " " + message.msg}
          />
        </div>
      ))}
    </div>
  );
};
Chipはこんな感じのもの

SendMessage.jsx
メッセージ送信部分のコンポーネント。
import React from "react";

import TextField from "@material-ui/core/TextField";
import Button from "@material-ui/core/Button";

export const SendMessage = ({
  chatMessage,
  changeChatMessage,
  activeTopic,
  user,
  sendChatAction,
}) => {
  return (
    <div className="send-message-container">
      <TextField
        id="filled-name"
        className="message-box"
        label="Type a message..."
        value={chatMessage}
        onChange={(e) => changeChatMessage(e.target.value)}
      />
      <Button
        color="primary"
        variant="contained"
        className="message-button"
        onClick={() => {
          sendChatAction({ topic: activeTopic, from: user, msg: chatMessage });
          changeChatMessage("");
        }}
      >
        Send
      </Button>
    </div>
  );
};
特に気になる実装はない。
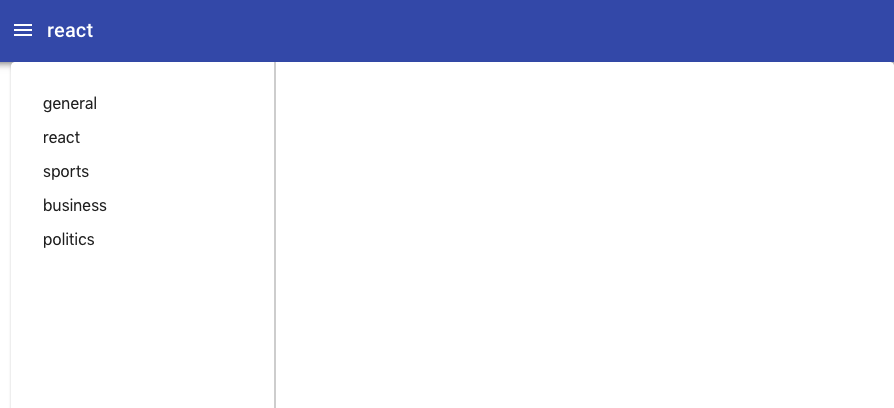
Topics.jsx
チャットのチャンネルを一覧で表示するコンポーネント。
import React from "react";
import List from "@material-ui/core/List";
import ListItem from "@material-ui/core/ListItem";

export const Topics = ({ topics, changeActiveTopic }) => {
  return (
    <div className="topics-container">
      <List>
        {topics.map((topic) => (
          <ListItem
            onClick={(e) => changeActiveTopic(e.target.innerText)}
            key={topic}
            button
          >
            {topic}
          </ListItem>
        ))}
      </List>
    </div>
  );
};
store.js
import React, { createContext } from "react";
import io from "socket.io-client";
export const CTX = createContext();

const baseUrl =
  process.env.NODE_ENV === "development"
    ? "http://localhost:3000"
    : "https://simple-chat.herokuapp.com";

const initialState = {
  general: [],
  react: [],
  sports: [],
  business: [],
  politics: [],
};

const chatReducer = (state, action) => {
  const { topic, from, msg } = action.payload;
  switch (action.type) {
    case "UPDATE_CHATS":
      return {
        ...state,
        [topic]: [...state[topic], { from: from, msg: msg }],
      };
    default:
      return state;
  }
};

let socket;

const sendChatAction = (message) => {
  socket.emit("simple-chat", message);
};

export const Store = (props) => {
  const [chats, chatDispatch] = React.useReducer(chatReducer, initialState);

  if (!socket) {
    socket = io(baseUrl);
    socket.on("simple-chat", (msg) => {
      const action = { type: "UPDATE_CHATS", payload: msg };
      chatDispatch(action);
    });
  }

  return (
    <CTX.Provider value={{ chats, sendChatAction }}>
      {props.children}
    </CTX.Provider>
  );
};
理解出来ていない所がいくつかある。
- baseUrl
- soket.emit
- soket.io
UIやpropsの流れは難しくないが、チャットとしての機能が現状完成していない。
次回調べながらチャットを表示できるようにする。+reduxへの移行。
3日目
ここまでのコードの理解から。
Dashboard.jsx
- store.jsからuseCotenxtでCTXを受け取る
- 各コンポーネントにpropsを渡していく
  //CTXからchatsとsendchatsActionを受け取る
  const { chats, sendChatAction } = useContext(CTX);
localStateはDashboard.jsx内で定義して、propsとして各コンポーネントに渡している。
  //localStateで定義してpropsでset関数を渡す
  const [chatMessage, changeChatMessage] = useState("");
  const [activeTopic, changeActiveTopic] = useState(topics[0]);
Header.jsx
-
activeTopicを受け取って表示しているだけ。
export const Header = ({ activeTopic }) => {
  return (
    <AppBar position="static">
      <Toolbar>
        <IconButton edge="start" color="inherit" aria-label="menu">
          <MenuIcon />
        </IconButton>
        <Typography variant="h6">{activeTopic}</Typography>
      </Toolbar>
    </AppBar>
  );
};
Messages.jsx
-
chatsとactiveTopicを受け取り、アクティブなメッセージだけmapで表示している。
export const Messages = ({ chats, activeTopic }) => {
  return (
    <div className="messages-container">
      {chats[activeTopic].map((message, i) => (
        <div className="messages" key={i}>
          <Chip
            avatar={<Icon>person</Icon>}
            label={message.from + " " + message.msg}
          />
        </div>
      ))}
    </div>
  );
};
Topics.jsx
- トピック一覧の部分、
changeActiveTopicを実行してactiveTopicを変更している。
export const Topics = ({ topics, changeActiveTopic }) => {
  return (
    <div className="topics-container">
      <List>
        {topics.map((topic) => (
          <ListItem
            onClick={(e) => changeActiveTopic(e.target.innerText)}
            key={topic}
            button
          >
            {topic}
          </ListItem>
        ))}
      </List>
    </div>
  );
};
SendMessage.jsx
-
chatMessage,changeChatMessageでlocalStateでのメッセージ送信部分を実装している -
sendChatActionでチャット - チャット内容を
sendChatMessageでtopic,user,chatを引数にチャット内容をサーバー側に送っている。
export const SendMessage = ({
  chatMessage,
  changeChatMessage,
  activeTopic,
  user,
  sendChatAction,
}) => {
  return (
    <div className="send-message-container">
      <TextField
        id="filled-name"
        className="message-box"
        label="Type a message..."
        value={chatMessage}
        onChange={(e) => changeChatMessage(e.target.value)}
      />
      <Button
        color="primary"
        variant="contained"
        className="message-button"
        onClick={() => {
          sendChatAction({ topic: activeTopic, from: user, msg: chatMessage });
          changeChatMessage("");
        }}
      >
        Send
      </Button>
    </div>
  );
};
Store.js
import React, { createContext } from "react";
import io from "socket.io-client";
export const CTX = createContext();

const baseUrl =
  process.env.NODE_ENV === "development"
    ? "http://localhost:3000"
    : "https://simple-chat.herokuapp.com";

const initialState = {
  general: [],
  react: [],
  sports: [],
  business: [],
  politics: [],
};

const chatReducer = (state, action) => {
  const { topic, from, msg } = action.payload;
  switch (action.type) {
    case "UPDATE_CHATS":
      return {
        ...state,
        [topic]: [...state[topic], { from: from, msg: msg }],
      };
    default:
      return state;
  }
};

let socket;

const sendChatAction = (message) => {
  socket.emit("simple-chat", message);
};

export const Store = (props) => {
  const [chats, chatDispatch] = React.useReducer(chatReducer, initialState);

  if (!socket) {
    socket = io(baseUrl);
    socket.on("simple-chat", (msg) => {
      const action = { type: "UPDATE_CHATS", payload: msg };
      chatDispatch(action);
    });
  }

  return (
    // Providerを使ってchats、sendChatActionをCTXに格納してDashboardコンポーネントに渡している
    <CTX.Provider value={{ chats, sendChatAction }}>
      {props.children}
    </CTX.Provider>
  );
};
chatReducer
Reducerはstateとactionを受け取り、新しいstateを作る。
UPDATE_CHATSならでstateを更新してtopicの配列を拡張して新しいメッセージデータを入れ、それ以外ならそのまま返している。
const chatReducer = (state, action) => {
  const { topic, from, msg } = action.payload;
  switch (action.type) {
    case "UPDATE_CHATS":
      return {
        ...state,
        [topic]: [...state[topic], { from: from, msg: msg }],
      };
    default:
      return state;
  }
};
Storeコンポーネント
useReducerは状態管理のためのフックで、useStateと似たような機能。useStateはuseReducerに内部実装されています。(state, action) => newState という型のreducer を受け取り、現在のstateとdispatch関数の両方を返します。
参考:https://qiita.com/seira/items/2fbad56e84bda885c84c
soketの通信によりmsgを入手して chatDispatch(action);を使ってメッセージを更新している。
sendChatActionにてsoket側に{topic,user,message}を渡していたが、受け取る際はmsgとして受け取り{topic,from,msg}のオブジェクトとして受け取る
export const Store = (props) => {
  const [chats, chatDispatch] = React.useReducer(chatReducer, initialState);

  if (!socket) {
    socket = io(baseUrl);
    socket.on("simple-chat", (msg) => {
      const action = { type: "UPDATE_CHATS", payload: msg };
      chatDispatch(action);
    });
  }

  return (
    // Providerを使ってchats、sendChatActionをCTXに格納してDashboardコンポーネントに渡している
    <CTX.Provider value={{ chats, sendChatAction }}>
      {props.children}
    </CTX.Provider>
  );
};
soket.ioについて
Socket.IOは、ブラウザとサーバー間のリアルタイムの双方向のイベントベースの通信を可能にするライブラリです。
ドキュメント:https://socket.io/docs/v4
サーバー側の設定
1からは書けないので本家をforkした。
サーバー側がちゃんとlisten出来ているか
サーバー側のsoket.ioの理解。
参考記事:https://solutionware.jp/blog/2017/11/25/socket-ioを使って簡単にチャットツールを作成する/
この記事も参考にしてサーバー側とクライアント側を繋ぎこみ。
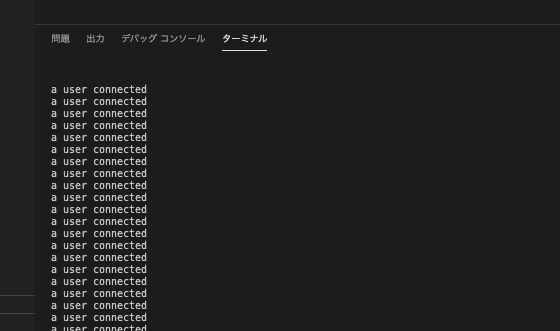
とりあえずサーバー側は3001ポートで「hello world」が出せた。
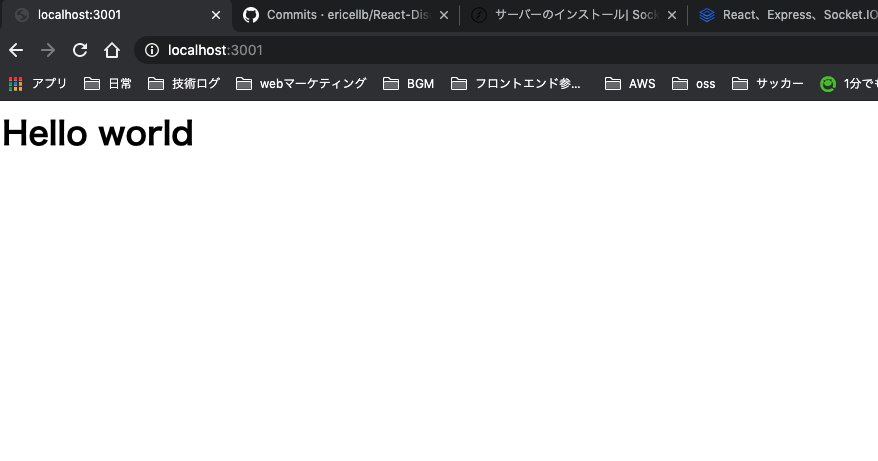
ポート3001でクライアント側と繋ぎこみ
var app = require("express")();
var http = require("http").createServer(app);
var io = require("socket.io")(http);

const PORT = process.env.PORT || 3001;

app.get("/", function (req, res) {
  res.send("<h1>Hello world</h1>");
});

io.on("connection", function (socket) {
  console.log("a user connected");
  socket.on("simple-chat", function (msg) {
    console.log("Message Received and Broadcasting : " + JSON.stringify(msg));
    io.emit("simple-chat", msg);
  });
});

http.listen(PORT, function () {
  console.log(`listening on ${PORT}`);
});
ポート3000と3001でやり取りが出来た
chatsデータをクライアント側で受け取りたい
次回に
4日目
soket.ioについて理解深める
soket.ioの関数
参考にする
このチュートリアルがsimpleChat機能を作るまでは同じなので参考にする。
socketにconnect出来ない
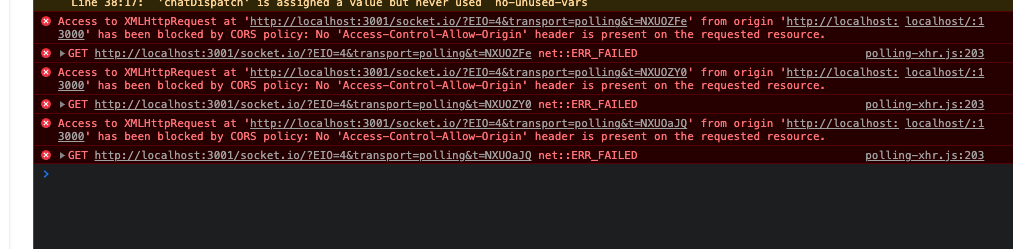
CORSのエラー。
公式のHandling CORSを参考に以下のコードを追求して解決した。(https://socket.io/docs/v3/handling-cors/)
const io = require("socket.io")(http, {
  cors: {
    origin: ["http://localhost:3000"],
    methods: ["GET", "POST"],
    allowedHeaders: ["my-custom-header"],
    credentials: true,
  },
});
1つのプロジェクト内src/server/index.jsを立てる事でうまく通信出来るようになった。
5日目
reduxに移行していく。
各々インストール
- redux
- react-redux
- redux-thunk
redux-thunk参考。
イメージ的にreduxのdispatchとasyncの両立をできる良いにしてくれる物らしい。
Thunkを使って、network関連の処理は「直ちに」実行させない、
その代わりにThunkの中に包んで、Thunkを返す事で対処するらしい。
actionsを作る
src/actionsディレクトリを作り、そこにindex.jsとtypes.jsを作る。
import { SEND_MESSAGE, UPDATE_CHAT } from "./types";

export const sendMessage = (message) => ({
  type: SEND_MESSAGE,
  payload: message,
});

export const updateChat = (message) => ({
  type: UPDATE_CHAT,
  payload: message,
});
app.jsにstyled-componentsを導入する。
ついでにstoreのデータをreduxを使ってDashboardコポーネントで扱う為、こちらからは削除。
styled-componentsの使い方はこちら参考。
const theme = createMuiTheme({
  palette: {
    primary: {
      main: "#7289da",
    },
    secondary: green,
  },
  status: {
    danger: "orange",
  },
});

export const App = () => {
  return (
    <ThemeProvider theme={theme}>
      <Dashboard></Dashboard>
    </ThemeProvider>
  );
};
DashboardコンポーネントでuseSelectorを使いstoreデータを受け取る
  //storeからuseSelectorでstateを受け取っている;
  const chatStore = useSelector((state) => state.chat);
Messangerコンポーネントで最新のメッセージまでスクロールするようにする。
scrollIntoView();を使います。
element.scrollIntoView()でelementが見える位置までスクロールしてくれるというメソッドです。
useEffectを依存配列なしで入れて初回のみ一番下のメッセージまでスクロールします。
export const Messages = ({ chats, activeTopic }) => {
  let messageContainer;
  useEffect(() => {
    messageContainer.scrollIntoView();
  });

  return (
    <div className="messages-flex-container">
      <div className="messages-container">
        {chats[activeTopic].map((message, i) => (
          <div className="message" key={i}>
            <Chip
              avatar={<Icon>person</Icon>}
              label={message.from + " " + message.msg}
            />
          </div>
        ))}
        <div ref={(element) => (messageContainer = element)}></div>
      </div>
    </div>
  );
};
sendMessageコンポーネント
storeから直接受け取ってここで実行していたsendActionをredux導入でactionsに移せたので、useDispatchを使って実行する。
storeにあるデータをuseSelectorで受け取り、useDispatchで実行するイメージ。
    <Button
          color="primary"
          variant="contained"
          className="message-button"
          onClick={() => {
            dispatch(
              sendMessage({ topic: activeTopic, from: user, msg: chatMessage })
            );
            changeChatMessage("");
          }}
        >
          Send
        </Button>
store.jsを分割していく
socketMiddleware.jsを作り、socket.ioを使ったactionの定義はここに書く。
import io from "socket.io-client";

import { SEND_MESSAGE, UPDATE_CHAT } from "../actions/types";

export const socketMiddleware = (baseUrl) => {
  return (storeAPI) => {
    let socket = io(baseUrl);

    socket.on("simple-chat", (message) => {
      storeAPI.dispatch({
        type: UPDATE_CHAT,
        payload: message,
      });
    });

    return (next) => (action) => {
      if (action.type === SEND_MESSAGE) {
        socket.emit("simple-chat", action.payload);
        return;
      }

      return next(action);
    };
  };
};
またindex.jsも修正してstoreをここで各コンポーネントに渡せるようにする。
const baseUrl = "http://localhost:3001";

const composeEnhancers = window.__REDUX_DEVTOOLS_EXTENSION_COMPOSE__ || compose;
const store = createStore(
  reducers,
  composeEnhancers(applyMiddleware(thunk, socketMiddleware(baseUrl)))
);

ReactDOM.render(
  <Provider store={store}>
    <App />
  </Provider>,
  document.getElementById("root")
);
src/reducersフォルダを作る。reducerはstoreを更新して新しいstoreを生み出す役割を担う。
チャットのstoreを扱うcharReducer.jsx
const initialState = {
  general: [],
  react: [],
  sports: [],
  business: [],
  politics: [],
};

export const chatReducer = (state = initialState, action) => {
  switch (action.type) {
    case "UPDATE_CHAT":
      return {
        ...state,
        [action.payload.topic]: [
          ...state[action.payload.topic],
          { from: action.payload.from, msg: action.payload.msg },
        ],
      };
    default:
      return state;
  }
};
要するに今までstoreに書いていた処理をmiddlewareとactionsとreducersに分けた。
material-ui
UIコンポーネントライブラリ。
参考:https://zenn.dev/h_yoshikawa0724/articles/2020-09-24-react-material-ui
カスタマイズ方法
いくつか方法がある。
テーマの適応
createMuiThemeを使って細かくデフォルトのカラーを変更できる。
paletteを使用することで細かいスタイリングが可能。
const theme = createMuiTheme({
  //カラーパレット追加
  palette: {
    //ダークモード
    type: "dark",
    primary: {
      main: "#7289da",
    },
  },
});
その他メモ
参考:https://qiita.com/ue5963/items/4a9a0c0cbadede05c88c
autoComplete
自動補完。chromeなどでは勝手にやっちゃう。
TextFIeldではoffにする事が多い。
<TextField
          autoComplete="off"
        />
6日目
serverを導入
大まかな手順として
- actionsにstore更新のactionsを追加
- reducerでstateの初期状態や更新の仕方を記述
- 各コンポーネントでstoreから取れるstateはpropsから移植
actionsの追加
topicとserverのデータはstoreで扱うようにした。
export const changeServer = (server) => ({
  type: CHANGE_SERVER,
  payload: server,
});

export const changeTopic = (server) => ({
  type: CHANGE_TOPIC,
  payload: server,
});
reducer
前半はserver→topicの階層での初期状態を定義している。
後半は実際のstateの更新。階層が深くなった分、スプレット構文が乱発されているので一瞬頭に入ってきにくいがやっている事は現在のserve,topicにメッセージデータを入れるか、アクティブなsever、topicを切り替えているだけ。
const initialState = {
servers: {
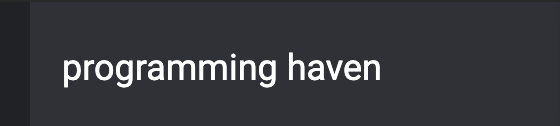
"programming haven": {
general: [],
react: [],
vue: [],
php: [],
node: [],
},
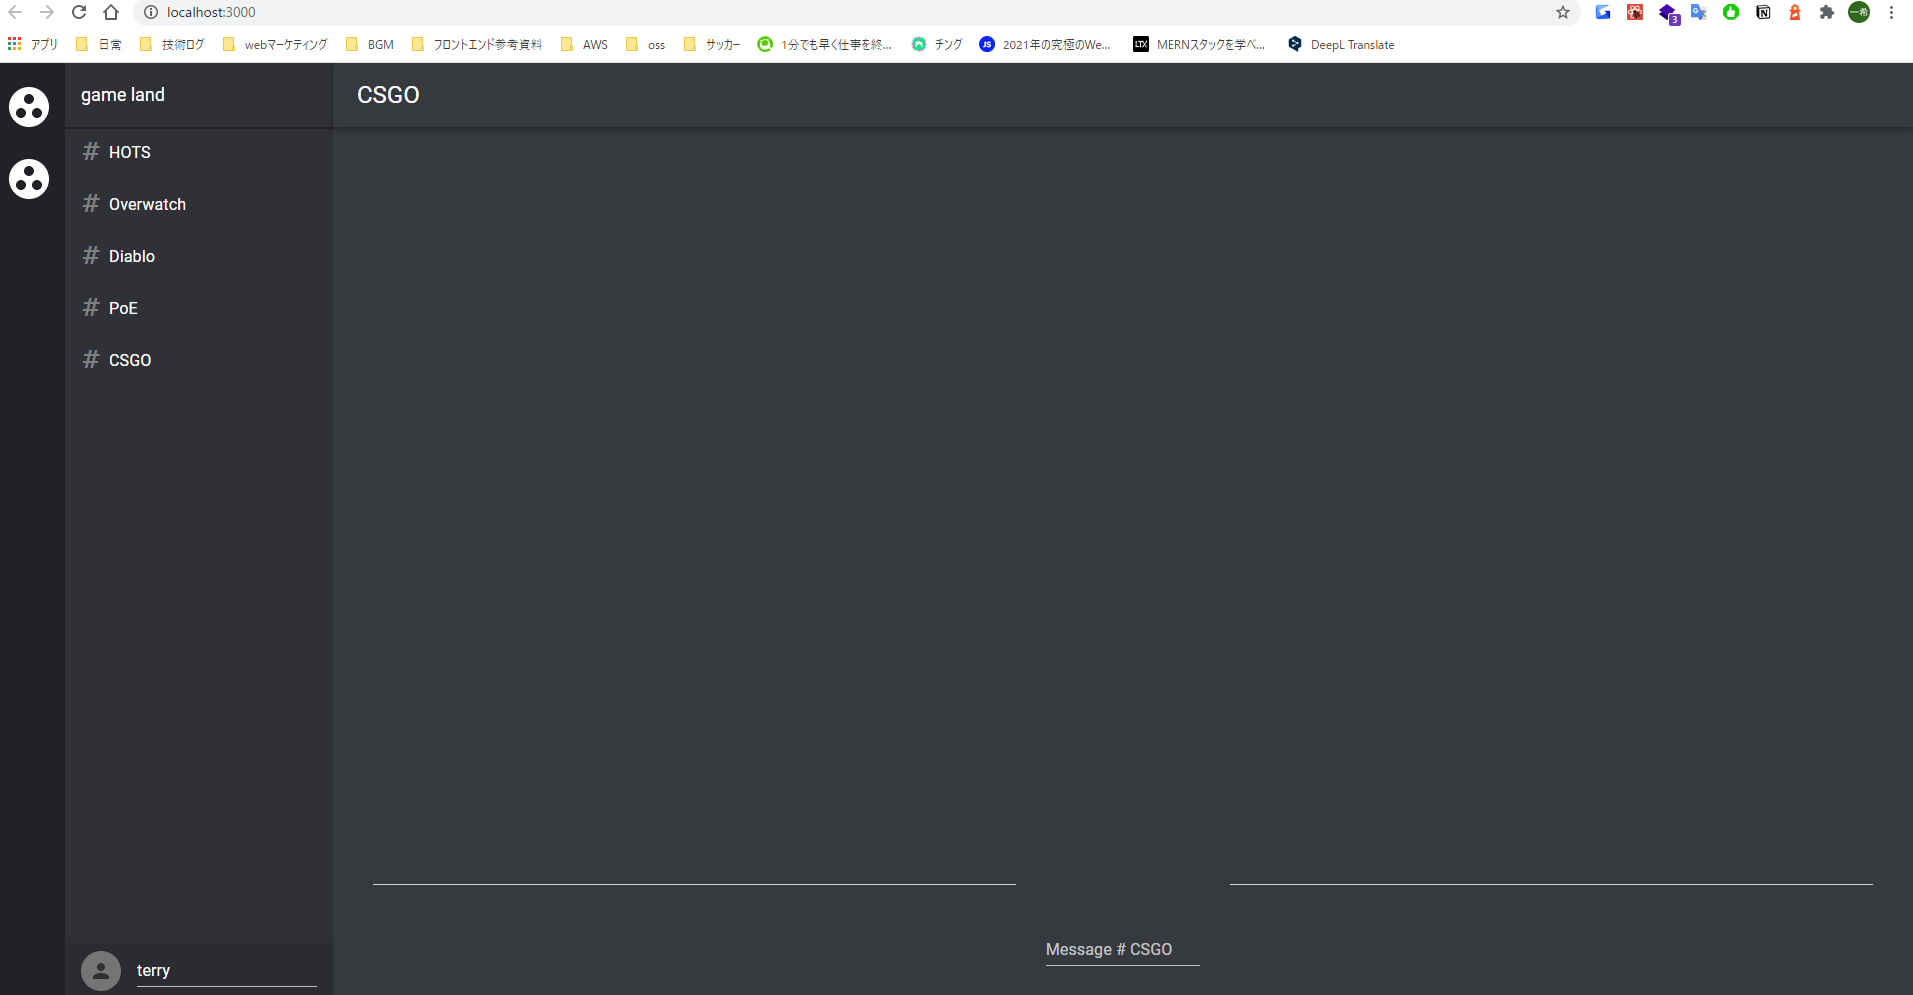
"game land": {
HOTS: [],
Overwatch: [],
Diablo: [],
PoE: [],
CSGO: [],
},
},
activeServer: "",
activeTopic: "",
};
export const chatReducer = (state = initialState, action) => {
switch (action.type) {
//現在activeなサーバー、トピックにメッセージのデータを入れる
case "UPDATE_CHAT":
const { server, topic, from, msg } = action.payload;
console.log(action);
return {
...state,
servers: {
...state.servers,
[server]: {
...state.servers[server],
[topic]: [
...state.servers[server][topic],
{ from: from, msg: msg },
],
},
},
};
//actveServerとactiveTopicを更新する
case "CHANGE_SERVER":
return {
...state,
activeServer: action.payload,
activeTopic: Object.keys(state.servers[action.payload])[0],
};
//activeTopicを更新する
case "CHANGE_TOPIC":
return { ...state, activeTopic: action.payload };
default:
return {
...state,
activeServer: Object.keys(state.servers)[0],
activeTopic: Object.keys(
state.servers[Object.keys(state.servers)[0]]
)[0],
};
}
};
各コンポーネントでのstate移植。
今回はserverのstateをstoreで扱う事になったので、activeTopicやactiveTopicあたりのpropsがごっそりuseSelectorでの受け取りになる。
例
  // Get store
  const { activeServer, activeTopic } = useSelector((state) => state.chat);
各コンポーネントで同じような移植を行っているので、詳しくはコミット履歴を参照。
ユーザー機能の追加
- トピックの下にユーザー情報を追加(変更可能)
- サーバーをdissocrdっぽくした
storeにユーザー情報を加える
actionsに追加
export const signIn = (user) => ({
  type: SIGN_IN,
  payload: user,
});

export const signOut = (user) => ({
  type: SIGN_IN,
  payload: user,
});
reducer
userに関する情報を扱うuserReducer.jsxを作成する。
初期状態の定義とSIGN_IN、SIGN_Outの際のstateの更新が行われている。
初期状態でuserNameはanonymous+適当な数字を与える。
SIGN_INではactions時にpayloadに与えられたuserIdとuserNameを反映している。
import { SIGN_IN, SIGN_OUT } from "../actions/types";

const initialState = {
  isSignedIn: false,
  isAdmin: false,
  userId: null,
  userName: "anonymous" + Math.floor(Math.random(0) * 100),
};

export const userReducer = (state = initialState, action) => {
  switch (action.type) {
    case SIGN_IN:
      return {
        ...state,
        isSignedIn: true,
        //payloadにこのactionだとuserデータが入っている
        userId: action.payload.userId,
        userName: action.payload.userName,
      };
    case SIGN_OUT:
      return {
        ...state,
        isSignedIn: false,
        userId: null,
        userName: "anonymous" + Math.random(0) * 100,
      };
    default:
      return state;
  }
};
Snackbarを追加
userNameを変更したら数秒現れる通知。
snackBarVisibleで現れる。
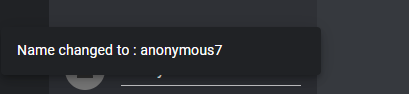
追加部分のコードは以下。
Enterで現状はdispatchからSignInのactionを実行し、userId、userNameを入れる。
  const handleKeyPress = (e) => {
    console.log("fired");
    if (e.key === "Enter") {
      //Enterで一旦SignInのactionとする
      dispatch({
        type: "SIGN_IN",
        payload: { userId: "1", userName: userName },
      });
      changeSnackBarMessage(`Name changed to : ${userName}`);
      //Snackbarは通知なので一時的にtrueに
      changeSnackBarVisible(true);
      setTimeout(() => changeSnackBarVisible(false), 2000);
    }
  };

return(
 …
  <Snackbar
            anchorOrigin={{ vertical: "bottom", horizontal: "left" }}
            open={snackBarVisible}
            message={snackBarMessage}
          />
)
細かく理解していく。
UI改善
public配下にuser.pngを追加
TextArea
TextareaAutosize使う。
コンテンツの大きさに合わせてテクストエリアの高さが変わるイメージ。
emoji mart
emojiメニューで表示されない。
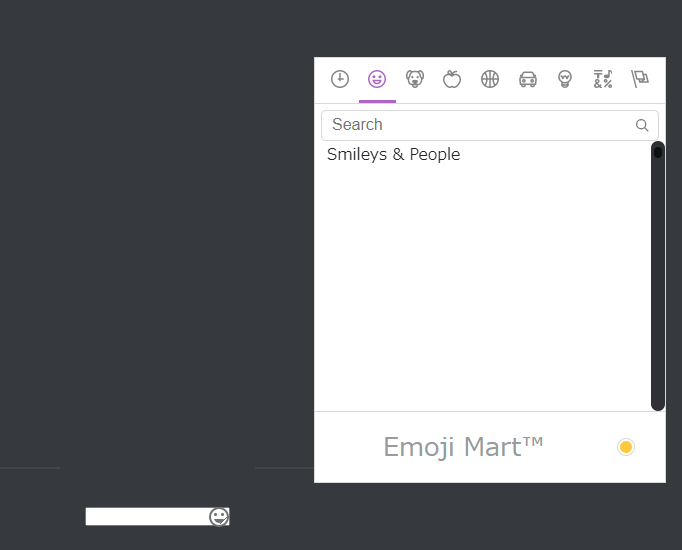
押せばメッセージには表示される。
吐いてるエラー
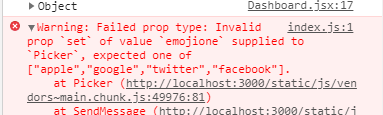
set="emojione"を削れば解決。
7日目
getInitialData周り
Dashboard.jsxで実行。
  const dispatch = useDispatch();

  useEffect(() => {
    dispatch(getInitialData());
  }, [dispatch]);
reduxを書きやすく
-
Immer
-
Redux toolkit
これらに移植してみる。 -
Redux devtool使ってみる
8日目
Google OAuthを導入。
OAuthって何?
クライアントからのリクエストに対して、サーバー側はAPIを返す。
セキュリティー強化として誰でもAPIを貰えないように、あらかじめ決められたアクセストークンがクライアント側から送られてきたリクエストに含まれているかをサーバー側で判定。
アクセストークンを予めクライアントに渡す役割→「許可サーバー」
許可サーバーからクライアント側がアクセストークンを貰う仕組み→OAuth2.0
Mathでのユーザーネーム
Math.floor(Math.random(0) * 100)
で0~100の整数を返す。
Math.floor:小数切り捨て
Math.random:小数込みで間の数を出す
google oauthを導入してみる
参考:https://katsu07.netlify.app/react-google-oauth-20/
GCPからプロジェクトを作っていく。
同意画面の警告が出る。

9日目
google OAuth続き
クライアントID取得で完了。
認証情報受け取れない
→接続失敗
auth.current = window.gapi.auth2.getAuthInstance();で上手くcurrentに入っていない。
これ参考の細かい原理を理解する
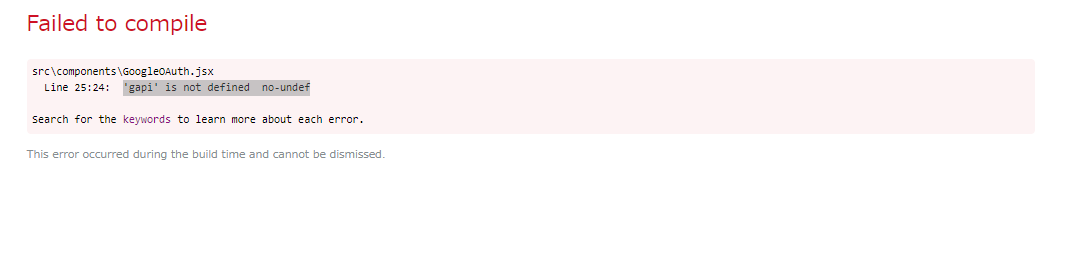
これで解決。
GCP自体のスクリプト入れてなかった
<script type='text/javascript' src='https://apis.google.com/js/platform.js' async defer></script>
google認証追加できた。
コード
storeとprops周りのリファクタ
サインインしてもユーザー情報が得られない
コンソールエラーを明日確認する
10日目
本家のREADME
ユーザー情報に基づくサーバー/チャンネル情報の読み込み
11日目
google oauthログイン時の確認
- googleoAuthでログインできるか
- ユーザーデータを取ってこれるか
参考:https://www.youtube.com/watch?v=-OgU5EAcQmo&ab_channel=AVDojo
参考にGoogleLoginライブラリを使った認証作った。
認証はうまくいくしユーザー情報も得られる。
今後
- GoogleOAuthのライブラリを既存のUIデータに落とし込む
- どうやって保存→取り出し?
- リロード時にユーザーやチャットの情報を取り出す
12日目
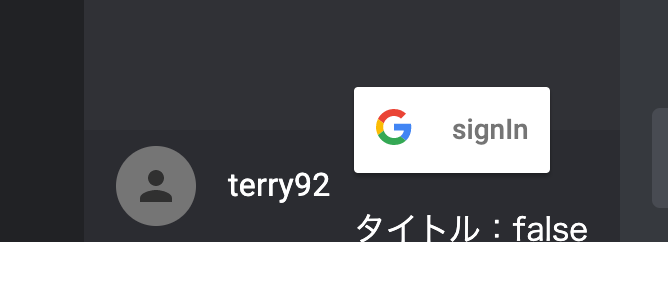
<GoogleLogin clientId="193248965975-lm5drb0mkrhepcipvomamrjamgcfopkq.apps.googleusercontent.com" buttonText="signIn" onSuccess={responseGoogle} onFailure={responseGoogle} cookiePolicy={"single_host_origin"} />
で既存のUIには近くなる。
まずSignIn、SignOutをちゃんとやる
-signInしたらそのユーザーネームで入る。
元々の流れ
- ログインボタンクリックでGoogleAuth オブジェクトにsignIn()が実行される。(ログアウトならsignOut実行)。GoogleAuth.signIn()
- useEffectでレンダリング初回にユーザーがログインしているかどうか取得。isSignedIn.get()
- isSignedIn.listenでsiginInが変化したらonAuthChangeを呼ぶ。
- onAuthChangeでsignIn=trueならgetBasicProfile()でユーザーデータを取得して、actionのsignInを実行。
- authにて得たsignInzUserId、userName、emailをstoreに反映。
- リロード時にgetInitialdataにてoAuthDataとして必要な諸々を取得。
どうやってユーザー情報を保存するか
ログインユーザーの識別はGoogleLogiunコンポーネントでも出来そう。
チャットデータをどうやってやり取りしているか?
signInの文言と状態を一致させる。
signInで状態に反映させる。
状態→userのstate に反映
13日目
ログイン認証・チャットデータの保存にfirebaseを検討。
14日目
firebaseで機能の記事を進めていく。
認証
firebase優秀だなー。これで慣れたら他の開発でも使いまわしたい。
firebase Authenticationを使う為のコマンド
yarn add react-router-dom firebase
src/iservicesフォルダを作り、そこでfirebaseの設定をする。
const config = {
  apiKey: "ADD-YOUR-DETAILS-HERE",
  authDomain: "ADD-YOUR-DETAILS-HERE",
  databaseURL: "ADD-YOUR-DETAILS-HERE"
};
firebase.initializeApp(config);
export const auth = firebase.auth;
export const db = firebase.database();
react とfirebaseでリアルタイムチャットを作るサンプル
とりあえず30分ぐらいで作ってみる。
firebase+reactベースでdiscord-cloneも作りたい。
npm install
firebaseとのやり取り(authやcloudFunction)をhooksとして保持できるライブラリ。っぽい
firebase.initializeApp({
  //your config
});
ちなみにfirebaseはFirebaseサービスにアクセスするためのグローバル名前空間(?)
firebaseインスタンスを作成して初期化。
インスタンス作成とは??
firebaseでプロジェクト作成
- authenticationで設定
- cloud functionでDB設定
14日目
signIn
const provider = new firebase.auth.GoogleAuthProvider();
auth.signInWithPopup(provider);
プロバイダーオブジェクトのインスタンスを作る。
それを使用してログインのポップアップウィンドウを表示。
参考:https://cloud.google.com/identity-platform/docs/web/google
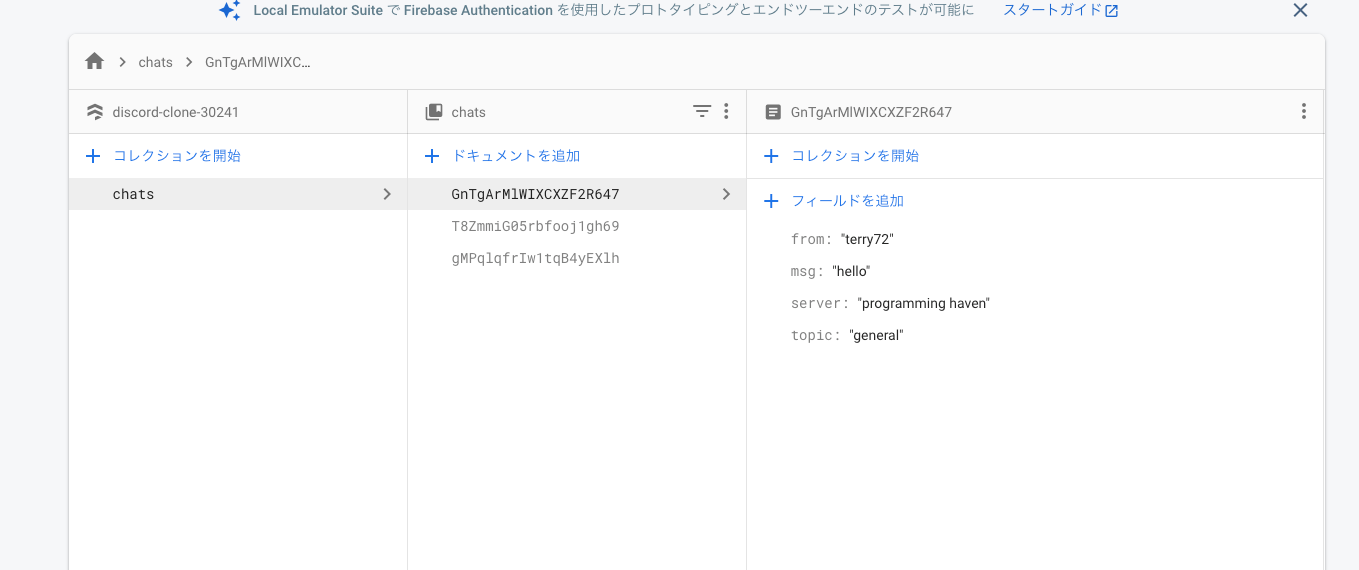
Cloud FIrestore
データベース設定をしてメッセージデータを扱う。
Firesoteからカラムデータを入れてみる。
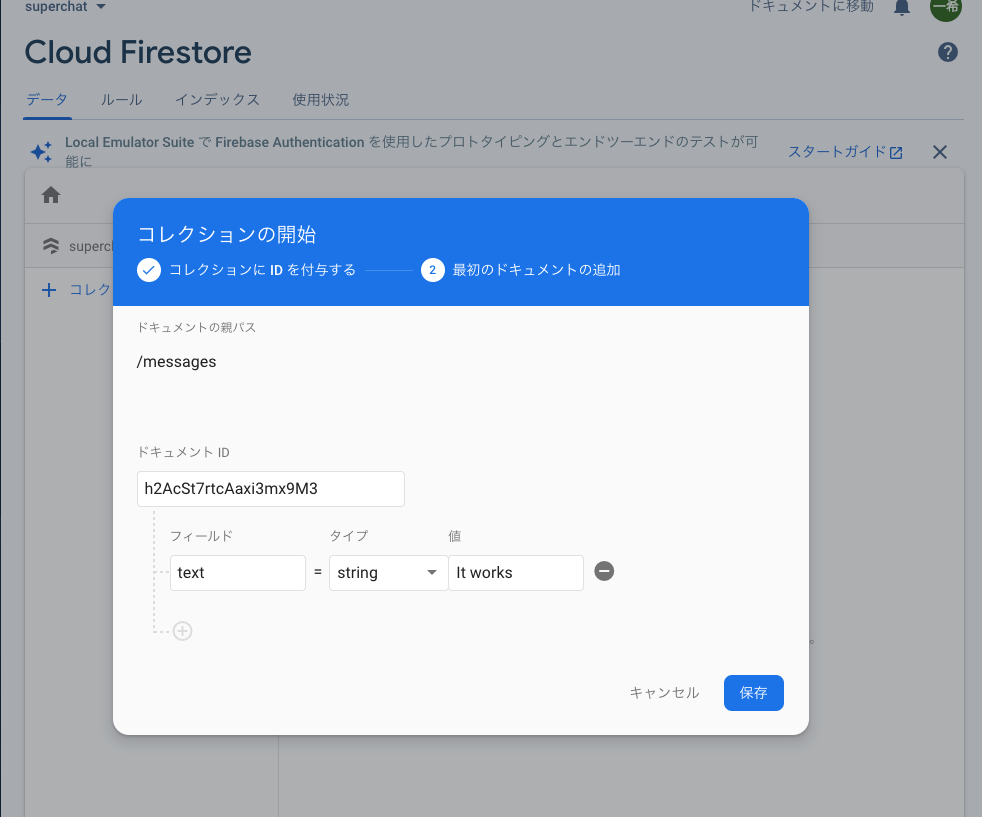
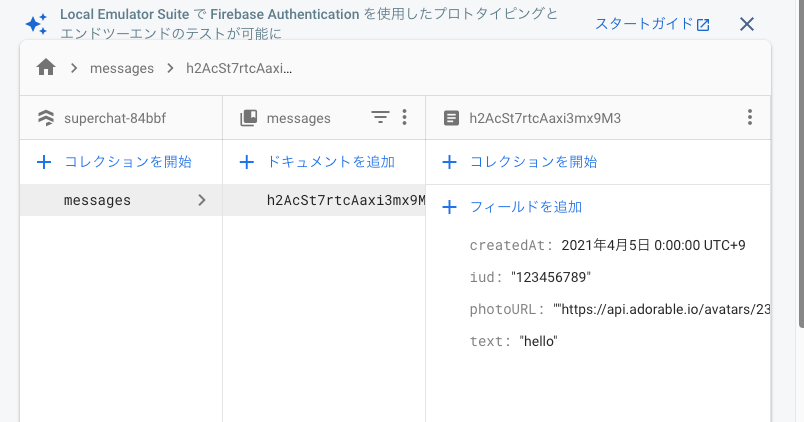
DBデータを受け取る。
//messagesコレクションの接続
  const messagesRef = firestore.collection("messages");

//新しい順に25個取得
  const query = messagesRef.orderBy("createdAt").limit(25);

//idFieldでidを取得する
//
  const [messages] = useCollectionData(query, { idField: "id" });
useCollectionDataの参考:https://github.com/csfrequency/react-firebase-hooks/tree/aeadd15b3f8ca642f52776edf2e4dad62a00d449/firestore#usecollectiondata
sendMessageから送った分もDBに反映されて表示される。
ここまででfirebaseでDBとのやりとりは成功。
コミットしておく。
コンポーネント単位に分割。
dummy.current.scrollIntoView({ behavior: "smooth" });でメッセージを最新までスクロール
cloud functionのルールを編集する
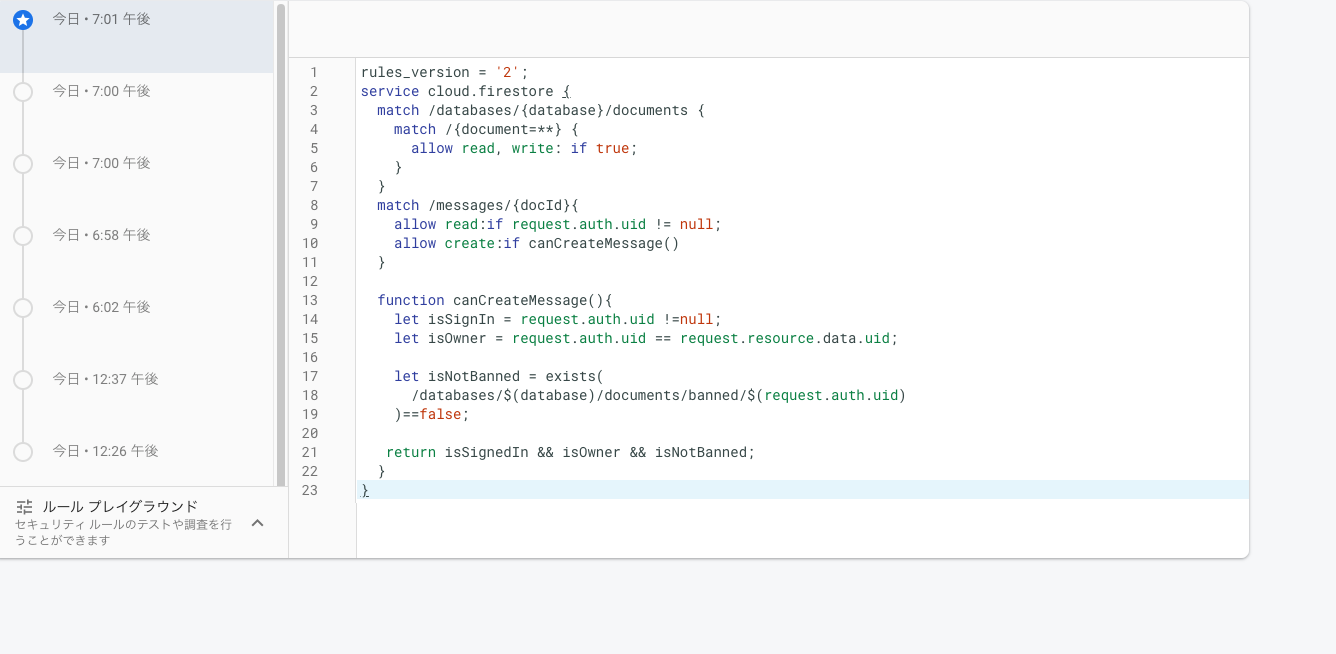
npm install -g firebase-toolsでコマンドラインでfirebaseを叩ける。
firebase init functionsでfunctionsフォルダ作る。
functions/index.jsを作りデプロイする。
const functions = require("firebase-functions");
const Filter = require("bad-words");
const admin = require("firebase-admin");
admin.initializeApp();

const db = admin.firestore();

exports.detectEvilUsers = functions.firestore
  .document("messages/{msgId}")
  .onCreate(async (doc, ctx) => {
    const filter = new Filter();
    const { text, uid } = doc.data();

    if (filter.isProfane(text)) {
      const cleaned = filter.clean(text);
      await doc.ref.update({
        text: `🤐 I got BANNED for life for saying... ${cleaned}`,
      });

      await db.collection("banned").doc(uid).set({});
    }

    const userRef = db.collection("users").doc(uid);

    const userData = (await userRef.get()).data();

    if (userData.msgCount >= 7) {
      await db.collection("banned").doc(uid).set({});
    } else {
      await userRef.set({ msgCount: (userData.msgCount || 0) + 1 });
    }
  });
blazeプランにするの嫌なので、デプロイせずに一旦コミット。
nodeでprocess.envで隠したい値を隠す
15日目
firebaseデプロイ
functionsでエラーが起きている。
cloud functionsとは
functions/index.jsがエラーを起こしているっぽい。
原因はわからないので保留。
これで学んだことを抽象化してdiscord-cloneに応用する。
firebasをdiscord-cloneに組み込む
##Authentication
認証はとても楽にできる。
authからDBへのアクセスもfirebase側で設定のあるコマンドで楽に設定できる。
const [user] = useAuthState(auth);でauthの状態をhooksで扱う。
GoogleAuth実装できた。
16日目
Realtime databaseとCloud Firestoreの違い
めちゃくちゃ重要。
要するにCloud FireStoreは上位互換。
discord-cloneのCloud Firestoreを作る
usersコレクションを作った。
ログイン時にコレクションに追加したい。
17日目
ログイン時にユーザー情報をコレクションに追加したい
よく分からんけど Authenticationのところ見たら保存してあった。
ChatデータのCRUDに移る。
chatデータの保存
出来た!
ごちゃごちゃしているので関連箇所だけ抜粋。
//firestore
import firebase from "firebase/app";
import "firebase/firestore";
import "firebase/auth";

export const SendMessage = () => {

  //firestoreの認証情報を取得
  const auth = firebase.auth();
  const firestore = firebase.firestore();
  const chatsRef = firestore.collection("chats");

  const handleSubmit = async (message) => {
    //chatsRefにmessageのデータを入れている
    await chatsRef.add(message);

    //送信後はTextFieldを空にする
    changeChatMessage("");
  };
return(~~

)
- firestore周りをimport
- collectionデータを取得(chatRef)
- collectionに新規で追加したいデータをaddする(chatRef.add)
18日目
chatsデータをfirestoreから読み取る
  const chatsRef = firestore.collection("chats");

  //firestoreから取得
  const [chats] = useCollectionData(chatsRef);
  console.log(chats);
chatsにcollectionのデータが格納される。
useCollectionDataとは?
import { useCollectionData } from "react-firebase-hooks/firestore";している。
useCollectionでfirebase.firestore.QuerySnapshot.docsと同じ。
useCollectionDataにする事でオプション等をつけられる。
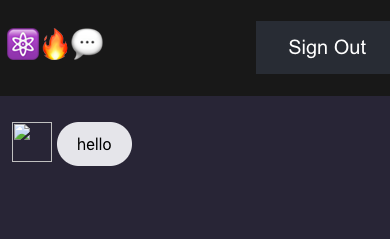
チャット一覧として表示
    {messages &&
            messages.map((message, i) => (~~~
でメッセージ一覧は表示。
サーバーやトピック分けはされていない。
→条件式で解決。
  {messages &&
            messages.map(
              (message, i) =>
                message.topic === activeTopic &&
                message.server === activeServer && (
                  <ListItem className="message" key={i}>
                    <ListItemAvatar>
                      <Avatar>
                        <img
                          src={process.env.PUBLIC_URL + "/user.png"}
                          alt="user icon"
                          height="48"
                        />
                      </Avatar>
                    </ListItemAvatar>
                    <ListItemText
                      primary={message.from}
                      secondary={message.msg}
                      className="message-text"
                    />
                  </ListItem>
                )
            )}
時系列でソートもなし
→createdbyのカラム追加。
→createdBy毎にorderByで解決。
  const handleKeyPress = (e) => {
    //Enterキーが押されたら送信する(Shift+Enterは除外)
    if (e.key === "Enter" && !e.shiftKey)
      handleSubmit({
        server: activeServer,
        topic: activeTopic,
        from: userName,
        msg: chatMessage,
        createdAt: firebase.firestore.FieldValue.serverTimestamp(),
      });
  };
  const query = messagesRef.orderBy("createdAt").limit(25);
  //firestoreから取得
  const [messages] = useCollectionData(query, { idField: "id" });
19日目
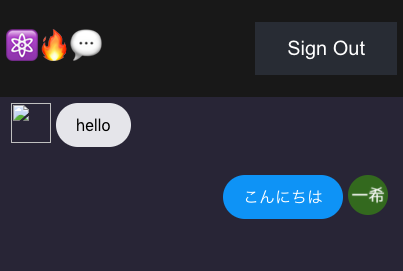
自分かそれ以外かで左右のレイアウト振り分け
discordにそれはない。
signIn signOut機能をsidebarに作る
App.jsからsignOutコンポーネントを持ってくるだけ。
css当てる。
signInとsignOutにmaterial/coreのButtonコンポーネントにしてデザイン統一
。
今後のtodo
Todo
- サーバーでのチャネルの作成
- サーバー設定(名前の変更、ユーザーの削除、アイコンの設定)
- チャンネル設定(名前の変更)
- 永続的なチャネル履歴
- 特定のチャネルへのメッセージのブロードキャスト
- プライベートメッセージ
サーバーの追加・チャンネルの追加
本家でのやり方を読み解く
- modalコンポーネントの中にロジックは格納
- modalは種類に応じてsidebarで条件分岐して(チャンネル作成、サーバー作成、チャンネルリネーム、サーバーリネームなど)呼び出される。
- useStateで値を扱って、それを引数としてfireStoreにアクセスする
まずはサーバーリネームから
途中まで。明日に持ち越し。
fireStoreの更新!!!
20日目
サーバーリネームを行う。
まずはmodalを表示。次にそこからfirestoreのupdateを試す。
エラー
modalをクリックすると起こる。
CreateJOinModal側でのエラーっぽい。

非同期で結果が帰ってきていないのにレンダリングしているのが問題。
とりあえず最低限にして検証。
エラー

関数コンポーネントの参照を与えてはいけない?
→material-uiが原因っぽい
リファレンスはここ参照
servername変更
この部分クリックでテキストフィールドにする
明日やる
21日目
サーバーリネームを行う
- クリックしてテキストフィールドにする
- localstateを使って書き換えでstate変更
- firestoreに反映させる
- ボタンでテキストフィールドモードをキャンセルor決定
クリックしてテキストフィールドにする
参考:http://jsfiddle.net/od6ces0a/1/
出来た。
firebaseのクエリの更新も可能!!
DOM部分
      <ListItem className="title-container">
            <form onSubmit={setNewName} className="">
              <input
                type="text"
                value={serverValue}
                onChange={(e) => setServerValue(e.target.value)}
              />
              <input type="submit" value="更新" />
            </form>
            {/* 仮でserverValueを置く todo:chatStoreを更新 */}
            {serverValue}
          </ListItem>
とりあえずテキストフォームを作った。
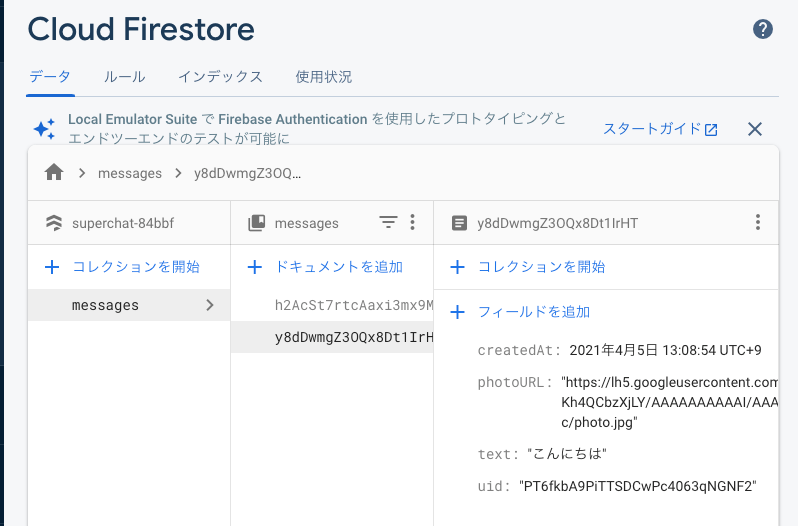
  //server名リネーム時のstate
  const [serverValue, setServerValue] = useState(activeServer);

  //firestoreの認証情報を取得
  const firestore = firebase.firestore();
  const messagesRef = firestore
    .collection("messages")
    .doc("7Hi1AhTdk81JbNI8Lx5n");

  const setNewName = async (e) => {
    e.preventDefault();

    await messagesRef.update({
      server: serverValue,
    });
    console.log(messagesRef);
  };
setNewNameでfirebstoreの指定してあるドキュメントのserverを更新できた!
この機能に関しては一旦、あとはキャンセルボタンをつけて、見えたり隠したりしたらOK!!
ちゃんと全体に反映させるにはserverやチャンネル情報をfirebase基準でやらないといけない!!